Gefen EXT-GAVA Скачать руководство пользователя страница 74

68

USING THE GAVA WIZARD

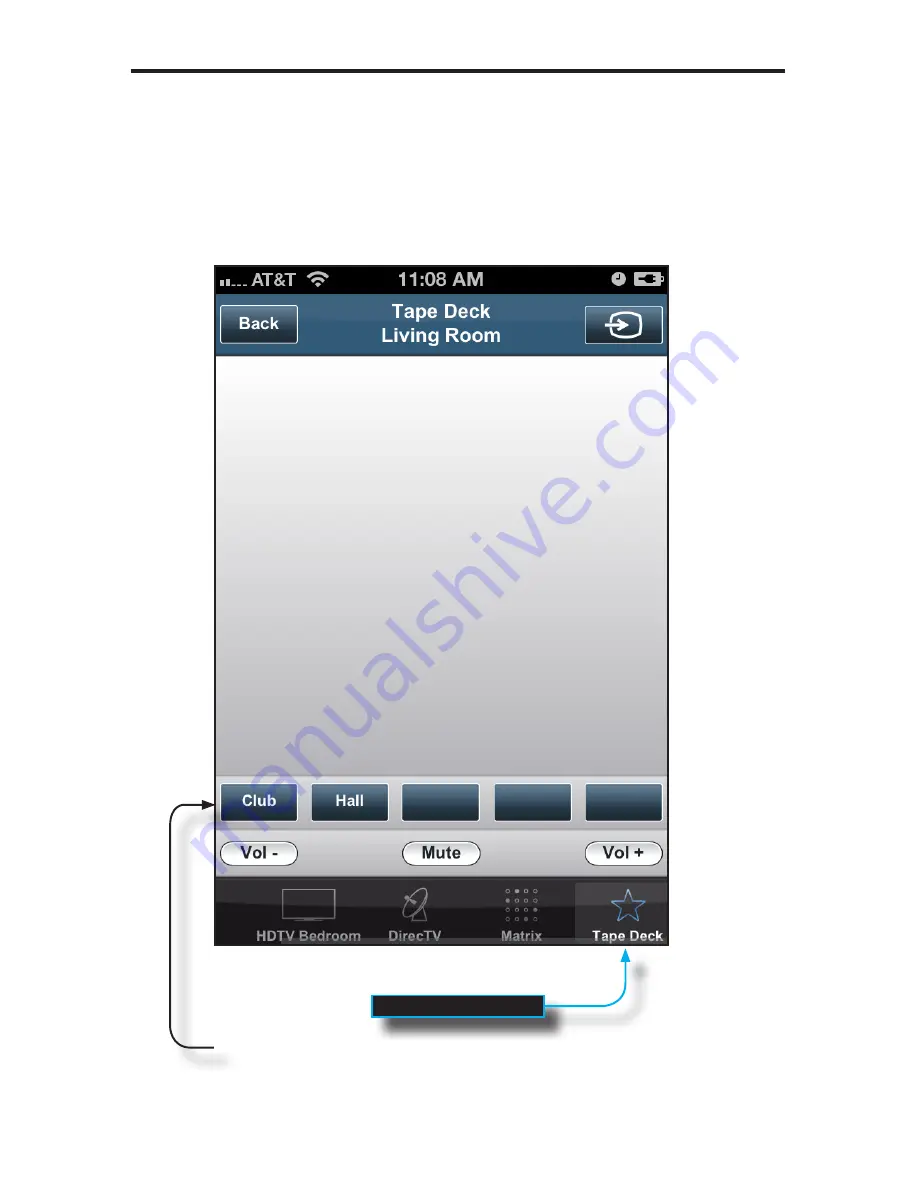
Adding “Generic” Sources 

You can use the “Generic” Source option to add input selection of devices that do not have 

control options, such as Cameras, Tuners, or other internal sources on your Receiver.

You can name the source, select a Receiver input, and add up to five Function Keys to add 

Macros to the screen for the Generic device.  A sample “tape deck” device is shown below.

Macros 

Only macros can be used 

with “generic” devices.

Generic source button

Содержание EXT-GAVA

Страница 1: ...Audio Video Automation System Processor EXT GAVA User Manual www gefen com...

Страница 2: ......

Страница 3: ...sworth CA 91311 www gefen com support gefen com Notice Gefen LLC reserves the right to make changes in the hardware packaging and any accompanying documentation without prior written notice GAVA PACS...

Страница 4: ...Configuration 18 Network Settings 18 Software Updates 20 Support VPN 21 Configuration 22 Adding Control Gateways 24 Adding a PACS or Mini PACS 24 Adding a Lutron Lighting Control System 27 Extracting...

Страница 5: ...with the GAVA 93 THE GAVA USER INTERFACE GUI 95 Accessing the GUI on a mobile device 96 GAVA Control User Interfaces 98 Disc Player 100 Set Top Box Cable Satellite 103 A V Receiver 107 Display 109 Ap...

Страница 6: ......

Страница 7: ...ce nario users have multiple sources such as Blu ray players Apple TV iTunes satellite or cable set top boxes and more all connected in a system integrated with one or more displays in one or more roo...

Страница 8: ...have a unique IP address before it is connected to the network Install one GAVA at a time and change its IP address before connecting another GAVA to the network The GAVA acts as a bridge between you...

Страница 9: ...h optional power adapter Fan less silent low power processor may be placed anywhere Full two way control of RS 232 and IP devices 2 way IP interface with Apple TV and computers running iTunes PC or Ma...

Страница 10: ...4 Panel Layout INTRODUCTION Top 4 3 2 1 6 5 7 Left Right...

Страница 11: ...connection is enabled When the VPN is enabled this indicator flashes approximately twice every few seconds Otherwise it flashes about once per second 6 Program Indicator This LED indicator glows brigh...

Страница 12: ...PACS Lighting Controller Z Wave or Lutron Dimmers A V Receiver GTV AUDDEC N GTB MINI PACS Set Top Box Apple TV 2 Blu ray Player EXT GAVA GAVA Control System Power Injector Wireless Access Point PC or...

Страница 13: ...Administrator or consultant they should be able to assist you or you can use some easily available tools to help you do it yourself Depending upon the configuration of the network locating installing...

Страница 14: ...ice 2 Make sure your mobile device is connected to the same network as the GAVA and PACS boxes then open Fing 3 Click on the refresh icon and a list will appear showing each device on the network The...

Страница 15: ...mart phones tablets Apple TVs IP Receivers Blu ray players displays and any other devices on your network You should record these IP addresses especially any that will be controlled by the GAVA We rec...

Страница 16: ...k as your GAVA and PACS boxes and click the Fing icon on your device Click on the refresh icon and a list will appear showing every device on the network The devices will initially be shown in order b...

Страница 17: ...PACS User Manual Then you can add the next PACS 1 Change the default IP address 192 168 1 72 of the last PACS that was installed on the network 2 Connect the next PACS to the network 3 To connect add...

Страница 18: ...GAVA Before using the interface the IP address may need to be configured on the GAVA See the instructions beginning on page 4 for more information 1 Using any Web browser Safari is preferred log into...

Страница 19: ...utton should now be open on the left hand side of the screen Once the Control Gateway tab is opened a Quick guide is displayed on the right side of the screen This tab provides a step by step list of...

Страница 20: ...uired to use the context sensitive help USING THE GAVA WIZARD Help Click this button to display context sensitive help You must be connected to the Internet in order for the help file to be displayed...

Страница 21: ...each button or tab be completed in the order in which it is presented When using the set of sidebar buttons on the left side of the screen make sure to always start at the top most button and work yo...

Страница 22: ...ol panel on the left side of the screen allows easy navigation of each section during the set up process Left click on any closed section to expand it The desired section will expand to display the av...

Страница 23: ...17 Left click on the expanded highlighted section to close it Left click on any section that was closed to expand it once again USING THE GAVA WIZARD...

Страница 24: ...ommended that a manual IP address outside of the DHCP range of the router is specified IP Address Enter the IP address of the GAVA in this field Netmask Enter the network subnet mask in this field usu...

Страница 25: ...r This is the Electronic Serial Number ESN for the GAVA unit This serial number is used by Gefen Technical Support when your GAVA is connected to the Gefen Support Server This number is different from...

Страница 26: ...be displayed under the available column Check for Updates Click this button to check for firmware updates Versions marked in red indicate that a new version is available for download Update Click the...

Страница 27: ...w seconds When the VPN is off the light blinks once every few seconds NOTE It is recommended that Customer Support VPN be enabled when setting up a new system This will aid Gefen Technical Support in...

Страница 28: ...tore an existing GAVA configuration file to the GAVA Controller NOTE GAVA network TCP IP settings are preserved and will not be erased if the GAVA is reset or powered down USING THE GAVA WIZARD Reset...

Страница 29: ...ration xml You should ALWAYS change this name to a unique name before saving it or you will overwrite any existing files on your computer Upload The Upload Configuration button lets you restore the en...

Страница 30: ...ting controls are also added here See page 24 for instructions on adding lighting controls Name Type the name of the device in this field Every name in the system must be unique Manufacturer Select th...

Страница 31: ...l display Ping OK If not then Ping Error will be displayed The Ping button can also be clicked to verify the network connection to the control gateway Pinging a contol gateway or device is useful duri...

Страница 32: ...ateway has been added and the IP address verified click the Save and Close button to save all changes 6 The added device will now appear under the Control Gateways tab Save and Close Left click this b...

Страница 33: ...r router s DHCP table or by using the Fing utility see page 7 Refer to the router documentation for details Example http 192 168 2 105 DbXmlInfo xml 2 Click on the File menu at the top of the page in...

Страница 34: ...ting control in the Name field 3 Select the manufacturer from the Manufacturer drop down list 5 Select the model number of the Lutron Main Repeater from the Model drop down list In the example below w...

Страница 35: ...e an option to enter an IP address Click the Next button in the lower right corner of the screen Under the Control tab enter the IP address of the Main Repeater in the IP Address field Ping If the IP...

Страница 36: ...t an RS 232 control device Once the controller has been selected check the appropriate RS232 check box If the selected controller was a PACS more than one RS 232 port would be available In that case m...

Страница 37: ...file on the computer e g 5DbXmlInfo2 xml See Extracting the XML from the Lutron software on page 24 3 Select the xml file from the File Upload dialog and click the Open button Once the xml file has b...

Страница 38: ...ements that will be used in the system here Elements will be assigned to specific rooms later in the Rooms menu Type Select the type of control from the drop down list Options Blind Dimmer Keypad Addr...

Страница 39: ...of element from the Type drop down list For this example we will select a Dimmer control 2 Type an identifier for this device in the Name field NOTE Special characters e g apostrophes quote marks etc...

Страница 40: ...ct the address from the Address drop down list This list is automatically created from the data in the Lutron xml file 4 To save the current element and add additional elements click the Save button u...

Страница 41: ...ol the device in the Name field In the example below we will assign a button to dim all lights to 50 4 Select the button name from the Status SET drop down list Once the Status SET value is selected t...

Страница 42: ...3 Type a name for the shade in the Name field 4 Select the button name from the Address drop down list The selections displayed in the Address field are generated from within the Lutron software 5 Cl...

Страница 43: ...t 3 Type a name for the switch in the Name field 4 Select the button name from the Address drop down list The selections displayed in the Address field are generated from within the Lutron software 5...

Страница 44: ...ete elements by clicking the icon next to the element to be deleted Edit change element settings by clicking on the desired element Delete Deletes the element from the list box Element name Click the...

Страница 45: ...he addition of elements to the list box and return to the Home screen click the Done button in the lower right corner of the screen 7 Under the Control gateways sidebar button the new control RadioRA...

Страница 46: ...r button 2 Click on ADD NEW ROOM 3 The Room tab will be displayed 4 Type the name of the room in the Name field For this example we will use the word Living Room 5 Select the system design that is app...

Страница 47: ...are selected by switching the TV inputs AVR Home Theater Template All sources are connected to an A V receiver or amplifier The receiver is connected to a single input on the TV Sources are selected b...

Страница 48: ...on The configuration screen for the named room in this case Living Room will be displayed in the top portion of the screen Now that the room has been created the next step is to add devices to the roo...

Страница 49: ...r the Basic tab Name Type a descriptive name for the receiver in the Name field Manufacturer Select the device Manufacturer from this drop down list Next Click the Next button after the Name Manufactu...

Страница 50: ...lower right portion of the screen the current settings and continue to the Control tab Model Select the model number based on the Manufacturer Device protocols Devices may be controlled by IR RS 232...

Страница 51: ...ss field RS 232 Port If RS 232 control is selected for this model receiver then the Control tab will provide an option to select an RS 232 control device IP Address Enter the IP address of the receive...

Страница 52: ...Harman Kardon AVP 1 then the Control tab will provide an option to select an IR Port The Model drop down list under the Basic tab would allow this selection as shown in the two steps below 4 Click the...

Страница 53: ...device For this example we will assign two commands play_favorites and Pandora 1 Select Command from the drop down list for Function Key 1 2 Click the Next button in the lower right portion of the sc...

Страница 54: ...ion drop down list for Function Key 2 and then select pandora from the drop down command list 5 Click the Save button in the lower right corner of the screen NOTE Macros should be created after all de...

Страница 55: ...G THE GAVA WIZARD Next Click the Next button after the Name Manufacturer and Model have been entered Manufacturer Select the device Manufacturer from this drop down list Name Type a descriptive name f...

Страница 56: ...ight portion of the screen the current settings and continue to the Input Output tab USING THE GAVA WIZARD Model Select the model number based on the Manufacturer NOTE The listed drivers have been tes...

Страница 57: ...ay back to the receiver It may also refer to the Audio Return Channel ARC which is an HDMI 1 4 feature and supported only on specific devices In either case this option selects the command on the remo...

Страница 58: ...d the Gefen Mini PACS as the control device Therefore we will use the Mini PACS to control the IR on the TV 2 Once the controller is selected the type of controls which are available on the controller...

Страница 59: ...allow us to cycle through the available aspect ratios provided by the display 1 Select Command from the drop down list for Function Key 1 Command Macro selection box Select either Command or Macro fr...

Страница 60: ...down command list scroll down and select pc The drop down list includes all commands that are in the driver for that particular device 3 Select Command from the drop down list for Function Key 2 and...

Страница 61: ...field 2 Click the Save button in the lower right corner of the screen to save all changes The next step will be to set up the source devices USING THE GAVA WIZARD NOTE If the icon for the selected ch...

Страница 62: ...f the source device in the Name field In the example below we have added the name player to the device name This is because the name Blu ray is already used by the RadioRA 2 control gateway Each devic...

Страница 63: ...Next button in the lower right corner of the screen to continue Control 1 Select the input for the display device from the Video and Audio drop down list In this example the display device is using b...

Страница 64: ...box Therefore we ll check IR port 2 as the control port Note in the example above that IR port 1 is colored red This means that this IR output has already been assigned on the Mini PACS This port was...

Страница 65: ...o the Function keys tab Function Keys The function keys can accept commands On Off Channel Up etc or macros which are a set of commands that perform a specific task 1 Select the desired commands to be...

Страница 66: ...er of the screen to save the changes and return to the Source tab 4 Add more sources by clicking ADD NEW 5 Create additional rooms by clicking the Back to main menu tab and clicking the Rooms tab on t...

Страница 67: ...Rooms tab on the left portion of the screen 2 Click on the room to which iTunes will be added In our example we will be adding iTunes to the room we created earlier Living Room 3 Click the Sources ta...

Страница 68: ...r that is running iTunes in the IP Address field Name Type a descriptive name for the iTunes device in this field IP Address Enter the IP address of the computer that is running iTunes Ping If the IP...

Страница 69: ...te the IP address of the computer in the command window Mac OS X On the computer running iTunes select System Preferences from the Apple menu in the upper left corner of the screen Click on the Networ...

Страница 70: ...he screen to continue to the Input tab Ping If the IP address is found then the Ping button will display Ping OK If not then Ping Error will be displayed Once a control device has been successfully ad...

Страница 71: ...e will connect the audio output from the iTunes computer to the CD input on the receiver 2 Click the Save button in the lower right portion of the screen The iTunes device will be displayed under the...

Страница 72: ...n Apple TV device control will appear in the Device Panel within the GUI 1 Click the Sources sidebar button on the left portion of the screen 2 Click ADD NEW 3 Click the Apple TV icon NOTE Before proc...

Страница 73: ...d 6 Under the Input tab select the input on the receiver that selects the Apple TV Name Type a descriptive name for the Apple TV device in this field IP Address Enter the IP address of the computer th...

Страница 74: ...ave control options such as Cameras Tuners or other internal sources on your Receiver You can name the source select a Receiver input and add up to five Function Keys to add Macros to the screen for t...

Страница 75: ...Rooms tab and click ADD NEW A V MATRIX DEVICE For illustrative purposes a second room Bedroom has already been created and is visible under the Rooms sidebar button 2 Provide a name for the matrix in...

Страница 76: ...in step 2 5 Use the drop down lists to select the Manufacturer and Model of the source device 6 Click the Next button in the lower right corner of the screen to continue Controlling the Matrix 1 Selec...

Страница 77: ...puts and inputs to connect the matrix to each device The specified outputs and inputs in the software must match the physical connection of each device to the matrix Outputs Select the Room and Device...

Страница 78: ...that Source is selected GAVA will automatically switch the Matrix to the proper input for the Source and select the Matrix Output for that Room 1 Click ADD NEW to add more sources to the matrix 2 Cli...

Страница 79: ...Room we created The automation controls will appear in the device panel 1 Click the Building Automation tab The RadioRA 2 control gateway will be displayed 2 Click on RadioRA 2 3 The list of available...

Страница 80: ...ective element under the Available list box The selected element will no longer be highlighted and removed from the Selected list To arrange elements use the and icons to move the elements within the...

Страница 81: ...type If we look at our current setup we added all the available control elements Each element has been added to the Selected list The order of elements under the Available list is not important Howeve...

Страница 82: ...under the Selected list Notice that the order of each button is the same as the Selected list Now let s say we want the Keypad elements to appear in the following order 25 50 All On All Off Shades Up...

Страница 83: ...NG THE GAVA WIZARD After changing the order of the elements the elements under the Keypad device panel will appear as follows This same procedure can be used to change the order of Dimmer and Shade el...

Страница 84: ...ould be done through different buttons on a remote control assigning these events to single button on the remote control is much more convenient 1 From the Home screen click the Macros tab on the left...

Страница 85: ...mmand from the Device drop down list In this example the macro will be received by the HDTV device 5 Select the command from the Command drop down list Command Select the command from the Command drop...

Страница 86: ...This value represents the number of milliseconds before the next command is executed For this example we will leave the Delay set to the default value of 250 The maximum value is 9999 approximately 1...

Страница 87: ...RD 8 Click the Add command button in the lower left corner of the Macro screen to add another command 9 Fill in the information for the A V Receiver as shown below Add command Adds a new device comman...

Страница 88: ...player by using the Add command button Use the icon to deleted a macro Use the and icons to change the sequence of macro events 11 Click the Save and Close button to save the power ON macro Save and...

Страница 89: ...r OFF macro has been created both the Power ON and Power OFF macros should appear under the Macros tab as shown below 14 Click the Save and Close button to save the power OFF macro 15 Click the Finish...

Страница 90: ...been created it will appear on the Home screen of the selected GUI see page 57 Macros can also be assigned to Function Keys 1 Open the Rooms tab and click on the name of the Room 2 Select the Display...

Страница 91: ...4 Select Macro from the drop down list next to an unassigned Function Key In our example we will select Function Key 3 5 Since we already created a macro called Power ON select this macro from the com...

Страница 92: ...THE GAVA WIZARD Click the Save button near the bottom right corner of the screen After the GUI is generated Function Key 3 for the HDTV device will be programmed with the Power ON macro shown below N...

Страница 93: ...he Kids Bedroom system You can also hide Device controls that are not ordinarily used and change the order of selections so the Blu ray player and Apple TV are always visible while the Receiver contro...

Страница 94: ...d using the Add view button will have an associated View button Click the desired View button to show the associated view The button name for the currently selected view will be highlighted Move Devic...

Страница 95: ...iving Room and Bedroom we will want to define the devices in each room 2 Click the Add view button Once the Add view button is clicked a button with the name provided in the View name field will be cr...

Страница 96: ...andard cannot be renamed or deleted In this example the Living Room will be using the Standard view 3 Click the Standard button to return to the default view The Standard button will be highlighted 4...

Страница 97: ...Apple iPod Touch 3 5 Apple iPhone and 7 Samsung Galaxy Tablet 9 7 diagonal Compatible with 9 7 Apple iPad 10 1 inch diagonal Compatible with Samsung 10 1 Galaxy tablet 2 For our example we will gener...

Страница 98: ...S 4 After about 30 60 seconds a screen similar to the following will be displayed depending upon the number of rooms that were created and the number of GUI interfaces that were generated The GUI inte...

Страница 99: ...with the GAVA The pairing procedure is performed after the desired GUI s have been successfully rendered see page 84 This procedure is only necessary if iTunes was added as a source device 1 Launch iT...

Страница 100: ...e GAVA 4 Click on the IP address and enter the 4 digit passcode to allow the GAVA to control iTunes The passcode is 1 2 3 4 5 Once the passcode is verified the following screen will be displayed 6 Cli...

Страница 101: ...95 The GAVA User Interface...

Страница 102: ...the Action icon and select Add to Home Screen Using the Add to Home Screen action lets you create an icon on your Home screen that will take you directly to the GAVA interface without the Web browser...

Страница 103: ...for the icon as shown below and click the Add button to add the icon to the Home screen 4 Tap the GAVA icon to launch the GUI A few moments after the splash screen left appears the main GUI screen wi...

Страница 104: ...n The illustration below shows the Home screen with Rooms and Macros THE GAVA USER INTERFACE Room tab Displays all rooms that were created Tap to select the desired room The selected room will be high...

Страница 105: ...that is added to this room will appear in this area of the GUI The Device Panel will scroll side to side if more than three devices have been added Device tabs Tap any tab within the GUI to expand ope...

Страница 106: ...100 THE GAVA USER INTERFACE NAV Navigation Disc Player Rewind Previous Next Fast Forward Stop Eject Play Pause Room Name The user defined room name Device Name The name of the device...

Страница 107: ...his tab to view the next tab for this device Some devices will have multiple tabs Select Press to switch the Receiver to display and list to this source Power Toggle Press to power ON and power OFF th...

Страница 108: ...102 THE GAVA USER INTERFACE Digit tab dot key This key can function as either a dot or dash depending upon the device Volume control Controls the volume for the current room...

Страница 109: ...ERFACE NAV Navigation Set top Box Vol Mute Vol These buttons will be displayed in place of a volume slider if the room uses IR or one way volume control Digit Opens the Digit numeric keypad used for c...

Страница 110: ...104 THE GAVA USER INTERFACE Digit tab DVR Opens the DVR Digital Video Recorder tab if available for this device FAV Opens the Favorite Channels tab...

Страница 111: ...105 THE GAVA USER INTERFACE DVR Digital Video Recorder tab Record Record button if available on this device...

Страница 112: ...106 THE GAVA USER INTERFACE FAV Favorites tab Favorites User defined favorite channels will be displayed here...

Страница 113: ...107 THE GAVA USER INTERFACE NAV Navigation tab A V Receiver NOTE this button is not used on this screen Inputs Allows direct selection of all inputs...

Страница 114: ...108 THE GAVA USER INTERFACE Inputs tab Inputs Allows direct selection of all inputs that are not available on the Device Slider Panel see page 98...

Страница 115: ...NAV Navigation tab THE GAVA USER INTERFACE Display Back Returns to the previous page Power Power button Switch Selects the display device as the audio source Audio Return Channel ARC is used if availa...

Страница 116: ...110 THE GAVA USER INTERFACE Digit tab Function Keys 1 5 These buttons can be assigned user defined functions See page 55 for more information...

Страница 117: ...111 THE GAVA USER INTERFACE DVR Digital Video Recorder tab...

Страница 118: ...112 THE GAVA USER INTERFACE FAV Favorites tab Favorites User defined favorite channels will be displayed here See page 53 Volume slider Use this slider control to adjust the volume in this room...

Страница 119: ...e TV Previous Beginning Press to go to the beginning of the media or play the previous media These button are used in the Apple TV and iTunes interface Next Jump ahead and play the next media file Use...

Страница 120: ...114 THE GAVA USER INTERFACE NAV Navigation tab...

Страница 121: ...tab iTunes Volume slider Displayed only if the device is using RS 232 or IP two way interfaces Album artwork If the iTunes track contains album artwork it will be displayed here Song Data This informa...

Страница 122: ...116 THE GAVA USER INTERFACE Playlist tab...

Страница 123: ...uch as cameras etc There are also five Function Keys that can be used for stored Macros See page 68 Matrix Normally there is no need to directly control a Matrix Switcher as GAVA handles the switching...

Страница 124: ...and Switch elements that were defined using the Web interface see page 33 Feedback indicator If the automation system provides feedback for a specific state then this LED indicator will turn on Back R...

Страница 125: ...mmer and Switch elements that were defined using the GAVA Wizard see page 33 Off button Set the light to its lowest brightness OFF Sliders Fine adjustment of the brightness of each light On button Set...

Страница 126: ...ys all the Shade elements that were defined using the Web interface Down Press this button to open the shade Press in the middle to stop the shade after pressing the Down or Up button Up Press this bu...

Страница 127: ...w devices have the proper names Using a template also allows you to just push buttons on your IR remove as prompted without having to simultaneously enter names and navigate the screen on your compute...

Страница 128: ...defined by what Control Gateways were defined PACS and or Mini PACS Name Type the name of the device in this field Model Enter the model number in this field Start learning Click this button once all...

Страница 129: ...123 APPENDIX A 7 Click the Start learning button 8 The GAVA will begin loading the appropriate template 9 Refer to the PACS Mini PACS manual for learning IR commands...

Страница 130: ...t the GAVA to the network IP The default IP address of the GAVA ESN Electronic Serial Number MAC Primary MAC address of the GAVA This address is different for each unit and cannot be changed IMPORTANT...

Страница 131: ...Otherwise use the following procedure to change the IP address on the GAVA to match the network settings 1 Access the Network Setting control panel in Windows and locate your LAN connection Under Win...

Страница 132: ...otocol Version 4 TCP IPv4 Click to highlight this Network protocol STOP Before continuing write down the current IP settings listed under this dialog box before making changes These settings will need...

Страница 133: ...t mask 255 255 255 0 Use the following DNS server addresses Click this radio button Clear these boxes If the IP address 192 168 1 80 is already in use on your network select another unused address tha...

Страница 134: ...VA to an appropriate address for your network 10 Click Save Changes Reboot and OK to save the new IP address 11 Reopen the computer s network settings and restore the original settings or go back to O...

Страница 135: ...ox 13 Internet Explorer 10 2 Opera 11 Mac OS X 1 Apple Safari 4 Google Chrome 20 Mozilla Firefox 13 2 Opera 11 Linux 1 Google Chrome 20 Mozilla Firefox 13 2 Opera 11 Apple iOS 5 6 iPhone iPad iPod tou...

Страница 136: ...168 25 1 GAVA Library Version 2 8 DNS Server IP Address 192 168 25 1 Support VPN IP Address 10 78 0 46 Electronic Serial Number NS S6W4471BSC MAC Address 00 0D B9 26 39 7C Control Gateways Gateway Dev...

Страница 137: ...on Brand Linksys Model EA3500 P IP Address 192 168 25 1 Router Password if applicable 5an7a c1au53 WiFi SSID Wireless router WiFi Channel 8 WiFi Security Type WPA2 PSK WiFi Password 5ham613_60bb13_61b...

Страница 138: ...V Apple Apple TV IP 192 168 25 116 HDMI 1 Source 3 iTunes Apple iTunes IP 192 168 25 192 Audio L R Source 4 Source 5 Source 6 Room name 2 Bedroom System Name Manufacturer Model Control Gateway Port IP...

Страница 139: ...non Denon GTV AUDDEC N Den PACS Serial 2 Display Sony Sony XBR4 Den PACS IR 1 Optical Source 1 Blu ray Samsung BD C5500 Den PACS IR 2 HDMI 2 Source 2 AppleTV Apple Apple TV IP 192 168 25 116 HDMI 1 So...

Страница 140: ...3 Main System Output 2 Yamaha AUX Bedroom System Output 3 Denon Satellite Den System Output 4 Output 5 Output 6 Output 7 Output 8 Name Manufacturer Model Control Gateway Port IP Address Input 1 Blu ra...

Страница 141: ...GAVA Library Version DNS Server IP Address Support VPN IP Address Electronic Serial Number NS MAC Address 00 0D B9 26 Control Gateways Gateway Device IP Address Name Location Model PACS 1 PACS 2 PACS...

Страница 142: ...136 APPENDIX D Remove page and photocopy if necessary Router Configuration Brand Model IP Address Router Password if applicable WiFi SSID WiFi Channel WiFi Security Type WiFi Password...

Страница 143: ...IP Address Amp Input Amp Display Source 1 Source 2 Source 3 Source 4 Source 5 Source 6 Room name Name Manufacturer Model Control Gateway Port IP Address Amp Input Amp Display Source 1 Source 2 Source...

Страница 144: ...IP Address Amp Input Amp Display Source 1 Source 2 Source 3 Source 4 Source 5 Source 6 Room name Name Manufacturer Model Control Gateway Port IP Address Amp Input Amp Display Source 1 Source 2 Source...

Страница 145: ...Amp Input Connects to on Input Location Notes Output 1 Output 2 Output 3 Output 4 Output 5 Output 6 Output 7 Output 8 Name Manufacturer Model Control Gateway Port IP Address Input 1 Input 2 Input 3 I...

Страница 146: ...t 1 RJ 45 USB Ports 2 Type B RS 232 Port 1 DB 9 male Power Supply 12V 1 2A DC Power Consumption 2 5W idle 25W max Dimensions W x H x D 4 2 x 6 4 x 1 2 107mm x 163mm x 30mm Shipping Weight 4 lbs 1 8 kg...

Страница 147: ...1 Proof of sale may be required in order to claim warranty 2 Customers outside the US are responsible for shipping charges to and from Gefen 3 Copper cables are limited to a 30 day warranty and cables...

Страница 148: ...Rev A1 20600 Nordhoff St Chatsworth CA 91311 1 800 545 6900 818 772 9100 fax 818 772 9120 www gefen com support gefen com Pb This product uses UL or CE listed power supplies...

Отзывы: