background image

16

RS-232 SERIAL CONTROL

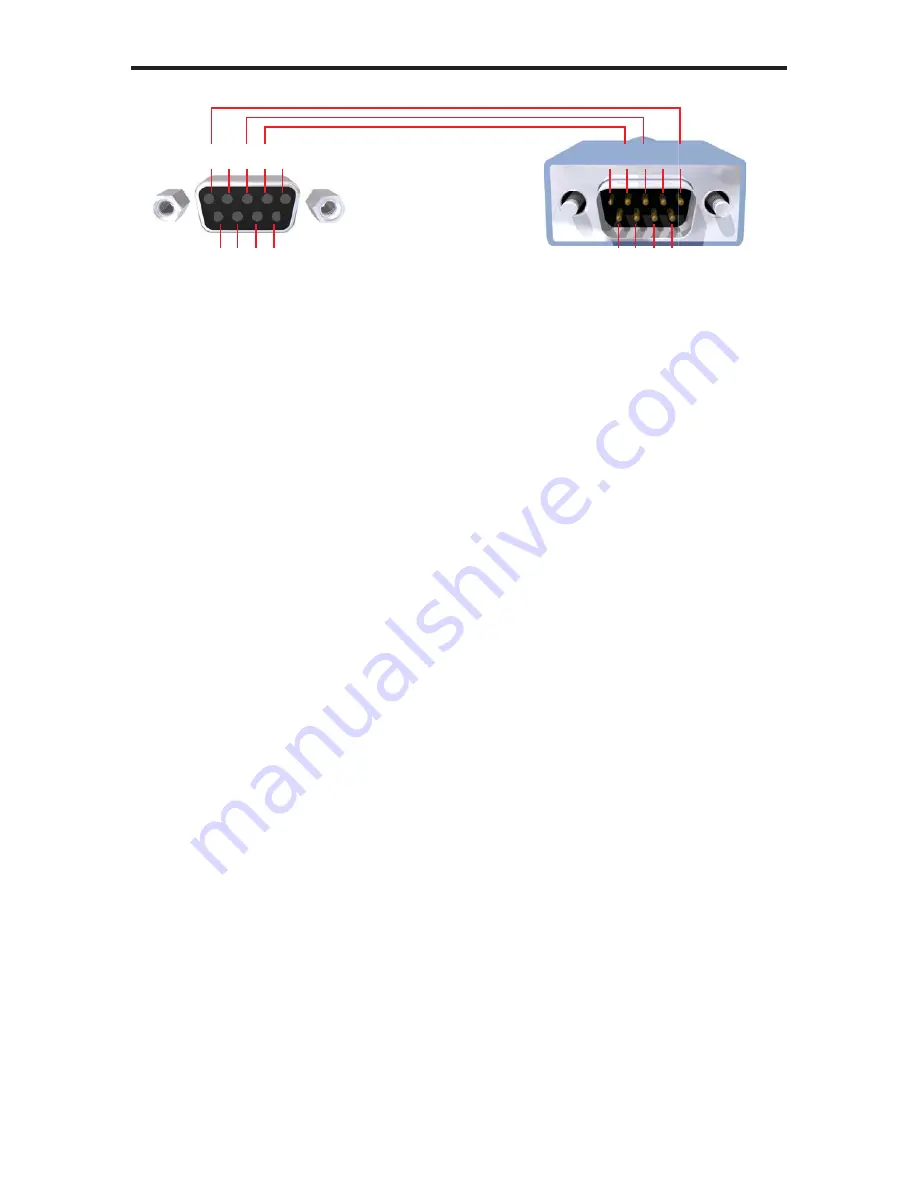
RS232 Settings

Bits per second ................................................................................................. 19200  

Data bits .................................................................................................................... 8

Parity .................................................................................................................. None

Stop bits .....................................................................................................................1

Flow Control ....................................................................................................... None

5 4 3 2 1

9 8 7 6

1 2 3 4 5

6 7 8 9

Only Pins 2 (RX), 3 (TX), and 5 (Ground) are used on the RS-232 serial interface

Содержание GEF-DVIKVM-848DL

Страница 1: ...1080P 8x8 DVI KVM Dual Link Matrix GEF DVIKVM 848DL User Manual www gefenpro com ...

Страница 2: ...upport number Write To Gefen LLC c o Customer Service 20600 Nordhoff St Chatsworth CA 91311 www gefenpro com support gefenpro com Notice Gefen LLC reserves the right to make changes in the hardware packaging and any accompanying documentation without prior written notice 8x8 DVI KVM Dual Link Matrix is a trademark of Gefen LLC 2011 Gefen LLC All rights reserved All trademarks are the property of t...

Страница 3: ... Remote Description 12 IR Remote Installation 13 IR Remote Configuration 14 Using the IR Remote Control Unit 15 EDID Management Feature 16 RS 232 Serial Control 16 RS 232 Settings 17 EDID Management 22 IP Configuration 26 General Functions 29 Commands 31 IP Control 31 View Matrix Status 32 Manage EDID 36 Masking 37 IP Configuration 38 Backup Restore 38 Power Management 39 Firmware Update 41 Rack M...

Страница 4: ...Link Matrix Easily switch eight cross platform DVI Dual Link computers to eight DVI Dual Link displays with our 8x8 DVI KVM Dual Link Matrix This product provides a simple reliable and highly effective method of creating multiple computer work stations with each workstation capable of accessing any one of the computers or sources at any time by remote control Eight stations can be set up locally o...

Страница 5: ...s For maximum compatibility it is recommended that only one compatible common resolution be used by all of the source devices Advanced EDID features and IP configuration features are accessible via the RS 232 serial communication port See page 16 for more information Routing and EDID features can be accessed via a web browser using the IP control feature built into the 8x8 DVI KVM Dual Link Matrix...

Страница 6: ...tains beautiful sharp resolutions up to 2560x1600 Serial RS 232 port for remote control via a computer or control automation device Supports DDWG standards for DVI monitors Package Includes 1 GefenPRO 8x8 DVI KVM Dual Link Matrix 8 6 ft DVI Dual Link cables M M 8 6 ft USB cables A B 1 AC Power Cord 1 Set of Rack Ears 1 User Manual ...

Страница 7: ...4 PANEL LAYOUT Front Panel 2 3 4 5 1 6 ...

Страница 8: ...el Button This button is used to cancel a routing change in progress 3 IR Window Receives signals from the IR Remote Control unit 4 Power Indicator This LED indicator will glow bright red when the power is turned on 5 Power Switch Turn the power on or off using this switch 6 LCD Display Displays the current routing status of the Matrix and is also used to manage source routing ...

Страница 9: ...6 PANEL LAYOUT Back Panel 3 4 2 1 5 6 7 8 9 10 11 ...

Страница 10: ...ut Ports 1 8 Connect DVI source devices to these ports 5 IP Control Interface Connect to this port to control the 8x8 DVI KVM Dual Link Matrix using IP Control See page 31 for more information 6 IR Extender Port Connect an IR extender cable to this port 7 USB Output Ports 16 Connect USB devices to these ports two outputs per channel 8 DVI Output Ports 1 8 Connect DVI monitors to these ports 9 USB ...

Страница 11: ...cable into an available electrical outlet How to Operate the GefenPRO 8x8 DVI KVM Dual Link Matrix The GefenPRO 8x8 DVI KVM Dual Link Matrix offers a number of control options The following methods can be used to control basic routing functions of the GefenPRO 8x8 DVI KVM Dual Link Matrix 1 Front Panel Control Buttons Pages 9 and 10 2 IR Remote Control Pages 11 13 3 RS 232 Serial Control Pages 16 ...

Страница 12: ...n the following screen is displayed After a few moments the Standby Screen is displayed The Standby Screen is shown below Displaying the Firmware Version Pressing the button on the front panel will display the current firmware version Displaying the Bootloader Version Press the button to display the bootloader version Press the button once more to return to the Standby Screen NOTE The Cancel butto...

Страница 13: ...UT may be different than the illustration above depending upon the current routing state Routing Sources Example Route the source device connected to In 2 to the monitor connected to Out 1 1 From the Standby Screen press the Select button on the front panel to display the routing status screen 2 Press the Select button again to move the cursor to INPUT 3 Press the button to set the source to Input...

Страница 14: ...activated momentarily each time a button is pressed 2 Monitor and Source Selection Buttons 1 16 These buttons are used to select which source is routed to a monitor See page 14 for information on using the IR Remote Control unit RMT 16IR Remote Control Unit 1 2 ...

Страница 15: ...he RMT 16IR Battery 1 Remove the battery cover on the back of the IR Remote Control unit 2 Insert the included battery into the open battery slot The positive side of the battery should be facing up 3 Replace the battery cover The Remote Control unit ships with two batteries One battery is required for operation and the other battery is a spare Empty Battery Slot ...

Страница 16: ...he battery cover 1 2 1 2 1 2 1 2 Channel 2 Channel 0 Default Channel 1 Channel 3 Battery compartment of the IR remote showing the exposed DIP Switch bank between the battery chambers It is important that the IR channel on the Remote Control unit matches the IR channel set on the 8x8 DVI KVM Dual Link Matrix For example if both DIP switches on the IR Remote Control unit are set to IR channel 0 both...

Страница 17: ...onitor where the source will be routed The second step is to select the source Example 1 Route the source device connected to In 7 to the monitor connected to Out 3 1 Press button 3 monitor 3 on the IR remote control unit 2 Press button 7 source 7 on the IR remote control unit The source connected to In 7 will be routed to the monitor connected to Out 3 Example 2 Route the source device connected ...

Страница 18: ...DID for each source to read What options do I have to manage the EDID in the 8x8 DVI KVM Dual Link Matrix First it is important to note that each source device can only output one video audio signal type This includes resolutions and timings When multiple devices monitors are used such as with the 8x8 DVI KVM Dual Link Matrix it is important to use devices monitors that have similar or compatible ...

Страница 19: ...ERIAL CONTROL RS232 Settings Bits per second 19200 Data bits 8 Parity None Stop bits 1 Flow Control None 5 4 3 2 1 9 8 7 6 1 2 3 4 5 6 7 8 9 Only Pins 2 RX 3 TX and 5 Ground are used on the RS 232 serial interface ...

Страница 20: ... r Sample FunctionName_param1_param2_param3_param4 r Syntax is NOT case sensitive EDID Management Function Description EDIDDSTOLO Read downstream EDID and stores into a Local EDID EDIDDSTOBA Read downstream EDID and stores in EDID Bank EDIDBATOLO Read downstream EDID and stores in any Local Input EDIDDETOLO Sets Local EDID to Default EDID LOCKEDID Secures Local EDID LOEDIDTOLO Load EDID file using...

Страница 21: ...1 8 param2 Input list 1 8 Notes If param2 0 then the downstream EDID is stored to all 8 DVI inputs Examples EDIDDSTOLO 2 1 2 3 4 5 inputs 1 5 use display 2 EDID EDIDDSTOLO 3 0 all inputs use display 3 EDID EDIDDSTOBA Function The EDIDDSTOBA function reads the downstream EDID and stores it to a specified EDID bank Syntax EDIDDSTOBA param1 param2 Parameters param1 A downstream monitor 1 8 param2 EDI...

Страница 22: ...eters param1 EDID bank offset 1 5 param2 Input 1 8 Notes If param2 0 then the EDID in the specified bank is copied to all eight inputs EDIDDETOLO Function The EDIDDETOLO function stores the Default EDID 640x480 in the specified Local EDID inputs Syntax EDIDDETOLO param1 param2 param3 param9 param1 Input 1 8 Notes If param1 0 then all 8 DVI inputs will be set to the Default EDID ...

Страница 23: ...am1 Input 0 1 Value Meaning 0 Disable 1 Enable LOEDIDTOLO Function The LOEDIDTOLO function loads an external EDID via RS 232 to any Local EDID input bank Syntax LOEDIDTOLO param1 param2 param3 Parameters param1 Input 1 8 param2 EDID size 1 2 Value Meaning 1 128 byte EDID 2 256 byte EDID param3 eco 0 1 Notes Set param1 to a value of 0 in order to specify all inputs When using HyperTermi nal param3 ...

Страница 24: ...1 A downstream monitor 1 8 PRLOEDID Function The PRLOEDID function reads the local EDID of a specified input and spools it to the serial port Syntax PRLOEDID param1 Parameters param1 A specified Input 1 8 PRBAEDID Function The PRBAEDID function reads the EDID file from the specified bank and sends to serial port Syntax PRBAEDID param1 Parameters param1 Input 1 5 ...

Страница 25: ...ID Parameters None IP Configuration Function Description PRWEBADD Displays the Web configuration RSTIP Set IP configuration to default SIPADD Specifies a new IP address SNETMASK Specifies a new net mask SGATEWAY Specifies the new gateway SPORT Specifies a new port PRWEBADD Function The PRWEBADD displays the IP address net mask gateway MAC address and port on the screen Syntax PRWEBADD Parameters N...

Страница 26: ... Notes A reboot is required after restoring the default IP settings SIPADD Function The SIPADD function specifies a new IP address Syntax SIPADD param1 param2 param3 param4 Parameters param1 IP address 0 255 param2 IP address 0 255 param3 IP address 0 255 param4 IP address 0 255 Notes A reboot is required after the new IP address is set ...

Страница 27: ...ram3 IP address 0 255 param4 IP address 0 255 Notes A reboot is required after the new net mask has been set SGATEWAY Function Specifies the new IP gateway Syntax SGATEWAY param1 param2 param3 param4 Parameters param1 Gateway address 0 255 param2 Gateway address 0 255 param3 Gateway address 0 255 param4 Gateway address 0 255 Notes A reboot is required after the gateway address has been assigned ...

Страница 28: ...25 RS 232 SERIAL CONTROL SPORT Function Specifies a new port Syntax SPORT param1 Parameters param1 Port 0 255 Notes A reboot is required after the new port has been created ...

Страница 29: ...Standby Mode ACTIVEBOLO Function The ACTIVEBOLO function enables the boot loader allowing the Matrix to be updated with firmware using RS 232 Syntax ACTIVEBOLO Parameters None Notes The ACTIVEBOLO command must be typed twice in order to activate the boot loader FADEFAULT Function The FADEFAULT function sets all Local EDIDs and routing settings to default turns off all FO 5V to inputs sets IR addre...

Страница 30: ...it down This pre serves the 5V state when the Matrix is restarted Syntax LOCKPOWER param1 Parameters param1 State 0 1 Value Meaning 0 Disable Power Lock 1 Enable Power Lock MASKOUT Function The MASKOUT function allows blanking or selected outputs Syntax MASKOUT param1 param2 Parameters param1 Output 1 8 param2 Output 1 8 Notes The current masking state will be lost if power is lost ...

Страница 31: ...he remote IR channel Syntax RMTIRADD param1 Parameters param1 IR channel 0 3 STBYMODE Function The STBYMODE function disables enables standby power mode Syntax STBYMODE param1 Parameters param1 Disable Enable 0 1 Value Meaning 0 Disable Standby Mode 1 Enable Standby Mode ...

Страница 32: ... R command allows specific routing of inputs and outputs Syntax r param1 param2 Parameters param1 DVI Ouput 1 8 param2 DVI Input 1 8 S Command The S command routes a single input to all 8 DVI outputs Syntax s param1 Parameters param1 Input 1 8 Notes Setting param1 to a value of 0 will place the matrix in one to one mode This means that Input1 will be routed to Output1 Input2 will be routed to Outp...

Страница 33: ...f the matrix Syntax m Parameters None F Command The F command returns the state of pin 14 of the DVI inputs Syntax f param1 param2 Parameters param1 DVI input 1 8 param2 State 0 1 Notes High is returned if 5V is enabled on the DVI input Low is returned if 5V is disabled on the DVI input ...

Страница 34: ...has been accomplished access to the Web Interface is possible Simply type the IP address that was assigned to the product in a web browser to access the Matrix Status Page It should look like the image below View Matrix Status The View Matrix Status will display the current status and can also be used to create routes To create a new route follow the steps below 1 Select which outputs will display...

Страница 35: ...s section has additional tabs for advanced EDID functions These tabs are SET INPUT TO DEFAULT EDID UPLOAD EDID Future Implementation DOWNLOAD EDID Future Implementation COPY EDID EDID LOCK STATE This page will automatically refresh every minute However at anytime the REFRESH button can be pressed to return the current status of the Matrix ...

Страница 36: ...Matrix To set an input s local memory location to the default EDID follow the steps below 1 Select any number of inputs by clicking on the desired checkboxes 2 Click on the Set Default EDID button to update the change s Note After this command is complete the Web Interface will return to the VIEW MATRIX STATUS page This page will automatically refresh every minute However the REFRESH button can be...

Страница 37: ...t Source to Copy from section An EDID can be selected from a monitor connected to one of the outputs or from an EDID already loaded into one of the local memory locations Input It should be noted that only one EDID can be selected for copying 2 Select the local memory locations that will receive the selected EDID under the Select Input s to Copy to section Mulitple local memory locations can be sp...

Страница 38: ...e EDID Lock State is used 1 Once the Local EDID has been stored press the EDID LOCK STATE web button 2 Select the ON radio button from the dialog and press Update EDID Lock State The 8x8 DVI KVM Dual Link Matrix can be powered down and the Local EDID will be preserved To disable the EDID LOCK STATE feature select the OFF radio button in the Web interface and press the Update EDID Lock State button...

Страница 39: ...video To set the Active or Mask mode follow the steps below 1 Select either Active or Mask for any number of desired outputs 2 Press the Submit button to initiate the change s After this command is complete the user will be returned to the Main Page This page will automatically refresh every minute however at anytime the Refresh button can be pressed to refresh the status of the matrix NOTE All ma...

Страница 40: ...o change these settings follow the steps below 1 Enter the desired network information into the fields provided 2 Press the Save button to initiate the change s Note After this command is complete the user will be returned to the Main Page Setting made on this page will not take effect until the unit is restarted Please disconnect power from the unit and reconnect power for changes to take effect ...

Страница 41: ...al devices The current status of this feature for each input can be viewed on this page To set this feature for each input follow the steps below 1 Select the 5V option either On or Off for each desired input 2 Click on the Update button to initiate the change s Note After this command is complete the user will be returned to the Main Page This page will automatically refresh every minute however ...

Страница 42: ...ype the command ACTIVEBOLO r If the unit is not powered on follow the instructions below to activate the Boot Loader 1 Connect RS 232 cable to PC and activate the Hyper Terminal program 2 Make sure Hyperterminal is set to the following a Baud rate 19200 b Stop bits 1 c Data bits 8 d Flow control None 3 Press the following three buttons on the front panel of the Matrix simultaneously while powering...

Страница 43: ...ry memory 2 A message will appear in Hyperterminal Waiting for the file to be sent press a to abort 3 In Hyperterminal click Transfer Send File 4 Click Browse and select the BIN file to be uploaded e g DVI8X8_ uIP_1_11 bin 5 Select Ymodem for the protocol 6 Press Send on the Send File dialog box 7 A message will appear in Hyperterminal Programming Completed Successfully ...

Страница 44: ... air flow as needed to maintain the recommended temperature inside the rack c Do not exceed maximum weight loads for the rack Install heavier equipment in the lower part of the rack to maintain stability d Connect a bonding wire between an approved safety ground and the grounding screw on the chassis ...

Страница 45: ...A Audio Output Connectors 8 3 5 mm mini stereo Audio Input Connectors 8 3 5 mm mini stereo Frequency Response 0 1db 20Hz 100 kHz THD 0 002 20 kHz IR Extender 3 5mm mini stereo RS 232 Interface DB 9 female IP Interface RJ 45 Power Supply 100 240 V AC IEC connector Power Consumption 70 Watts max Operating Temperature 0 C 45 C 32 F 104 F Storage Temperature 20 C 60 C 4 F 140 F Relative Humidity 20 90...

Страница 46: ...1 Proof of sale may be required in order to claim warranty 2 Customers outside the US are responsible for shipping charges to and from Gefen 3 Copper cables are limited to a 30 day warranty and cables must be in their original condition The information in this manual has been carefully checked and is believed to be accurate However Gefen assumes no responsibility for any inaccuracies that may be c...

Страница 47: ...ame of the author may not be used to endorse or promote products derived from this software without specific prior written permission THIS SOFTWARE IS PROVIDED BY THE AUTHOR AS IS AND ANY EXPRESS OR IMPLIED WARRANTIES INCLUDING BUT NOT LIMITED TO THE IMPLIED WARRANTIES OF MERCHANTABILITY AND FITNESS FOR A PARTICULAR PURPOSE ARE DISCLAIMED IN NO EVENT SHALL THE AUTHOR BE LIABLE FOR ANY DIRECT INDIR...

Страница 48: ......

Страница 49: ...Rev A6 Pb 20600 Nordhoff St Chatsworth CA 91311 1 800 545 6900 818 772 9100 fax 818 772 9120 www gefenpro com support gefenpro com ...

Отзывы: