background image

29

28

5

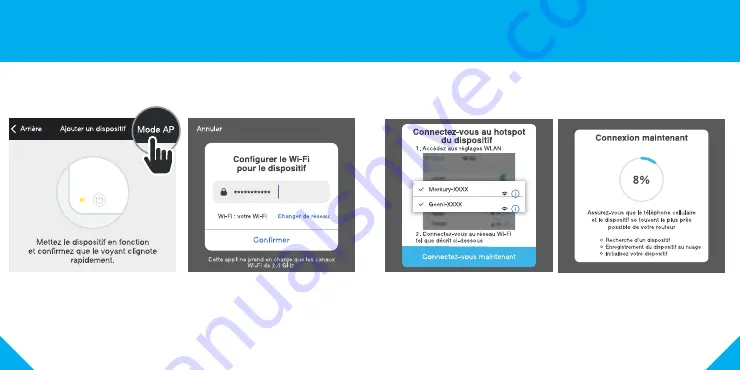
ÉTAPE 1. 

Assurez-vous que le dispositif est en mode AP, et qu’il clignote lentement 

(consultez la section Instructions de réinitialisation de la page 21).

ÉTAPE 3.  

Cliquez sur “Next” et entrez 

vos informations Wi-Fi.

ÉTAPE 4. 

Procédez tel que décrit aux 

instructions afin de choisir le dispositif 

de votre liste de dispositifs Wi-Fi.

ÉTAPE 5. 

Le dispositif se connectera.

Ajouter un dispositif. 

Méthode 2 :  Sauvegarde du mode AP.

ÉTAPE 2. 

Dans l’appli Geeni, dans le coin 

supérieur droit de l’écran des 

dispositifs, cliquez sur (+). Choisissez 

“Smart Power”. Choisissez “Mode 

AP” dans le coin supérieur.

Содержание SMART WI-FI WATER SENSOR

Страница 1: ...SMART WI FI WATER SENSOR START GUIDE ENGLISH Pour les instructions en fran ais veuillez consulter la page 19...

Страница 2: ...to a 2 4GHz Wi Fi network Geeni can t connect to 5GHz networks Connect your sensor to the Geeni app before installing it Thank you for purchasing your GEENI smart home product Get started using your...

Страница 3: ...3 2 2 Register a Geeni account STEP 1 Enter your mobile phone number or email address STEP 2 Enter the verification code and create a password 1 Download the Geeni app...

Страница 4: ...hat does the blinking light mean Reset the sensor by pressing and holding the Reset Button for 6 seconds The LED Indicator Light will begin to flash rapidly Reset one time press and hold to reach Easy...

Страница 5: ...is rapidly flashing blue If it is not press and hold the Reset Button for 6 seconds Once the LED Indicator Light is rapidly flashing blue press Next Step in the Geeni app STEP 3 Enter your Wi Fi netw...

Страница 6: ...structions on page 5 to reset STEP 2 In the Geeni app on the top corner of the Devices screen click Choose Smart Sensors Choose AP Mode in the top corner STEP 3 Click Next and enter your Wi Fi details...

Страница 7: ...be input jack when you consider placement Step 2 Plug the Sensor Probe into the input jack on the Holder and ensure that the Sensor Probe is placed where you wish to detect liquid Step 3 Snap the Main...

Страница 8: ...ns The sensor will send notifications within 3 5 seconds of being triggered Select History to view recent sensor activations Select Notice to turn the sensor alerts on or off Connect multiple Geeni de...

Страница 9: ...me How do I rename it From your main device list click on the sensor that you want to rename press the button on the top right for advanced settings and click Modify Device Name You ll then be able to...

Страница 10: ...FCC Rules These limits are designed to provide reasonable protection against harmful interference in a residential installation Important Information Before installing read and follow all precautions...

Страница 11: ...GUIDE DE D MARRAGE DU CAPTEUR D EAU WI FI INTELLIGENT Connexion impossible Besoin d aide NE RETOURNEZ PAS CE PRODUIT AU MAGASIN O VOUS L AVEZ ACHET Soutien Geeni support mygeeni com ou tapez sur Supp...

Страница 12: ...ni ne peut se connecter aux r seaux de 5 GHz Connectez votre capteur l appli Geeni avant de l installer sur votre porte ou fen tre Nous vous remercions d avoir achet cette trousse de contr le pour mai...

Страница 13: ...r votre appli Geeni 1 TAPE 1 Entrez votre num ro de t l phone cellulaire ou votre adresse courriel TAPE 2 Entrez le code de v rification et cr ez un mot de passe T l chargez l appli Geeni du magasin A...

Страница 14: ...r initialisation et en le maintenant enfonc pendant 6 secondes Le voyant lumineux DEL commence clignoter rapidement R initialiser une fois appuyer et maintenir enfonc pour atteindre le mode Easy bleu...

Страница 15: ...elle est pr t pour la connexion Sinon teignez l ampoule et allumez la nouveau 3 fois de suite jusqu ce qu elle clignote Appuyez sur Next Step TAPE 3 Entrez votre r seau Wi Fi est votre mot de passe Si...

Страница 16: ...rez vos informations Wi Fi TAPE 4 Proc dez tel que d crit aux instructions afin de choisir le dispositif de votre liste de dispositifs Wi Fi TAPE 5 Le dispositif se connectera Ajouter un dispositif M...

Страница 17: ...visagez de la placer TAPE 2 Branchez la sonde du capteur dans la prise d entr e du support et assurez vous que la sonde du capteur est plac e l endroit o vous souhaitez d tecter le liquide TAPE 3 Ins...

Страница 18: ...capteur enverra des notifications dans les 3 5 secondes suivant le d clenchement S lectionnez History pour afficher les activations r centes des capteurs S lectionnez Remarque pour activer ou d sacti...

Страница 19: ...sur l un des dispositifs que vous d sirez grouper et appuyez sur le bouton situ dans le coin sup rieur droit et cliquez sur modifier le nom du dispositif ou modifier le nom du groupe si disponible Vo...

Страница 20: ...es Convient pour une utilisation dans un environnement de fonctionnement compris entre 20 C et 40 C 4 F et 104 F Ne pas utiliser dans des luminaires totalement ferm s Ne pas utiliser avec des gradateu...

Страница 21: ...Can t connect Need help DO NOT RETURN THIS PRODUCT TO THE STORE Geeni support support mygeeni com 888 232 3143 Toll free or tap Support for help in the Geeni app...

Отзывы: