Gear Head 1-1DPF100 Скачать руководство пользователя страница 9

Save:Save photos from your digital keychain to your 

computer. 

Remove: Remove photo from LoadData area.


SaveData: Record the picture shown under the preview 
screen onto your computer.  Use this to store your most 
frequently used pictures so you can quickly reload your 
favorite pictures by simply clicking the “

LoadData

” button.


LoadData

Click this to clear out the preview screen and 

show the pictures stored on your computer using the 

SaveData

” button. 


LoadData

: This area 

allows you to transfer 
photos between your 
digital keychain and 
the computer. 

Synchronize: Transfer data. Note: No change will be made 
to your photo frame until this button is clicked. 


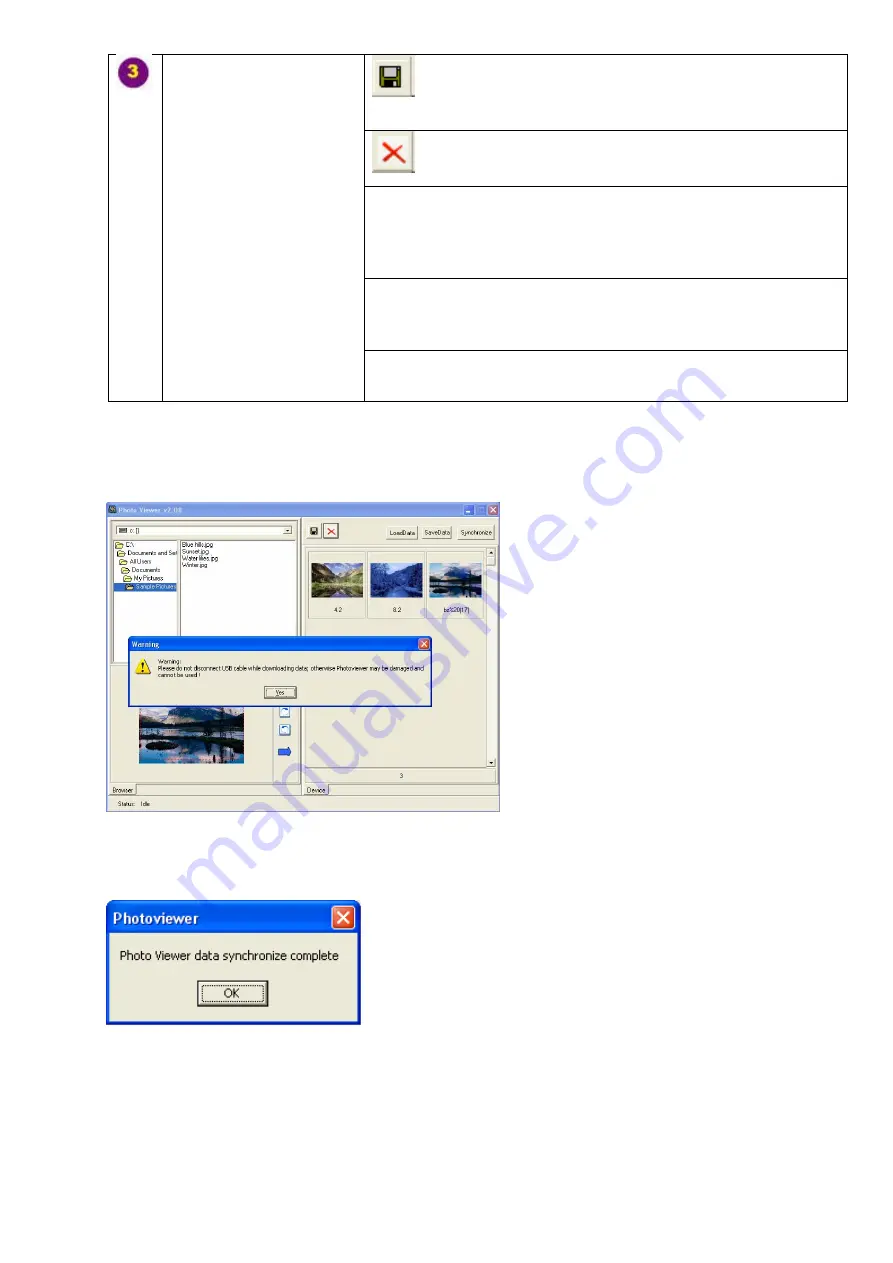
8.  To delete a photo from your digital keychain, select the photo in the LoadData area, 

click ”

Remove”, 

then


click “

Synchronize

.”  You will be warned not to disconnect the USB 

Cable while downloading data, click “

Yes

” to continue.


9.  After transfer is complete, the PhotoViewer will have a “

data synchronize complete

” 

screen indicating that the photos have been deleted from your digital keychain. 


10. To add a photo to your digital keychain, select a photo by browsing your computer. Click 

the blue arrow at the bottom of the “

Edit

” column, the photo will be added to the LoadData 

area, then click “

Synchronize

.”  You will be warned not to disconnect the USB Cable while 

downloading data, click “

Yes

” to continue.


11. After transfer is complete, the PhotoViewer will have a “

data synchronize complete

” 

screen indicating that the photo has been added to your digital keychain. 

Содержание 1-1DPF100

Страница 1: ...PID 161301 109259 Rev 071205 Digital Keychain 1 1 LCD Model 1 1DPF100 User s Manual ...

Страница 2: ...2 ...

Страница 3: ...ction against frequency interference in residential installation This equipment generates uses and can radiate radio frequency energy and if not installed or used in accordance with the instructions may cause harmful interference to radio communication However there is no guarantee that interference will not occur in television reception which can be determined by turning the equipment off and on ...

Страница 4: ...lable USB Port SYSTEM SPECIFICATIONS Your new Digital Keychain complies with the following specifications USB Interface HARDWARE DESCRIPTION Press to turn on your digital photo frame POWER ON OFF While the digital photo frame is turned on press this switch to open the control menu This button also acts as an Enter button after the different function icon is selected PREVIOUS Press to view previous...

Страница 5: ...alled You can determine if you have Service Pack 4 by right clicking My Computer and then selecting Properties Select the General tab and the Service Pack you have will be listed under System If Service Pack 4 is not listed please visit www windowsupdate com and install it For Windows XP Windows XP users are recommended to have Service Pack 2 installed You can determine if you have Service Pack 2 ...

Страница 6: ...chain will detect the connection and prompt you whether to charge the picture viewer or to connect to the computer for data transfer Select USB Power 3 Your digital keychain will charge automatically Note When the battery is nearly full at the end of the charge cycle your digital keychain will continue to use a very low current to ensure better battery life Your digital keychain might continue to ...

Страница 7: ... of your computer 3 Double click the CD icon on your desktop you will see the following screen 4 Choose MAC AP folder by double clicking it double click Digital Photo Viewer 1 0 0 then select Digital Photo Viewer Install Follow the onscreen instructions to complete the installation 5 When the screen reminds you to restart your computer to finish the installation the Digital Photo View icon as show...

Страница 8: ...keychain 5 Your computer will automatically detect and install the necessary drivers 6 Double click the PhotoViewer icon on your desktop 7 The following interface will appear Browse You can choose a photo from your computer by clicking the pull down menu on the top of this area the photo selected will be displayed at the botton of this area Select an area of the photo Cancel the selected area Rota...

Страница 9: ...ked 8 To delete a photo from your digital keychain select the photo in the LoadData area click Remove then click Synchronize You will be warned not to disconnect the USB Cable while downloading data click Yes to continue 9 After transfer is complete the PhotoViewer will have a data synchronize complete screen indicating that the photos have been deleted from your digital keychain 10 To add a photo...

Страница 10: ...choose a photo from your computer by clicking the pull down menu on the top of this area the photo selected will be displayed at the botton of this area Rotate the photo clockwise by 90 degrees Rotate the photo counter clockwise by 90 degrees Select an area of the photo Cancel the selected area Edit You can edit the selected photo by using the tools in this section Put the selected photo in the Lo...

Страница 11: ...ntrol Menu press the ON OFF Button while the digital keychain is running The Power ON OFF button also acts as an Enter button after the different function icon is selected POWER OFF Choose this icon to turn off your digital keychain EXIT MENU Choose this icon to exit the control menu DELETE IMAGE Choose this icon to delete photos SLIDE SHOW Choose this icon and the photos will be displayed one by ...

Страница 12: ... any loss or damages and claims or damages related to loss of or damage to your records or data This warranty does not apply to any product the exterior of which has been damaged or defaced This warranty will be voided by misuse improper physical environment improper repair acts of God war or terror commercial use and improper service operation or handling Technical Support Gear Head provides Tech...

Отзывы: