GEAppliances GFW480 Скачать руководство пользователя страница 28

Before you call for service…  

28

Problem

Possible Cause

What To Do

Water does not 

enter washer or 

enters slowly

Automatic self system checks

Water supply is turned off
Water valve screens are 

stopped up

• 

After 

Start

 is pressed, the washer does several system checks. Water 

will flow 60 seconds after 

Start

 is pressed.

• 

Turn on both hot and cold faucets fully.

• 

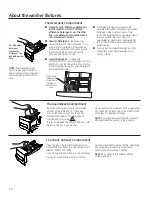
Turn off the water source and remove the water connection hoses 

from the upper back of the washer. Use a brush or toothpick to clean 

the screens in the machine. Reconnect the hoses and turn the water 

back on.

Wrinkling

Improper sorting

Overloading

Incorrect wash cycle

Repeated washing in water 

that is too hot

• 

Avoid mixing heavy items (like work clothes) with light items (like 

blouses).

• 

Load your washer so clothes have enough room to move freely.

• 

Match cycle selection to the type of fabric you arewashing (especially 

for easy care loads).

• 

Wash in warm or cold water.

Grayed or 

yellowed clothes

Not enough detergent
Not using HE (high efficiency) 

detergent
Hard water

Water is not hot enough

Detergent is not dissolving
Dye transfer

• 

Use correct amount of detergent.

• 

Use only HE detergent.

• 

Use hottest water safe for fabric.

• 

Use a water conditioner like Calgon brand or install a water softener.

• 

Make sure water heater is delivering water at 120°–140°F (48°–60°C).

• 

Try a liquid HE detergent.

• 

Sort clothes by color. If fabric label states wash separately, unstable 

dyes may be indicated.

Colored spots

Incorrect use of fabric softener

Dye transfer

• 

Check fabric softener package for instructions and follow directions 

for using dispenser.

• 

Sort whites or lightly colored items from dark colors.

• 

Promptly remove wash load from washer.

Water 

temperature is 

incorrect

Water supply is improperly 

connected
House water heater is not set 

properly

• 

Make sure hoses are connected to correct faucets.

• 

Make sure house water heater is delivering water at 120°–140°F 

(48°–60°C).

Bad odor inside 

your Washer

Washer unused for a long time, 

not using recommended quality 

of HE detergent or used too 

much detergent

• 

Run a 

Tub Clean

 cycle.

• 

In case of strong odor, you may need to run the 

Tub Clean 

cycle more 

than once.

• 

Use only the amount of detergent recommended on the detergent 

container.

• 

Use only HE (high efficiency) detergent.

• 

Always remove wet items from the washer promptly after machine 

stops running.

• 

Leave the door slightly open for the water to air dry. Close supervision 

is necessary if this appliance is used by or near children. Do not allow 

children to play on or in this or any other appliance.

Содержание GFW480

Страница 1: ...da 31 Consumer Support 32 GFW490 GFW480 GFWR4805 GFWR4800 GHWS3605 GHWS3600 GFWR2705 GFWR2700 GFWS2605 GFWS2600 OWNER S MANUAL INSTALLATION INSTRUCTIONS Write the model and serial numbers here Model _________________ Serial _________________ You can find them on a label on the side of the washer 49 90518 2 06 16 GEA ENGLISH FRANÇAIS ESPAÑOL GE is a trademark of the General Electric Company Manufac...

Страница 2: ...very GE Appliances product and we think you will too Among other things registration of your appliance ensures that we can deliver important product information and warranty details when you need them Register your GE appliance now online Helpful websites and phone numbers are available in the Consumer Support section of this Owner s Manual You may also mail in the pre printed registration card in...

Страница 3: ...is flammable DO NOT smoke or use an open flame during this time DO NOT allow children to play on or in this appliance Close supervision of children is necessary when this appliance is used near children Before the washer is removed from service or discarded remove the door or lid Failure to follow these instructions may result in death or injury to persons DO NOT reach into the appliance if the ba...

Страница 4: ...Parts and Accessories Order on line at GEApplianceparts com today 24 hours a day or by phone at 800 626 2002 during normal business hours Part Number Accessory PM14X10002 4 ft Rubber Water Supply Hoses Or PM14X10005 4 ft Braided Metal Water Supply Hoses WX10X10011 Tide Washing Machine Cleaner PM7X1 Washer Floor Tray PM7X3 Low Profile Universal Washer Floor Tray for use with pedestal models GFP1328...

Страница 5: ...ic shock or injury to persons read the IMPORTANT SAFETY INSTRUCTIONS before operating this appliance WARNING Wash Soil Temp Spin Delay Wash Tumble Add a Garment Steam Complete Wash Stain Removal Guide Add Steam Power Lock Control Light Tap Cold No Spin Normal Heavy Extra H eavy Cold Hot Warm Extra Hot Medium Low High Max Volume Start Pause Add Garment Allergen Sanitize Whites Quick Wash Towels She...

Страница 6: ... Medium Low No Spin Stain Removal Guide Prewash or Presoak Add Steam Time Saver Extra Rinse Delay Wash Tumble Care Overnight Dry Cycle for normal regular or typical use for washing up to a full load of normally soiled cotton clothing Choose the Heavy or Extra Heavy soil level selection and Warm or Hot water temperature selection as appropriate for your clothes load for a higher degree of cleaning ...

Страница 7: ...x Light Hot Warm Cold Tap Cold Extra High High Medium Low No Spin Stain Removal Guide Prewash or Presoak Add Steam Time Saver Extra Rinse Delay Wash Tumble Care Overnight Dry Cycle designed for care of medium to lightly soiled active wear athletic wear and technical fabrics Cycle for normal regular or typical use for washing up to a full load of normally soiled cotton clothing using only cold wate...

Страница 8: ...inse Spin Extra High High Medium Low No Spin Extra Rinse Delay Wash Tumble Care To quickly rinse and spin out any items at any time Utilizes a high speed spin to extract water from wet items To achieve a drain and spin delselect the Extra Rinse option Wet load of items For items that need only to be spun out use this cycle Drain Spin Extra High High Medium Low No Spin Extra Rinse Delay Wash Utiliz...

Страница 9: ...emperatures are available for certain wash cycles NOTE The first 10 seconds of the wash fill is always cold This feature assists in conditioning the fabric and preventing stains from setting on garments Spin Changing the Spin speed changes the final spin speed of the cycles Always follow the garment manufacturer s care label when changing the Spin speed To change the Spin speed press the Spin spee...

Страница 10: ...able on the following cycles Active Wear Whites Normal and Single Item Overnight Dry is intended for smaller loads only This feature is intended for use when clothes need to be washed dried and ready to wear or finished the next morning This feature will tumble clothes and introduce a constant stream of air into the machine compartment upon completion of select wash cycles Clothes can be removed a...

Страница 11: ...he desired volume There are four sound levels including OFF To turn the button sounds ON OFF press and hold the button for 3 seconds 18 Lock Control You can lock the controls to prevent any selections from being made Or you can lock or unlock the controls after you have started a cycle Children cannot accidentally start the washer by touching buttons with this option selected To lock the washer pr...

Страница 12: ...until the end of the cycle NOTE The cycle time is affected by how long it takes the washer to fill This depends on the water pressure in your home The smart timer learns the amount of time it takes to fill your washer and adjusts the total time accordingly Cycle status is also displayed and certain features such as Delay Wash or Steam are shown indicating they have been selected If an out of balan...

Страница 13: ...detergent residue being left on the clothes The Dispenser Drawer Slowly open the dispenser drawer by pulling it out until it stops After adding laundry products slowly close the dispenser drawer Closing the drawer too quickly could result in early dispensing of the bleach fabric softener or detergent NOTE You may see water in the detergent bleach and fabric softener compartments at the end of the ...

Страница 14: ...enser The Detergent Compartment Only use high efficiency detergent in this washer DO NOT fill high efficiency detergent over the MAX line Use detergent manufacturer s recommended amount Powder Detergent Remove the Liquid Detergent cup and place it in a safe location outside of the washer Follow the detergent manufacturer s instructions when measuring the amount of powder to use Liquid Detergent Lo...

Страница 15: ...6 T shirts 4 Pairs of Sweatpants 4 Sweatshirts 2 Hoodies 7 Pairs of Socks DELICATES 7 Bras 7 Panties 3 Slips 2 Camisoles 4 Nightgowns Using a nylon mesh bag for small items is recommended SPEED WASH 2 4 GARMENTS 2 Casual Wear Work Shirts 1 Pair Casual Wear Work Pants OR 3 Soccer Uniforms The wash drum may be fully loaded with loosely added items Loading Examples Fire Hazard WARNING DO NOT wash fab...

Страница 16: ... in about 90 minutes Do not interrupt the cycle 5 After the cycle is complete leave the door open slightly for better ventilation If for any reason the cycle needs to be interrupted the door will not open immediately Forcing open the door at this stage may cause water to flood The door will open after the water is drained to a level where it would not flood the floor Tub Clean may be interrupted b...

Страница 17: ... and towels on the floor in front of the washer to protect the floor It is normal to catch about a cup of water when the filter is removed 3 Pull down the pour spout 4 Turn the pump filter counterclockwise and remove the filter slowly controlling the flow of the draining water 5 Remove the filter and clean the debris from the filter 6 Replace the filter and turn clockwise Tighten securely 7 Flip u...

Страница 18: ...urn inserts to the proper compartments Replace the dispenser drawer To reduce buildup in the Dispenser Drawer area Use only HE High Efficiency detergent Lock tab is visible only after drawer has been pulled out Cleaning the Door Gasket Open the washer door Using both hands press down the door gasket Remove any foreign objects if found trapped inside the gasket Make sure there is nothing blocking t...

Страница 19: ...ical and electrical skills Completion time 1 3 hours Proper installation is the responsibility of the installer Product failure due to improper installation is not covered under the Warranty TOOLS REQUIRED FOR WASHER INSTALLATION 1 2s socket with ratchet Adjustable wrench or 14mm and 16mm open end wrenches Channel lock adjustable pliers Carpenter s level PARTS SUPPLIED Cable Tie PARTS REQUIRED Sol...

Страница 20: ...ring NOTE With Legs 40 1 2 102 5 cm 3 4 1 9 cm adjustability With Built In Pedestal 46 117 cm 3 4 1 9 cm adjustability With Optional Pedestal GFXP1308 52 132 1 cm 3 4 1 9 cm adjustability Stacked 78 1 4 198 8 cm IMPORTANT Minimum Installation Clearances When installed in alcove Sides Rear Top 0s 0 cm When installed in closet Sides Rear Top 0s 0 cm Front 1s 2 54 cm Consideration must be given to pr...

Страница 21: ...3 Remove the following from the back side of the washer 4 bolts 4 plastic spacers including rubber grommets 4 power cord retainers 4 Remove the shipping bolt Insert plug into shipping bolt hole NOTE Failure to remove the shipping bolts can cause the washer to become severely unbalanced Save all bolts for future use NOTE If you must transport the washer at a later date you must reinstall the shippi...

Страница 22: ...nd wire not provided may be added Attach to washer cabinet with a 8 18 x sheet metal screw available at any hardware store to rear of washer Mobile Home Installation Installation must conform to Standard for Mobile Homes ANSI A119 1 and National Mobile Home Construction and Safety Standards Act of 1974 PL93 383 Installation Instructions GROUNDING INSTRUCTIONS This appliance must be grounded In the...

Страница 23: ...elbow end of the HOT and COLD hoses Reinstall the rubber washer into the hose fitting if it has fallen out during shipment Carefully connect the inlet hose marked HOT to the outside H outlet of the water valve Tighten by hand then tighten another 2 3 turn with pliers Carefully connect the other inlet hose to the inside C outlet of the water valve Tighten by hand then tighten another 2 3 turn with ...

Страница 24: ...wer is off at the circuit breaker fuse box before plugging the power cord into an outlet 10 Turn on the power at the circuit breaker fuse box 11 Read the rest of this Owner s Manual It contains valuable and helpful information that will save you time and money 12 Before starting the washer check to make sure Main power is turned on The washer is plugged in The water faucets are turned on The unit ...

Страница 25: ...UPO WRXFKLQJ WKH ÀRRU DQG WKH ORFN QXWV DUH VHFXUHO WLJKWHQHG 7KLV LV HVSHFLDOO LPSRUWDQW if the washer is installed on a pedestal Leveling the legs on the washer or the pedestal require the same steps It is impossible to overload a frontload washer MYTH Although the capacity of the frontload washer allows for larger loads than a traditional topload washer care must be taken to not overload the wa...

Страница 26: ... rubber door seal Sometimes dirt or clothing is left in this seal and can cause a small leak If this area is wet you have oversudsing condition Use less detergent Make sure hose connections are tight at washer and faucets and make sure end of drain hose is correctly inserted in and secured to drain facility Check household plumbing You may need to call a plumber Powder soap may cause clogs inside ...

Страница 27: ...er is unplugged Water supply is turned off Circuit breaker fuse is tripped blown Automatic self system checks Make sure cord is plugged securely into a working outlet Turn both hot and cold faucets fully on Check house circuit breakers fuses Replace fuses or reset breaker Washer should have separate outlet First time the washer is plugged in automatic checks occur It may take up to 20 seconds befo...

Страница 28: ...fe for fabric Use a water conditioner like Calgon brand or install a water softener Make sure water heater is delivering water at 120 140 F 48 60 C Try a liquid HE detergent Sort clothes by color If fabric label states wash separately unstable dyes may be indicated Colored spots Incorrect use of fabric softener Dye transfer Check fabric softener package for instructions and follow directions for u...

Страница 29: ...onthly clean the dispenser drawer to remove buildup of chemicals Make sure to have the correct amount of softener or bleach Make sure softener and bleach cap for dispenser are seated or they will not work Dispenser drawer not dispensing properly Laundry detergent packet placed in dispenser drawer Laundry detergent packets should not be used in the dispenser They should only be added directly to th...

Страница 30: ...aused by accident fire floods or acts of God Incidental or consequential damage caused by possible defects with this appliance Defects or damage due to operation in freezing temperatures Damage after delivery Product not accessible to provide required service What Is Not Covered in the United States Warrantor GE Appliances Staple your receipt here Proof of the original purchase date is needed to o...

Страница 31: ...ay require the use of the onboard data port for diagnostics This gives a GE Appliances Factory Service technician the ability to quickly diagnose any issues with your appliance and helps GE Appliances improve its products by providing GE Appliances with information on your appliance If you do not want your appliance data to be sent to GE Appliances please advise your technician NOT to submit the d...

Страница 32: ...discounts that are available while your warranty is still in effect You can purchase it on line anytime or call 800 626 2224 during normal business hours GE Appliances Consumer Home Services will still be there after your warranty expires Parts and Accessories GEAppliances com Individuals qualified to service their own appliances can have parts or accessories sent directly to their homes VISA Mast...

Отзывы: