background image

Care and Cleaning of the Dryer.


GEAppliances.com

The Exterior:

 Wipe or dust any spills or 

washing compounds with a damp cloth. 

Dryer control panel and finishes may be 

damaged by some laundry pretreatment 

soil and stain remover products. Apply these 

products away from the dryer. The fabric 

may then be washed and dried normally. 

Damage to your dryer caused by these 

products is not covered by your warranty.

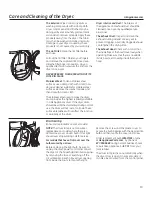
The Lint Filter:

 Clean the lint filter before 

each use.
Pull out the lint filter. Moisten your fingers 

and remove the captured lint. Once clean, 

slide the filter back into position. Have a 

qualified technician vacuum the lint from the 

dryer once a year.

NEVER OPERATE  THE DRYER WITHOUT ITS 

FILTER IN PLACE.
Stainless Steel:

 To clean stainless steel 

surfaces use a damp cloth with a mild, non-

abrasive cleaner suitable for stainless steel 

surfaces. Remove the cleaner residue and 

then dry with a clean cloth. 
The stainless steel used to make the dryer 

drum provides the highest reliability available 

in a GE Appliances dryer. If the dryer drum 

should be scratched or dented during normal 

use, the drum will not rust or corrode. These 

surface blemishes will not affect the function 

or durability of the drum.

Dryer Interior and Duct: 

The interior of 

the appliance and exhaust duct should be 

cleaned once a year by qualified service 

personnel.

The Exhaust Duct:

 Inspect and clean the 

exhaust ducting at least once a year to 

prevent clogging. A partially clogged exhaust 

can lengthen the drying time.

The Exhaust Hood:

 Check with a mirror that 

the inside flaps of the hood move freely when 

operating. Make sure that there is no wildlife 

(birds, insects, etc.) nesting inside the duct or 

hood.

13

NOTE:

 The drum lamp is 

not

 consumer 

replaceable on models where there is a 

domed cover over an LED bulb. If this light 

should ever stop working, call for service.

For models that have a flat cover over the 

bulb secured by a screw:

Before replacing the light bulb, be sure to 

unplug the dryer power cord or disconnect 

the dryer at the household distribution panel 

by removing the fuse or switching off the 

circuit breaker. Reach above dryer opening 

from inside the drum to locate the light.

Remove the screw and the plastic cover to  

access the bulb. Replace with the appropriate 

bulb and then reaffix the cover and screw.
Order replacement bulb 

WE4M305 

on-line 

at 

GEApplianceParts.com

, by phone at 

877.959.8688

 during normal business hours, 

or purchase appliance bulb 

7C7

 from your 

local retailer.
The drum lamp turns on automatically when 

the dryer door is open. On some models, it 

can also be activated from the control panel.

Drum Lamp 

(consumer replaceable on some models)

Содержание GFD49

Страница 1: ...anty 46 Consumer Support 48 GFD49 GFD48 GFDR485 GFDR480 GHDS365 GHDS360 GFDR275 GFDR270 GFDS265 GFDS260 OWNER S MANUAL INSTALLATION INSTRUCTIONS Write the model and serial numbers here Model _________...

Страница 2: ...y GE Appliances product and we think you will too Among other things registration of your appliance ensures that we can deliver important product information and warranty details when you need them Re...

Страница 3: ...3 Notes GEAppliances com...

Страница 4: ...ed to the weather DO NOT tamper with controls DO NOT repair or replace any part of this appliance or attempt any servicing unless specifically recommended in the user maintenance instructions or in pu...

Страница 5: ...reach your gas supplier call the fire department Installation and service must be performed by a qualified installer service agency or the gas supplier SAVE THESE INSTRUCTIONS 5 State of California P...

Страница 6: ...0 1 8 3 7 6 5 4 16 14 15 2 9 10 11 12 17 13 18 19 1 8 3 7 6 5 4 16 15 2 9 10 11 12 17 13 18 19 Models GFDS265 GFDS260 1 8 3 7 6 5 4 16 15 2 9 10 11 12 17 13 18 19 WARNING Models GFD49 GFD48 Delay Dry...

Страница 7: ...anent press items Delicates For lingerie and special care fabrics Speed Dry or Quick Dry For small loads that are needed in a hurry such as sports or school uniforms Can also be used if the previous c...

Страница 8: ...6 Extra Dry on some models Use for heavy duty fabrics or items that should be very dry such as towels More Dry Use for heavy or mixed type of fabrics Dry Use for normal dryness level suitable for most...

Страница 9: ...times will change when e Dry is selected This cycle can be used with Cottons Normal Active Wear Delicates Speed Dry Bulky Towels Sheets Sanitize and Steam Dewrinkle 10 Extended Tumble Minimizes wrink...

Страница 10: ...d additional tumble options can increase or decrease your energy efficiency Some cycles will not provide a display 18 Clean Filter Message This message represents only a reminder and does not always a...

Страница 11: ...ric softener sheets once the load has become warm They may cause fabric softener stains Bounce Fabric Conditioner Dryer Sheets have been approved for use in this dryer when used in accordance with the...

Страница 12: ...angled ledge and then rest the rear two legs on the rear angled edge NOTES The drying rack is designed for use with the Time Dry cycles Use with sensor cycles may result in damp items or extended cycl...

Страница 13: ...Duct The interior of the appliance and exhaust duct should be cleaned once a year by qualified service personnel The Exhaust Duct Inspect and clean the exhaust ducting at least once a year to prevent...

Страница 14: ...liances at 800 GE CARES 800 432 2737 or visit our Web site at GEAppliances com In Canada call 1 800 561 3344 or visit www GEAppliances ca Fire Hazard WARNING Clothes dryer installation must be perform...

Страница 15: ...ed parts These hoses are manufactured and tested to meet GE Appliances specifications GE Appliances strongly recommends the use of new water supply hoses Hoses degrade over time and need to be replace...

Страница 16: ...at least 18 46 cm above the floor for a garage installation Failure to do so can result in death explosion or fire The dryer MUST be vented to the outdoors Minimum clearance between dryer cabinet and...

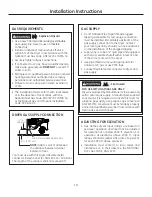
Страница 17: ...time NOTE Use new inlet hoses never use old hoses 1 Turn the cold water faucet off Remove the washer inlet hose from the washer fill valve connector cold 2 Ensure the rubber flat washer is in place a...

Страница 18: ...flexible gas connector and ducting material Shut off Valve 18 MATERIALS YOU WILL NEED 4 dia metal elbow Pipe compound or PTFE tape Flexible gas line connector Duct clamps 2 or Spring clamps 2 Safety g...

Страница 19: ...AL FUEL GAS CODE ANSI Z223 You must use with this dryer a flexible metal connector listed connector ANSI Z21 24 CSA 6 10 The length of the connect shall not exceed 3 ft Explosion Hazard WARNING Use a...

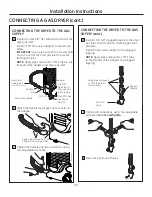
Страница 20: ...the gas shut off valve F Apply pipe compound or PTFE tape to all male threads Shut Off Valve Plugged Tapping CONNECTING THE DRYER TO THE GAS SUPPLY Install a female 3 8 NPT elbow at the end of the dr...

Страница 21: ...fore use GROUNDING INSTRUCTIONS This dryer must be grounded In the event of a malfunction or breakdown grounding will reduce the risk of electric shock by providing a path of least resistance for elec...

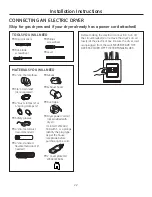
Страница 22: ...FF THE TERMINAL BLOCK 22 MATERIALS YOU WILL NEED 4 dia metal elbow 3 4 Strain relief UL recognized 4 Duct clamps 2 or 4 spring clamps 2 Safety glasses 4 dia metal duct recommended 4 Cover plate Kit WE...

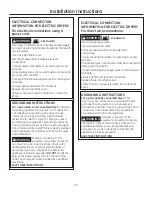
Страница 23: ...l shock GROUNDING INSTRUCTIONS For a grounded cord connected dryer This dryer must be grounded In the event of a malfunction or breakdown grounding will reduce the risk of electric shock by providing...

Страница 24: ...s circuit fuse at the electrical box 2 Be sure the dryer cord is unplugged from the wall receptacle 3 Remove the power cord cover located at the lower back 4 Remove and discard ground strap Keep the...

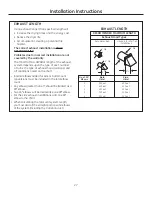
Страница 25: ...pecially at turns and joints Exhaust system shall be inspected and cleaned at least once a year INSULATION Ductwork that runs through an unheated area or is near air conditioning should be insulated t...

Страница 26: ...ed ONLY in installations where rigid metal or flexible metal semi rigid ducting cannot be used AND where a 4 diameter can be maintained throughout the entire length of the transition duct In Canada an...

Страница 27: ...AUST LENGTH RECOMMENDED MAXIMUM LENGTH Exhaust Hood Types Recommended Use only for short run installations No of 90 Rigid Rigid Elbows Metal Metal 0 90 Feet 60 Feet 1 60 Feet 45 Feet 2 45 Feet 35 Feet...

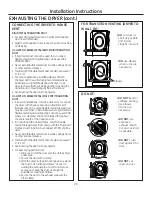
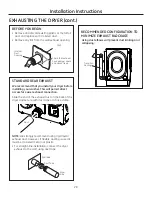
Страница 28: ...lling your washer This will permit direct access for easier exhaust connection Slide the end of the exhaust duct on the back of the dryer and secure with duct tape or a hose clamp NOTE We strongly rec...

Страница 29: ...o the dryer internal duct Remove screw and save Remove desired knockout one only Right electric models only Left TAB LOCATION Through the rear opening locate the tab in the middle of the appliance bas...

Страница 30: ...and the side duct Use 4 rigid metal ducting only inside the dryer Internal duct joints must be secured with tape otherwise they may separate and cause a safety hazard Duct tape BOTTOM VENTING Dryer Ex...

Страница 31: ...A of the duct to the blower housing Make sure that the shortened duct is aligned with the tab in the base Use the screw saved previously to secure the duct in place through the tab on the appliance ba...

Страница 32: ...ryer is level from side to side and front to rear Lower Raise PLUG DRYER IN Ensure proper ground exists before use 1 2 DRYER START UP Press the Power button NOTE If the dryer has been exposed to tempe...

Страница 33: ...uctions are for changing the hinges IURP WKH ULJKW VLGH WR WKH OHIW VLGH LI RX HYHU ZDQW to switch them back to the right side follow these same instructions and reverse all references to the left and...

Страница 34: ...ning REVERSING THE DOOR SWING if desired Installation Instructions 34 B Remove 2 screws 10 x 5 8 from the hinge starting with the bottom screw The door will tilt away from the front panel but will com...

Страница 35: ...door frame from the chrome door cover Set the inner door frame aside on a soft and flat surface RE LOCATE THE DOOR MASK 4 A Place the chrome door cover on a soft and flat surface so that the door mas...

Страница 36: ...the handle spacer or handle spacer latch assembly depending on model 180 degrees and re locate on the opposite side of the inner door frame RE LOCATE HINGE ASSEMBLY AND HANDLE SPACER cont 5 F Re insta...

Страница 37: ...ATE HINGE PIN SCREW 7 A Remove the hinge pin screw from the hole labeled D RE INSTALL DOOR ASSEMBLY 8 A Install the door assembly by guiding the hinge pin screw head through the key hole on the front...

Страница 38: ...877 959 8688 during normal business hours Part Number Accessory GEFLSTACK Complete Stack Kit Excessive Weight Hazard WARNING Use two or more people to install dryer Failure to do so may result in bac...

Страница 39: ...U WILL NEED Phillips screwdriver Open ended wrench Pliers Gloves Level INSTALLING THE STACK BRACKET KIT REMOVE THE DRYER LEVELING LEGS A Carefully lay the dryer on its side Use the packing material so...

Страница 40: ...recommended to lift the dryer into position because of its weight and size Failure to do so could result in personal injury or death 4 FINALIZE THE INSTALLATION A Refer to the washer Installation Ins...

Страница 41: ...41 Notes...

Страница 42: ...ng only one or two items add a few items to ensure proper tumbling eDry is enabled The eDry feature is designed to operate your dryer in the most energy efficient mode which is not always the fastest...

Страница 43: ...nk Dryer should heat when utility service is restored Inconsistent drying times Type of heat Drying time will vary according to the type of heat used If you recently changed from an electric to a gas...

Страница 44: ...g clothes Static occurs No fabric softener was used Try a fabric softener Bounce Fabric Conditioner Dryer Sheets have been approved for use in all GE Appliances dryers when used in accordance with the...

Страница 45: ...into drum This is normal Water drips from door when opened after a Steam Cycle Steam condenses on inner door This is normal Cannot see steam at beginning of cycle Steam released at different times in...

Страница 46: ...legal rights are consult your local or state consumer affairs office or your state s Attorney General Warrantor GE Appliances All warranty service provided by our Factory Service Centers or an authori...

Страница 47: ...acement of the light bulb after its expected useful life Replacement of house fuses or resetting of circuit breakers Damage to the product caused by accident fire floods or acts of God Incidental or c...

Страница 48: ...or call 800 626 2224 during normal business hours GE Appliances Consumer Home Services will still be there after your warranty expires In Canada call 1 800 290 9029 Parts and Accessories In the U S GE...

Страница 49: ...GE 42 SOUTIEN AU CONSOMMATEUR Garantie 46 Soutien au consommateur 48 49 90519 3 09 16 GEA GUIDE DE L UTILISATEUR ET INSTRUCTION D INSTALLATION Inscrivez ici les num ros de mod le et de s rie Mod le __...

Страница 50: ...iances et nous pensons que vous le serez aussi Dans cette optique nous vous rappelons que l enregistrement de votre lectrom nager vous assure la communication de renseignements importants sur le produ...

Страница 51: ...Notes www electromenagersge ca 3...

Страница 52: ...otalit ou en partie en remplacez une quelconque pi ce moins que cela ne soit express ment recommand dans les instructions d entretien ou de r paration destin es l utilisateur dont vous avez une compr...

Страница 53: ...vice d incendie L installation l entretien et les r parations doivent tre ex cut s par un installateur agr un organisme de service ou le fournisseur de gaz CONSERVEZ CES INSTRUCTIONS Avertissements de...

Страница 54: ...les GFDR275 GFDR270 1 8 3 7 6 5 4 16 14 15 2 9 10 11 12 17 13 18 19 1 8 3 7 6 5 4 16 15 2 9 10 11 12 17 13 18 19 6 Mod les GFDS265 GFDS260 1 8 3 7 6 5 4 16 15 2 9 10 11 12 17 13 18 19 AVERTISSEMENT Mo...

Страница 55: ...ons en nouvelle technologie et sont compos s de fibres lastiques comme le Spandex Aussi pour v tements tiquet s Sans repassage Easy Care ou Infroissable Perma Press Pour les articles qui ne n cessiten...

Страница 56: ...More Dry Plus sec Utilis pour les types de tissus lourds ou m lang s Dry Sec Utilis pour un niveau de s chage normal adapt la plupart des brass es C est le cycle recommand pour un fonctionnement en c...

Страница 57: ...ments de sport Delicates D licats Speed Dry S chage rapide Bulky Literie volumineuse Towels Sheets Serviettes draps Sanitize Sanitize and Steam Dewrinkle Vapeur d froissage 10 Extended Tumble Culbutag...

Страница 58: ...e Good Bon 1 t moin Better Meilleur 5 t moins Le cycle dur e le niveau de s chage la temp rature et des options de culbutages suppl mentaires peuvent augmenter ou diminuer l efficacit nerg tique Certa...

Страница 59: ...ble dry Dry Normal Permanent Press wrinkle resistant Gentle delicate Do not tumble dry Do not dry used with do not wash Heat setting High Medium Low No heat air Special instructions Line dry hang to d...

Страница 60: ...ngulaire arri re REMARQUES La grille de s chage est con ue pour une utilisation avec les programmes de Time Dry S chage minut L utilisation de la grille avec un programme de s chage par capteur peut a...

Страница 61: ...e tissu peut ensuite tre lav et s ch normalement Les dommages caus s par ces produits ne sont pas couverts pas la garantie de votre s cheuse Filtre charpie Nettoyez le filtre charpie avant chaque util...

Страница 62: ...s et ordonnances en vigueur Installez la s cheuse conform ment aux instructions du fabricant et aux r glementations locales Remarque pour l installateur Assurez vous de laisser ces instructions au cli...

Страница 63: ...sont fabriqu s et essay s de fa on satisfaire aux sp cifications de GE Appliances GE Appliances recommande vivement l utilisation de flexibles d alimentation d eau neufs Les flexibles se d t riorent...

Страница 64: ...ission de prendre ces pr cautions peut provoquer la mort l explosion ou l incendie L air de la s cheuse DOIT tre vacu vers l ext rieur L espace minimum entre la s cheuse et les murs adjacents ou d aut...

Страница 65: ...REMARQUE Utilisez des tuyaux d entr e nouveaux n utilisez jamais de vieux tuyaux 1 Fermez le robinet d eau froide D branchez le boyau d arriv e du connecteur du robinet de remplissage froid 2 Assurez...

Страница 66: ...cien connecteur de gaz flexible et l ancien conduit Vanne d arr t 18 MAT RIEL N CESSAIRE Coude m tallique 4 po de diam tre Mastic ou PTFE ruban pour joints de tuyaux Tuyau de raccordement souple Colli...

Страница 67: ...TIONAL FUEL GAS CODE ANSI Z223 ALIMENTATIONENGAZ FILETAGEM LENPT3 8po REMARQUE Ajoutez la dimension verticale la distance entre le fond de la carrosserie et le sol 11 27 cm 47 16 po 4 05 cm 1 19 32 po...

Страница 68: ...ruban PTFE sur tous les filetages m les Vanne d arr t Obturateur RACCORDEMENT DE LA S CHEUSE L ALIMENTATION EN GAZ Installez un coude femelle 3 8 po NPT l extr mit du raccord d entr e de gaz de la s...

Страница 69: ...on de prendre ces pr cautions peut provoquer la mort l explosion ou l incendie Circuit individuel correctement polaris et mise la terre disjoncteur de 15 ou 20 amp res ou fusible temporisation Aliment...

Страница 70: ...llique 4 po diam tre R ducteur de tension 3 4 po UL Colliers de conduit 4 po 2 ou brides ressort 4 po 2 Lunettes de protection Tuyau m tallique 4 po de diam tre recommand Plaque de couverture de 4 pou...

Страница 71: ...des bornes L omission de prendre ces pr cautions peut provoquer la mort l explosion ou l incendie INSTRUCTIONS DE MISE LA TERRE Pour une s cheuse branch e par cordon mis la terre Cette s cheuse doit t...

Страница 72: ...sion conforme UL 3 4 po dans le trou d entr e du cordon Faites passer le cordon d alimentation dans le r ducteur de tension 5 Connectez le cordon d alimentation comme suit A Connectez les 2 fils sous...

Страница 73: ...on chauff e ou situ s proximit d un climatiseur doivent tre isol s pour r duire la condensation et la cr ation de charpie Percez l aide d un foret de 1 8 po pour vacuation par le dessous AVERTISSEMENT...

Страница 74: ...oser pr s du mur sans plier ni craser le conduit de transition optimisant ainsi l efficacit du s chage vitez de faire reposer le conduit sur des objets coupants CONDUIT DE TRANSITION EN M TAL FLEXIBLE...

Страница 75: ...IMUM RECOMMAND Types de couverts de tuyau d chappement Recommand Utilisation pour des installations de courte dur e seulement Nombre de M tal M tal Coudes 90 rigide rigide 0 90 pieds 60 pieds 1 60 pie...

Страница 76: ...rez l extr mit du conduit d vacuation sur le raccord arri re de la s cheuse et fixez la avec du ruban de toile ou un collier de fixation REMARQUE Nous vous recommandons fortement d utiliser un conduit...

Страница 77: ...z la portion d coup e A du conduit au bo tier du ventilateur Veillez ce que le conduit raccourci soit align sur la languette dans la base Utilisez la vis mise de c t pr c demment pour fixer le conduit...

Страница 78: ...ique rigide de 10 cm uniquement l int rieur de la s cheuse Les jonctions de canalisation interne doivent tre bloqu es avec un ruban adh sif sinon elles peuvent se s parer et poser un danger pour la s...

Страница 79: ...et galement sur le joint entre le coude et le tuyau du dessous Les joints du conduit interne doivent tre fix s avec du ruban adh sif afin d viter qu ils ne se d tachent et que ceci n entra ne un risqu...

Страница 80: ...EUSE Assurez vous au pr alable qu une mise la terre existe bien et qu elle fonctionne correctement 1 INSTALLATION FINALE 2 D MARRAGE DE LA S CHEUSE Appuyez sur la touche Power Alimentation REMARQUE Si...

Страница 81: ...ces m mes instructions et inversez toutes les r f rences aux termes gauche et droite INVERSION DE L OUVERTURE DE LA PORTE optionnel 2 Tournevis cruciforme Tournevis torx T 25 Tournevis douille 1 4 po...

Страница 82: ...re de 180 degr s et reposez la l aide des vis du c t oppos de l ouverture de porte B Enlevez 2 vis 10 x 5 8 po de la charni re en commen ant par celle les bas La porte s cartera du panneau frontal ma...

Страница 83: ...te chrom Mettez le cadre de porte int rieur de c t sur une surface molle et plane REPOSITIONNEMENT DU MASQUE DE PORTE 4 A Placez le couvercle de porte chrom sur une surface molle et plane de fa on que...

Страница 84: ...ains mod les espaceur de poign e ou espaceur de poign e L ensemble du loquet selon le mod le de poign e du cadre de porte int rieur Assemblage charni re Espaceur de poign e sur certains mod les Le bou...

Страница 85: ...LA VIS DE L AXE DE CHARNI RE 7 A Retirez la vis de l axe de charni re du trou identifi D R INSTALLATION DE LA PORTE 8 A Installez la porte en guidant la t te de la vis de l axe de charni re par le tro...

Страница 86: ...maison mobile ou pr fabriqu e n est pas autoris e Risque li au poids excessif AVERTISSEMENT La participation de deux personnes ou plus est n cessaire pour installer la s cheuse L omission de prendre...

Страница 87: ...COMMENT RETIRER LES PATTES DE NIVELLEMENT DE LA S CHEUSE A Posez avec pr caution la s cheuse sur le c t Utilisez le mat riau d emballage de mani re ne pas gratigner le fini de la s cheuse 1 B Utilisez...

Страница 88: ...E A Placez la s cheuse au dessus de la laveuse Prenez soin de ne pas gratigner le dessus de la laveuse avec les supports Prot gez le panneau de contr le avec du carton ou tout autre protection Prenez...

Страница 89: ...Notes 41...

Страница 90: ...obtenir un bon culbutage eDry est activ La fonction eDry est con ue pour faire fonctionner la s cheuse dans le mode le plus conome en nergie ce qui est toujours le mode le plus rapide Dans certains ca...

Страница 91: ...ur Le temps de s chage variera en fonction du type de chauffage utilis Si vous avez r cemment remplac votre s cheuse lectrique par un mod le gaz propane ou vice versa le temps de s chage peut ne pas t...

Страница 92: ...tatique Surcharge R partissez les tissus lourds et de grande taille en de plus petites charges Papier mouchoir etc oubli s dans les poches Videz toutes les poches avant de laver le linge lectricit sta...

Страница 93: ...ouc fournie avec le boyau La s cheuse met des bruits d eau La valve d eau est ouverte bruits d eau remplissant le g n rateur de vapeur C est normal Le g n rateur de vapeur met de la vapeur dans le tam...

Страница 94: ...S INDIRECTS Pour une p riode de Nous remplacerons Un an Toute pi ce de la s cheuse qui se r v le d fectueuse en raison d un vice de mat riaux ou partir de la date de fabrication Pendant cette garantie...

Страница 95: ...47 Notes www electromenagersge ca...

Страница 96: ...LH OH FRQFHSW GH GHVLJQ XQLYHUVHO GHV SURGXLWV GHV VHUYLFHV HW GHV HQYLURQQHPHQWV TXL SHXYHQW tre utilis s par des personnes de tous ges tailles et capacit s Nous reconnaissons le besoin de concevoir...

Страница 97: ...I N DE PROBLEMAS 42 SOPORTE AL CONSUMIDOR Garant a 46 Soporte al consumido 48 49 90519 3 09 16 GEA Escriba aqu los n meros de modelo y serie Modelo ________________ Serie __________________ Se encuent...

Страница 98: ...s que usted tambi n Entre otras cosas el registro de su electrodom stico asegura que podamos entregarle informaci n importante del producto y detalles de la garant a cuando los necesite Registre su el...

Страница 99: ...Notas GEAppliances com 3...

Страница 100: ...oles NO reparar ni reemplazar cualquier parte del electrodom stico o realizar cualquier otro trabajo t cnico a menos que esto sea espec ficamente recomendado en las instrucciones de mantenimiento del...

Страница 101: ...beros La instalaci n y las reparaciones deber n ser realizadas por un instalador calificado agencia de servicios o el proveedor de gas 5 GUARDE ESTAS INSTRUCCIONES Advertencias de la Proposici n 65 de...

Страница 102: ...S360 1 8 3 7 6 5 4 16 14 15 2 9 10 11 12 17 13 18 19 Modelos GFDR275 GFDR270 1 8 3 7 6 5 4 16 15 2 9 10 11 12 17 13 18 19 Modelos GFDS265 GFDS260 1 8 3 7 6 5 4 16 15 2 9 10 11 12 17 13 18 19 ADVERTENC...

Страница 103: ...ormales Las telas incluyen acabados de tecnolog a nueva y fibras el sticas como el Spandex Tambi n para vestimenta con etiqueta Easy Care Cuidado F cil y Perma Press Planchado Permanente Para prendas...

Страница 104: ...to Dry Seco selo para un nivel de secado normal adecuado para la mayor a de las cargas Este es el ciclo preferido para ahorrar energ a Less Dry Menos seco selo para telas m s livianas ideal para planc...

Страница 105: ...arse con Cottons Algodones Normal Carga normal Active Wear Ropa deportiva Delicates Delicados Speed Dry Secado r pido Bulky Prendas voluminosas Towels Sheets Toallas S banas Sanitize Sanitize and Stea...

Страница 106: ...pciones adicionales de rotaci n pueden incrementar o disminuir la eficiencia de energ a Algunos ciclos no mostraran luz de advertencia 18 Clean Filter Message Mensaje limpiar el filtro Este mensaje re...

Страница 107: ...te de clasificar las prendas de acuerdo al tama o Por ejemplo no seque una s bana con medias u otros elementos peque os No agregue suavizante de telas una vez que la carga se ha calentado Esto puede p...

Страница 108: ...ar las dos patas traseras en el apoyo del ngulo trasero NOTAS La rejilla de secado se encuentra dise ada para utilizar con los ciclos Time Dry Secado cronometrado El uso con ciclos por sensor pueden d...

Страница 109: ...o El ducto de escape Inspeccione y limpie el ducto de escape por lo menos una vez al a o para evitar los obstrucciones Un escape parcialmente taponado puede prolongar el plazo de secado La salida de...

Страница 110: ...e alguna pregunta llame a GE Appliances 800 GE CARES 800 432 2737 o visite nuestro sitio Web en GEAppliances com En Canad llame a 1 800 561 3344 o visite www GEAppliances ca ADVERTENCIA Riesgo de ince...

Страница 111: ...e modo que se cubran las especificaciones de GE Appliances GE Appliances recomienda enf ticamente el uso de nuevas mangueras de suministro de agua Con el paso del tiempo las mangueras se degradan y de...

Страница 112: ...se cumple con esto se podr producir una explosi n incendio o la muerte Esta secadora DEBE tener una ventilaci n al exterior El espacio libre m nimo entre el armario de la secadora y las paredes adyac...

Страница 113: ...NOTA Utilice nuevas mangueras de entrada nunca utilice mangueras viejas 1 Cierre el grifo de agua fr a Quite la manguera de entrada de la lavadora del conector de la v lvula de llenado fr a 2 Aseg res...

Страница 114: ...l del conducto V lvula de cierre MATERIALES NECESARIOS Codo de metal de 4 di metro Compuesto o PTFE cinta para tuber as Conector de tuber a de gas flexible Abrazaderas de tuber a 2 o abrazaderas de re...

Страница 115: ...Agregue a la dimensi n vertical la distancia entre la parte inferior del gabinete y el piso 47 16 11 27 cm 1 19 32 4 05 cm Riesgo de explosi n ADVERTENCIA Use una l nea nueva de suministro de gas fle...

Страница 116: ...tuber a o cinta PTFE en todas las roscas macho V lvula de apagado Toma a rosca C MO CONECTAR LA SECADORA AL SUMINISTRO DE GAS Instale un codo hembra NPT de 3 8 al final de la entrada de gas de la seca...

Страница 117: ...ito individual correctamente polarizado y conectado a tierra interruptor de 15 o 20 amperios o un fusible de retardo Potencia 2 hilos m s la tierra 120 voltios monof sica 60 Hz corriente alterna Tomac...

Страница 118: ...IALES NECESARIOS Codo de metal de 4 de di metro Alivio de tensi n de 3 4 reconocido por UL Abrazaderas de tuber a de 4 2 o abrazaderas de resorte de 4 2 Gafas de seguridad Conducto de metal de 4 de di...

Страница 119: ...N A TIERRA Para una secadora conectada con cable con conexi n a tierra Esta secadora deber estar conectado a tierra En caso de mal funcionamiento o aver a la conexi n a tierra reducir el riesgo de de...

Страница 120: ...de entrada del cable de energ a Pase el cable de energ a a trav s del alivio de tensi n 5 Conecte el cable de energ a de la siguiente manera A Conecte los dos cables vivos a los tornillos externos de...

Страница 121: ...nte en las curvas Inspeccione y limpie el conducto por lo menos una vez al a o AISLACI N Los conductos instalados a trav s de una rea sin calefacci n o ubicados cerca de un acondicionador de aire debe...

Страница 122: ...el conducto de transici n maximizando el rendimiento del secado Evite que la tuber a se apoye sobre objetos cortantes CONDUCTO DE TRANSICI N DE METAL FLEXIBLE TIPO HOJA DE ALUMINIO DE LA LISTA DE UL...

Страница 123: ...gr fico LONGITUD DE SALIDA LONGITUD M XIMA RECOMENDADA Tipos de campana de salida Recomendado Utilizar s lo en instalaciones de trayecto corto Cant de Metal Metal codos de 90 r gido r gido 0 90 pies 6...

Страница 124: ...i n de salida Deslice el extremo del conducto de salida hacia la parte trasera de la secadora y sujete con cinta aislante o una abrazadera de mangueras NOTA Recomendamos el uso de un conducto de salid...

Страница 125: ...o interno de la secadora UBICACI N DE LA LENG ETA Gire la leng eta hasta 45 A trav s de la abertura trasera ubique la leng eta en el medio de la base del artefacto Levante la leng eta hasta alrededor...

Страница 126: ...TE SALIDA LATERAL VENTILACI N POR LA PARTE INFERIOR La secadora cuenta con una salida por la parte inferior del gabinete en modelos a gas y el ctricos SIN Pedestal Encastrado Corte el conducto como pu...

Страница 127: ...LA PLACA DE CUBIERTA A LA PARTE TRASERA DEL GABINETE SALIDA POR LA PARTE INFERIOR C MO AGREGAR UN CONDUCTO NUEVO A trav s de la abertura trasera ubique la leng eta en el medio de la base del artefact...

Страница 128: ...del frente a la parte trasera Bajar Elevar ENCHUFE LA SECADORA Verifique que haya una conexi n a tierra adecuada antes del uso 1 CONFIGURACI N FINAL 2 32 INICIO DE LA SECADORA Presione el bot n Power...

Страница 129: ...a las mismas instrucciones e invierta todas las referencias de izquierda a derecha 2 Destornillador Phillips Destornillador Buscapolos T 25 Llave de tuercas de 1 4 HERRAMIENTAS NECESARIAS PIEZAS DE LA...

Страница 130: ...r la misma con tornillos sobre el lado opuesto a la apertura de la puerta B Retire los 2 tornillos n 10 x 5 8 de la bisagra comenzando con el tornillo inferior La puerta se inclinar con relaci n al pa...

Страница 131: ...a puerta interior a un costado sobre una superficie suave y plana VUELVA A UBICAR LA M SCARA DE LA PUERTA 4 A Coloque la tapa de la puerta de cromo en una superficie suave y plana de modo que la m sca...

Страница 132: ...o seg n el modelo 180 grados y vuelva a ubicar el mismo en el lado opuesto de la estructura de la puerta interna VUELVA A UBICAR EL ENSAMBLE DE LA BISAGRA Y EL ESPACIADOR DE LA MANIJA cont 5 F Vuelva...

Страница 133: ...ta guiando la cabeza del tornillo de la clavija de la bisagra a trav s del agujero de la llave en el panel frontal y bajando el ensamble de la puerta en su posici n B Abra la puerta aproximadamente 14...

Страница 134: ...icadas ADVERTENCIA Riesgo de Peso Excesivo Se deber contar con dos o m s personas para instalar la secadora Si esto no se cumple se podr n producir lesiones en la espalda u otras heridas REQUERIMIENTO...

Страница 135: ...los 8 x 1 2 HERRAMIENTAS NECESARIAS Destornillador Phillips Llavedeextremoabierto Pinzas Guantes Nivel C MO INSTALAR EL KIT DE SOPORTE DE APILADO C MO QUITAR LAS PATAS NIVELADORAS DE LA SECADORA A Con...

Страница 136: ...enda que m s de dos personas levanten la secadora hasta su posici n debido a su peso y tama o No hacerlo puede provocar una lesi n personal o la muerte Instale los soportes en la parte trasera inferio...

Страница 137: ...Notas GEAppliances com 41...

Страница 138: ...s de una carga en la secadora por vez Poca carga Si va secar s lo una o dos prendas agregue algunas m s para asegurar un secado correcto eDry est activado La caracter stica eDry est dise ada para ope...

Страница 139: ...tado el suministro de gas modelos a gas solamente Aseg rese que la v lvula de cierre en la secadora y la v lvula maestra est completamente abierta El tanque de suministro de gas LP est vac o o se ha p...

Страница 140: ...propiados de lavado antes del secado Pelusa en las prendas El filtro de pelusa est lleno Limpie el filtro antes de cada carga Clasificaci n incorrecta Clasifique las prendas que producen pelusa como f...

Страница 141: ...de la secadora La conexi n de manguera de agua a la v lvula se encuentra floja Ajuste la conexi n La manguera no cuenta con la arandela de goma en la conexi n con la v lvula Instale la arandela de gom...

Страница 142: ...e un a o GE Appliances tambi n ofrece en forma gratuita compra original toda la mano de obra y los costos de servicio para reemplazar la pieza defectuosa 86 1 5 17 6 03 7 6 6X QLFR H FOXVLYR GHUHFKR H...

Страница 143: ...Notes GEAppliances com 47...

Страница 144: ...lamar al 800 626 2224 en horario normal de trabajo El Servicio Dom stico al Consumidor de GE Appliances tambi n lo ayudar despu s de que su garant a haya expirado En Canad llame al 1 888 261 2133 Piez...

Отзывы: