background image

GE
D

IRECTION

 FQ091019, R

EVISION

 2 


V

IVID Q

N S

ERVICE

M

ANUAL

Chapter 8 - Replacement Procedures

 8-137

NOTE:

The total RAID 1 capacity is half the physical capacity of the two drives.

5.) Connect the AC power cable from the power supply to the AC power outlet on the SafeLock Cart.

6.) Switch ON the power.

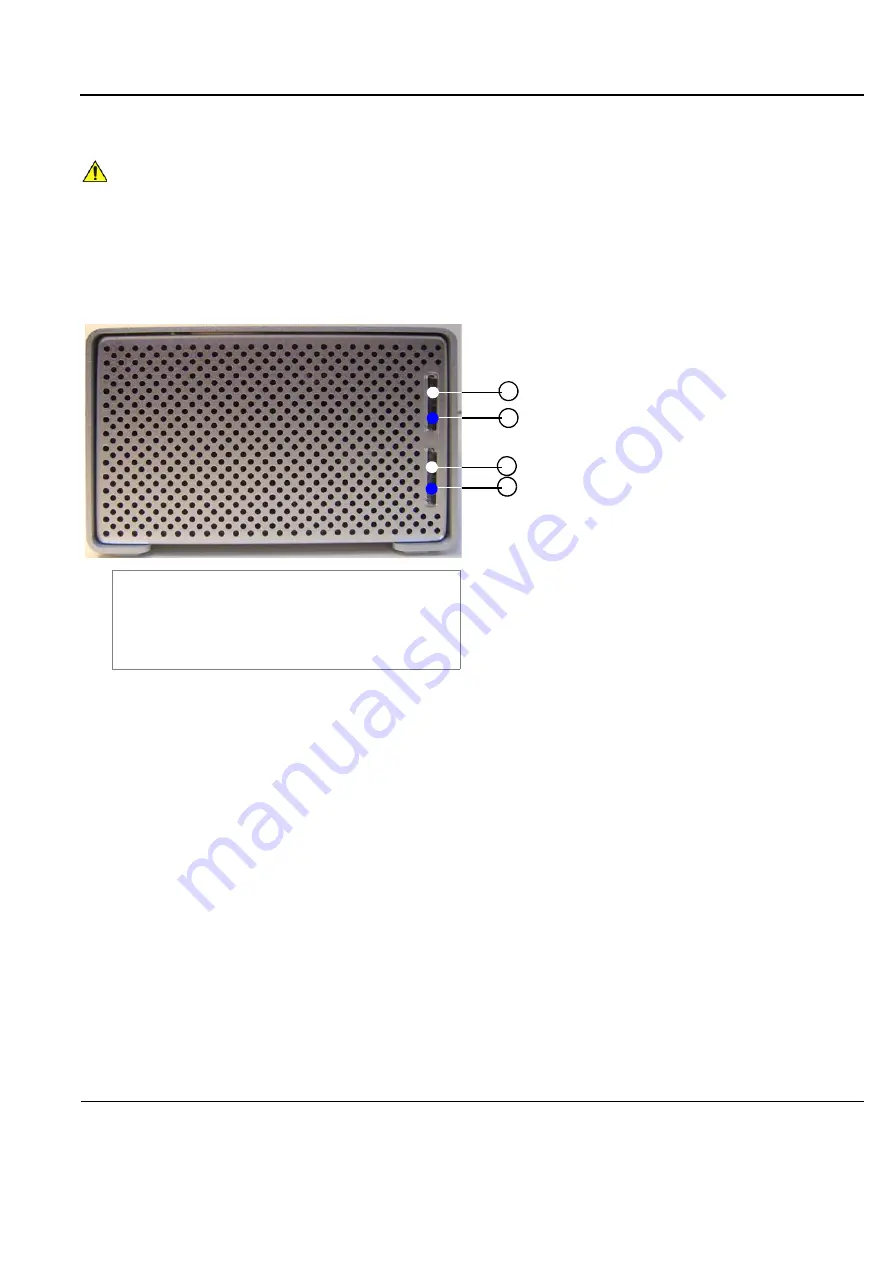
7.) Study the status light indicators and verify that they function as described in 

Figure 8-146

.

Figure 8-146 External USB Hard Disk - Status Light Indicators

8-7-2-6

Changing the Volume Name

NOTE:

It is important that the External USB Hard Disk has a unique volume name. The site should 
choose a naming convention to use for marking this Hard Drive and any future hard drives, in 
case more than one drive will be needed in the future.

NOTE:

Only connect one USB storage device (like this External USB Hard Disk) to the Vivid q N 
scanner at a time.

Follow these steps to set the Volume Name:

1) Connect the USB cable from the External USB Hard Disk


to a laptop or PC.

2.) Power up the External USB Hard Disk.

3.) Under My Computer, after a while, the disk will show as a new drive, named 

Removable Disk


- refer to 

Figure 8-147 on page 8-138

. (It will be allocated the next available drive letter.)

CAUTION

CHANGING THE VOLUME CONFIGURATION WILL ERASE ALL EXISTING DATA! 
IF THE DRIVE CONTAINS FILES YOU WANT TO SAVE, MOVE THEM TO ANOTHER DRIVE 
BEFORE CHANGING THE SWITCH SETTINGS.

1

2

3

4

1. HDD1 connection/power indicator

Glows white when the hard disk is connected and the 
drive is powered up. Blinks when building a mirrored 
RAID if HDD1 is the target disk.

2. HDD1 status indicator

Displays the status of the hard disk. 
See the status indicator color/state chart below.

3. HDD2 connection/power indicator

Glows white when the hard disk is connected and the 
drive is powered up. Blinks when building a mirrored 
RAID if HDD2 is the target disk.

4. HDD2 status indicator

Displays the status of the hard disk. See the status indi-
cator color/state chart below.

Status Indicator Color and State:

• Flashing blue

- Hard drive is being accessed

• Solid blue

- Array is being rebuilt

• Red

- Disk failure

Содержание Vivid q N

Страница 1: ...GENERAL ELECTRIC COMPANY 2013 and 2015 General Electric Company All Rights Reserved 3 SEP 2015 VQN_SVC_FRNT_CVR P R E L I M I N A R Y Vivid q N Service Manual Vivid q N with software version SW 12 x...

Страница 2: ......

Страница 3: ...GE DIRECTION FQ091019 REVISION 2 VIVID Q N SERVICE MANUAL i 3 SEP 2015 FRONTMATTER FM P R E L I M I N A R Y Important Precautions TRANSLATION POLICY...

Страница 4: ...GE DIRECTION FQ091019 REVISION 2 VIVID Q N SERVICE MANUAL ii 3 SEP 2015 FRONTMATTER FM P R E L I M I N A R Y...

Страница 5: ...GE DIRECTION FQ091019 REVISION 2 VIVID Q N SERVICE MANUAL iii 3 SEP 2015 FRONTMATTER FM P R E L I M I N A R Y...

Страница 6: ...GE DIRECTION FQ091019 REVISION 2 VIVID Q N SERVICE MANUAL iv 3 SEP 2015 FRONTMATTER FM P R E L I M I N A R Y...

Страница 7: ...GE DIRECTION FQ091019 REVISION 2 VIVID Q N SERVICE MANUAL v 3 SEP 2015 FRONTMATTER FM P R E L I M I N A R Y...

Страница 8: ...GE DIRECTION FQ091019 REVISION 2 VIVID Q N SERVICE MANUAL vi 3 SEP 2015 FRONTMATTER FM P R E L I M I N A R Y...

Страница 9: ...GE DIRECTION FQ091019 REVISION 2 VIVID Q N SERVICE MANUAL vii 3 SEP 2015 FRONTMATTER FM P R E L I M I N A R Y...

Страница 10: ...GE DIRECTION FQ091019 REVISION 2 VIVID Q N SERVICE MANUAL viii 3 SEP 2015 FRONTMATTER FM P R E L I M I N A R Y...

Страница 11: ...GE DIRECTION FQ091019 REVISION 2 VIVID Q N SERVICE MANUAL ix 3 SEP 2015 FRONTMATTER FM P R E L I M I N A R Y...

Страница 12: ...GE DIRECTION FQ091019 REVISION 2 VIVID Q N SERVICE MANUAL x 3 SEP 2015 FRONTMATTER FM P R E L I M I N A R Y...

Страница 13: ...GE DIRECTION FQ091019 REVISION 2 VIVID Q N SERVICE MANUAL xi 3 SEP 2015 FRONTMATTER FM P R E L I M I N A R Y...

Страница 14: ...GE DIRECTION FQ091019 REVISION 2 VIVID Q N SERVICE MANUAL xii 3 SEP 2015 FRONTMATTER FM P R E L I M I N A R Y...

Страница 15: ...ly trained field engineers All of GE s electrical work on these products will comply with the requirements of the applicable electrical codes The purchaser of GE equipment shall only utilize qualified...

Страница 16: ...cation may not be copied or duplicated in any form in whole or in part without prior written permission of GE GE may revise this publication from time to time without written notice TRADEMARKS All pro...

Страница 17: ...ISION DATE REASON FOR CHANGE 1 2013 AUG 12 Initial release of manual 2 2015 SEP 03 Updated and corrected content Pages Revision Pages Revision Pages Revision Title Page 2 1 1 to 1 28 2 7 1 to 7 148 2...

Страница 18: ...GE DIRECTION FQ091019 REVISION 2 VIVID Q N SERVICE MANUAL xvi 3 SEP 2015 FRONTMATTER FM P R E L I M I N A R Y This page was intentionally left blank...

Страница 19: ...Conventions Used in this Manual 1 5 Standard Hazard Icons 1 6 Safety Considerations 1 7 Introduction 1 7 Human Safety 1 7 Mechanical Safety 1 9 Electrical Safety 1 11 Vivid q N Battery Safety 1 15 Pat...

Страница 20: ...GE DIRECTION FQ091019 REVISION 2 VIVID Q N SERVICE MANUAL xviii Customer Assistance 1 26 Contact Information 1 26 System manufacturer 1 27...

Страница 21: ...2 2 Cooling Requirements 2 2 Lighting Requirements 2 2 Time and Manpower Requirements 2 2 Electrical Requirements 2 3 EMI Limitations 2 4 Probe Environmental Requirements 2 5 Facility Needs 2 6 Purch...

Страница 22: ...x Contents 3 11 Physical Inspection 3 11 EMI Protection 3 11 Preparing for Installation 3 12 Confirming Customer Order 3 12 Verifying the Transportation Box Contents 3 12 Component Inspection 3 13 Con...

Страница 23: ...tion to a DICOM Server in a Network 3 110 Setup Connection to HL7 Server in a Network 3 117 Query Retrieve Q R Setup 3 120 MPEGVue Export Configuration 3 127 eVue Dataflow Configuration 3 132 Using MP...

Страница 24: ...Labeling Removable Media 4 15 Formatting Removable Media 4 15 Verifying Removable Media 4 16 Archiving and Loading Presets 4 16 Functional Checks 4 19 Basic Controls 4 19 Peripherals 4 24 SafeLock Car...

Страница 25: ...d MUX P M Board 5 18 Back End Processor 5 21 Introduction 5 21 ETX SBC Central Processing Unit CPU 5 23 ETX Base Board 5 23 Hard Disk 5 25 Fan Control 5 25 RTC BIOS Battery 5 25 Back End Processor Loc...

Страница 26: ...ANUAL xxiv ECG Patient I O Module Specifications 5 40 Isolation 5 40 ECG Respiratory Module 5 41 Internal ECG Respiratory Board 5 41 External ECG Respiratory Interface 5 43 Peripherals 5 46 Introducti...

Страница 27: ...xxv CHAPTER 6 Service Adjustments Overview 6 1 Purpose of Chapter 6 6 1 LCD Display Adjustments and Calibration 6 1 Keyboard Adjustments 6 9 Configuring Print Orientation 6 9 Video System Adjustments...

Страница 28: ...Accessing the Full System Diagnostic Options 7 20 Performing Front End FE Diagnostics 7 24 Accessing the Front End Diagnostic Options 7 25 Calibration Tests 7 25 Radio Frequency Interface RFI Diagnost...

Страница 29: ...attery Replacement 8 47 DC to DC Power Supply Replacement Procedure 8 48 Fan Replacement Procedure 8 51 Speaker Assembly Replacement Procedure 8 54 AUO LCD Display Replacement Procedure 8 55 AUO LCD F...

Страница 30: ...ure 8 95 Rear Wheel Replacement Procedure 8 97 Software Loading 8 99 Software Upgrade Procedure Overview 8 99 Setting the BIOS 8 114 Formatting and Partitioning the Hard Disk Automatic Procedure BT 12...

Страница 31: ...Overview 9 1 Purpose of Chapter 9 9 1 List of Abbreviations 9 2 Mechanical Hardware Parts 9 3 Electronic Parts 9 4 Cables 9 6 Software 9 7 Probes 9 8 Peripherals 9 10 SafeLock Cart Parts 9 11 Optiona...

Страница 32: ...ptional Diagnostic Checks 10 14 Probe Maintenance 10 15 Probe Checks 10 15 Probe Handling 10 15 Basic Probe Care 10 16 Probe Cleaning 10 16 Returning and Shipping of Defective Probes 10 18 Electrical...

Страница 33: ...st read and understand all the information presented here before installing or servicing a unit Table 1 1 Contents in Chapter 1 Section Description Page Number 1 1 Overview 1 1 1 2 Service Manual Over...

Страница 34: ...checks that are recommended as part of the installation procedure or as required during servicing and periodic maintenance Chapter 5 Components and Function Theory Contains block diagrams and functio...

Страница 35: ...N 2 VIVID Q N SERVICE MANUAL Chapter 1 Introduction 1 3 1 2 3 Vivid q N Models Covered in this Manual Table 1 2 Vivid q N Model Model H Cat No Part Number Description Comments Vivid q N H45571ZC FQ000...

Страница 36: ...a variety of applications The Vivid q N ultrasound imaging scanner is similar to the Vivid i n however designed to offer additional features including the ability to support use of M4S RS probes Also...

Страница 37: ...n one of three ways DANGER WARNING CAUTION When a hazard is present that can cause property damage but has absolutely no personal injury risk a NOTICE is used Example Disk drive may crash NOTE Notes a...

Страница 38: ...included for your reference Others icons make you aware of specific procedures that should be followed NOTE The Vivid q N scanner and SafeLock Cart has no unintended or motorized moving parts that co...

Страница 39: ...laws may restrict this device for sale or use by or on the order of a physician DANGER DANGEROUS VOLTAGES CAPABLE OF CAUSING DEATH ARE PRESENT IN THIS EQUIPMENT USE EXTREME CAUTION WHEN HANDLING TEST...

Страница 40: ...ERE OPERATION OF ANY ELECTRICAL EQUIPMENT IN SUCH AN ENVIRONMENT CONSTITUTES A DEFINITE SAFETY HAZARD WARNING WARNING DO NOT SUBSTITUTE PARTS OR MODIFY EQUIPMENT BECAUSE OF THE DANGER OF INTRODUCING A...

Страница 41: ...FOLLOW THESE PRECAUTIONS CAN RESULT IN SERIOUS INJURY AND EQUIPMENT DAMAGE DANGER NEVER USE A PROBE THAT HAS BEEN SUBJECTED TO MECHANICAL SHOCK OR IMPACT EVEN IF THE PROBE APPEARS TO BE UNBROKEN IT M...

Страница 42: ...in its original packaging before transporting Special care must be taken to correctly position the packing material For further information refer to Chapter 3 System Setup Place the probes in their c...

Страница 43: ...housing Do not use a cracked or damaged probe In this event call your field service representative immediately to obtain a replacement Avoid pulling pinching or kinking the probe cable since a damage...

Страница 44: ...and extending vertically 2 29 m 7 5 ft above the floor WARNING WARNING ENVIRONMENTAL DANGERS ALL DEVICES MEETING IEC60950 MUST BE KEPT OUTSIDE THE PATIENT ENVIRONMENT AS DEFINED IN IEC60601 1 1 UNLES...

Страница 45: ...d and a horizontal distance of 1 5 m 4 9 ft have justified themselves as indicative of the dimensions of the Patient Environment The patient environment vicinity is depicted as a dashed line in this p...

Страница 46: ...wered from a non isolated power source is connected to the Vivid q N system using a network cable RJ45 the cable shielding should NOT be soldered to the LAN connector Refer to Figure 1 3 below 1 Do NO...

Страница 47: ...ARNING WARNING THE VIVID Q N BATTERY HAS A SAFETY DEVICE DO NOT ATTEMPT TO DIS ASSEMBLE OR ALTER THE BATTERY ALWAYS OBSERVE THE FOLLOWING PRECAUTIONS Charge batteries only when the ambient temperature...

Страница 48: ...anding unbalanced For this reason the dummy battery should be kept so it may be inserted in position to provide stability to the scanner while the lithium ion battery is being charged In addition use...

Страница 49: ...FROM AN OPERATING VIVID Q N SOME METAL SURFACES MAY BE WARM ENOUGH TO POSE A POTENTIAL HEAT HAZARD IF TOUCHED EVEN WHILE IN SHUT DOWN MODE WARNING WARNING EXPLOSION WARNING DO NOT OPERATE THE EQUIPMEN...

Страница 50: ...on All potentially hazardous stored or residual energy is relieved WARNING WARNING ENERGY CONTROL AND POWER LOCKOUT FOR VIVID Q N WHEN SERVICING PARTS OF THE SYSTEM WHERE THERE IS EXPOSURE TO VOLTAGE...

Страница 51: ...d with product labels and icons These represent pertinent information regarding the operation of the unit 1 7 1 Universal Product Labels The following diagrams illustrate the labels found on the Vivid...

Страница 52: ...ng documents is intended to alert the user to refer to the User Manual or other instructions when complete information cannot be provided on the label Various CAUTION Dangerous voltage the lightning f...

Страница 53: ...ay be caused by the weight of the machine if one person attempts to move it considerable distances or on an incline Used in the Service and User Manual which should be adjacent to equipment at all tim...

Страница 54: ...VISION 2 VIVID Q N SERVICE MANUAL 1 22 Section 1 7 Product Labels and Icons Date of manufacture On the base of the unit Table 1 6 Label Icons and Symbols Description and Location cont d 3 of 3 Label N...

Страница 55: ...se in patient care are regulated medical waste for transportation purposes and must be transported as a hazardous material NOTE The USER SERVICE staff should dispose of all the waste properly per fede...

Страница 56: ...applicable conducted and radiated emission limits and to immunity from electrostatic discharge radiated and conducted RF fields magnetic fields and power line transient requirements For applicable sta...

Страница 57: ...s are in good condition and installed tightly without skew or stress Proper installation following all comments noted in this service manual is required in order to achieve full EMC performance CAUTIO...

Страница 58: ...ow Prepare the following information before you call System ID and or serial number Software version Date and time of occurrence Sequence of events leading to issue Is the issue reproduceable Imaging...

Страница 59: ...1 Introduction 1 27 1 10 1 1 Phone numbers for Customer Assistance 1 10 2 System manufacturer Table 1 7 System manufacturer MANUFACTURER PHONE NUMBER FAX NUMBER GE VINGMED ULTRASOUND A S STRANDPROMENA...

Страница 60: ...GE DIRECTION FQ091019 REVISION 2 VIVID Q N SERVICE MANUAL 1 28 Section 1 10 Customer Assistance This page left blank to facilitate double sided printing...

Страница 61: ...ultrasound unit Included are descriptions of the electrical and facility requirements that must be met by the purchaser A worksheet is provided at the end of this chapter see Figure 2 2 on page 2 10 t...

Страница 62: ...mind that lighting controls and dimmers can be a source of EMI which could degrade image quality These controls should be selected to minimize possible interference 2 2 4 Time and Manpower Requirement...

Страница 63: ...pecifications for the Vivid q N system are as follows 2 2 5 2 Inrush Current Inrush current is not a factor for consideration due to the inrush current limiting properties of the power supplies 2 2 5...

Страница 64: ...es magnetic fields and transients in the air or wiring They also generate EMI The Vivid q N ultrasound units comply with limits as stated on the EMC label However there is no guarantee that interferen...

Страница 65: ...ection requires a magnet wrap at each end Install the shield over the front of the card cage Loose or missing covers or RF gaskets allow radio frequencies to interfere with the ultrasound signals Repl...

Страница 66: ...n and testing must also be performed by qualified personnel The products involved and the accompanying electrical installations are highly sophisticated and special engineering competence is required...

Страница 67: ...a rack Material to safely clean probes performed using a plastic container never metal In the case of a network option An active network outlet in the vicinity of the ultrasound unit A network cable o...

Страница 68: ...ows a floor plan illustrating the recommended layout of the Ultrasound Room and depicting the minimal room layout requirements Figure 2 1 Recommended Floor Plan 4 3m x 5 2m 14 ft x 17 ft 36 IN 92 CM D...

Страница 69: ...done while scanning continues With DICOM images can be archived stored and retrieved faster easier and at a lower cost 2 3 4 4 DICOM Option Pre Installation Requirements To configure the Vivid q N ult...

Страница 70: ...ation Devices TCP IP Settings Device Type Manufacturer Name IP Address Port AE Title 1 2 3 4 5 6 7 8 9 10 11 12 Dept Vivid q N Type Floor Room REV Comments CONTACT INFORMATION Name Title Phone E Mail...

Страница 71: ...ormation Vivid i n or Vivid q N Host Name AE Title Local Port IP Address Net Mask ROUTING INFORMATION ROUTER2 ROUTER3 ROUTER1 Destination IP Addresses GATEWAY IP Addresses Default DICOM APPLICATION IN...

Страница 72: ...nces from the basic installation Make sure system and probes have been subject to acclimation period Environmental cooling is sufficient Lighting is adjustable to adapt to varying operational conditio...

Страница 73: ...Installation Acceptance Test Criteria on page 3 180 a Vivid q N ultrasound scanner is ready for use after the system has been configured successfully in accordance with the information provided in Sy...

Страница 74: ...qualified service personnel should carry out servicing and troubleshooting 3 2 2 1 System Acclimation Time Following transport the Vivid q N system may be very cold or hot Allow time for the system to...

Страница 75: ...l shock connect the unit to a properly grounded power outlet Do NOT use a three prong to two prong adapter as this defeats safety grounding CAUTION To ensure proper grounding connect this equipment to...

Страница 76: ...f the package itself is undamaged To make it easier to detection if the handling during transportation has been unproper a set of Tilt Shock indicators have been attached to the transportation box 3 2...

Страница 77: ...ilt Indicator has been triggered Make a remark on the Post Delivery Checklist about the triggered indicator and then follow the rest of the instructions in subsection 3 3 2 Damage in Transportation If...

Страница 78: ...signed for by a GE representative or hospital receiving agent 2 Report the damage to the carrier Whether noted or concealed damage MUST be reported to the carrier immediately upon discovery or in any...

Страница 79: ...id q N Transportation Box Label details Figure 3 2 Transportation Box Label Figure 3 3 Vivid q N Transportation Box Label details HANDLE WITH CARE FRAGILE HANDLE WITH CARE KEEP DRY PROTECT FROM MOISTU...

Страница 80: ...n 3 4 Unpacking the Equipment Section 3 4 Unpacking the Equipment CAUTION Please read this section fully before unpacking the Vivid q N ultrasound unit Figure 3 4 Shipping Box for the Vivid q N only F...

Страница 81: ...ortation box closely at time of delivery as described in the procedure that follow Figure 3 6 Transportation box lid removed Table 3 6 Shipping Carton Dimensions and Weights Description Height Width D...

Страница 82: ...and and be ready to mark the check list 3 Remove the surface packing material paper pad silica gel etc Continue to remove additional packing material as applicable during the following procedure steps...

Страница 83: ...tings are 220 240V AC 3 4 5 EMI Protection The Vivid q N Ultrasound Unit has been designed to minimize the effects of Electro Magnetic Interference EMI Many of the covers shields and screws are provid...

Страница 84: ...list the contents of the shipping carton that are additional to the Vivid q N These include external accessories and probes as well as a regional language support kit and optional peripherals as order...

Страница 85: ...lumination of all the control panel buttons 3 Probes Check all probes for wear and tear on the lens cable and connector Look for bent or damaged pins on the connector and in the connector socket on th...

Страница 86: ...the peripherals in accordance with the manufacturer s directions To prevent EMI or system overheating dress the peripheral cables inside the peripheral cover 5 AC System Check the AC board connectors...

Страница 87: ...side of the ultrasound unit 1 Display Monitor tilts up and down 2 Speakers Two loudspeakers for Doppler sound 3 Control Panel Contains the alphanumeric keyboard and the buttons used to operate the ul...

Страница 88: ...unit rear panel and external peripheral accessory connectors 1 Two interchangeable USB ports digital printer CD RW and other peripherals 2 Docking connector currently not in use 3 Port for DC IN AC Ad...

Страница 89: ...Cart Components Label Item Label Item 1 Top Shelf Assembly with handle 7 Bottom Cover Rear AC Assembly Cover 2 Probe Shelf with probe holders 8 Rear Lower Cover 3 Peripheral Power Outlet 9 SafeLock C...

Страница 90: ...that the jumper is set to either 100 to 120 V AC or to 220 240 V AC in accordance with the voltage rating shown on the safety rating plate step 1 3 5 5 System Voltage Confirmation 3 5 5 1 System Volta...

Страница 91: ...heck the grounding of the power cord and power outlet Be aware of RF sources Keep the unit at least 5m 16 4 ft away from other EMI sources Special shielding may be required to eliminate interference p...

Страница 92: ...ired it is possible to disable access to all Vivid q N scanner USB ports including the CD DVD drive in order to limit system vulnerability This is implemented from the System Configuration window via...

Страница 93: ...of Procedure Instructions NOTE The printers approved for use with the Vivid q N system are categorized in Table 3 11 below Refer to the appropriate instructions for connecting a specific printer as ap...

Страница 94: ...er the Print button or Alt Print to activate a variety of outputs 5 Use the left or right arrows below to add any of the available options listed on the left as Outputs listed on right 6 From the list...

Страница 95: ...es the system at the Applications level from the Additional Outputs screen By selecting the Advanced option under Selected Devices the user accesses the Printer Properties dialog box and proceeds with...

Страница 96: ...rdware Installation 3 Click Configure in the Printer Properties dialog to enter Print Setup 4 In the Orientation area select Portrait or Landscape as needed 5 From the Paper Size drop down list select...

Страница 97: ...erties The printer properties screen opens Figure 3 17 7 Verify that the selected orientation and paper size are correct 8 Click OK twice and then once more to return to the Advanced Outputs tab Figur...

Страница 98: ...er or lower on the rear connectors panel When connecting directly to the system it is necessary to use an additional power source As a safety precaution this must be done via an isolation transformer...

Страница 99: ...Printer may be connected to any of the USB outlets provided on the SafeLock Cart One must use the additional power source to activate the DeskJet Color Printer However this must be powered from the Sa...

Страница 100: ...g the Vivid i q system on the SafeLock cart as described in Mounting the Vivid q N on the SafeLock Cart optional on page 3 65 NOTE When using the Vivid i q system mounted on the SafeLock cart the HP O...

Страница 101: ...r are pre configured and installed designated to be used with the specific B W Printer supplied by GE No SafeLock Cart connection via USB hub As stated above Safety considerations must be taken into a...

Страница 102: ...ny UP D897 Printer the following steps are required 1 Click the Tcpip tab on the Connectivity screen see Figure 3 14 on page 3 23 2 Select Advanced Settings see Figure 3 22 3 The Network Connection sc...

Страница 103: ...MANUAL Chapter 3 System Setup 3 31 5 From the menu select Printer Properties 6 The Sony UP D897 Properties screen opens Select Printing Preferences Figure 3 24 Sony UP D897 printer configuration dial...

Страница 104: ...Installation 7 From the Printing Preferences dialog under Orientation A Under Paper click the scroll down arrow and select the required paper size B Under Orientation choose the required printing ori...

Страница 105: ...ated to be used with the specific Digital Color Printer supplied by GE No SafeLock Cart connection via USB hub As stated above Safety considerations must be taken into account The Digital Color Printe...

Страница 106: ...there is no preference as to which cable to connect first One end of the telephone cable can be connected to the wall outlet and the other side to the modem followed by connecting one end of the USB c...

Страница 107: ...ration on page 3 90 CAUTION For network security reasons when configuring the wireless USB network adaptor on the Vivid q N system do not use the USB ports on the SafeLock cart CAUTION For network sec...

Страница 108: ...3 1 Samsung DVD SE TO84M RSBN Kit P N S2423870 Part No Part Description RS2423870 Samsung DVD SE TO84M RSBN R2423877 DVD Patch CD 2418071INS Pocket DVD with USB Installation Guide Table 3 2 Samsung Ca...

Страница 109: ...om media to the Vivid q N system To perform the Database Backup procedure in order to store back up copies of patient Exams data Archive and also to create free space on the local hard disk To export...

Страница 110: ...W drive rear panel b Disconnect the 5V power supply output cable from the power port on the Samsung DVD R RW drive rear panel 2 Remove the Samsung DVD CD RW drive from the system Installation Procedur...

Страница 111: ...Insert a CD R disk in the DVD CD RW Drive b Eject and remove the CD R disk to check the eject mechanism functions properly NOTE In the event that problems are experienced when exporting to DVD media t...

Страница 112: ...isconnect both ends of the 5V power outlet one end from the SafeLock Cart main column power and the other from the Samsung DVD R RW drive rear panel 5 Release the locking arm retaining clamp lever loc...

Страница 113: ...the USB ports located below the upper shelf of the SafeLock Cart see Figure 3 35 and Figure 3 36 Figure 3 34 Cable for Installation on Vivid q N Cart Figure 3 35 USB Cable Plugged Into the DVD CD Driv...

Страница 114: ...o the USB port located at the rear of the Vivid q N system Figure 3 31 on page 3 39 6 Re connect power to the SafeLock Cart and to the Vivid q N system 7 Switch on the circuit breaker and turn ON powe...

Страница 115: ...N or after shutdown All software drivers for the MOD Drive are pre configured and installed designated to be used with the specific MOD drive supplied by GE No SafeLock Cart connection via USB hub As...

Страница 116: ...B Hard Disk Refer to the External USB Hard Disk Installation Procedure section page 8 136 for instructions on initial configuration and connecting the External USB Hard Disk to the Vivid q N portable...

Страница 117: ...k Cart connection via USB hub As above If applicable the USB hub must be powered via the isolation transformer Vivid q N mounted on SafeLock Cart As above 3 7 2 7 Footswitch The Footswitch USB connect...

Страница 118: ...allation Vivid q N mounted on SafeLock Cart As above NOTE After connecting the Footswitch to the system define the required functionality settings as follows 1 Press Config to access the Configuration...

Страница 119: ...ICE MANUAL Chapter 3 System Setup 3 47 3 Using the Footswitch Functionality drop down menus select the required functionality for the Left Middle and or Right Footswitch see the example in Figure 3 42...

Страница 120: ...ee note below NOTE When performing step 1 it may be necessary to use the VGA adaptor P N 2420728 see Figure 3 44 to connect the end of the VGA cable to the Vivid q N rear connector panel Since some VG...

Страница 121: ...all power and signal cables are connected to the system VCR and video converter proceed as follows in the order stated a Press the power ON switch on the VCR b Press the power ON switch on the video c...

Страница 122: ...aneously The following screen will appear Figure 3 48 Intel Dual Display Clone 9 Select the Intel Dual Display Clone icon and press OK see Figure 3 48 NOTE If the VGA cable is not properly connected t...

Страница 123: ...e cart It is possible to use a different type of VCR brand and model However it is highly recommended to use a medical graded VCR as this will ensure that both safety and image quality levels meet uni...

Страница 124: ...ION 2 VIVID Q N SERVICE MANUAL 3 52 Section 3 7 Completing the Hardware Installation 3 7 2 9 Connecting the VGA Splitter Figure 3 51 VGA Splitter Figure 3 52 Cables and Bracket for Wall Mounting Power...

Страница 125: ...id q N system and the GE Video Splitter Isolation box 1 Connect the VGA cable Figure 3 52 to the VGA input port at the rear of the VGA splitter see Figure 3 53 and Figure 3 54 Connect the other end of...

Страница 126: ...r further connection to other DVI devices Refer to Figure 3 54 above 4 When connecting the DVI output cable to an external monitor press V Out on the Vivid q N system console The screen shown in Figur...

Страница 127: ...water or conductive liquids this is not a sealed case Do not open the charger or power supply case There are no user serviceable parts inside Do not cover the fan exhaust or obstruct the airflow as th...

Страница 128: ...if the battery is fully discharged to begin with The recalibration time is approximately 9 hours for an empty battery and approximately 14 hours for a fully charged battery NOTE Calibration is initia...

Страница 129: ...tery charger unit No action is required if only a recharge is required as the charger will automatically begin to charge the battery The blue calibration LED will flash to indicate that the battery is...

Страница 130: ...can be connected or changed any time as described below regardless of whether the system is powered ON or OFF 1 Place the probe s carrying case on a stable surface and open the case 2 Inspect the pro...

Страница 131: ...that it is free to move and is not resting on the floor When the probe is connected it is automatically activated NOTE It is not necessary to turn OFF power to connect or disconnect a probe Figure 3...

Страница 132: ...CTION FQ091019 REVISION 2 VIVID Q N SERVICE MANUAL 3 60 Section 3 7 Completing the Hardware Installation 3 7 4 1 Available Probes For a list of the available probes please see Section 9 7 Probes on pa...

Страница 133: ...of the External Respiratory option is enabled by removal of the ECG Board and installation of the Internal ECG Respiratory Board For instructions refer to the ECG Respiratory Module Assembly Installa...

Страница 134: ...ify compliance with all electrical and safety requirements and check the power cord to verify that it is intact and of hospital grade before connecting the unit to the power source Products equipped w...

Страница 135: ...cable connector from the AC input socket on the SafeLock Cart or the AC DC converter of the system 3 Unplug the mains power cable from the AC wall outlet socket 4 Unplug the AC DC power connector fro...

Страница 136: ...n If the probe has been removed since the system was last used the currently connected probes and their available applications are displayed and selected by default 3 7 7 2 Switching the System OFF NO...

Страница 137: ...rds between the sliding guides on either side of the shelf as shown below NOTICE Only the SafeLock Cart supplied by GE and or any medical grade cart which has been approved as suitable for use with th...

Страница 138: ...one finger between the SafeLock Cart arm rest and the front of the scanner 3 If necessary perform the alignment procedure as described in 3 8 2 Adjusting the SafeLock Cart Locking Mechanism on page 3...

Страница 139: ...he Vivid q N on the SafeLock Cart cont d 6 Connect the USB Cable from the cart to the USB port on the Vivid q N rear panel Figure 3 64 Vivid q N Rear Panel on page 3 66 Use the lower port the upper po...

Страница 140: ...ee Figure 3 67 on page 3 68 2 Working from the underneath the main shelf use a Phillips screwdriver to loosen the two screws half turn counter clockwise holding the middle locking tooth in position on...

Страница 141: ...iew Table 3 5 below outlines the Vivid q N Configuration procedures described in the relevant sub sections Table 3 5 Configuration Procedures SUB SECTION DESCRIPTION PAGE NUMBER 3 9 2 Vivid q N Config...

Страница 142: ...arations If needed select SYSTEM The System Settings Window is displayed 2 Select the Hospital field see a in Figure 3 68 and type the name of the hospital max 64 characters The 24 first characters of...

Страница 143: ...isplayed 4 Select the preferred Time Format see c in Figure 3 69 24 the 24 hour format is used 12 the 12 AM PM hour format is used 5 Select the preferred Date Format see d in Figure 3 69 DD Date two d...

Страница 144: ...elect SYSTEM if needed The System Settings Window is displayed 2 Use the Language drop down dialog see Figure 3 70 to select your preferred language for the on screen interface The following languages...

Страница 145: ...gs The Regional and Language Options dialog box opens 4 Under Standards and formats in the language field scroll down to the desired language e g Russian and click OK Reboot the system The interface a...

Страница 146: ...T S 1 Open the Configuration Window see Log On to the System as ADM on page 4 10 Select SYSTEM if needed The System Settings Window is displayed 2 Use the drop down Units dialog see Figure 3 71 to sel...

Страница 147: ...acklight Intensity Keyboard Setups Printer Setup Disable TCPIP filtering NOTE The Disable TCPIP Filtering option should only be used for Troubleshooting procedures after which it it is recommended to...

Страница 148: ...d For instructions see LCD Display Adjustments and Calibration on page 6 1 3 9 3 5 Keyboard Setup 1 Press F2 select Service Tab The Select Keyboard Setup dialog is displayed 2 Click Keyboard Setup The...

Страница 149: ...GE DIRECTION FQ091019 REVISION 2 VIVID Q N SERVICE MANUAL Chapter 3 System Setup 3 77 3 9 3 5 1 Regional Options Select appropriate Format and Location then click Apply Figure 3 75 Regional Options...

Страница 150: ...ICE MANUAL 3 78 Section 3 9 Configuration 3 9 3 5 2 Languages 1 Under the Languages tab click Details to select appropriate Language 2 If necessary activate applicable Supplemental Language Support ch...

Страница 151: ...19 REVISION 2 VIVID Q N SERVICE MANUAL Chapter 3 System Setup 3 79 3 9 3 5 3 Advanced 1 Under the Advanced tab select a language version of the non unicode programs you want to use then click Apply Fi...

Страница 152: ...is a need follow the instructions provided by GE Medical Systems or the instructions in the respective printer installation manual 1 Select ADD PRINTER to start the Add Printer Installation Wizard 2...

Страница 153: ...fer to the External USB Hard Disk Installation Procedure on page 8 136 DVD CD R Drive via USB Printer Deskjet HP 450 via USB Virtual printer any of the DeskJet printers can be used as virtual printers...

Страница 154: ...nt jobs will be printed out automatically Sometimes this feature is device dependent Therefore in order to initiate the manual print of all spooled jobs process proceed as described below 1 Press ALT...

Страница 155: ...sound scanner is mounted on the SafeLock Cart always use the lower USB port for the Hub 5 The Vivid q N ultrasound scanner and all connected devices working with scanner should be powered and connecte...

Страница 156: ...ADMIN lower part of window 3 Select the SYSTEM ADMIN tab 4 Select NEW to open the New Key dialog where you type the Software Option Key Serial String 5 Type the Password Software Option Key 6 Press O...

Страница 157: ...ed for eVue Images or loops may be transmitted to a designated PC e Vue PC on the network in compact MPEG format and will appear at the review PC in almost real time 3 10 1 1 The Dataflow Concept Comm...

Страница 158: ...he local database is used for patient archiving Images are stored to internal hard drive LocalArchive MOD dataflow The local database is used for patient archiving Images are stored to a MOD Worklist...

Страница 159: ...q N to an EchoPAC PC Workstation In this configuration the data is transferred from the Vivid q N to a dedicated EchoPAC PC Workstation over an Ethernet connection The connection may be done in one o...

Страница 160: ...ation Figure 3 87 Local Network Connection Figure 3 86 Ethernet Switch Identifications Position Label Function X To PC To connect an end station or a Server to the Port To HUB To connect a HUB or anot...

Страница 161: ...to EchoPAC PC Workstation Figure 3 88 Hospital Network Connections See the EchoPAC PC Service Manual Part Number EP091298 for details about the EchoPAC PC and the required set up procedures Using sta...

Страница 162: ...in the DVD drive 3 Boot up the system in maintenance mode and navigate to Windows Explorer 4 Create a new folder on the system s D drive and name it WIFI DRIVER 5 Copy the contents of the disk to the...

Страница 163: ...list or specific location Advanced see Figure 3 90 and click Next 10 Select Include this location in search Figure 3 91 and browse to D WIFI DRIVER Figure 3 92 11 Click Next The following screen opens...

Страница 164: ...Select the WIFI DRIVER folder then click OK The following screen opens 13 Click Next The installation process continues displaying wizard screens until installation is complete 14 Click Finish The in...

Страница 165: ...n press Config Select the Connectivity tab and from the Connectivity screen click TCP IP 2 Click Advanced Settings to open the Network Connections screen see Figure 3 94 3 From the Wireless Network Co...

Страница 166: ...rk and click Connect In this example Figure 3 95 the wireless network connection is Vivid_S Testing The Wireless Network Connection dialog box opens see Figure 3 96 5 Type the required network key in...

Страница 167: ...ting that the wireless adaptor is connected see Figure 3 98 6 Return to the instructions for Installing the Compact Wireless G Adaptor Software on page 3 90 and repeat the entire procedure in order to...

Страница 168: ...GE DIRECTION FQ091019 REVISION 2 VIVID Q N SERVICE MANUAL 3 96 Section 3 10 Connectivity Setup Figure 3 99 CISCO_350 Sub directory...

Страница 169: ...rk connector to the EchoPAC PC Workstation see Chapter 3 in the EchoPAC PC Workstation Service Manual Connection via a Peer to Peer Network You will need a network hub and one network cable for each u...

Страница 170: ...e 2 10 Typically the source for this information is the network administrator Follow the steps below to prepare the scanner for use on the network 3 10 3 2 Select TCP IP Set up Screen 1 Press CONFIG F...

Страница 171: ...address 0 0 0 0 4 In addition the scanner s AE Title must be entered in the DICOM server s setup 3 10 3 4 Set the Remote Archive s Network Information In the Remote Archive Setup area of the screen s...

Страница 172: ...or exporting error logs with Alt D 1 From the system keyboard press Config and log on as an ADM user with the appropriate password 2 Click Connectivity from the bottom row of buttons on the screen and...

Страница 173: ...the default user and password Under Configurable Remote Path User refer to Figure 3 103 type the desired user name and password as configured on the destination PC This is the password usually assigne...

Страница 174: ...ton on the control panel 1 On the Vivid q N control panel press the Config button 2 From the System Configuration window click the Connectivity tab at the bottom of the window The Connectivity dialog...

Страница 175: ...0 0 0 1 NOTE The IP must be different from the IP address used for network computer 12 Type in the Subnet mask 255 255 255 0 NOTE The Subnet mask should be the same for both the network computer and t...

Страница 176: ...3 Double click on Local Area Connection icon The Local Area Connection Properties dialog box opens 4 Select Internet Protocol TCP IP 5 Click the Properties button The Internet Protocol TCP IP Properti...

Страница 177: ...all changes Return to regular mode 10 Connect the Vivid q N and network computer LAN connection using a cross over Network cable Normally with RED connector covers on both sides cable not longer than...

Страница 178: ...n the control panel 1 On the Vivid q N control panel press the Config button 2 From the System Configuration window click the Connectivity tab at the bottom of the window The Connectivity dialog box o...

Страница 179: ...ddress 10 0 0 1 or the one provided by the local network administrator NOTE The IP must be different from the IP address used for network computer 12 Type in the Subnet mask 255 255 255 0 or the one p...

Страница 180: ...mputer access the Control Panel as follows a Double click on My Computer icon on desktop b Double click on Control Panel icon 2 Double click on Network Connections icon 3 Double click on Local Area Co...

Страница 181: ...ar mode 8 Connect the Vivid q N and network computer LAN connection using a regular Network cable The Vivid q N and the network computer are now ready for export import of files NOTE One can check the...

Страница 182: ...ICOM server the following information has to be entered in the scanner DICOM server IP address subnet mask and eventually the gateway DICOM server port number DICOM server AE title the server applicat...

Страница 183: ...2 VIVID Q N SERVICE MANUAL Chapter 3 System Setup 3 111 The selected flow is shown as seen in the example in Figure 3 116 below Worklist Local Archive DICOM Server Int HD Figure 3 116 Worklist Local A...

Страница 184: ...to display the Properties dialog 7 Click on Search Criterias Figure 3 117 The Search Criterias window opens Figure 3 117 8 Highlight the modality filter in the list and click on Remove see Figure 3 1...

Страница 185: ...e Search Criterias window is updated see Figure 3 118 11 Click OK to close the window 12 From the Worklist Properties Dialog select the IP Address down arrow to choose the Worklist Server from the pul...

Страница 186: ...nge the IP Address settings a From the IP Address pull down menu select Modify to display the IPs dialog box b From the IPs dialog box select the server you want to modify then select Modify Figure 3...

Страница 187: ...turn to the Properties dialog box f Enter the DICOM server AE Title This entry is case sensitive and must match exactly g Enter the DICOM server port h For some DICOM Servers the default Time out sett...

Страница 188: ...on to the device verification process The verification process may require up to one minutes When done a sign prefix displayed in front of the listed device indicates whether the test passed green che...

Страница 189: ...ivid q N being configured to the Mitra support personnel 3 10 5 3 Configuration of Modality Worklist Services Identify Dataflow to be Used 1 Identify which dataflow is to be used at the site If the DI...

Страница 190: ...Value 3 Click the Add to List button 4 Click the OK button Assign DICOM Worklist name to Dataflow 1 Select the Dataflow tab 2 From the Dataflow name pull down menu select the Dataflow which will be us...

Страница 191: ...that Text is select for the Export file format Test Connectivity with the Vivid HL7 Gateway 1 Start a new study and acquire an image or use an existing study 2 In the Measurements mode make some of th...

Страница 192: ...r for further analysis on the Vivid q N 3 10 6 2 Query Retrieve Setup on the Vivid q N 1 Press CONFIG F2 and log on as Adm as described in Log On to the System as ADM on page 4 10 2 Select Connectivit...

Страница 193: ...3 121 5 Select QueryRetrieve so it is highlighted and then select Properties to display the Properties dialog box Figure 3 128 Query Retrieve Workflow Figure 3 129 Select Query Retrieve s Properties S...

Страница 194: ...menu and edit the setup for one of the predefined servers 7 Enter the correct AE Title and Port Number for the DICOM Query Retrieve server in the respective fields in the Query Retrieve screen Change...

Страница 195: ...3 System Setup 3 123 2 Select the correct tag from the Select Tag pull down menu 3 If needed type in the value 4 Select Add to List 5 Click OK to close the Search Criterias window Figure 3 131 Select...

Страница 196: ...Select the Smiley button to Ping the server 2 If the network connection to the server is OK it will be illustrated by a smiling Smiley A sad Smiley indicates that the network connection is failing Typ...

Страница 197: ...COM Ping 1 Select QueryRetrieve from the Selected devices list 2 Select Check If the test passes a pop up dialog is displayed see left illustration in Figure 3 134 Select OK to continue A green check...

Страница 198: ...AL 3 126 Section 3 10 Connectivity Setup If the test fails a pop up warning is displayed see left illustration in Figure 3 135 Select OK to continue A red X to the left of the Selected devices indicat...

Страница 199: ...s for all of the images in the exam It also contains measurements and reports generated and saved during the exam the reports are all saved as files in CHM format Any media generated as MPEGvue also c...

Страница 200: ...s the Config or F2 button and log on as Adm as described in Log On to the System as ADM on page 4 10 2 Select Connectivity 3 Select Dataflow 4 From the drop down menu select Misc Export see Figure 3 1...

Страница 201: ...r the remote computer s ID address in the Remote Path field After the path has been typed it is available for selection from the Dataflow Name drop down menu or you can select an existing path from th...

Страница 202: ...elect Patient List The Patient List will be displayed with the following header 4 Trackball to the Export softkey in the bottom menu shown below and press SET The Export dialog box opens 5 Under Expor...

Страница 203: ...yed 9 If required click OK then select any additional Patient Files for export 10 When export complete click OK then remove the media containing the exported MPEGVue data from the Vivid q N system NOT...

Страница 204: ...nario where consultation with another doctor in the hospital in real time is required 3 10 8 2 Preparations Before configuring the Vivid q N for eVue dataflow it is necessary to decide upon a specific...

Страница 205: ...nu 7 From drop down menu select the Dataflow named Local Archive Int HD eVue 8 Trackball to the Selected devices window and select highlight eVue see Figure 3 140 9 Trackball to the Properties button...

Страница 206: ...ded for Windows XP After initial transfer of eVue it is recommended to disable this check box The Vivid q N dataflow is set and ready for export import of eVue files into a network computer From now o...

Страница 207: ...l Archive Int HD eVue as shown in Figure 3 142 4 Using the soft key buttons select CREATE PATIENT 5 Now start scanning Each image you would like to store press the STORE button A few seconds after the...

Страница 208: ...nd Figure 3 144 requesting the user to download and install some drivers The requested drivers may be downloaded from the Internet or if the DVD CD was pre configured those drivers will be located on...

Страница 209: ...lly Setting the Network PC for eVue Import 1 On the network computer create a New User by accessing the Control Panel as follows a Double click on My Computer icon on desktop b Double click on Control...

Страница 210: ...Setup The User Accounts dialog box opens 3 Select the Advanced Tab 4 Click on the Advanced button The Local Users and Groups dialog box opens 5 Select the Users folder and right click to select New U...

Страница 211: ...boxes e Click Create to confirm setting and Close f Close all windows The new user account has been set and is ready for activation Create a new folder for import export and set sharing permissions b...

Страница 212: ...t Rename Rename the folder as eVue _Import 9 Setting the Sharing properties for the new folder as follows a Right click on eVue_Import icon and select Properties The eVue_Import Properties dialog box...

Страница 213: ...ck on the Permissions button The Permissions for eVue Import dialog box opens d Click the Add button NOTE It is recommended to remove the User Everyone from Share Permissions Figure 3 148 eVue_Import...

Страница 214: ...lect all to be active activate all the check boxes as shown below and press OK g From the Select Users Computers or Groups dialog box Figure 3 150 click on the Locations button h In the Locations dial...

Страница 215: ...43 j Click the Check Names button The name and path will be detected by underlining as shown below k Now click OK l From the Permission for eVue_Import dialog box highlight and select User Name from t...

Страница 216: ...omputer using the browsing option to select the appropriate path For an example of Vivid q N dataflow settings refer to Figure 3 140 on page 3 133 3 10 9 1 2 Manually Stopping the Firewall on the Netw...

Страница 217: ...VID Q N SERVICE MANUAL Chapter 3 System Setup 3 145 c Select Control Panel from the Menu 2 Double click on Network Connections as shown above 3 Select your network connection and right click 4 From th...

Страница 218: ...nternet Connection Firewall check box as shown in Figure 3 153 7 Click the OK button to confirm changes and close all windows Stopping an External Service Firewall 1 On the network computer access the...

Страница 219: ...alog box select your firewall program for example Black Ice 5 Right click and select Stop from drop down menu The following message will be displayed indicating that the Firewall is being stopped 6 Wh...

Страница 220: ...mputer access the Control Panel as follows a Press Start b Select Settings c Select Control Panel from the Menu 2 Double click on Windows Firewall The Windows Firewall dialog box opens 3 Select the Ge...

Страница 221: ...btain these from the local IT person 2 Close all Internet Explorer windows if open 3 From the C Program Files GEULS eStorePlayer Version1_0 folder double click on the UnRegisterAll bat icon as shown i...

Страница 222: ...N SERVICE MANUAL 3 150 Section 3 10 Connectivity Setup 5 From the C Program Files GEULS eStorePlayer Version1_0 folder delete all files as shown in Figure 3 160 on page 3 151 Figure 3 158 Uninstall Me...

Страница 223: ...E DIRECTION FQ091019 REVISION 2 VIVID Q N SERVICE MANUAL Chapter 3 System Setup 3 151 6 Restart Windows then confirm that the MPEGVue application is no longer installed Figure 3 160 Deleting All Files...

Страница 224: ...an MPEGVue exam stored on a DVD CD proceed as follows Insert the MPEGVue CD in the computer DVD CD drive The MPEGVue Patient List is displayed see Figure 3 161 below NOTE In the event that the MPEGvue...

Страница 225: ...ll size in the MPEGVue Screen view pane There are several ways to select a thumbnail image from the clipboard Use the mouse pointer With the pointer on the required image click the left mouse button t...

Страница 226: ...tion an image may be saved to any of the following file formats BMP WMV MPEG4 JPEG To save an image click on the diskette icon 8 in Figure 3 162 A Save As dialog box will appear allowing you to select...

Страница 227: ...pting the user to first logon to Outlook It is possible to send images loops or full exams from any eVue PC An eVue PC is a PC which contains the MPEGvue player and an e mail client application e g Mi...

Страница 228: ...xisting recipient address from the drop down menu or type a new address in the Send To field NOTE Up to 10 addresses can be stored for future selection 5 Click Next The user is prompted to enter a pas...

Страница 229: ...as been sent from the Outlook Outbox NOTE Examinations sent by E mail as attachments are compressed encrypted and password protected If the size of the exam is too large to be sent as a single attachm...

Страница 230: ...MPEGVue Player software to the recipient first complete this procedure then proceed to Sending the MPEGVue Player Software by E mail on page 3 159 The E mail address window is displayed 3 Select an ex...

Страница 231: ...shown below 5 Click OK to close the message window 6 Check that the message has been sent from the Outlook Outbox When the message has been sent from the Outbox and received by the E mail recipient th...

Страница 232: ...the message window 6 Check that the message has been sent from the Outlook Outbox NOTE When the message has been sent from the Outbox and has arrived at the addressee the recipient should follow the...

Страница 233: ...dow then click Yes to proceed When the installation of the MPEGVuePlayer software is complete the MPEGVue Player Screen is displayed as shown in Figure 3 175 on page 3 163 NOTE At this point the MPEGV...

Страница 234: ...e MPEGVue utilities described below 1 From the desktop double click on the MPEGVue Startup icon The MPEGVue Startup Menu opens Figure 3 174 MPEGVue Startup Menu 2 Proceed to use the required utility a...

Страница 235: ...Startup Menu click on the Get new exams by email button The Start MPEGVue screen is displayed as shown in Figure 3 175 below 2 Click the Outlook E mail button shown in Figure 3 175 The E mail dialog b...

Страница 236: ...x is being scanned for studies When complete all studies found in the Inbox are listed in the Found Studies dialog box as shown in Figure 3 176 below 4 Select the required Study from the list NOTE By...

Страница 237: ...ord is case sensitive In the event that an incorrect password is typed the user is prompted with a warning message as shown here Click OK and enter the correct password 7 Click Next The message Receiv...

Страница 238: ...ination If you were previously viewing different MPEGvue Patient exams you will need to switch over to the previous instance of the MPEGvue Receiving and Viewing a Partial Examination In the event tha...

Страница 239: ...ve to select and display images of that exam The MPEGVue screen is displayed as shown in the example in Figure 3 162 on page 3 153 Activate e Vue 1 From the MPEGVue Startup Menu click on the Activate...

Страница 240: ...l tab is activated 2 Manage Exams from Email as follows a Make sure the Manage Exams from Email tab is activated as shown in Figure 3 181 The Patient List displays details in table format of all patie...

Страница 241: ...hese tasks have been performed will these two buttons become enabled c To copy or move the selected exams first click the Browse button and select the required destination folder then click the Copy S...

Страница 242: ...ient List displays details in table format of all patient exams received via export from E Vue Patient ID Patient Name Exam Date etc The current path information is displayed below the Patient List as...

Страница 243: ...path information is displayed below the Patient List together with details of the removable media e g CD DVD ROM By default the destination path Other Folder radio button is enabled additional informa...

Страница 244: ...10 Connectivity Setup e Click the Copy Selected Patients button During the copy operation the following message and progress bar is displayed When done the currently selected exam s are available in...

Страница 245: ...e Minimum Requirements Below this information the eVue Operation Utility buttons enable the user to enable or disable the eVue mode as required An additional button Configure eVue is used to perform t...

Страница 246: ...e folder destination drive If applicable enable the peer to peer connection check box then type the correct current IP address and Subnet mask details Click Save to save the new configuration The Enab...

Страница 247: ...nfiguration inconsistencies before using the Enable eVue or Disable eVue functions make sure that your PC is connected to the appropriate network and that all network cables are properly connected Oth...

Страница 248: ...most computers when inserting the DVD CD media with MpegVue files the MpegVue Player will start automatically due to the autoplay option of DVD CD media In the event that any updates are required on t...

Страница 249: ...screen Additional thumbnail pictures will be displayed accordingly NOTE The MpegVue Player can be used as a regular player using the Play Stop Forward and Rewind buttons In addition the user can forwa...

Страница 250: ...ID Q N SERVICE MANUAL 3 178 Section 3 10 Connectivity Setup View Tool Bars and un checking all tools that are not required until both lines of command keys are visible as shown below Figure 3 189 MPEG...

Страница 251: ...Time section on page 3 2 3 11 1 Safety Precautions for Moving the Vivid q N Unit 3 11 2 Transportation Box and Packaging Materials Verify that the required packing materials are available All these m...

Страница 252: ...d after installation the documentation i e User Manuals Installation Manuals for the peripheral units must be kept as part of the original system documentation This will ensure that all relevant safet...

Страница 253: ...roduct Locator Installation Card shown may not be the same as the provided Product Locator card From the factory a sheet with four Product Locator cards for transportation and one for Installation are...

Страница 254: ...ion Specific language versions of the Vivid q N User Manual may also be available Check with your GE Sales Representative for availability During and after installation supplementary documentation suc...

Страница 255: ...er as a part of the installation procedure or as required during servicing and periodic maintenance of the Vivid q N ultrasound scanner Note Refer to Chapter 7 Diagnostics Troubleshooting for detailed...

Страница 256: ...An empty blank MO Disk P N 066E0490 1 3 GB P N 066E0519 5 4 GB P N 066E0514 8 6 GB ECG Pads ECG Cable IEC EUROPE ASIA ROW P N 2378938 2 At least one probe ideally you should check all the probes used...

Страница 257: ...has been in the OFF condition for an extended period of time 3 to 5 days or more the unit may not boot or may beep when turned on DANGER TO AVOID THE RISK OF FIRE POWER TO THE SYSTEM MUST BE SUPPLIED...

Страница 258: ...hat the power switch is turned OFF 2 Uncoil the power cable allowing sufficient slack so that the unit can be moved slightly 3 Verify that the power cable is without any visible scratches or any sign...

Страница 259: ...boot you may observe that a The unit s ventilation fans starts on full speed but slow down after a few seconds listen to the fan noise b Power is distributed to the peripherals Operator Panel control...

Страница 260: ...sets up the Front End electronics and the rest of the scanner 4 The Keyboard backlight is lit 5 As soon as the software has been loaded a 2D screen is displayed on the monitor as shown below NOTE Tot...

Страница 261: ...recommended under normal circumstances Closing the lid will place the system in Standby Mode Note The system will remain in Standby Mode for as long as battery power will allow The System Exit dialog...

Страница 262: ...ed for a longer period of time a full shutdown is automatically performed As described above the battery is automatically charged when the system is plugged to the wall outlet and the power is switche...

Страница 263: ...splay Then system shut down commences The time required to power down the unit including the Back End Processor may vary from 10 seconds up to approximately 1 minute The last component that shuts down...

Страница 264: ...possible for the administrator adm to establish unique passwords for each user but don t do it now 3 Select the user adm From the factory the password has been left blank so you may try to log on wit...

Страница 265: ...pter 4 General Procedures and Functional Checks 4 11 5 Select System to access the System Setup window The System Settings window is displayed 6 Proceed to select the required settings Table 4 2 Loggi...

Страница 266: ...other side to the rear of the MOD drive When connecting the MOD drive directly to the system it is necessary to use an additional power source As a safety precaution this must be done via an isolation...

Страница 267: ...he MO Disk 3 Remove the ejected MO Disk from the MO Drive and place it in its cover box for storage in a safe place 4 2 5 4 Connecting External USB Hard Disk to USB Port The External USB Hard Disk can...

Страница 268: ...nstalling DVD CD into DVD CD Drive NOTE Use only CD R DVD R or DVD R media from a reputable vendor and only high grade media types 1 Press the Eject button on the right side of the DVD CD Drive once t...

Страница 269: ...1 characters may be used for the label name Remember that MO Disks have two sides Side A and Side B Each Side must have a unique name Example MO Disks for storing images may be labeled IMAGE_1A Side A...

Страница 270: ...software reload are as up to date as possible All user presets except changes to Summary Anatomy and Biometry pages can be saved on an MO disk for reloading on the system 4 2 9 1 Archiving Presets to...

Страница 271: ...ctional Checks 4 17 3 Enable the User Defined Configuration check box 4 Select the MOD as the Destination 5 Press Backup Now A copy of the Presets is saved on the MO disk 6 Press Alt E on the alphanum...

Страница 272: ...TASK FUNCTION 1 Insert the MO disk with the archived presets into the MOD 2 Press Config or F2 select Admin then select Restore The Restore window is displayed 3 Enable the User Defined Configuration...

Страница 273: ...e from the maximum lowest position to the maximum upper position Verify that the handle is able to reach the maximum lowest and maximum highest positions smoothly 6 Pick up the system using the handle...

Страница 274: ...tion value is 31 2 for all TGC Sliders 7 Perform the ROTARY TEST as follows Rotate the rotary in both directions and press the button at the center of the rotary The rotary is activated properly press...

Страница 275: ...tery green check box Check the Battery yellow check box Press Set Battery yellow LED is On c Uncheck the Battery yellow check box Check the Extern DC green check box Press Set Extern DC green LED is O...

Страница 276: ...l and that the x and y coordinate values displayed at the bottom of the screen move digit by digit up and down Movement is smooth no jumping and the trackball has no dead areas i e when the trackball...

Страница 277: ...em Test and press Start PASS 5 Connect the 3S RS probe to the probe port 6 From the Diagnostic Test tree select Front End Test 7 Select TR32 then select TX Select TXProbeTX Test and press Start PASS 8...

Страница 278: ...d the cassette Press the Play button on the VCR The recorded Image is played back 6 Verify that in CW Mode both the left and right audio channels are working and that the played back audio is similar...

Страница 279: ...is installed in a system that is already configured proceed as described below 4 3 2 4 1 Wireless USB Network Functionality Test 1 With the system up and running press Config 2 Click Connectivity and...

Страница 280: ...performed as indicated by the green confirmation tick see Figure 4 9 7 Under Selected Devices Figure 4 9 proceed to the next device in this example Remote Database that is under Outputs click Check an...

Страница 281: ...2 Create a dummy patient file on the Vivid q N scanner Save several images in the patient file 3 Export the images to the External USB Hard Disk 4 Delete the dummy patient file including images from...

Страница 282: ...llowing the main shelf to be raised 2 While lifting the release handle raise the shelf upwards and make sure it is able to reach its maximum height Ensure that you do not apply too much force to move...

Страница 283: ...tted successfully is displayed 8 Select the GetVolInfo button The message Media in drive G has following properties Media Label MY_LABEL Media File System Name FAT is displayed 9 Select the Get BTPsec...

Страница 284: ...dia into the DVD CD device Note For information on types of media see DVD CD RW Drive on page 3 36 9 Select To CD DVD Archive and press OK A pop up is displayed with the message Current media is not f...

Страница 285: ...t is deleted from patient list Table 4 20 Plug and Scan Test Recommended Task Expected Result s 1 Press the On Off button on the control console for no more than 3 seconds The system enters Standby mo...

Страница 286: ...ing TVI Checks on page 4 37 Color Mode Checks on page 4 34 Probe Connectors Check on page 4 38 NOTE For more details refer to the information provided in the Vivid q N User Manual 4 4 1 2D Mode B Mode...

Страница 287: ...rate to increase resolution in image Use Frequency move to lower frequency to increase penetration Use the Reject control to reduce noise in the image Use the DDP control to optimize imaging in the b...

Страница 288: ...to the available grey scale Adjust Compress and Edge Enhance to further optimize the display Adjust Reject to reduce noise while taking care not to eliminate significant low level diagnostic informati...

Страница 289: ...flow area Radial and Lateral Averaging smooths the image by averaging collected data along the same horizontal line An increase of the lateral averaging will reduce noise but this will also reduce the...

Страница 290: ...robe or with an ordinary probe By using an ordinary probe you can first bring up a 2D picture for navigation purposes and then add PW CW Doppler 4 4 4 2 Preparations 1 Connect one of the probes to the...

Страница 291: ...2 Preparations 1 Connect one of the probes to the scanner s left most probe connector See Connecting Probes on page 3 58 for information about connecting the probes 2 Turn ON the scanner The 2D Mode...

Страница 292: ...tion menu for the desired probe is listed on the screen 3 Trackball to the desired application Press Select to launch the application To change application without changing the current probe press App...

Страница 293: ...ustments on page 3 71 2 Check the language settings Refer to Language Selection on page 3 72 3 Ensure that all of the software options are configured correctly Refer to Software Options Configuration...

Страница 294: ...GE DIRECTION FQ091019 REVISION 2 VIVID Q N SERVICE MANUAL 4 40 Section 4 6 Site Log Section 4 6 Site Log Table 4 1 Vivid q N Site Log Date Service Person Problem Comments...

Страница 295: ...GE DIRECTION FQ091019 REVISION 2 VIVID Q N SERVICE MANUAL Chapter 4 General Procedures and Functional Checks 4 41 Table 4 1 Vivid q N Site Log cont d Date Service Person Problem Comments...

Страница 296: ...GE DIRECTION FQ091019 REVISION 2 VIVID Q N SERVICE MANUAL 4 42 Section 4 6 Site Log This page was intentionally left blank...

Страница 297: ...functions for both the Vivid q N systems It also describes the power distribution system and probes Table 5 1 Contents in Chapter 5 Section Description Page Number 5 1 Overview 5 1 5 2 General Inform...

Страница 298: ...Scale imaging Color M Mode Doppler Different combinations of the above modes 5 2 1 Introduction The Vivid q N systems are equipped with a highly efficient power supply resulting in low power consumpt...

Страница 299: ...the Front End FE Electronics to the Back End Processor BEP and finally are displayed on the monitor and peripherals In addition the Vivid q N systems enable acquisition of the following signals ECG an...

Страница 300: ...tions via the Operator Panel that has ultrasound specific buttons mode dependent softkey buttons and an alphanumeric keyboard 5 2 2 3 Electronics Vivid q N internal electronics are divided into three...

Страница 301: ...0RGXOH 7 9 6 9 YROWDJHV 9 9 9 9 9ROWDJHV 9 67 9 67 9 9 DWWHU 30 WHUQDO 0RQLWRU 2 73 FK 3UH PS 7 URVV 3RLQW 9 FK 7 URVV 3RLQW K 9 FRQYHUWHU QDORJ HDPIRUPLQJ 0L HU 3 4 3 5 63 7 6 5 0 0 17 3 02 3 4 5 N 8...

Страница 302: ...ms 1 Scanner Subsystem Consists of the RFI Board Scan Controller and tissue processing For a detailed description see RFI Board on page 5 11 2 Front End Subsystem Includes the following Two TR32 Board...

Страница 303: ...9 6 9 YROWDJHV 9 9 9 9 9ROWDJHV 9 67 9 67 9 9 DWWHU 30 WHUQDO 0RQLWRU 2 73 FK 3UH PS 7 URVV 3RLQW 9 FK 7 URVV 3RLQW K 9 FRQYHUWHU QDORJ HDPIRUPLQJ 0L HU 3 4 3 5 63 7 6 5 0 0 17 3 02 3 4 5 N 86 5 DWD Q...

Страница 304: ...86 6 9 08 3UREH 08 7 5 6LJQDOV 56 3UREH 2 73 FK 3UH PS 7 URVV 3RLQW 9 FK 7 URVV 3RLQW K 9 FRQYHUWHU QDORJ HDPIRUPLQJ 0L HU 3 4 3 5 63 7 6 5 0 0 17 3 02 3 4 5 N 86 5 DWD Q 0 86 7 7 67 6 LDJQRVWLF LUFX...

Страница 305: ...mbly on the right side as shown in Figure 5 5 Figure 5 5 Bottom Assembly showing Location of Front End Figure 5 6 Keyboard Assembly in Opened Position WARNING WARNING When opening and closing the Keyb...

Страница 306: ...FQ091019 REVISION 2 VIVID Q N SERVICE MANUAL 5 10 Section 5 3 Front End Unit Figure 5 7 Bottom Assembly showing Position of Boards RFI TR32 P M Probe and MUX Board TR32 Boards located below the RFI Bo...

Страница 307: ...ator Tx voltage Enable Disable Probe Sensing Control of TR32 and P M Boards Ultrasound data acquisition and processing Figure 5 8 RFI Block Diagram 5 3 3 2 Watchdog and Power ON Reset For safety reaso...

Страница 308: ...roceeds as follows 1 The actual FPGA contents bit streams are written into DSP memory from the Host 2 The DSP configures serial port 0 to aid configuration 3 The DSP writes the bit streams to serial p...

Страница 309: ...5 13 5 3 3 6 RFI Board Connectors Figure 5 9 RFI Board Connector Locations Table 5 2 RFI Board Connectors Connector Description P5 To P M P6 PCI Flex to RFI P14 To power supply J1 To TR32 Boards J2 T...

Страница 310: ...below minimum temperature the RFI stops scanning and disables Tx voltage The minimum temperature references are set to 15 o C A temperature reading as low as 15 o C indicates a probe temperature sensi...

Страница 311: ...A and TR32B see Figure 5 10 Each TR32 Board is a complete 32 channel ultrasound Front End that includes the following features and functions 32 Transmitters 32 receiving channels T R switch Pre Amp TG...

Страница 312: ...cription Connector PIN Connected From 5 VA DC voltage distributed via RFI Board A indicates analog circuit J2 80 81 82 RFI 1 8 V DC voltage distributed via RFI Board J2 85 96 RFI 3 3 V DC voltage dist...

Страница 313: ...ds reside in the RFI Board The two TR32 Boards are linked together in parallel The way in which they operate depends upon the probe currently in use and also on the current type of Transmit Receive mo...

Страница 314: ...es up to 64 receive transmit channels and performs the following functions Receiving the channels and connecting them to the TR32 Boards Probe connectors High voltage MUX that selects 64 out of 128 in...

Страница 315: ...ion Theory 5 19 Figure 5 15 Probe and MUX Board Connector Locations Table 5 6 Probe and MUX Board Connectors Connector Description J1 Pencil Probe Connector J2 RS Probe Connector J3 To Upper TR32 Boar...

Страница 316: ...ge distributed in P M Board J5 16 21 RFI Board 3 3 V DC voltage distributed in P M Board J5 5 8 RFI Board 5 VA DC voltage distributed in P M Board A indicates analog circuit J5 13 15 RFI Board 5 VA DC...

Страница 317: ...A block diagram of the BEP is provided in Figure 5 17 Vivid q N Back End Processor Block Diagram on page 5 22 The various components that comprise the Vivid q N BEP are described in the following sec...

Страница 318: ...E DIRECTION FQ091019 REVISION 2 VIVID Q N SERVICE MANUAL 5 22 Section 5 4 Back End Processor Figure 5 17 Vivid q N Back End Processor Block Diagram DFN QG 7 6 DVHERDUG 3 0RQLWRU 0RQLWRU 86 3 0 86 3RUW...

Страница 319: ...interfaces to the following components HDD Front End RFI Board USB ports Docking port speaker phones and speaker jacks Keyboard Battery VGA Fans Power supply The Power Management Controller PMC mount...

Страница 320: ...Board Figure 5 18 ETX Base Board Block Diagram 5 4 3 2 VGA Interface The interface to the VGA is via the VGA connector on the rear side of the ETX Base Board The VGA port is connected to the DIB wher...

Страница 321: ...d disk F Drive Swap file partition The partition size is 1GB The following additional partitions are hidden Grub 32MB Repository 10GB NOTE When connected to the system a DVD device or disk on key will...

Страница 322: ...ocessor 5 4 7 Back End Processor Location of Components Figure 5 20 Views of the Back End Processor BEP To Fan Board From DC DC Power Supply KBD LAN VGA PCI Cable to RFI Internal Battery Docking Conne...

Страница 323: ...ll connections to P1 P2 P3 and P4 according to ETX specs Table 5 9 BEP Connectors Connector Description J7 VGA J19 EXT DC INPUT J18 DOCKING J20 Speakerphones J16 RFI P1 P4 ETX J5 LCD PANEL J6 KEYBOARD...

Страница 324: ...e Fan board see Figure 5 19 on page 5 25 Table 5 10 BEP Input DC Voltages Input Description Connector PIN Connected From EXT_DC 20 V DC from PS J17 1 2 3 4 5 PS Battery Varies from 14 V to 16 7 V DC d...

Страница 325: ...VGA to S Video adaptor RJ 45 connector for LAN connection Two USB ports for external peripherals 20V DC inlet main DC power to the system Figure 5 22 Vivid q NSystem Rear Panel Connections Legend 1 T...

Страница 326: ...wer Supply Unit located inside and mounted to the bottom assembly provides the system with both Low Voltage and High Voltage power and also enables recharging of the battery The Power Supply Unit cont...

Страница 327: ...t Components Block Diagram 5 6 3 1 Critical Temperature Sensor The PS Unit includes temperature sensors When the monitoring application measures the maximum temperature limit or above it will shut dow...

Страница 328: ...n to AC operation and vice versa When shutting down the system leave the main power cable connected to keep the battery fully charged NOTE The lithium ion technology used in the system s battery is si...

Страница 329: ...aters Do not leave the battery in direct sunlight Do not pierce the battery with a sharp object hit it or step on it Do not use a damaged battery Do not solder a battery Do not connect the battery to...

Страница 330: ...he layout of the keyboard and operator panel The buttons and controls are grouped together for ease of use the different areas of the keyboard and operator panel include the following Soft menu Keys p...

Страница 331: ...Keyboard Block Diagram 5 7 2 Keyboard and Operator Panel Components 5 7 2 1 Power ON OFF Button The Power On Off button receives 3 3 V from the BEP Once shorted this voltage is routed to the PMC which...

Страница 332: ...hese are equivalent to the normal PC mouse left and right click Set left click Menu right click The operation of these buttons is supported via the PS 2 Board Zoom Trackball and Store Buttons These bu...

Страница 333: ...riving the power On Off and status LEDs 2 5V BE Back End is used for the remaining circuits The keyboard operates with 5 voltage deviation on each supply The keyboard has current limiting circuitry im...

Страница 334: ...5 38 Section 5 7 Monitor and Operator Panel 5 7 2 12 LCD Display Unit The display monitor is a 15 LCD and is connected via a flex cable to the BEP as shown in Figure 5 28 Figure 5 28 LCD Display Flex...

Страница 335: ...els leads I II The External ECG module supports acquisition of a single bipolar ECG input channel ranging from 1 to 1 volt allowing amplification of 1000 The minimal allowed impedance is 10 M ohm The...

Страница 336: ...y currents apply the values listed in Table 5 12 below taken from table IV in IEC601 1 section 19 3 The ECG signals have double reinforced isolation B a from live parts Hence creepage distance and air...

Страница 337: ...ivid q N Internal ECG Respiratory module is designed to enable acquisition of the following signals ECG Respiratory and external ECG The Internal ECG Respiratory Board is located in the cabinet cage a...

Страница 338: ...8 31 2 Hz for Monitor use only Lead Fault Indicator Yes A2D resolution 12 bit 2 complement Sample Rate 1000 Table 5 15 Internal ECG Respiratory Board Specifications External ECG Characteristic Specifi...

Страница 339: ...or output type being used as follows Option 1 Monitor with single ended Positive output Connect the signal lead to pin 2 on the connector Connect the ground shielding to pins 5 and 7 on the connector...

Страница 340: ...ac 2v peak to peak A2D resolution 12 bit 2 complement Sample Rate 500 samples second Ground Isolation 4 kV rms Table 5 18 Connector Pin Out J5 ECG Respiration External ECG Pin Number Specification 1...

Страница 341: ...45 Table 5 19 Connector Pins Out J3 J4 USB Pin Number Specification J3 1 J4 28 J4 30 VUSB 5V DC Input from USB Bus J3 2 J4 8 D USB differential Data signal J3 5 J3 shell D USB differential Data signa...

Страница 342: ...d to print out reports and exams and is controlled in one of two ways depending on the system configuration Directly via the USB port Via LAN connection The printing operation to the Color Inkjet Prin...

Страница 343: ...twork Adapter The Vivid q N supports a unique type of Wireless Network Adapter For details regarding type and installation refer to Wireless USB Network Adaptor on page 3 35 The Wireless Network Adapt...

Страница 344: ...to provide the best thermal conduction allowing the maximum amount of heat to be removed from the system It is crucial that the system ventilation access is not blocked a distance of at least 20 cm f...

Страница 345: ...ality or shades visible on the Vivid q N LCD Display may be the result of improper monitor calibration Therefore adjustments may be made to the Contrast Brightness Watermark and or Blue Tint as requir...

Страница 346: ...ncrease the brightness To assist in making Brightness adjustments an adjustment bar is displayed below the screen NOTE The screen Brightness is calibrated when the dark blocks on the left numbers 1 th...

Страница 347: ...Adjustment Procedure NOTE Systems with BT11 installed software have a Blue Tint 2 option that enables blue tint enhancement This option can be switched off if preferred by the user NOTE This option a...

Страница 348: ...GE DIRECTION FQ091019 REVISION 2 VIVID Q N SERVICE MANUAL 6 4 Figure 6 6 Identifying Monitor Type...

Страница 349: ...on Screen 2 To adjust the blue tint hold down ALT then use the and keys as required Repeatedly pressing will decrease the blue tint repeatedly pressing will increase the blue tint NOTE To assist in ma...

Страница 350: ...VID Q N SERVICE MANUAL 6 6 6 1 2 5 2 Turning Off the Blue Tint 2 Option 1 Press Config Service The Service Screen opens see Figure 6 9 2 Under LCD Setup de select Blue Tint 2 to turn off this option F...

Страница 351: ...the External Monitor as the Primary monitor but does not have access to it and therefore cannot make separate adjustments to it using the controls on the External Monitor itself Moreover the calibrati...

Страница 352: ...1 Purchase a standard VGA isolated splitter Do not use the GE VGA isolated splitter P N 5390022 as this has a special pin configuration dedicated for use with CardioLab MacLab Carto 2 Connect the dev...

Страница 353: ...4 Configuring Print Orientation For information on Print Orientation Portrait or Landscape refer to Configuring Printing Orientation Portrait or Landscape and Paper Size on page 3 23 6 1 5 Video Syst...

Страница 354: ...ay then allow it to continue to run automatically overnight For details see Figure 6 10 below IMPORTANT During the Battery Calibration procedure no scanning can be performed NOTE For step by step inst...

Страница 355: ...e completed overnight as outlined in Figure 6 10 1 Click on the battery icon at the bottom of the scanning screen OR from the message window shown below click Recalibrate The Battery Calibration Wizar...

Страница 356: ...for the confirmation window to be displayed showing that the battery is fully charged See Battery Calibration Wizard Page 2 in Figure 6 12 4 Click Next The Battery Calibration Wizard Page 3 opens see...

Страница 357: ...djustments 6 13 5 Disconnect the AC power cable from the Vivid q N then click Next The second phase of the process Full Discharge commences and the Battery Calibration Wizard Page 3 is displayed as sh...

Страница 358: ...id q N system automatically shuts down at the end of this process the battery calibration procedure is now complete 7 The following morning re connect the AC power cable and turn ON power to the syste...

Страница 359: ...tic tools to locate system problems and failures The Vivid q N ultrasound unit includes built in diagnostic tools that can be accessed from the scanner application Table 7 1 Contents in Chapter 7 Sect...

Страница 360: ...ed When the Back End is operating you can verify proper voltages and temperatures in the Front End and in the Power Supply To check the Front End parts the tests must follow a logical sequence in orde...

Страница 361: ...nformation The Data Flow Map area on the right is designed to provide an instant visual representation of the system components the color illumination of graphic buttons light blue light gray and stat...

Страница 362: ...0 NOTE When performing a specific test for an intermittent problem it is highly recommended to use the Loop option use the combo box or type the required number of loops as appropriate Looping the tes...

Страница 363: ...isplays a menu of diagnostic test sequences and tests available for selection Execute Displays the name of the currently selected diagnostic test or test sequence Controls and Special Instructions Dis...

Страница 364: ...currently selected test sequence Result Lists test results as either PASS or FAIL Loop Lists name of loop and the sub tests within the loop Date Date test was performed Tests Scroll Bar and Arrows Ena...

Страница 365: ...ase Button Clears all test sequence log files for that specific currently selected test listed in the Tests window passed and failed tests It is not recommended to clear the test sequence log files un...

Страница 366: ...irst harmonic is displayed in the Report window When there is more than one report listed the first report is displayed by default Double clicking on another report for example Test signal amplitude s...

Страница 367: ...on a currently selected channel marks a red square on the report graph and also evokes the display of the following information relative to that specific point Average Deviation standard deviation fr...

Страница 368: ...s approximately 10 minutes for completion 7 2 4 1 1 Full System Test FE and BEP Performs a full sequence of complete Front End and Back End tests automatically that do not require user intervention Th...

Страница 369: ...t verifies that the calibration saved on the Hard Disk is within acceptable limits For test procedure instructions see the DC Offset Verification section page 7 28 7 2 4 2 2 RFI Tests Full RFI Test Th...

Страница 370: ...tterns are summed and focused on the BF 32A and generated to the RFI demodulator For test procedure instructions see the TR32 BF Digital Test section page 7 46 System BF Digital Test In this test both...

Страница 371: ...expected results are shown on the Test report For test procedure instructions see the ACW Delay Range Test section page 7 68 ACW Pre Mixer Gain Test The ACW Analog CW Pre Mixer Gain Test checks the P...

Страница 372: ...sensors in the system to ensure that the system is operating within the pre defined temperature limits and that there is no overheating of any components For test procedure instructions see the Tempe...

Страница 373: ...vided in the PC Doctor section page 7 115 Automatic Full Back End Test without Hard Disk This test performs a full system check without a Hard Disk scan The test sequence includes all automatic tests...

Страница 374: ...ests the MXX commands PAND PANDN POR and PXOR If errors are detected the failed commands are listed CPU MMX Shift Tests the MXX commands PSLL and PSRL If errors are detected the failed commands are li...

Страница 375: ...with 18 test patterns one pattern at a time These tests fill the entire screen with a single color Video Data Transfer Tests the graphics acceleration part of the video controller This test fills the...

Страница 376: ...t logs as FAILED For test procedure instructions see the Network Test section page 7 130 Interactive Audio Test The Audio Test is performed to check for proper operation of the audio system the follow...

Страница 377: ...y if the Vivid q N system shows signs of an intermittent problem As described in this section the testing sequence can be paused and restarted at any stage providing a quick and easy method of reviewi...

Страница 378: ...components are highlighted blue in the Schematic View as shown below Figure 7 5 Full System FE and BEP Test 2 As indicated in the Special Instructions area make sure the system is calibrated and disco...

Страница 379: ...ere identified Red Problems were identified in these components during the performance of the test Yellow The tests executed so far on these components have passed but not all recommended tests have b...

Страница 380: ...ION 2 VIVID Q N SERVICE MANUAL 7 22 Section 7 3 Performing Full System Diagnostics 8 If necessary use the scroll bars and or arrows to scroll through the list of Test results Figure 7 6 View Test Log...

Страница 381: ...est If errors were identified results exceeding acceptable upper or lower limits verify that all system cables and boards are connected not misplaced and functioning properly as described in Chapter 5...

Страница 382: ...quence will help to derive the correct conclusions regarding the source of the problem As described in this section the testing sequence can be paused and restarted at any stage providing a quick and...

Страница 383: ...ction from the Diagnostic Test Tree see Figure 7 7 below and press Set The DC Offset Calibration name is displayed under Execute the relevant system components to be tested in this case all components...

Страница 384: ...tests for these components have been completed and no problems were identified Red Problems were identified in these components during the performance of the test Yellow The tests executed so far on...

Страница 385: ...to the upper or lower limits repeat the DC Offset Calibration test again and review the newly acquired results If errors were identified results exceeding acceptable upper or lower limits verify that...

Страница 386: ...wn below 2 As indicated in the Special Instructions area disconnect any probes currently connected to the system and make sure that nothing is touching the probe connectors 3 Under the Special Instruc...

Страница 387: ...red 7 To resume testing from the point where you paused trackball to the Start button and press Set When the DC Offset Verification Test sequence is complete the Diagnostic Test window displays the Fi...

Страница 388: ...ower limits verify that all system cables and boards are connected not misplaced and functioning properly as described in Chapter 5 Components and Function Theory If the problem persists this indicate...

Страница 389: ...Full RFI Test name is displayed under Execute the relevant system component to be tested is highlighted light blue in the Schematic View RFI as shown below 2 As indicated in the Special Instructions...

Страница 390: ...re you paused trackball to the Start button and press Set When the Full RFI Test sequence is complete the Diagnostic Test window displays the Finished message the View Test Log window opens automatica...

Страница 391: ...at the test If errors were identified results exceeding acceptable upper or lower limits verify that all system cables and boards are connected not misplaced and functioning properly as described in C...

Страница 392: ...that nothing is touching the probe connectors 3 Under the Special Instructions area activate the Loops checkbox and select the required number of Loops from the combo box 4 Adjacent to On Fail select...

Страница 393: ...paused trackball to the Start button and press Set When the RFI FE Cache Test sequence is complete the Diagnostic Test window displays the Finished message the View Test Log window opens automaticall...

Страница 394: ...repeat the test If errors were identified results exceeding acceptable upper or lower limits verify that all system cables and boards are connected not misplaced and functioning properly as described...

Страница 395: ...s shown below 2 As indicated in the Special Instructions area disconnect any probes currently connected to the system and make sure that nothing is touching the probe connectors 3 Under the Special In...

Страница 396: ...press Set if required 7 To resume testing from the point where you paused trackball to the Start button and press Set When the RFI Analog Circuits Test sequence is complete the Diagnostic Test window...

Страница 397: ...at the test If errors were identified results exceeding acceptable upper or lower limits verify that all system cables and boards are connected not misplaced and functioning properly as described in C...

Страница 398: ...nd make sure that nothing is touching the probe connectors 3 Under the Special Instructions area activate the Loops checkbox and select the required number of Loops from the combo box 4 Adjacent to On...

Страница 399: ...odulator Short Test sequence is complete the Diagnostic Test window displays the Finished message the View Test Log window opens automatically listing all tests performed and showing details of which...

Страница 400: ...repeat the test If errors were identified results exceeding acceptable upper or lower limits verify that all system cables and boards are connected not misplaced and functioning properly as described...

Страница 401: ...ow 2 As indicated in the Special Instructions area disconnect any probes currently connected to the system and make sure that nothing is touching the probe connectors 3 Under the Special Instructions...

Страница 402: ...coming from the speakers NOTE If no sound is heard it is necessary to perform the BEP Audio Test as described in Audio Test on page 7 132 In the event this test also fails the problem is probably in...

Страница 403: ...ery close to the upper or lower limits perform calibration as described in DC Offset Calibration on page 7 25 and then repeat the test If errors were identified results exceeding acceptable upper or l...

Страница 404: ...is test no probe should be connected to the system and nothing should be touching the probe connectors 1 In the Diagnostic Test window trackball to TR32 BF Digital Test in the list of TR32 BF tests av...

Страница 405: ...ding to the various system components will be highlighted in the appropriate color to indicate the current test status as follows Green All recommended tests for these components have been completed a...

Страница 406: ...your local On Line Center for assistance If errors were identified but the results were very close to the upper or lower limits perform calibration as described in DC Offset Calibration on page 7 25...

Страница 407: ...ow 2 As indicated in the Special Instructions area disconnect any probes currently connected to the system and make sure that nothing is touching the probe connectors 3 Under the Special Instructions...

Страница 408: ...age trackball to the Pause button and press Set if required 7 To resume testing from the point where you paused trackball to the Start button and press Set When the System BF Digital Test sequence is...

Страница 409: ...25 and then repeat the test If errors were identified results exceeding acceptable upper or lower limits verify that all system cables and boards are connected not misplaced and functioning properly...

Страница 410: ...2 As indicated in the Special Instructions area disconnect any probes currently connected to the system and make sure that nothing is touching the probe connectors 3 Under the Special Instructions ar...

Страница 411: ...e you paused trackball to the Start button and press Set When the ADC Test sequence is complete the Diagnostic Test window displays the Finished message the View Test Log window opens automatically li...

Страница 412: ...nd report the report is highlighted in the Reports list and the corresponding results are shown in the Report window below as shown in Figure 7 29 10 Use the tools provided to scroll through the chann...

Страница 413: ...channels and view the results as previously described 14 When done trackball to the Close button and press Set to close the View Report window 15 Select the fourth report the report is highlighted in...

Страница 414: ...perform calibration as described in DC Offset Calibration on page 7 25 and then repeat the test If errors were identified results exceeding acceptable upper or lower limits verify that all system cabl...

Страница 415: ...below 2 As indicated in the Special Instructions area disconnect any probes currently connected to the system and make sure that nothing is touching the probe connectors 3 Under the Special Instructio...

Страница 416: ...ere you paused trackball to the Start button and press Set When the Rx Test sequence is complete the Diagnostic Test window displays the Finished message the View Test Log window opens automatically l...

Страница 417: ...oblems were identified it is recommended to re boot the system this is obligatory when prompted If the test passed but the original problem persists contact your local On Line Center for assistance If...

Страница 418: ...VID Q N SERVICE MANUAL 7 60 Section 7 4 Performing Front End FE Diagnostics 13 Trackball to the Exit button and press Set to close the View Test Log dialog box 14 Press the Esc button on the keyboard...

Страница 419: ...nectors 1 In the Diagnostic Test window trackball to ACW IQ Symmetry Test in the list of ACW tests available for selection from the Diagnostic Test Tree see Figure 7 32 below and press Set The ACW IQ...

Страница 420: ...e test progress Status indicators in the Data Flow map corresponding to the various system components will be highlighted in the appropriate color to indicate the current test status as follows Green...

Страница 421: ...n Line Center for assistance If errors were identified results exceeding acceptable upper or lower limits verify that all system cables and boards are connected not misplaced and functioning properly...

Страница 422: ...nnect any probes currently connected to the system and make sure that nothing is touching the probe connectors 3 Adjacent to On Fail select either Stop or Continue as required Stopping on failure enab...

Страница 423: ...ll to the Start button and press Set When the ACW Matrix Test sequence is complete the Diagnostic Test window displays the Finished message the View Test Log window opens automatically listing all tes...

Страница 424: ...the second report Signal RMS the report is highlighted in the Reports list and the corresponding results are shown in the Report window below as shown in Figure 7 39 9 Use the tools provided to scroll...

Страница 425: ...s were identified results exceeding acceptable upper or lower limits verify that all system cables and boards are connected not misplaced and functioning properly as described in Chapter 5 Components...

Страница 426: ...sconnect any probes currently connected to the system and make sure that nothing is touching the probe connectors 3 Adjacent to On Fail select either Stop or Continue as required Stopping on failure e...

Страница 427: ...he Start button and press Set When the ACW Delay Range Test sequence is complete the Diagnostic Test window displays the Finished message the View Test Log window opens automatically listing all tests...

Страница 428: ...second report Signal RMS the report is highlighted in the Reports list and the corresponding results are shown in the Report window below as shown in Figure 7 43 9 Use the tools provided to scroll th...

Страница 429: ...were identified results exceeding acceptable upper or lower limits verify that all system cables and boards are connected not misplaced and functioning properly as described in Chapter 5 Components an...

Страница 430: ...e relevant system components to be tested are highlighted light blue in the Schematic View P M as shown below 2 As indicated in the Special Instructions area disconnect any probes currently connected...

Страница 431: ...n completed and no problems were identified Red Problems were identified in these components during the performance of the test Yellow The tests executed so far on these components have passed but not...

Страница 432: ...errors were identified results exceeding acceptable upper or lower limits verify that all system cables and boards are connected not misplaced and functioning properly as described in Chapter 5 Compon...

Страница 433: ...nts to be tested are highlighted light blue in the Schematic View P M as shown below 2 As indicated in the Special Instructions area disconnect any probes currently connected to the system and make su...

Страница 434: ...ave been completed and no problems were identified Red Problems were identified in these components during the performance of the test Yellow The tests executed so far on these components have passed...

Страница 435: ...t and the corresponding results are shown in the Report window below as shown in Figure 7 49 9 Use the tools provided to scroll through the channels and view the results as previously described 10 Whe...

Страница 436: ...annels and view the results as previously described 13 When done trackball to the Close button and press Set to close the View Report window 14 Select the fourth report Signal SNR the report is highli...

Страница 437: ...errors were identified results exceeding acceptable upper or lower limits verify that all system cables and boards are connected not misplaced and functioning properly as described in Chapter 5 Compon...

Страница 438: ...mponents to be tested are highlighted light blue in the Schematic View P M as shown below 2 As indicated in the Special Instructions area disconnect any probes currently connected to the system and ma...

Страница 439: ...e been completed and no problems were identified Red Problems were identified in these components during the performance of the test Yellow The tests executed so far on these components have passed bu...

Страница 440: ...test passed but the original problem persists contact your local On Line Center for assistance If errors were identified results exceeding acceptable upper or lower limits verify that all system cable...

Страница 441: ...elow 2 As indicated in the Special Instructions area disconnect any probes currently connected to the system and make sure that nothing is touching the probe connectors 3 Under the Special Instruction...

Страница 442: ...At any stage trackball to the Pause button and press Set if required 7 To resume testing from the point where you paused trackball to the Start button and press Set When the Pencil RX Test sequence is...

Страница 443: ...er limits verify that all system cables and boards are connected not misplaced and functioning properly as described in Chapter 5 Components and Function Theory If the problem persists this indicates...

Страница 444: ...stem components to be tested are highlighted light blue in the Schematic View as shown below 2 As indicated in the Special Instructions area disconnect any probes currently connected to the system and...

Страница 445: ...passed but not all recommended tests have been performed 6 At any stage trackball to the Pause button and press Set if required 7 To resume testing from the point where you paused trackball to the Sta...

Страница 446: ...t result values are within the pre defined Max and Min limits as shown in Figure 7 59 10 Select the second report Temperatures the report is highlighted in the Reports list and the corresponding resul...

Страница 447: ...and that result values are within the pre defined Max and Min limits as shown in Figure 7 60 12 Select the third report Fans Speed the report is highlighted in the Reports list and the corresponding r...

Страница 448: ...result values are within the pre defined Max and Min limits as shown in Figure 7 59 14 Select the fourth report Battery Parameters the report is highlighted in the Reports list and the corresponding...

Страница 449: ...hat result values are within the pre defined Upper and Lower limits as shown in Figure 7 62 16 Select the fifth report Tx Voltages the report is highlighted in the Reports list and the corresponding r...

Страница 450: ...ation as described in DC Offset Calibration on page 7 25 and then repeat the test If errors were identified results exceeding acceptable upper or lower limits verify that all system cables and boards...

Страница 451: ...fails Alternatively you may prefer testing to continue on failure and later you may review the report 4 Trackball to the Start button and press Set The Fixed Voltages Test commences While the test pr...

Страница 452: ...test passed and that result values are within the pre defined Max and Min limits as shown in Figure 7 65 8 When done trackball to the Exit button and press Set to close the View Report window 9 After...

Страница 453: ...at another board that supports the operation of this board is faulty Continue trouble shooting down to the appropriate board If necessary perform a specific test If the problem still persists contact...

Страница 454: ...ternatively you may prefer testing to continue on failure and later you may review the report 4 Trackball to the Start button and press Set The Temperatures Test commences While the test proceeds the...

Страница 455: ...iew Test Log window opens automatically listing all tests performed and showing details of which tests passed or failed as shown in the example in Figure 7 67 NOTE For this test there is one report Te...

Страница 456: ...e test If errors were identified results exceeding acceptable upper or lower limits verify that all system cables and boards are connected not misplaced and functioning properly as described in Chapte...

Страница 457: ...s Alternatively you may prefer testing to continue on failure and later you may review the report 4 Trackball to the Start button and press Set The Fans Speed Test commences While the test proceeds th...

Страница 458: ...t values for each fan are within the pre defined Max and Min limits as shown in Figure 7 69 8 When done trackball to the Exit button and press Set to close the View Report window 9 After reviewing the...

Страница 459: ...hat another board that supports the operation of this board is faulty Continue trouble shooting down to the appropriate board If necessary perform a specific test If the problem still persists contact...

Страница 460: ...ery PS as shown below 2 Under the Special Instructions area activate the Loops checkbox and select the required number of Loops from the combo box 3 Adjacent to On Fail select either Stop or Continue...

Страница 461: ...to the Start button and press Set When the Battery Parameters Test sequence is complete the Diagnostic Test window displays the Finished message the View Test Log window opens automatically listing a...

Страница 462: ...ced and functioning properly as described in Chapter 5 Components and Function Theory If the test fails again repeat the Fan Speed Test If the problem persists this indicates that either the specific...

Страница 463: ...tery PS as shown below 2 Under the Special Instructions area activate the Loops checkbox and select the required number of Loops from the combo box 3 Adjacent to On Fail select either Stop or Continue...

Страница 464: ...all to the Start button and press Set When the Tx Voltages Test sequence is complete the Diagnostic Test window displays the Finished message the View Test Log window opens automatically listing all t...

Страница 465: ...oards are connected not misplaced and functioning properly as described in Chapter 5 Components and Function Theory If the problem persists this indicates that either the specific board you tested is...

Страница 466: ...scribed in the Accessing the Front End Diagnostic Options section on page 7 25 7 6 1 1 Extended Keyboard Test NOTE For a description of this test refer to the information in the Extended Keyboard Test...

Страница 467: ...y of the other ATGC sliders above or below i e all other sliders remain stationary 4 Repeat step 3 to test each of the other ATGC sliders 5 Check all keyboard keys by pressing each in turn as follows...

Страница 468: ...illuminated green Patient CW Application etc alternatively check each one one by one individually b trackball to the Backlights button under Lights Control and press Set Make sure that all the extend...

Страница 469: ...in Figure 7 76 below 17 Trackball to the Exit button and press Set to close the View Test Log dialog box 18 Proceed as follows If the test passed but the original problem persists contact your local O...

Страница 470: ...tests available for selection from the Diagnostic Test Tree see Figure 7 77 below and press Set The ECG Test name is displayed under Execute the relevant system components to be tested are highlighte...

Страница 471: ...shooting 7 113 7 Make sure that the resolution scale is set to 1 Sec as shown in Figure 7 78 above 8 Trackball to the Open Device button and press Set The ECG signal is displayed in the Data area as s...

Страница 472: ...yed on the screen as shown in Figure 7 79 10 When done trackball to the Exit button and press Set 11 When prompted by the following message select Yes or No as applicable 12 Proceed as follows If the...

Страница 473: ...age 7 130 7 6 1 3 1 Full Back End Test w o Hard Disk Scan NOTE For a description of this test refer to Full Back End Test without Hard Disk on page 7 15 1 In the Diagnostic Test window trackball to Fu...

Страница 474: ...ponents during the performance of the test Yellow The tests executed so far on these components have passed but not all recommended tests have been performed 5 At any stage trackball to the Pause butt...

Страница 475: ...supports the operation of this board is faulty Continue trouble shooting down to the appropriate board If necessary perform a specific test If the problem still persists contact the GE On Line Center...

Страница 476: ...or these components have been completed and no problems were identified Red Problems were identified in these components during the performance of the test Yellow The tests executed so far on these co...

Страница 477: ...that another board that supports the operation of this board is faulty Continue trouble shooting down to the appropriate board If necessary perform a specific test If the problem still persists conta...

Страница 478: ...as follows Green All recommended tests for these components have been completed and no problems were identified Red Problems were identified in these components during the performance of the test Yell...

Страница 479: ...for assistance If errors were identified results exceeding acceptable upper or lower limits verify that all system cables and boards are connected not misplaced and functioning properly as described...

Страница 480: ...s Alternatively you may prefer testing to continue on failure and later you may review the report 4 Trackball to the Start button and press Set The Hard Drive Full Test w o Scan commences While the te...

Страница 481: ...Seek Random Seek Funnel Scan 8 When done trackball to the Exit button and press Set to close the View Report window 9 After reviewing the test results proceed as follows If no problems were identifie...

Страница 482: ...oment it fails Alternatively you may prefer testing to continue on failure and later you may review the report 4 Trackball to the Start button and press Set The Full Memory Test commences While the te...

Страница 483: ...tern Test Memory Parity Test 8 When done trackball to the Exit button and press Set to close the View Report window 9 After reviewing the test results proceed as follows If no problems were identified...

Страница 484: ...ment it fails Alternatively you may prefer testing to continue on failure and later you may review the report 4 Trackball to the Start button and press Set The Full Video Test commences While the test...

Страница 485: ...ata Transfer Video Text Output 8 When done trackball to the Exit button and press Set to close the View Report window 9 After reviewing the test results proceed as follows If no problems were identifi...

Страница 486: ...moment it fails Alternatively you may prefer testing to continue on failure and later you may review the report 4 Trackball to the Start button and press Set The PCI Test commences While the test proc...

Страница 487: ...d as follows If no problems were identified it is recommended to re boot the system this is obligatory when prompted If the test passed but the original problem persists contact your local On Line Cen...

Страница 488: ...e moment it fails Alternatively you may prefer testing to continue on failure and later you may review the report 4 Trackball to the Start button and press Set The Network Test commences While the tes...

Страница 489: ...eed as follows If no problems were identified it is recommended to re boot the system this is obligatory when prompted If the test passed but the original problem persists contact your local On Line C...

Страница 490: ...96 below and press Set The Test name is displayed under Execute the relevant system components to be tested are highlighted light blue in the Schematic View BEP Peripherals Keyboard as shown below 2 T...

Страница 491: ...the test results proceed as follows If no problems were identified it is recommended to re boot the system this is obligatory when prompted If the test passed but the original problem persists contac...

Страница 492: ...of Interactive PC Doctor tests available for selection from the Diagnostic Test Tree see Figure 7 99 below and press Set The Test name is displayed under Execute the relevant system components to be t...

Страница 493: ...the displayed screen press any key to return to PC Dr for Windows Monitor Test screen 6 When done trackball to the Close button and press Set to exit the test When the Monitor Test sequence is complet...

Страница 494: ...identified results exceeding acceptable upper or lower limits verify that all system cables and boards are connected not misplaced and functioning properly as described in Chapter 5 Components and Fun...

Страница 495: ...shown in the example in Figure 7 102 The bookmark will allow users to place a time stamp where a particular problem has occurred while continuing with their current activity with minimum interruption...

Страница 496: ...select the required export destination DVD CD or Memory Stick then click Save and Export A Zip file named logfile_ date _ time zip is copied onto the selected removable media NOTE Previously users wer...

Страница 497: ...in the External position as shown in Figure 7 104 below 2 Insert the blank DVD CD media into the DVD CD RW drive tray 3 On the Vivid q N system press the Config key 4 Select the Connectivity Tab and a...

Страница 498: ...EVISION 2 VIVID Q N SERVICE MANUAL 7 140 Section 7 7 Automatic Error Log 6 Click the Format button When DVD CD formatting is complete a formatting successful message is displayed together with details...

Страница 499: ...7 4 Extensive Log Categories and Failure Scenarios Extensive Log Category Type of Failure Archive Loss of patient information or images System lock up due to database corruption Display of message wa...

Страница 500: ...ate checkboxes to activate the categories for which detailed analysis is required refer to the recommendations in Table 7 4 NOTE The impact of activating a checkbox would be to generate larger detaile...

Страница 501: ...File Ranges NOTE By default the log files may be very large as they are not limited by time date The user is able to limit the size timeframe of the log files by choosing the required settings as desc...

Страница 502: ...ted press Ctrl E to eject the media Table 7 5 Attachment Categories and Recommendations for Use Category Type of Information and Recommended Use Diagnostic Reports Should be used whenever a diagnostic...

Страница 503: ...NOTE Successful upload of logs to the GE ftp site can only be achieved when the designated PC is connected to the Internet and when all security measures such as firewalls taken at the local network...

Страница 504: ...local GE personnel that you have uploaded files to the GE ftp site NOTE In the event that the upload process fails check your local network security settings to make sure that they did not prevent th...

Страница 505: ...e message The action may take a long time Please wait During this procedure a log file which contains information about the integrity of the database will automatically be created and stored in the Lo...

Страница 506: ...GE DIRECTION FQ091019 REVISION 2 VIVID Q N SERVICE MANUAL 7 148 Section 7 7 Automatic Error Log This page was intentionally left blank...

Страница 507: ...eplacement Procedure 8 10 Rear Cover Latch Assembly Replacement Procedure 8 20 LCD Display Cover Hinges Replacement Procedure 8 22 Bottom Assembly Replacement Procedure 8 25 LCD Display Frame Replacem...

Страница 508: ...ers as indicated in the Bearing Handle replacement procedure 8 2 1 2 Time Required 10 minutes 8 2 1 3 Preparations None 8 2 1 4 Bearing Handle Removal Procedure 1 Close the Vivid q N LCD cover making...

Страница 509: ...hands to pull the Bearing Handle slightly apart in order to slot the ends into the handle holes on the Vivid q N casing 2 Carefully fasten each captive screw on either side of the Bearing Handle to s...

Страница 510: ...ultrasound scanner 2 Close the Vivid q N LCD cover making sure both front latches are securely fastened 3 Carefully turn the Vivid q N over placing it face down 4 While holding the Vivid q N steady p...

Страница 511: ...r 4 Reconnect the AC adapter and all cables to the Vivid q N portable ultrasound scanner 5 Proceed to perform the following functionality tests SafeLock Cart Grounding Continuity on page 10 22 only if...

Страница 512: ...in Chapter 3 System Setup 8 2 3 4 Hard Disk Removal Procedure 1 Make sure the Vivid q N LCD Display cover is securely closed and that the scanner is standing firmly on a flat surface 2 Working from th...

Страница 513: ...two screws previously removed to secure the Hard Disk in position refer to Figure 8 6 on page 8 6 NOTE The formatting process limits the size of the partition E on the hard disk to approximately 120G...

Страница 514: ...ter The following message is displayed The following window displays 3 Press any key The system ejects the CD 4 Remove the CD from the CD drive 5 Insert the appropriate software installation CD into t...

Страница 515: ...ll software procedure corresponding to the BT level of your system Refer to the Software Upgrade Procedure Overview on page 8 99 Note IMPORTANT if both the Hard Disk and Back End are being replaced si...

Страница 516: ...nd Keyboard Removal Procedure 1 Remove the bearing handle as described in the Bearing Handle Removal Procedure on page 8 2 2 Place the Vivid q N portable ultrasound scanner face down and remove the ba...

Страница 517: ...trol Panel and Keyboard during other replacement procedures Step 6 will only be required if indicated 6 Lift the Control Panel and Keyboard up to gain access to the cable connector underneath and disc...

Страница 518: ...h those in the Bottom Assembly 3 Close the Vivid q N LCD Display cover making sure both front latches are securely fastened 4 Carefully turn the Vivid q Nover placing it face down 5 Return and fasten...

Страница 519: ...wish to remove and its neighboring keycap 2 Use the screw driver to gently lever off the defective keycap until it is completely loosened from its base see Figure 8 17 below 3 Lift off and remove the...

Страница 520: ...the bracket that fasten the trackball assembly to the base of the Control Panel as shown in Figure 8 18 below 3 Disconnect the three trackball cable connectors from the trackball assembly carefully p...

Страница 521: ...keycap see Figure 8 19 below 8 2 4 5 6 ATGC Slider Keycap Installation Procedure 1 Carefully place a new slider keycap in position on the slider base taking care to place the plastic alignment pin in...

Страница 522: ...he defective knob see Figure 8 20 below 8 2 4 5 8 ATGC Rotary Knob Installation Procedure 1 Carefully place a new ATGC Rotary Knob in position on the keyboard taking care to place the plastic alignmen...

Страница 523: ...the event that the traces res file is not deleted prior to installing the new ECG Respiratory board the following error message will later be displayed 2 Shut down the Vivid q N ultrasound unit as des...

Страница 524: ...ocation on the base of the Control Panel 3 Re connect the ECG cable see Figure 8 22 above 4 Re connect the Flex Cable previously removed from the ECG Board to the new ECG Respiratory Board 5 Return an...

Страница 525: ...shown in Figure 8 23 11 Proceed to perform the following functionality tests Isolated Patient Lead Source Leakage Lead to Ground on page 10 26 Isolated Patient Lead Source Leakage Lead to Lead on pag...

Страница 526: ...ssembly Removal Procedure 1 Disconnect the AC adapter and all cables from the Vivid q N portable ultrasound scanner 2 Remove the Bearing Handle as described in the Bearing Handle Removal Procedure on...

Страница 527: ...on Procedure on page 8 57 4 Return the LCD Display Frame as described in the LCD Display Frame Installation Procedure on page 8 28 5 Return the Control Panel and Keyboard as described in the Control P...

Страница 528: ...vid q N ultrasound unit as described in System Setup 8 2 6 4 LCD Display Cover Hinges Removal Procedure 1 Remove the bearing handle as described in the Bearing Handle Removal Procedure on page 8 2 2 R...

Страница 529: ...must be aligned with the holes in the Bottom Assembly as explained in the next step 3 Gently maneuver the LCD cover by raising and lowering it while exerting pressure to slide the LCD Display Cover u...

Страница 530: ...nel and Keyboard Installation Procedure on page 8 12 10 Close and open the lid a few times to ensure proper closure of the LCD Display cover 11 Reconnect the AC adapter and all cables to the Vivid q N...

Страница 531: ...oval Procedure on page 8 10 5 Remove the P M Board as described in the P M Probe and MUX Board Removal Procedure on page 8 30 6 Remove the TR32 and RFI Boards as described in the TR32 and RFI Boards R...

Страница 532: ...ation Procedure on page 8 50 7 Return the BEP as described in the BEP Installation Procedure on page 8 44 8 Return the TR32 and RFI Boards as described in the TR32 and RFI Boards Installation Procedur...

Страница 533: ...asound unit as described in Chapter 3 System Setup 8 2 8 4 LCD Display Frame Removal Procedure 1 With the LCD Display in the open upright position use a flat screwdriver to remove the screw cap from e...

Страница 534: ...n the LCD display frame to the correct position and using both hands press the frame under the securing clips on all four sides to fasten it against the LCD display Refer to Figure 8 30 on page 8 28 2...

Страница 535: ...ews do not overtighten or use excessive force 8 3 1 P M Probe and MUX Board Replacement Procedure 8 3 1 1 Tools Use the appropriate Phillips and flat screw drivers as indicated in the bottom assembly...

Страница 536: ...8 2 2 Remove the Control Panel and Keyboard as described in the Control Panel and Keyboard Removal Procedure on page 8 10 3 Loosen and remove the four screws that secure the P M Board to the RFI Boar...

Страница 537: ...33 and Figure 8 32 above 2 Return and fasten the four screws to secure the P M Board to the RFI Board as shown in Figure 8 31 on page 8 30 3 Return the Control Panel and Keyboard as described in the...

Страница 538: ...nnot be used with a TR32 Board V7 Always verify this by examining the version number stated on the board as shown in Figure 8 34 below NOTE Before installing the TR32 V12 board check that the DCDC V4...

Страница 539: ...rew drivers as indicated in the bottom assembly replacement procedures 8 3 2 2 Time Required 15 minutes 8 3 2 3 Preparations Shut down the Vivid q N ultrasound unit as described in Chapter 3 System Se...

Страница 540: ...he Control Panel and Keyboard as described in the Control Panel and Keyboard Removal Procedure on page 8 10 3 Loosen the eight screws that secure the TR32 and RFI Boards to the Bottom Assembly as show...

Страница 541: ...of the P M Board upwards and hinge it open to gain access to the RFI and TR32 Board assembly beneath as shown in Figure 8 41 below The RFI and TR32 Boards are seated together in the system as one unit...

Страница 542: ...cement Procedures in Figure 8 41 below 9 Remove the RFI Board from the TR32 Boards separate by gently pulling them apart as shown in Figure 8 42 below Figure 8 41 Removing the RFI and TR32 Boards from...

Страница 543: ...rocedures 8 37 10 Separate the two TR32 Boards from each other as shown in Figure 8 43 below NOTE Replace the defective board as described in the appropriate steps of the following procedure Figure 8...

Страница 544: ...val Procedure 1 Prepare each of the two TR32 Boards as follows a Apply a small quantity of heat sink paste Dow Corning 340 Heat Sink Compound or similar to each of the eleven areas shown in Figure 8 4...

Страница 545: ...DC Power Supply see Figure 8 39 on page 8 35 6 Reconnect the PCI cable flex BEP to RFI to the cable connector on RFI Board see Figure 8 38 on page 8 35 7 Return the eight screws and fasten the TR32 a...

Страница 546: ...4 Remove the Hard Disk as described in the Hard Disk Removal Procedure on page 8 6 5 Loosen and remove the two securing nuts one on each side of the VGA Connector located on the Vivid q N rear panel...

Страница 547: ...nect the HVPS to BEP power cable d Disconnect the Fan Speaker to BEP power cable 8 Unscrew and remove the four screws that secure the BEP to the Bottom Assembly as shown in Figure 8 47 Disconnecting C...

Страница 548: ...ted in Figure 8 49 that serves to seat the BEP firmly in position It is necessary to loosen and release this tab lift it up using a screw driver if necessary in order to facilitate complete removal of...

Страница 549: ...removing the BEP for replacement with the SATA BEP disconnect the control panel keyboard cable Figure 8 51 from the parallel BEP you have just removed and keep this cable for installing on the SATA B...

Страница 550: ...e bracket is shown on the left in Figure 8 52 in the picture on the right the bracket is shown in position in the Vivid q N scanner Notice that the bracket sits on the PCMCIA slot flap which is presse...

Страница 551: ...cess codes already registered in the Hard Disk Only qualified personnel should perform these tasks 2 Check that the BEP is seated correctly then return and fasten the four screws previously removed to...

Страница 552: ...ation Procedure on page 8 3 9 Turn ON the system and boot up 10 Perform a complete functional check of the system as described in Chapter 4 General Procedures and Functional Checks 11 Proceed to perfo...

Страница 553: ...OS Battery Removal Procedure 1 Remove the BEP as described in the BEP Removal Procedure on page 8 40 2 Take out the BIOS battery located on the bottom of the BEP as shown in Figure 8 55 8 3 4 5 BIOS B...

Страница 554: ...apter 3 System Setup 8 3 5 4 DC to DC Power Supply Removal Procedure 1 Make sure the Vivid q N LCD Display cover is securely closed and place the scanner face down Remove the battery as described in t...

Страница 555: ...Figure 8 58 below 6 Proceed to perform the following functionality tests SafeLock Cart Grounding Continuity on page 10 22 only if the Vivid q N system is currently mounted on the SafeLock cart SafeLo...

Страница 556: ...8 57 on page 8 49 3 Reconnect each of the two Power Supply cables to the DC Power Supply HVPS to BEP and HVPS to RFI as shown in Figure 8 56 on page 8 48 4 Return the bearing handle as described in t...

Страница 557: ...Preparation Shut down the Vivid q N ultrasound unit as described in Chapter 3 System Setup 8 3 6 4 Fan Removal Procedure 1 Remove the bearing handle as described in the Bearing Handle Removal Procedur...

Страница 558: ...the front and then the rear to remove it from the Bottom Assembly lay it down adjacent to the system ready for the next step as shown in Figure 8 61 below Figure 8 61 Removing the Fan Assembly 6 Disco...

Страница 559: ...mbly is seated in the correct position Return and fasten the two screws previously removed to secure the Fan Assembly to the Bottom Assembly as shown in Figure 8 59 on page 8 51 4 Reconnect the speake...

Страница 560: ...described in the Control Panel and Keyboard Removal Procedure on page 8 10 3 Loosen and remove the two screws on each of the speaker housings four in total 4 Disconnect the speaker cables from the fan...

Страница 561: ...ly P N 5439596 should be available if this is required See Note on page 8 58 8 3 8 1 Tools Use the appropriate Phillips and flat screw drivers and Loctite 402 glue as indicated in the AUO LCD Display...

Страница 562: ...the LCD Flex ribbon cable from BEP refer to Figure 8 65 4 Unscrew and remove the four screws two on either side as shown in Figure 8 66 that secure the Rear Cover and Latch Assembly to the Bottom Ass...

Страница 563: ...supplied 1 Protect the Bottom Assembly with a protective cloth as shown in Figure 8 67 2 Check that there is a coating of Loctite 402 on each of the screw threads 3 Carefully position the AUO LCD Dis...

Страница 564: ...bearing handle as described in the Bearing Handle Installation Procedure on page 8 3 11 For the final stage of the LCD Display installation procedure proceed to calibrate the newly installed LCD Displ...

Страница 565: ...ference the relevant parts are illustrated in Table 8 3 below Table 8 2 AUO LCD Cable and Flex RSPL Kit P N 5443867 Contents Part Description Quantity LCD flex 8 bit data cable 1 Inverter Flex Board c...

Страница 566: ...8 3 1 Remove the AUO LCD display refer to the AUO LCD Display Removal Procedure on page 8 55 2 Disconnect the AUO LCD cable 3 from the rear of the LCD panel 3 Disconnect and remove the flex board 4 b...

Страница 567: ...the Flex Board cable through the Display Flex Cover 6 making sure that the Display Flex Cover is correctly orientated as shown in Figure 8 72 3 Thread the Flex Board cable through the ferrite core 7 a...

Страница 568: ...t be prepared by folding as shown in Figure 8 73 Folding the flex cable in this manner enables the LCD panel to lie flat in the lid housing 6 Fold the LCD flex as shown in Figure 8 73 7 Connect the LC...

Страница 569: ...8 75 11 Refit the AUO LCD Display in the system s top rear cover as described in the AUO LCD Display Installation Procedure on page 8 57 12 Check that the LCD Display can be tilted upwards and downwar...

Страница 570: ...D WITHIN 15 FEET OF ANY MAGNETIC EQUIPMENT DANGER Electrical hazards exist at several points in the system Familiarize yourself with all hazardous voltages and high current levels before removing any...

Страница 571: ...Label Item Label Item 1 Top Shelf Assembly with handle 8 Bottom Cover Front 2 ECG Cable Protector 9 Bottom Cover Rear AC Assembly Cover 3 Peripheral Power Outlet 10 AC Power Cable Bumper Protector 4...

Страница 572: ...supporting the cover with one hand carefully remove the cover see Figure 8 77 8 4 2 4 Upper Cover Rear Installation Procedure 1 Return the cover to the correct position on the rear of the SafeLock Ca...

Страница 573: ...Cover rear unscrew the four AC Cable Hook retaining screws see Figure 8 78 and remove the cable hook holder 8 4 3 3 AC Cable Hook Installation Procedure 1 Position the AC Cable Hook on the Upper Cover...

Страница 574: ...rews refer to Figure 8 81 and Figure 8 79 2 Remove the Bumper Protector from the Cart 8 4 4 3 AC Power Cable Bumper Protector Installation Procedure NOTE If this is a first time installation of the bu...

Страница 575: ...he mounting tabs ears with the screws then pushing the bumper downwards until it is seated securely See Figure 8 81 4 Proceed to perform the following functionality tests SafeLock Cart Grounding Conti...

Страница 576: ...ation Procedure If this is a first time installation of the ECG Cable Protector it is necessary to remove the two plastic guide holders from the Top Shelf Assembly as shown in Figure 8 82 While facing...

Страница 577: ...curing screw then the front securing screw 3 Return and fasten the rear securing screw Figure 8 84 then the front securing screw Figure 8 85 illustrates the ECG Cable Protector secured in position on...

Страница 578: ...o perform the following functionality tests SafeLock Cart Grounding Continuity on page 10 22 SafeLock Cart Chassis Current Leakage Test on page 10 24 Figure 8 85 ECG Cable Protector Secured on SafeLoc...

Страница 579: ...he lower cover rear and while supporting the cover with one hand gently remove the cover see Figure 8 86 8 4 6 4 Lower Cover Rear Installation Procedure 1 Return the cover to the correct position on t...

Страница 580: ...rear 2 Remove the Upper Cover Rear as described in the Upper Cover Rear Removal Procedure on page 8 66 3 Remove the Lower Cover Rear as described in the Lower Cover Rear Removal Procedure on page 8 73...

Страница 581: ...ound screw to the AC Distribution Assembly Figure 8 88 above 3 Reconnect the peripheral power cable to the AC Distribution Assembly Figure 8 88 above 4 Secure all cables in position with new cable tie...

Страница 582: ...Lock Cart as described in Upper Cover Rear Removal Procedure on page 8 66 and Lower Cover Rear Removal Procedure on page 8 73 8 4 8 3 Peripheral Power Cable Removal Procedure 1 Disconnect the Peripher...

Страница 583: ...er socket in position in the SafeLock s Upper Cover front see item 4 in Figure 8 76 page 8 65 2 With the AC power socket plugged into the cart Figure 8 90 left picture connect the ground cable to the...

Страница 584: ...igure 8 92 Figure 8 92 Routing of Cable Downwards inside Rear Upper Cover 7 Fasten the Peripheral AC Outlet cable to the Main Harness cable as shown in Figure 8 93 Figure 8 93 Peripheral AC Outlet Cab...

Страница 585: ...u shape and fasten together with tie wraps as shown in Figure 8 95 11 Check that the routing procedure has been implemented correctly lower the cart s top shelf and make sure that the cables do not in...

Страница 586: ...er 8 section 8 4 3 4 13 Return the Upper Cover rear and Lower Cover rear of the SafeLock Cart as described in Upper Cover Rear Installation Procedure on page 8 66 and Lower Cover Rear Installation Pro...

Страница 587: ...s shown in Figure 8 97 4 From above the Top Shelf carefully push the Main Cable Harness Vivid q N power supply cable through the top shelf aperture and gently pull it through from below 5 From below t...

Страница 588: ...val Procedure 1 Turn OFF power to the SafeLock Cart and disconnect the AC power cable from the AC input assembly at the base of the cart rear 2 Remove the Upper Cover Rear as described in the Upper Co...

Страница 589: ...98 2 Reconnect the P6 cable to the P6 connector on the USB board 3 Reconnect the USB cable to the USB board 4 Return the Upper Cover Rear as described in the Upper Cover Rear Installation Procedure on...

Страница 590: ...66 3 Remove the Lower Cover Rear as described in the Lower Cover Rear Removal Procedure on page 8 73 4 Disconnect the Main Harness cable from the AC unit cut both tie clips and free the Main Cable Ha...

Страница 591: ...cking nut counter clockwise until it rises about a quarter way upwards on the thread 3 Insert the Gas Spring handle into the Gas Spring Housing Assembly until it is flush with the outer cylindrical su...

Страница 592: ...Spring and then reconnect it to the AC unit 8 Secure all cables in position with new cable ties 9 Return the Lower Cover Rear as described in the Lower Cover Rear Installation Procedure on page 8 73...

Страница 593: ...r with one hand remove the four retaining screws as shown in Figure 8 102 2 Remove the DVD Holder from the base of the Top Shelf 8 4 12 3 DVD Holder Installation Procedure 1 Working from beneath the T...

Страница 594: ...N Holder retaining screws see Figure 8 103 and remove the LAN Holder 3 Remove the LAN Isolation Box 8 4 13 3 LAN Isolation Box and Holder Installation Procedure 1 Position the LAN Isolation Box in the...

Страница 595: ...Lower Cover Rear as described in the Upper Cover Rear Removal Procedure on page 8 66 5 Remove the USB board as described in the USB Board Removal Procedure on page 8 82 6 Remove the gas spring as des...

Страница 596: ...Return the USB Box as described in the USB Board Installation Procedure on page 8 83 5 Fasten all cables in position using new cable ties 6 Return the Lower Cover Rear as described in the Lower Cover...

Страница 597: ...from the Vivid q N portable ultrasound scanner 2 Working from the front of the SafeLock Cart and below the main shelf loosen and remove the three screws that secure the handrest to the main shelf see...

Страница 598: ...ultrasound unit 8 4 16 3 Probe Shelf Assembly Removal Procedure 1 Remove all peripherals from the Vivid q N portable ultrasound scanner 2 Working from the front of the SafeLock Cart and underneath th...

Страница 599: ...eturn and fasten the two upper screws previously removed 3 Return and fasten the two lower screws one on either side making sure that the shelf is firmly secured in position 4 Place the required perip...

Страница 600: ...le Hook Removal Procedure 1 From below the Probe Shelf remove the Probe Cable Hook retaining screw see Figure 8 109 on page 8 94 2 Gently pull the Probe Cable Hook upwards to remove it 8 4 17 3 Probe...

Страница 601: ...ultrasound unit as described in Chapter 3 System Setup 8 4 18 3 Front Wheel Removal Procedure 1 Disconnect mains power from the AC adapter 2 Disconnect the AC adapter and all cables and peripherals f...

Страница 602: ...eviously removed and make sure that wheel is secured firmly to the chassis 3 Stand the SafeLock Cart upright 4 Return the Vivid q N and all peripherals to their appropriate positions on the SafeLock C...

Страница 603: ...moval Procedure 1 Disconnect mains power from the AC adapter 2 Disconnect the AC adapter and all cables and peripherals from the Vivid q N portable ultrasound scanner 3 Remove the Vivid q N and all pe...

Страница 604: ...emoved see Figure 8 111 and make sure that wheel is secured firmly to the chassis 3 Stand the SafeLock Cart upright 4 Return the Vivid q N and all peripherals to their appropriate positions on the Saf...

Страница 605: ...commencing software installation or whenever upgrading the software Normally the Vivid q N system is supplied from the manufacturer with the software already installed In some cases it is necessary to...

Страница 606: ...ialist visit is recommended Until an Application Specialist has visited the site it is recommended that only the factory default presets be used NOTE After performing an upgrade all logs are deleted I...

Страница 607: ...esent Wireless network settings if present Trackball speed InSite ExC settings 4 Modify the BIOS settings as described below in Modifying BIOS Settings prior to Software Installation 5 Proceed to perf...

Страница 608: ...listed in Boot priority order as shown below promote it to the second position in the list by selecting it then while pressing and holding Shift repeatedly pressing the button until USB HDD is in the...

Страница 609: ...the rear panel and make sure the LED is blinking Table 8 6 Step by Step Vivid q N Software Upgrade Installation Reinstallation Procedure Step Instruction Expected Result 1 Perform a complete shutdown...

Страница 610: ...le loading commences While in progress the following screen is displayed When complete after approximately 10 minutes the following message is displayed prompting you to select the required option 7 S...

Страница 611: ...h the option selected in this step The message window closes the process of copying files from the Flash Drive to the system repository commences This requires approximately 2 minutes during which tim...

Страница 612: ...the following options are displayed 10 Select the following option Reboot Machine then press Enter The following Warning message is displayed 11 Press Yes to continue The following message is display...

Страница 613: ...stem e g DVD drive c Press OK to continue The system reboots and then begins the software installation process This stage of the process takes approximately 20 minutes during which time a progress ind...

Страница 614: ...N SERVICE MANUAL 8 108 Section 8 5 Software Loading The system automatically reboots then displays the following screens Table 8 6 Step by Step Vivid q N Software Upgrade Installation Reinstallation P...

Страница 615: ...n is complete it is still in progress The system performs a number of reboots before completing the installation During the installation procedure various screens will be displayed DO NOT ATTEMPT TO S...

Страница 616: ...adm Click Logon The normal scanning screen is displayed 17 To verify the software version press Config and click About at the bottom of the screen Select the System Version tab The About screen opens...

Страница 617: ...onfiguration and then de select GSP Resources 20 Install peripherals 21 Restore the settings Verify proper Connectivity functionality refer to Connectivity Setup on page 3 85 22 Proceed to perform the...

Страница 618: ...a complete shutdown of the system 2 Remove the battery and remove all external devices peripherals currently connected to the system 3 Insert the USB Flash Drive containing the full software version...

Страница 619: ...press Enter The following message is displayed 8 IMPORTANT Perform these steps before proceeding a Remove the USB Flash Drive from the USB port on the rear panel b Check that no other media is connec...

Страница 620: ...ile booting press F2 Config Diag on alphanumeric keyboard 2 Type the password marlin04 3 Exit and save presets 4 Select Exit section and load Setup Defaults 5 Select Main section 6 Set correct System...

Страница 621: ...nu and press Enter Advanced Chipset Control is highlighted BIOS Parameter Corresponding Figure Chipset Control Figure 8 116 on page 8 116 PCI PNP Configuration Figure 8 117 on page 8 116 Memory Cache...

Страница 622: ...8 116 4 Press Esc to return to the Advanced menu home screen Figure 8 115 5 Scroll to PCI PNP Configuration and press Enter to open the PCI PNP Configuration screen 6 Set the parameters in the PCI PN...

Страница 623: ...screen as shown above in Figure 8 118 10 Press Esc to return to the Advanced menu home screen Figure 8 115 11 Scroll to I O Device Configuration and press Enter to open the I O Device Configuration sc...

Страница 624: ...screen 15 Set the parameters in the Keyboard Features screen as shown above in Figure 8 120 16 Press Esc to return to the Advanced menu home screen Figure 8 115 17 Scroll to Hardware Monitor and pres...

Страница 625: ...hdog Settings screen 21 Set the parameters in the Watchdog Settings as shown above in Figure 8 122 22 Press Esc to return to the Advanced menu home screen Figure 8 115 23 Scroll to Display Control and...

Страница 626: ...urn to the Advanced menu home screen Figure 8 115 26 Scroll to Miscellaneous and press Enter to open the Miscellaneous screen 27 Set the parameters in the Miscellaneous screen as shown above in Figure...

Страница 627: ...is section 1 From the BIOS main menu see Figure 8 114 select the Advanced menu and press Enter 2 Select the Security menu and press Enter 3 Set the parameters in the Security screen as shown above in...

Страница 628: ...en as shown above in Figure 8 126 7 Press Esc to return to the main BIOS screen Figure 8 114 on page 8 114 8 Select the Boot menu and press Enter 9 Set the parameters in the Boot parameters screen as...

Страница 629: ...it Saving Changes as shown in Figure 8 128 12 Reboot the system and check that the Supervisor PASSWORD was installed properly 13 Proceed to perform the following functionality tests Software Configura...

Страница 630: ...supporting documentation P N 5455533 into one of the USB ports on the rear panel 4 On the console hold down the ON OFF button for three seconds The system powers ON and when system boot up from the US...

Страница 631: ...gress is displayed on the screen When Hard Disk formatting is complete the system automatically reboots The following options are now displayed 8 Proceed to perform the Software Installation procedure...

Страница 632: ...een only appears after the first boot up of the system 4 Insert media e g CD DVD or connect to a network repository 5 Click the Admin tab at the bottom of the screen 6 Click the Disk Management tab at...

Страница 633: ...Operation select Copy see Figure 8 131 8 Under Destination Device see Figure 8 130 select the required media device 9 Click Start and follow the on screen wizard instructions The system stores the im...

Страница 634: ...132 3 From the screen select the Patients List The Search Create Patient screen is displayed see Figure 8 133 Figure 8 133 Search Create Patient Screen 4 Click the Export soft key at the bottom of the...

Страница 635: ...s displayed to indicate that only the database is exported to the target media 5 Click OK The Export screen opens see Figure 8 136 6 From the Export screen select the required destination media Figure...

Страница 636: ...ion 8 6 Performing a Complete System Back up Figure 8 137 Export Patient Archive 7 Click the soft keys at the bottom of the screen consecutively in the following order as the system processes the acti...

Страница 637: ...screen see Figure 8 139 NOTE If the Import button is not displayed click More consecutively until the Import button is displayed NOTE A warning is displayed Figure 8 141 to indicate that only the dat...

Страница 638: ...r as the system processes the actions see Figure 8 142 NOTE Wait while the system processes each action before pressing the next soft key 8 Press Alt E to eject the CD 9 Press 2D on the keyboard to re...

Страница 639: ...Figure 8 143 below 8 7 1 Connecting and Removing Peripherals For detailed instructions on connecting peripherals to the Vivid q N portable ultrasound scanner refer to the following procedure as appro...

Страница 640: ...peripherals perform the following functionality tests SafeLock Cart Grounding Continuity on page 10 22 only if the Vivid q N system is currently mounted on the SafeLock cart SafeLock Cart Chassis Curr...

Страница 641: ...4 External USB Hard Disk Removal Procedure NOTE Ensure that there is no activity on the drive before you turn it off If power is turned off while files are being written to the drive the files will b...

Страница 642: ...k is configured as a mirrored volume RAID 1 This ensures optimal data integrity and immediate access to the data even if one disk fails 4 Verify that both MODE switches are set to the ON position as i...

Страница 643: ...Hard Disk to a laptop or PC 2 Power up the External USB Hard Disk 3 Under My Computer after a while the disk will show as a new drive named Removable Disk refer to Figure 8 147 on page 8 138 It will b...

Страница 644: ...on 8 7 Peripherals Figure 8 147 Removable Disk Shown under My Computer 4 Right click the drive name Removable Disk and select Rename from the menu Figure 8 148 Select Rename from the Drop down Menu 5...

Страница 645: ...ive in the future 8 Use the Safely Remove Hardware tool in the Task Bar before continuing with the next step 9 Disconnect the USB cable from the laptop or PC 8 7 2 7 Connecting the External USB Hard D...

Страница 646: ...GE DIRECTION FQ091019 REVISION 2 VIVID Q N SERVICE MANUAL 8 140 Section 8 7 Peripherals This page left blank to facilitate double sided printing...

Страница 647: ...ew of replacement parts for the Vivid q N Table 9 1 Contents in Chapter 9 Section Description Page Number 9 1 Overview 9 1 9 2 List of Abbreviations 9 2 9 3 Mechanical Hardware Parts 9 3 9 4 Electroni...

Страница 648: ...reviations Assy Assembly BEP Back End Processor Ctrl Control FEP Front End Processor FRU 1 Replacement part available in parts hub FRU 2 Replacement part available from the manufacturer lead time invo...

Страница 649: ...rdware Parts ITEM PART NAME PART NUMBER DESCRIPTION QTY FRU 1 KEYCAP KIT VIVID q N BT11 S2423463 BT 11 and higher 1 Y 2 Internal Battery Pack 5423275 Replaces 2378963 2 S2423267 FL200027 and FL200068...

Страница 650: ...IPTION QTY FRU 1 Vivid q IR KB RSPL Kit 5503081 1 Y 2 Vq Operator Panel w o ECG Keyboard Assy 5376323 1 Y 3 Trackball S2423360 BT 09 1 Y 4 Backend assy S2424596 SATA BEP SERVICE KIT BT 06 and BT 09 Re...

Страница 651: ...q R2423283 1 Y 11 ECG Module Assy N5448727 For Vivid q N Replaces NR2421861 1 Y 12 TR32 v12 Board N5444671 For Vivid q N Replaces NS2423369 1 Y 13 Probe and MUX Assy N5452376 For Vivid q N Replaces N...

Страница 652: ...9727 BT 06 and BT 09 1 Y 2 LEAD WIRE KIT EUROPE YELLOW RED GREEN S2424558 For Vivid q N 1 Y 3 Cable ECG Cable Europe 2418832 2 BT 06 and BT 09 Replaces FL200039 1 Y 4 Cable External ECG 2413451 BT 06...

Страница 653: ...REVISION 2 VIVID Q N SERVICE MANUAL Chapter 9 Renewal Parts 9 7 Section 9 6 Software Table 9 5 Software ITEM PART NAME PART NUMBER DESCRIPTION QTY FRU 1 SW and Doc disk on key BT12 N5444462 Software f...

Страница 654: ...2377059 H4000PE 1 Y 11 Probe 10S RS 2377040 H4000PF 1 Y 12 Probe M4S RS H40452LH 1 5 3 6 MHz 1 Y 13 Probe 9L RS H40442LL 4 0 13 0 MHz 1 Y 14 Probe 6T RS KN100093 H45531MZ Must have TEE Probe Interfac...

Страница 655: ...29 TEE Clip On Bite Guard Adult H45511EE 1 Y 30 TEE Clip On Bite Guard Adult OR H45521CB 1 Y 31 TEE Conventional Bite Guard Pediatric H45521JG 1 Y 32 TEE Conventional Bite Guard Adult H45521JH 1 Y 33...

Страница 656: ...MD30000E PAL S VHS 066E9513 1 Y 7 Video Scan Converter H45531XE 2412280 1 Y 8 Modem USB 5114058 1 Y 9 USB Flash Card 1GB R2422220 1 Y 10 USB Flash Card 512MB H45531XG 2411544 1 Y 11 NetGear PCIMCIA N...

Страница 657: ...art Parts 1 of 2 ITEM PART NAME PART NUMBER DESCRIPTION QTY FRU 1 AC Distribution Assy 220V 240V S2423305 1 Y 2 Handrest S2423250 1 Y 3 Lower Shelf Package assy S2422977 1 Y 4 Main Column S2422975 1 Y...

Страница 658: ...d i Cart Gel Holder Cup S2422982 1 Y 13 Probe Cable Hooks S2422983 1 Y 14 AC Cable Hook S2422984 1 Y 15 Pencil Probe Holder Kit S2422985 1 Y 16 Pheripherals Power Out Cable S2422986 1 Y 17 Vi Cart Scr...

Страница 659: ...r peripherals shelves hand rest and handles Y 2 Cable Clip M Cart KTZ220885 BT 06 and BT 09 Cable Clip M Cart 2 Y 3 Isolation Transformer M Cart KTZ220714 BT 06 and BT 09 Isolation Transformer Power S...

Страница 660: ...i_q SATA BEP SERVICE KIT TR32 Board 1 Y 1 Spare Part Kit 1 for Vivid i n BT06 FL200087 BT 06 1 Y 2 Spare Part Kit 2 FL200115 BT 09 This kit includes Vi_q SATA BEP SERVICE KIT RFI Board 1 Y 3 Spare Par...

Страница 661: ...D I R2376696 1 Y 10 ECG BOARD V3 Vivid i q N Natural N2419020 1 Y 11 Spare Part Kit 3 OBSOLETE This kit includes Keyboard assy FL200059 Fans and Speakers Kit FL200040 Cable and Flex kit FL200037 ECG M...

Страница 662: ...cludes Doc CD FL200028 SW CD FL200103 SW ver 1 36 19 Appl SW 6 1 0 build 122 FL200107 Application SW Patch for Vivid q N 1 Y 17 VI COVER KIT BT09 S2423361 This kit includes BOTTOM BASIC ASSY VIVID I C...

Страница 663: ...VID I DISPLAY RIGHT LATCH ASSY VIVID I DISPLAY LEFT LATCH ASSY VIVID I REAR DISPLAY COVER VIVID I DISPLAY FRONT FRAME ASSY DISPLAY SCREW CAP VIVID I MAGNET PERMANENT 4X20MM DISPLAY FLEX COVER VIVID I...

Страница 664: ...i n Vivid q N Unpacking Packing Procedure FL094023 1 N 3 BT 12 Vivid q N User manual English FQ092023 1 N 4 BT 12 Vivid q N User manual French FQ092024 1 N 5 BT 12 Vivid q N User manual Indonesian FQ0...

Страница 665: ...ivid q N ultrasound scanner and its peripherals These procedures are designed to protect your investment in the system and are intended to maintain the quality of system performance After delivery and...

Страница 666: ...AIN CIRCUIT BREAKER BEFORE YOU REMOVE ANY PARTS BE CAUTIOUS WHENEVER POWER IS STILL ON AND COVERS ARE REMOVED CAUTION PRACTICE GOOD ESD PREVENTION WEAR AN ANTI STATIC STRAP WHEN HANDLING ELECTRONIC PA...

Страница 667: ...ge of Radiology USA it is the customer s responsibility to have a Quality Assurance program in place for each scanner The program must be directed by a medical physicist the supervising radiologist ph...

Страница 668: ...h levels of safety dependability and system performance Your GE Service Representative has an in depth knowledge of your Vivid q N ultrasound scanning system and can best provide competent efficient s...

Страница 669: ...lso after corrective maintenance or as required by your facility s QA program Surface Probe Current Leakage Checks Also after corrective maintenance or as required by your facility s QA program Endoca...

Страница 670: ...sions Equipment for loose or missing hardware The keyboard for defects Brakes for defective operation DANGER TO AVOID ELECTRICAL SHOCK HAZARD DO NOT REMOVE THE PANELS OR COVERS FROM THE MACHINE THIS S...

Страница 671: ...ep Item Description 1 Ask Listen Ask the customer if they have any problems or questions about the equipment 2 Paperwork Note all probes and system options 3 Power up Turn the system power ON and veri...

Страница 672: ...eck the basic system controls that affect this mode of operation 5 Applicable Software Optionsa a Some software may be considered as standard depending upon system model configuration Verify the basic...

Страница 673: ...rify hardcopy output of the Color video page printer Clean heads and covers if necessary 4 DICOM Verify that DICOM is functioning properly Send an image to a DICOM device 5 InSite iLinq Verify that In...

Страница 674: ...ION When performing Cleaning Procedures to prevent the risk of system damage always observe the following precautions Use only cleaning materials and solutions such as Isopropyl Alcohol IPA as recomme...

Страница 675: ...es Wring out as much of the liquid as possible then wipe the LCD Display again Do not let any liquid drip into the computer Be sure to dry the LCD Display before closing the cover 3 Control Panel and...

Страница 676: ...water Never allow liquid to flow into the keyboard Use a 70 30 mixture of isopropyl alcohol and water Staff users doctors Monitor display surface Weekly In event of contamination clean immediately wi...

Страница 677: ...ect the Probe Holders for cracks or damage 7 SafeLock Cart Check all four SafeLock Cart wheels and castors for wear Check the brakes on each of the two front wheels Make sure that pressing the brake l...

Страница 678: ...during scanning 13 Peripherals Check and clean the peripherals according to the manufacturer s directions To prevent EMI or system overheating dress the peripheral cables inside the peripheral cover 1...

Страница 679: ...to clean the probe NOTE For detailed information on handling endocavity probes refer to the appropriate supplementary instructions for each probe WARNING WARNING Any evidence of wear on a probe indica...

Страница 680: ...handling instructions user manual 10 5 4 Probe Cleaning 10 5 4 1 Basic Probe Cleaning NOTE For details on general probe cleaning refer to the information provided in the Vivid q N User Manual NOTE Fo...

Страница 681: ...instructions to disinfect the probe including concentration and soaking time 10 minutes is a typical disinfecting period 4 Follow step 3 for a much longer duration to sterilize the probe 10 hours is a...

Страница 682: ...ibly clean and properly disinfected The purpose of the regulation is to protect employees in the transportation industry as well as the persons who will receive and or open the package NOTE The US Dep...

Страница 683: ...INSPECTIONS CAUTION Compare all safety test results with safety test results of previously performed safety tests e g last year etc in event of unexplainable abrupt changes of safety test results cons...

Страница 684: ...enclosed in plastic parts only and therefore does not have any accessible metal parts when the scanner is not mounted on the SafeLock Cart it is not necessary to perform the following safety tests i...

Страница 685: ...tion Open Ground Reverse Polarity Open Neutral Mains Applieda a Mains Applied is the Sink Leakage Test In this test mains supply voltage is supplied to the part or equipment to determine the amount of...

Страница 686: ...ster can detect the condition in which the Neutral grounded supply conductor and the Grounding protective earth conductor have been reversed If later tests indicate high current leakages this should b...

Страница 687: ...s to the tested AC wall outlet cable side Ground pin 2 Using the other Ohmmeter probe touch the exposed metal part of the SafeLock Cart 3 Set the meter Function switch to the Resistance position 4 Mea...

Страница 688: ...st reading of current When using the Microguard or a similar test instrument its power plug may be inserted into the wall outlet and the equipment under test be plugged into the receptacle on the pane...

Страница 689: ...s than the values shown in Table 10 13 Record all data Table 10 16 Typical Data Sheet for Chassis Source Current Leakage Test Unit Power Tester Polarity Switch Tester Neutral or Ground Switch Test 1 P...

Страница 690: ...ch as the lead switch should be operated to find the worst case condition NOTE Electrical leakage testing may be accomplished with any calibrated Electrical Safety Analyzer tool compliant with AAMI ES...

Страница 691: ...Lead Sink Leakage Isolation Test NOTE Refer to the procedure in the IEC 60601 1 NOTE Electrical leakage testing may be accomplished with any calibrated Electrical Safety Analyzer tool compliant with...

Страница 692: ...UND CLOSED Patient Lead to Ground Current Leakage Test and Patient Lead to Lead Current Leakage Test 115V 10uA 10uA 220 240V 500uA 10uA Table 10 18 Maximum Allowance Limit for ECG Lead Isolation Sink...

Страница 693: ...th the Ground OPEN and CLOSED with power line polarity Normal and Reversed and with the unit OFF and ON For each combination the probe must be active to find the worst case condition NOTE Each probe w...

Страница 694: ...r 4 Set the meter s FUNCTION switch to EXTERNAL position 5 Connect the probe for test with the connector of the console 6 Add the saline probe and the imaging area of the probe into the saline bath 7...

Страница 695: ...switch the Polarity and the status of Neutral Be sure to turn OFF power to the unit before switching them using the POLARITY switch and or the NEUTRAL switch Failure to comply with this warning may c...

Страница 696: ...NOTE Each probe will have some amount of leakage depending on its design Small variations in probe current leakages are normal from probe to probe Other variations will result from differences in lin...

Страница 697: ......

Страница 698: ...2013 and 2015 General Electric Company GE Vingmed Ultrasound AS P O Box 141 N 3191 HORTEN NORWAY www gehealthcare com...

Отзывы: