background image

CARE AND CLEANING

(continued)

Light Bulb Replacement

14

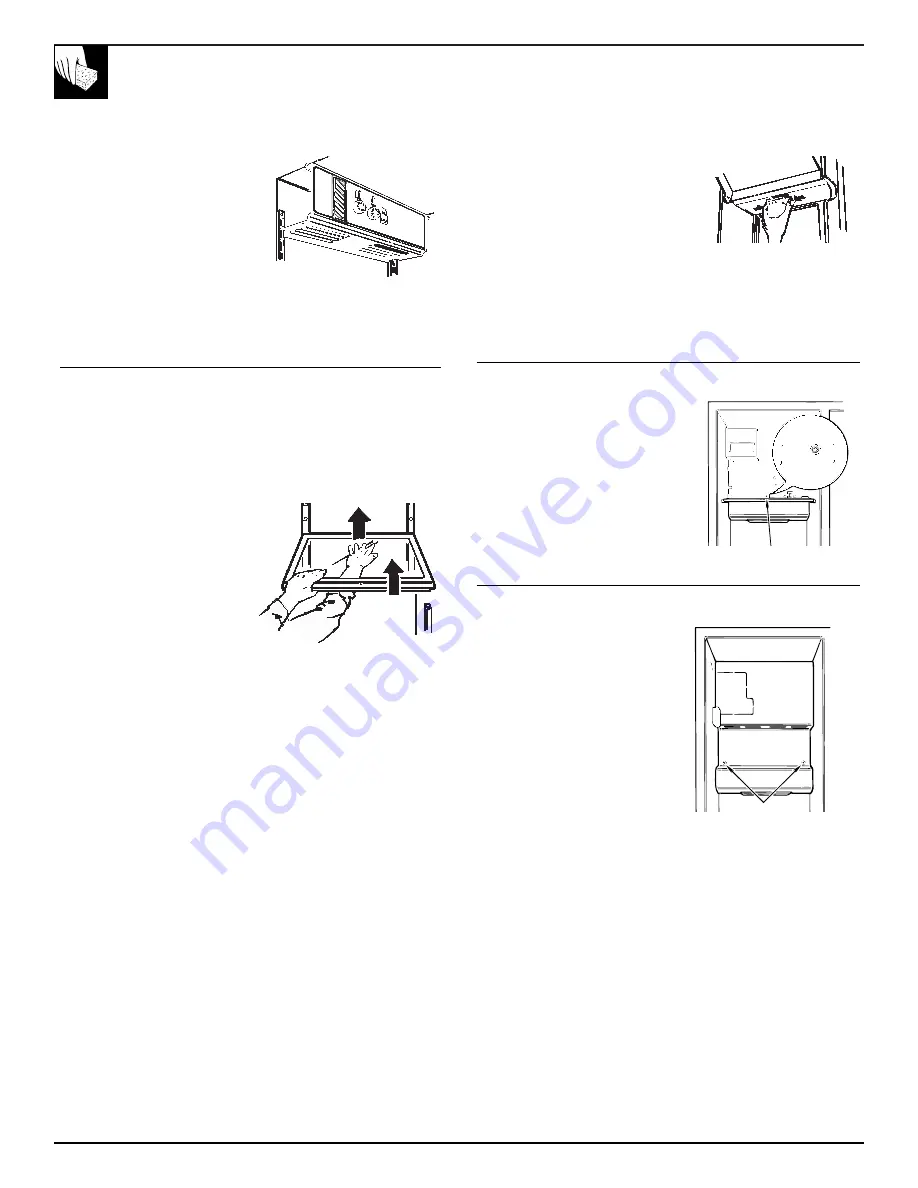
Fresh Food Compartment—Upper Light

1. Unplug the refrigerator.

2. For easiest reassembly move the

knobs to their lowest setting, then
pull off the knobs

3. Pull the light shield down and

forward, then rotate the top up and
off. After replacing with same size
bulb, reinstall light shield and set
the knobs to the position that they
were at before; or set both knobs 
at “5”. If you cannot locate the 
correct bulb, see your dealer.

4. Plug the refrigerator back in.

Fresh Food Compartment—Lower Light (on some models)

This light is located either behind the top drawer or right above the top
drawer (depending on your model).

1. Unplug the refrigerator.

2. If the light is behind the top drawer you will need to remove the

drawer and the shelf above it. To remove the drawer see the Drawer
Removal section in Care and Cleaning.

• To remove the shelf first 

remove any food on the shelf.
Then tilt the shelf up at the front
and lift it up and out of the
tracks.

3. Grasp the bottom of the light

shield and pull it forward and up.

4. After replacing with the same size

bulb, replace the shield. If you
cannot locate the correct bulb, see
your dealer.

5. If the light was behind the top drawer, you will need to replace the

drawer and the shelf above it.

• To replace the shelf, raise the shelf front slightly and place the top

hooks in the lowest large track slots. Then lower the front of the
shelf until it is level.

6. Plug the refrigerator back in.

Refreshment Center (on some models)

1. Unplug the refrigerator.

2. Open fresh food compartment door,

remove top bin and raise Refreshment
Center inner door.

3. Press sides of flexible light shield to

release locking tabs and allow the
shield to swing down.

4. Unscrew burned-out bulb and replace it with appliance light bulb of

same wattage. If you cannot locate the correct bulb, see your dealer.

5. Place rear tab of light shield into door and rotate shield up until tabs

lock into slots above.

6. Plug refrigerator back in.

Freezer Compartment with a Dispenser

1. Unplug the refrigerator and 

remove the ice bin.

2. Remove the screw holding the light

shield in place.

3. Shift the shield to the left to free the

tabs, then lower it.

4. After replacing with same size bulb,

hook the shield in place and replace
the screw. If you cannot locate the
correct bulb, see your dealer.

5. Plug the refrigerator back in.

Freezer Compartment with no Dispenser

1. Unplug the refrigerator and 

remove the top shelf.

2. Remove the two screws holding

the light shield in place.

3. Pull the light shield toward you

to reach the bulb.

4. After replacing with same size

bulb, hook the shield in place
and replace the screw. If you
cannot locate the correct bulb,
see your dealer.

5. Plug the refrigerator back in.

Screw

Screws

Содержание Side by Side 26

Страница 1: ...d Refrigerator 13 Cleaning Inside and Outside 12 Drawer Removal 13 Light Bulb Replacement 14 Under Refrigerator 13 Problem Solver 20 22 Normal Operating Sounds 20 Preparation Base Grille 15 Clearances...

Страница 2: ...Never unplug your refrigerator by pulling on the power cord Always grip plug firmly and pull straight out from the outlet Repair or replace immediately all electric service cords that have become fra...

Страница 3: ...you want colder or warmer temperatures in either compartment adjust the controls one step at a time NOTE Moving the freezer control to the 0 position turns off cooling in both compartments fresh food...

Страница 4: ...f the door allows you to tilt and lift up the entire door in order to clean the bottom of the frame NOTE Use caution in closing or using the clean out feature in the presence of small children Cold ai...

Страница 5: ...corrective measures described in the Problem Solver section If water supply to the icemaker is not connected or not turned on make sure manual icemaker switch is in the up position This code stops fla...

Страница 6: ...t caused the code to flash has been corrected How to Set the Door Alarm Why the Warm Temperature Light Glows You don t have to set the visual alarm As long as either door is open this pad flashes When...

Страница 7: ...o the bin they may pile up close to the icemaker and push the feeler arm to the up position before the bin gets full Keeping the cubes level allows the icemaker to fill the bin The icemaker ejects cub...

Страница 8: ...m the shelf Pull the bin straight out while supporting it at front and back Slide the bin back until the tab on the bin locks into the slot in the shelf If the bin does not go all the way back remove...

Страница 9: ...ave individual adjustable humidity controls that let you regulate the amount of moisture retained in foods Slide the control all the way to the setting and the drawer provides high humidity recommende...

Страница 10: ...can easily be carried from the refrigerator to your work area On models with a Refreshment Center Compartment all except the top bin can be relocated on the fresh food compartment door The top bin is...

Страница 11: ...on left wall 3 Select desired shelf height and insert shelf rods into holes on left wall Lower shelf into grooves on support while pressing tabs Be sure shelf wire is fully inserted into grooves FREE...

Страница 12: ...rain becomes clogged use a meat baster and baking soda and water solution to force the clog through the drain line Do not wash any plastic parts from your refrigerator in your automatic dishwasher CAR...

Страница 13: ...g or refrigerator When pushing the refrigerator back make sure you don t roll over the power cord or icemaker supply line on some models continued next page Clean the condenser coils at least once a y...

Страница 14: ...it To replace the shelf raise the shelf front slightly and place the top hooks in the lowest large track slots Then lower the front of the shelf until it is level 6 Plug the refrigerator back in Refre...

Страница 15: ...ement Protect outside of refrigerator with blanket Rollers Adjustable rollers behind the base grille enable you to move the refrigerator away from the wall for cleaning These rollers should be set so...

Страница 16: ...T TO STAND ON TOP OF YOUR APPLIANCE IT IS NOT DESIGNED FOR SUCH USE AND YOU COULD INJURE YOURSELF OR DAMAGE THE APPLIANCE BY SUCH ABUSE CHILDREN SHOULD NOT BE ALLOWED TO PLAY WITH THE APPLIANCE OR TAM...

Страница 17: ...of the coloured marks or insert in the base of the plug In the event of replacing a fuse in the plug supplied with this refrigerator a 13A ASTA approved fuse to BS1362 must be fitted With an alternati...

Страница 18: ...Shelf Front 18 HOW TO INSTALL FEATURES DAIRY COVER Depress pins on the cover and insert into holes in the door 1 DOOR BIN SNUGGERS Roll the snugger on the door bin lip Slide to the desired location 2...

Страница 19: ...ction of supports Push in until the basket stops Tilt up and push all the way in Make sure the baskets are securely engaged in the supports 1 BEVERAGE RACK Slide lip of the rack along the edge of the...

Страница 20: ...fer to Rollers in Preparation section If dishes vibrate on shelves try moving them Slight vibration is normal NORMAL OPERATING SOUNDS These sounds are normal and do not indicate a need for service The...

Страница 21: ...air flow cooling motor In the refrigerator process it is normal that heat OF REFRIGERATOR be expelled in the area under the refrigerator Some floor coverings will discolor at these normal and safe ope...

Страница 22: ...SLOW ICE CUBE FREEZING Door may have been left ajar on some models Turn temperature control to colder setting WATER DISPENSER Water supply line turned off or not connected DOES NOT WORK Supply line ma...

Страница 23: ...teur 35 Nettoyage ext rieur int rieur 34 35 Remplacement de l ampoule 36 Sous le r frig rateur 35 Solutions des probl mes 43 46 Bruits de fonctionnement normaux 43 Pr paration Alimentation en eau de l...

Страница 24: ...n usage pr vu comme d crit dans le pr sent guide Installez le r frig rateur conform ment aux directives d installation avant de l utiliser AVERTISSEMENT Raccordez uniquement une conduite d eau potable...

Страница 25: ...ou plus basse dans l un ou l autre des compartiments r glez les commandes d une position la fois REMARQUE Lorsque vous r glez la commande du cong lateur 0 la r frig ration cesse dans les deux comparti...

Страница 26: ...rte afin de nettoyer la partie inf rieure du cadre NOTE Soyez prudent en la pr sence d enfants lorsque vous fermez la porte ou lorsque vous utilisez la conception speciale pour la laver De l air froid...

Страница 27: ...s t pas mise en marche assurez vous que le bras palpeur de la fabrique de glace est en position relev D s que vous avez r solu le probl me ou appuy sur la touche ce code s arr te de clignoter Le syst...

Страница 28: ...Comment r gler le Signal sonore des portes D clenchement du voyant de Temp rature lev e Vous n avez pas besoin de r gler la touche qui correspond au Signal sonore des portes Si l une des portes est ou...

Страница 29: ...rsque les gla ons tombent dans le bac ils risquent de s empiler pr s de la fabrique de glace et de pousser le bras palpeur la position relev avant que le bac ne soit rempli Si le niveau est uniforme l...

Страница 30: ...tenant l avant et l arri re Faites glisser le bac jusqu ce que la languette du bac soit bien engag e dans la fente de la clayette Si le bac ne peut tre pouss jusqu au fond enlevez le et tournez le m c...

Страница 31: ...s qui vous permettent de r gler la quantit d air froid entrant dans le bac Glissez la commande fond sur le r glage pour que le bac conserve le degr d humidit lev recommand pour la conservation de la p...

Страница 32: ...ains mod les se r glent de la m me mani re Balconnets de contre porte du r frig rateur sur certains mod les Vous pouvez facilement transporter les bacs r glables du r frig rateur votre plan de travail...

Страница 33: ...as de paquets et de 15 25 mm entre le haut de chaque tas et la clayette ou le panier qui se trouve juste au dessus de celui ci Les paquets peuvent d passer l avant de la clayette mais doivent tre rang...

Страница 34: ...n linge propre l g rement humect de cire pour lectrom nagers ou de d tergent liquide doux pour la vaisselle Essuyez et polissez avec un linge doux et propre N essuyez pas le r frig rateur avec un ling...

Страница 35: ...ats et les couvercles du syst me Quick Serve peuvent tre lav s au lave vaisselle ou la main dans une solution d eau et de d tergent liquide pour la vaisselle Pour faire dispara tre les taches faite le...

Страница 36: ...chets sup rieurs dans les grandes fentes des cr maill res inf rieures Ensuite abaissez l avant de la clayette jusqu ce qu il soit niveau 6 Rebranchez le r frig rateur Compartiment rafra chissements su...

Страница 37: ...i ce risque d tre inf rieure 16 C suivez les m mes directives que pour une absence prolong e D branchez le cordon d alimentation retirez tous les aliments du r frig rateur nettoyez et s chez l int rie...

Страница 38: ...vous puissiez loigner le r frig rateur du mur environ 2 5 m de tube en cuivre de 1 4 de pouce enroul pour former trois boucles d environ 25 cm de diam tre N utilisez pas d ensembles avec du tuyau en p...

Страница 39: ...JOUER AVEC LE R FRIG RATEUR OU LES BOUTONS DE COMMANDE Branchement de l lectricit Pour votre s curit personnelle le r frig rateur doit tre correctement mis la terre Le cordon d alimentation du r frig...

Страница 40: ...de couleur verte ou verte et jaune 2 Branchez le fil bleu neutre la borne de la fiche marqu e N ou de couleur noire 3 Branchez le fil brun sous tension la borne marqu e L ou de couleur rouge Si la fi...

Страница 41: ...ur les c t s du portillon puis ins rez les axes du portillon dans les orifices am nag s dans la contre porte 1 CLOISON MOBILE DES BALCONNETS Faites glisser la cloison mobile sur la l vre du balconnet...

Страница 42: ...qu il s arr te Soulevez le puis poussez le jusqu au fond Assurez vous que les paniers sont bien engag s dans les supports 1 SUPPORT BOUTEILLE DE VIN Faites glisser la l vre du support bouteille de vi...

Страница 43: ...ndement tourne plus vite et produit un bourdonnement ou un bruit de pulsation plus aigu au cours du fonctionnement Sifflement dans le cong lateur pendant le cycle de d givrage provoqu par la d cong la...

Страница 44: ...ent ou trop longtemps Il est normal que du givre se forme l int rieur du paquet CONDENSATION SE FORME Pas inhabituel pendant les p riodes d humidit lev e Pour viter la rouille SUR LA SURFACE DE essuye...

Страница 45: ...d arr t d eau qui relie le r frig rateur l arriv e d eau est peut tre bouch e Un amas de gla ons dans le bac peut provoquer l arr t pr matur de la fabrique de glace Avec le bras palpeur en position e...

Страница 46: ...re ne sera pas aussi froide que celle des verres suivants Apr s la vidange du r servoir d eau attendez plusieurs heures pour que l eau refroidisse L EAU A MAUVAIS Si le distributeur d eau n a pas t ut...

Страница 47: ...za detr s del frigor fico 59 Limpieza exterior e interior 58 Soluci n de problemas 67 70 Ruidos normales de funcionamiento 67 Preparaci n Dimensiones 62 Espacio libre 61 Rejilla de la base 61 Ruedas 6...

Страница 48: ...igor fico debe instalarse de acuerdo con las Instrucciones de instalaci n ADVERTENCIA Conectar s lo al suministro de agua potable No desenchufe nunca el frigor fico de un tir n Al contrario sujete la...

Страница 49: ...e el mando al n mero contiguo OBSERVACION Al situar el mando del congelador en la posici n 0 se detiene la refrigeraci n en ambos compartimentos el de alimentos frescos y el del congelador pero con el...

Страница 50: ...por completo y as limpiar la parte inferior del marco NOTA Tome precaucciones en presencia de ni os cuando cierre la puerta o cuando use la caracter stica especial para limpiarla El aire fr o que pen...

Страница 51: ...r hielo Siga las instrucciones que se ofrecen en la secci n Soluci n de problemas Si el suministro de agua de la m quina de hacer hielo estuviera desconectado o no estuviera abierto aseg rese de que e...

Страница 52: ...programar la alarma de la puerta No es necesario programar la se al luminosa Siempre que una de las puertas est abierta este bot n parpadea Cuando brilla el bot n Alarma de la puerta significa que se...

Страница 53: ...vez en cuando Cuando los cubos caen en el recipiente podr n apilarse cerca de la m quina para hacer hielo y empujar la varilla de contacto a la posici n hacia arriba antes de que se llene el recipient...

Страница 54: ...cipiente de almacenamiento de hielo Deslice el recipiente hacia atr s hasta que la pesta a en el recipiente se trabe en la ranura de la parrilla Si el recipiente no se desliza completamente hasta el f...

Страница 55: ...n controles individuales de humedad con los que se puede regular la cantidad de humedad retenida en los alimentos Deslice el control hasta llegar a la posici n y el caj n proporcionar el alto nivel de...

Страница 56: ...nera Compartimentos de la puerta del conservador en algunos modelos Estos compartimentos ajustables se pueden llevar f cilmente desde el frigor fico al rea donde est trabajando En los modelos que disp...

Страница 57: ...congelado pueden meterse y sacarse con gran facilidad cuando se colocan en el soporte de la puerta del congelador Para meterlas coloque la primera lata en el fondo del soporte Seguidamente meta m s la...

Страница 58: ...bo de vaciado se obstruyera elimine la obstrucci n con la ayuda de un irrigador de carnes y una soluci n de bicarbonato s dico y agua No lave ninguna pieza de pl stico del frigor fico en el lavavajill...

Страница 59: ...ego ponga el control en marcha de nuevo Para mejores resultados utilice un cepillo especialmente dise ado para esto se encuentra en la mayor a de los centros de refacciones Esta operaci n f cil de lim...

Страница 60: ...te el frente de la estanter a y coloque los ganchos superiores en las ranuras inferiores m s grandes Entonces baje el frente de la estanter a hasta que est nivelada 6 Enchufe otra vez el frigor fico C...

Страница 61: ...iga las mismas instrucciones que se ofrecen para per odos largos de vacaciones Desconecte el cable el ctrico de la toma de corriente de la pared saque todos los alimentos limpie el interior y s quelo...

Страница 62: ...itir desplazar el frigor fico de la pared a varios cent metros de distancia aproximadamente un tubo de cobre de 1 4 de unos 2 5 metros en tres bobinas de un di metro de 25 cm No utilice tubos de pl st...

Страница 63: ...L MISMO C mo conectar el suministro el ctrico Por razones de seguridad personal este electrodom stico debe estar puesto a tierra debidamente El cable el ctrico de este electrodom stico va equipado de...

Страница 64: ...verde y amarillo tierra al borne de la clavija que dice E con el s mbolo o color verde o verde y amarillo 2 Conecte el alambre azul neutro al borne de la clavija que dice N o de color negro 3 Conecte...

Страница 65: ...re la tapa e introd zcalas en los agujeros de la puerta 1 DIVISORES PARA EL RECIPIENTE EN LA PUERTA Rodee el divisor sobre el borde del recipiente en la puerta Mu valo al lugar preferido 2 RECIPIENTES...

Страница 66: ...hasta que la canastilla se pare Incline la canastilla hacia arriba y emp jela hacia el fondo Aseg rese de que las canastillas se queden firmemente en los soportes 1 BOTELLERO Resbale el botellero sobr...

Страница 67: ...iene las temperaturas de todo el conservador El agua que cae en el calefactor de descongelaci n causa un ruido de siseo silbido o como un ruido seco durante el ciclo de descongelaci n El flujo de refr...

Страница 68: ...raci n Si los platos o cazuelas vibran en las estanter as intente moverlos Es normal una ligera vibraci n LOS ALIMENTOS SE RESECAN Los alimentos no est n bien tapados envueltos o en recipientes herm t...

Страница 69: ...a LA LUZ INTERIOR No llega electricidad a la toma de corriente NO FUNCIONA Necesita cambiar la bombilla Consulte la secci n Cuidado y limpieza EL TABLERO NO RESPONDE Si la luz interior no est encendid...

Страница 70: ...mo dos minutos para eliminar el aire atrapado de la l nea de agua y llenar el sistema EL AGUA DEL PRIMER Tras la instalaci n del frigor fico deje pasar alrededor de 24 horas para que el VASO ESTA TEMP...

Страница 71: ...NOTAS 71 Soluci n de problemas...

Страница 72: ...tives Cet appareil m nager est conforme aux directives CEE suivantes Este electrodomestico se conforma con las siguientes instrucciones de la CEE Low Voltage Equipment Appareils m nagers bas voltage E...

Отзывы: