background image

13

Safety Instructions

Operating Instructions

Care and Cleaning

Installation Instructions

Tr

oubleshooting T

ips

Consumer Support

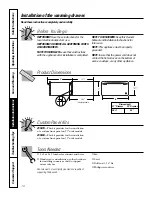
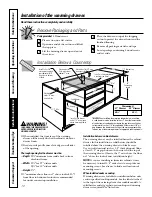
When installed, the front face of the warming
drawer will be nearly flush with cabinetry doors
or drawer fronts.

Drawer overlaps will conceal cut edges on 
all sides of the opening.

The rough opening for the drawer must be:

—Depth:  

23

1

2

minimum from inside back 

to front of cabinet frame.

—Width:  

25

1

2

for 27

wide models

28

1

2

for 30

wide models.

—Height:  

9

1

4

Allow 2

minimum between oven and drawer

cutouts for clearance of overlaps.

NOTE:  

If you are installing in frameless cabinets, 

it may be necessary to install 1/2

wide cleats to

accept drawer mounting screws. See drawer to
find exact locations of mounting screws.

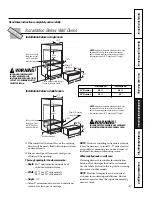
When installed under a wall oven:

Warming drawers are suitable for installation
below only certain specified wall oven models. 
See the label attached to the top of the warming
drawer for suitable models.

NOTE:  

Electrical receptacle can be installed 

as shown for countertop installations. Do not
install receptacle above the top of the warming
drawer cutout.

23

1

2

Min.

2x2 or 2x4 anti-tip
block against rear
wall 9” from floor
to bottom of block

1

Min. above toekick or adjust

to oven installation height

A

NOTE:

Additional clearance between cutouts may

be required. Check to be sure that oven supports
above the warming drawer location do not obstruct
the required interior 23

1

2

depth and 9

1

4

height.

Installation below a single oven

2

Min

1

Min. above toekick

NOTE:

Additional clearance between cutouts may

be required. Check to be sure that oven supports
above the warming drawer location do not obstruct
the required interior 23

1

2

depth and 9

1

4

height.

Installation below a double oven

Dimension A

Dimension B

27

Drawer

25

1

2

26

3

4

30

Drawer

28

1

2

30

2x2 or 2x4 anti-tip
block against rear
wall 9” from floor
to bottom of block

2

Min.

Allow 5/8”
overlap on
all sides

10

1

2

23

1

2

Min.

Allow 5/8

overlap

on all sides

A

23

1

4

10

1

2

9

9

1

4

23

1

4

Installation Below Wall Ovens

Read these instructions completely and carefully.

9

9

1

4

B

Oven

cutout

Oven

cutout

B

WARNING!

IN CANADA THE WALL OVEN 
IS ONLY APPROVED FOR
INSTALLATION WITH A BOTTOM
CUTOUT AT A MINIMUM OF 32.5"
FROM THE FLOOR.

WARNING!

IN CANADA THIS DRAWER IS NOT APPROVED
FOR INSTALLATION UNDER A DOUBLE OVEN.

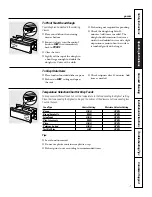
Содержание Profile PKD915

Страница 1: ...Bowl and Plates 6 Care and Cleaning 9 Installation Instructions 10 15 Troubleshooting Tips 16 Consumer Support Consumer Support Back Cover Product Registration 19 20 Warranty for Customers in Canada 23 Warranty for Customers in the U S A 22 Write the model and serial numbers here Model ____________________ Serial ____________________ You can find them on a label located on the backside of the lowe...

Страница 2: ... should not be left alone or unattended in an area where an appliance is in use They should never be allowed to sit or stand on any part of the appliance Do not allow anyone to climb stand or hang on the drawer They could damage the warming drawer or cause severe personal injury Be sure the warming drawer is securely installed in a cabinet that is firmly attached to the house structure Never leave...

Страница 3: ...R The inside surface of the warming drawer may be hot when the drawer is opened Do not store or use combustible materials gasoline or other flammable vapors and liquids in the vicinity of this or any other appliance Never leave jars or cans of fat drippings in or near your warming drawer Use care when opening the drawer Open the drawer a crack and let hot air or steam escape before removing or rep...

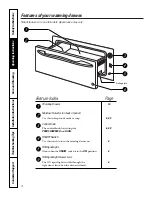
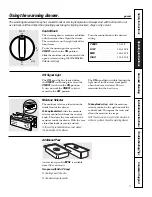
Страница 4: ... has settings for 6 8 9 PROOF LOW MED and HIGH ON OFF Switch Use this switch to turn the warming drawer on 6 ON Signal Light Glows when the ON OFF switch is in the ON position 6 ON Signal Light Viewer Lens The ON signal light is visible through the 6 light viewer lens when the drawer is closed Consumer Support Troubleshooting Tips Installation Instructions Care and Cleaning Operating Instructions ...

Страница 5: ... is located below the ON OFF switch and glows when the ON OFF switch is in the ON position It stays on until the ON OFF switch is moved to the OFF position The ON signal light is visible through the light viewer in the drawer front panel when the drawer is closed This is a reminder that the heat is on Additional Pans An accessory pan kit JXPN2 is available from GE at extra cost Two pans with lids ...

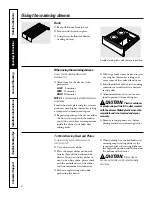
Страница 6: ...Food in heat safe glass and glass ceramic pans may need higher thermostat setting as compared to food in metal pans Repeated opening of the drawer allows the hot air to escape and the food to cool Allow extra time for temperature inside the drawer to stabilize after adding items With large loads it may be necessary to use a higher thermostat setting and cover some of the cooked food items Food sho...

Страница 7: ...on remains when the surface is touched gently with a finger To Crisp Stale Items Place food in low sided dishes or pans Preheat on LOW setting and open the vent Check crispness after 45 minutes Add time as needed Temperature Selection Chart for Crisp Foods To keep several different foods hot set the temperature to the food needing the highest setting Place the items needing the highest setting on ...

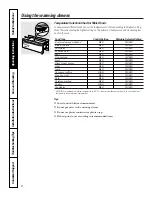
Страница 8: ...t MED CLOSED Gravy cream sauces MED CLOSED Ham MED CLOSED Lamb MED CLOSED Pancakes waffles HIGH CLOSED Pies one crust MED CLOSED Pork MED CLOSED Potatoes mashed MED CLOSED Poultry HIGH CLOSED Vegetables MED CLOSED USDA FSIS recommends an internal temperature of 145 F as the minimum doneness for beef Use a portable meat thermometer to check internal temperatures Tips Cover food with lid or aluminum...

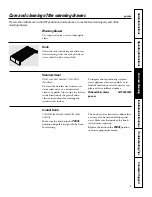
Страница 9: ...less steel surface use warm sudsy water or a stainless steel cleaner or polish Always wipe the surface in the direction of the grain Follow cleaner instructions for cleaning the stainless steel surface To inquire about purchasing stainless steel appliance cleaner or polish or to find the location of a dealer nearest you please call our toll free number National Parts Center 1 877 959 8688 ge com C...

Страница 10: ... and brace Wood screws and adhesive or other hardware for installing runners or shelf to support warmer drawer Runners must be level rigidly mounted and capable of supporting 150 pounds Saw Level Drill and 1 16 bit Phillips screwdriver Custom Panel Kits ZXD27B This kit provides for the installation of a custom front panel on 27 wide models ZXD30B This kit provides for the installation of a custom ...

Страница 11: ... by a 15 or 20 amp circuit breaker or time delay fuse A properly grounded 3 prong receptacle should be located within reach of the drawer s 56 long power cord Locate the receptacle in an adjacent cabinet within 42 of the right side or within 16 of the left side or A recessed receptacle may be located on the right side of the cutout 7 maximum from the back of the cabinet In this location the excess...

Страница 12: ...er is required See Note above Electrical outlet 16 max from left side Electrical outlet 42 max from right side 1 Min 25 9 91 4 231 2 Min 36 Countertop height Electrical outlet flush with side of cabinet 7 max Install 2x4 or 2x2 anti tip block against rear cabinet wall 9 from floor to bottom of block NOTE When installing the warming drawer below a cooktop a solid barrier must be installed at least ...

Страница 13: ...e above the top of the warming drawer cutout 231 2 Min 2x2 or 2x4 anti tip block against rear wall 9 from floor to bottom of block 1 Min above toekick or adjust to oven installation height A NOTE Additional clearance between cutouts may be required Check to be sure that oven supports above the warming drawer location do not obstruct the required interior 231 2 depth and 91 4 height Installation be...

Страница 14: ...ut do not obstruct the 231 2 required depth of the warming drawer cutout A 2 minimum clearance between oven and warming drawer cutouts are required Additional clearance may be required if 2 x 4 blocks are used to support runners or solid floor of the oven above The warming drawer may be supported by either a solid bottom 2 x 4 or 2 x 2 runners The support must be level and rigidly mounted flush wi...

Страница 15: ...ing plug the cord into the outlet In this location the excess power cord should be coiled and taped to the right side of the unit Make sure the cord does not get trapped by the drawer NOTE Insure that the power cord does not contact the hot surfaces on the bottom of ovens cooktops or any other appliance Push the drawer back until the front flange is flush to the cabinet front Open the drawer fully...

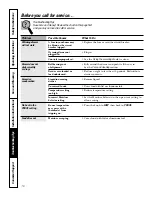
Страница 16: ...l bearings out Fully extend the drawer and push it all the way in slide smoothly of alignment See the Care and cleaning section or drags Drawer over loaded or Reduce weight to less than 50 pounds Redistribute load unbalanced drawer contents Excessive Liquid in warming Remove liquid condensation drawer Uncovered foods Cover food with lid or aluminum foil Temperature setting Reduce temperature setti...

Страница 17: ...Safety Instructions Operating Instructions Care and Cleaning Installation Instructions Troubleshooting Tips Consumer Support 17 Notes ...

Страница 18: ...Consumer Support Troubleshooting Tips Installation Instructions Care and Cleaning Operating Instructions Safety Instructions 18 Notes ...

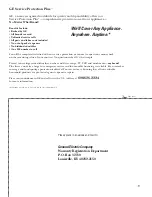
Страница 19: ...otection or you may request your money back on the remaining value of your contract No questions asked It s that simple Protect your refrigerator dishwasher washer and dryer range TV VCR and much more any brand Plus there s no extra charge for emergency service and low monthly financing is available Even icemaker coverage and food spoilage protection is offered You can rest easy knowing that all y...

Страница 20: ...ce of mind of knowing we can contact you in the unlikely event of a safety modification After mailing the registration below store this document in a safe place It contains information you will need should you require service Our service number is 800 GE CARES 800 432 2737 Read your Owner s Manual carefully It will help you operate your new appliance properly Model Number Serial Number E mail Addr...

Страница 21: ...Safety Instructions Operating Instructions Care and Cleaning Installation Instructions Troubleshooting Tips Consumer Support 21 Notes ...

Страница 22: ...f the product is located in an area where service by a GE Authorized Servicer is not available you may be responsible for a trip charge or you may be required to bring the product to an Authorized GE Service Location for service In Alaska the warranty excludes the cost of shipping or service calls to your home Some states do not allow the exclusion or limitation of incidental or consequential dama...

Страница 23: ...rcuit breakers Damage to the product caused by accident fire floods or acts of God Incidental or consequential damage caused by possible defects with this appliance Damage caused after delivery Product not accessible to provide required service What Mabe Will Not Cover All warranty service provided by our Factory Service Centres or an authorized Customer Care technician For service call 1 800 361 ...

Страница 24: ... anytime or call 800 626 2224 during normal business hours GE Consumer Home Services will still be there after your warranty expires In Canada call 1 888 261 2133 Parts and Accessories In the U S ge com Individuals qualified to service their own appliances can have parts or accessories sent directly to their homes VISA MasterCard and Discover cards are accepted Order on line today 24 hours every d...

Отзывы: