background image

Содержание Profile JGS905

Страница 1: ...overning codes and ordinances Note to Installer Be sure to leave these instructions with the Consumer Note to Consumer Keep these instructions for future reference Product failure due to improper inst...

Страница 2: ...ructions If you cannot reach your gas supplier call the fire department Installation and service must be performed by a qualified installer service agency or the gas supplier This range has been desig...

Страница 3: ...your range must be wired and fused to meet the requirements of the Canadian Electrical Code Be sure the installation of this product in a mobile home conforms with the Manufactured Home Construction...

Страница 4: ...e the top flat should be made or gaps between the countertop and range cooktop may occur Forcing the cooktop to fit may cause excessive gaps and could break the glass and void the warranty To obtain K...

Страница 5: ...il stop and fully closed REMOVE THE DOOR IF NECESSARY cont LIFT OFF DOOR Lift door up and out until the hinge arms clear the slots DO NOT LIFT THE DOOR BY THE HANDLE NOTE The oven door is very heavy B...

Страница 6: ...nd heat up to 194 F generated by the range FollOW packa 30 Min STANDARD INSTALLATION If the construction of your cabinet cannot provide a 1 4 flat area at the back of the countertop opening consider c...

Страница 7: ...TANT Please read carefully FOR PERSONAL SAFETY THIS APPLIANCE MUST BE PROPERLY GROUNDED An adequate electrical supply and outlet must be used to operate the electrical parts of your range The power co...

Страница 8: ...open position Gos supply _X_ _ tooven Oven shut off _ _ lever shown in the op_ Gas supply to top burner _ Pr s_utr r as seen from front of range _ MAKING THE CONNECTIONS cont Install 1 2 flare union...

Страница 9: ...or Wood and Wall b Drill a 1 8 pilot hole through the pre marked areas Note the angle of the wall screw in Fig 2 c Mount the Anti Tip bracket with the 4 screws provided Top front Fig 2 edge of counter...

Страница 10: ...front two leveling legs similar to Step E until the glass overhang touches the countertop Carefully push the range into the opening until the countertop fully engages the control panel The back glass...

Страница 11: ...osition Hinge in locked position Notch of hinge secu rely fitted into bottom of hinge slot Close the oven door REPLACE THE STORAGE DRAWER Place the drawer rail on the guides Push the drawer in until i...

Страница 12: ...ead _ igniter Burner _ Glass base _ maintop Vent cover CHECK FOR LEAKS Turn the gas supply on and use a liquid leak detector soap solution at all joints and connections to check for leaks Do not use a...

Страница 13: ...the steps below WARNING Lighting gas burners with a match is dangerous You should match light the cooktop burners only in an emergency a Light a match and hold the flame near the burner you want to l...

Страница 14: ...1 Remove the orifice fitting cover 2 Use a screwdriver to loosen the air shutter screw 3 Adjust the air shutter to 11 32 4 Retighten the air shutter screw Orifice fitting shutter _ _ _ _JJ WHAT ADJUST...

Страница 15: ...the trim holding the filler piece centered on the maintop frame and pushing upward to close the gap between the bottom of the glass and the filler trim When the trim is set in the proper position tigh...

Страница 16: ...replacement parts Recheck Steps Double check to make sure everything in this guide has been completed Rechecking steps will ensure safe use of the Range Please see L P conversion instructions supplied...

Страница 17: ...ue une mauvaise installation 4 AVE RTISSE ME NT Cet appareil menager doit _tre bien mis a la terre IMPORTANT vous devez faire les essais de fuite de cet appareil en vous conformant aux instructions du...

Страница 18: ...gaz Si vous n arrivez pas a communiquer avec votre fournisseur de gaz appelez les pompiers L installation et le service doivent _tre faits par un installateur qualifi_ une agence de service ou votre...

Страница 19: ...isiniere conformement aux codes en vigueur vous provoquez une situation dangereuse En I absence de codes vous devez c_bler et isoler votre cuisiniere conformement aux exigences du Canadian Electrical...

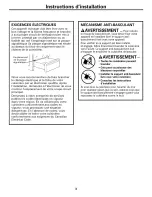
Страница 20: ...ptoir et la table de cuisson de votre cuisiniere En poussant la table de cuisson pour aller dans le comptoir vous pouvez occasionner des ecarts excessifs et vous pouvez casser la vitre et annuler la g...

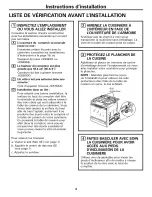
Страница 21: ...SAIRE suite ENLEVEZ LA PORTE EN LA SOULEVANT Enlevez la porte en la soulevant et en la faisant sortir jusqu a ce que les bras de charniere sortent des fentes NE SOULEVEZ JAMAIS LA PORTE UN ANGLE NOTE...

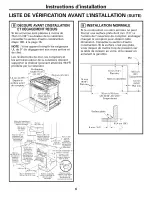
Страница 22: ...rmoire horizontales 58 9 superieure 90 8 cm 35 3 4 a 92 7 prise la prise cm 36 1 2 electrique et le depuis le plancher jusqu au comptoir 7 6 cm 3 76 cm 29 15 16 min 76 5 cm 30 1 16 max Endroit accepta...

Страница 23: ...ONNELLE VOUS DEVEZ BIEN METTRE A LA TERRE CET APPAREIL Vous devez utiliser une bonne alimentation electrique et une bonne prise pour faire fonctionner les pieces electriques de votre appareil Le cordo...

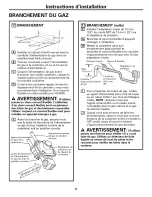
Страница 24: ...dehaut en gaz de la _ cutsmtere _ Lev e r de ferm _u r_e k _ _nl_alni i_e de I alimentation f_ _ _ en gaz du four en _ f _ posltlO__ BRANCHEMENT suite Installez I adaptateur evase de 13 mm 1 2 au cou...

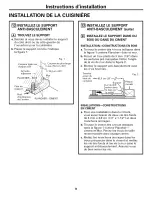
Страница 25: ...1 comme Plancheribois et mur b Percez un trou pilote de 3 mm 1 8 dans les surfaces pre marquees Notez I angle de la vis de mur dans la figure 2 c Montez le support anti basculement avec les 4 vis fou...

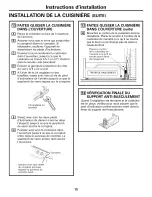
Страница 26: ...de devant comme dans I etape E jusqu a ce que le surplomb de verre touche le comptoir Poussez avec soin la cuisiniere dans I ouverture jusqu a ce que le comptoir entre dans le panneau de contr61e Le s...

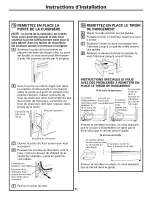
Страница 27: ...en position verrouillee Charniere en I 1 posi oo verroo ee c C Chee i a entree d ans le bas I _ 4_ de a fente de a I_ _ _ charniere REMETTEZ EN PLACE LE TIROIR DE RANGEMENT Placez les rails du tiroir...

Страница 28: ...Allumeur brQleur _ etincelle Base de E _ I Table de bruleur _ verre Couvercle de I event VI_RIFIEZ QU IL N Y A PAS DE FUlTE Allumez I alimentation de gaz et utilisez un detecteur de fuite liquide sol...

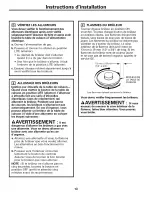
Страница 29: ...st dangereux d allumer les brGleurs a gaz avec une allumette Vous ne devez allumer un brGleur avec une allumette qu en cas d urgence a Allumez une allumette et tenez la flamme pres du brQleur que vous...

Страница 30: ...VOLET A AIR BRULEUR ARRII_RE 1 Enlevez le couvercle recouvrant I orifice 2 Utilisez un tournevis pour desserrer la vis du volet a air 3 Ajustez le volet a air a 11 32 4 Revissez la vis du volet a air...

Страница 31: ...la garniture en tenant la piece de remplissage centree sur le chassis du haut et en poussant vers I avant pour reduire I ecart entre le bas du verre et la garniture de remplissage Quand la garniture...

Страница 32: ...iez une deuxieme fois pour vous assurer d avoir bien suivi toutes les instructions de ce guide Cette deuxieme verification assurera une utilisation de la cuisiniere en toute securit Veuillez consulter...

Отзывы: