GE Profile JB988KHCC Скачать руководство пользователя страница 36

Care and cleaning of the range.

Consumer Support

Tr

oubleshooting T

ips

Care and Cleaning

Operating Instructions

Safety Instructions

36

Oven Heating Elements

Do not clean the broil element. Any soil
will burn off when the element is heated.
Clean the oven floor with warm, soapy
water.

On some models, the bake element is not
exposed and is under the oven floor. If spillovers,
residue or ash accumulate on the oven floor, 
wipe up before self-cleaning.

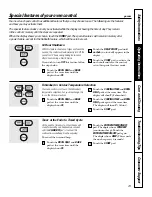
Storage Drawer Removal 

(on some models)

To remove the drawer:

Pull the drawer out until it stops.

Lift the front of the drawer until the
stops clear the guides.

Remove the drawer.

To replace the drawer:

Place the drawer rails on the guides.

Push the drawer back until it stops.

Lift the front of the drawer and push
back until the stops clear the guides.

Lower the front of the drawer and
push back until it closes.

Stop guide

Rail

Oven Light Replacement

CAUTION: 

Before replacing your oven light bulb,

disconnect the electrical power to the range at the
main fuse or circuit breaker panel. 

Be sure to let the light cover and bulb
cool completely.

To remove the cover:

Hold a hand under the cover so it
doesn’t fall when released. With
fingers of the same hand, firmly
push back the wire cover holder. 
Lift off the cover. 

Do not remove any screws to remove 
the cover.

Replace bulb with a 40-watt
appliance bulb.

To replace the cover:

Place it into groove of the light
receptacle. Pull wire forward to the
center of the cover until it snaps 
into place. 

Connect electrical power to the
range.

Wire cover holder.

Wipe up heavy soil on the oven
bottom.

Содержание Profile JB988KHCC

Страница 1: ...lled Models 10 11 Touch Pad Controlled Models 8 9 Thermostat Adjustment Do It Yourself 19 Timed Baking and Roasting Features 16 Warming Feature 26 Care and Cleaning 33 39 Troubleshooting Tips 40 44 Ac...

Страница 2: ...ductive harm and requires businesses to warn customers of potential exposure to such substances The fiberglass insulation in self clean ovens gives off a very small amount of carbon monoxide during th...

Страница 3: ...These surfaces may be hot enough to burn even though they are dark in color During and after use do not touch or let clothing or other flammable materials contact the surface units areas nearby the su...

Страница 4: ...eating fat beyond the smoking point Avoid scratching the glass cooktop The cooktop can be scratched with items such as sharp instruments rings or other jewelry and rivets on clothing Large scratches o...

Страница 5: ...asket is essential for a good seal Care should be taken not to rub damage or move the gasket Before self cleaning the oven remove shiny silver colored oven racks on some models and all other cookware...

Страница 6: ...ed off Glow brightly until the unit has cooled below 150 F NOTE A slight odor is normal when a new cooktop is used for the first time It is caused by the heating of new parts and insulating materials...

Страница 7: ...elain enamel as it may scratch the glass ceramic cooktop Glass ceramic usable but not recommended Poor performance May scratch the surface Stoneware usable but not recommended Poor performance May scr...

Страница 8: ...ng Burner To use the multi size burner Touch the ON OFF pad for the front right surface unit Use the pad to set the desired power setting Touch the BURNER SIZE pad as needed to select the desired burn...

Страница 9: ...everages W5 Soups liquid W5 The chart above shows initial suggested settings only The temperature type and amount of food type of pan and the time held will affect the quality of the food CAUTION Do n...

Страница 10: ...ooking Using the Bridge Burner on some models To use the bridge burner turn the left front control knob to the BRIDGE BURNER settings For full bridge surface unit operation also turn on the left rear...

Страница 11: ...minum foil Always use pot holders or oven mitts when removing food from the WARMING ZONE as cookware will be hot A HOT surface indicator light will glow when the glass surface is hot and will remain o...

Страница 12: ...here has been a power outage SELF CLEAN STD LO Pad Touch to select self cleaning function See the Using the self cleaning oven section OVEN LIGHT ON OFF Pad Touch to turn the oven light on or off DELA...

Страница 13: ...must be reset The time of day will flash in the display when there has been a power outage SELF CLEAN STD LO Pad Touch to select self cleaning function See the Using the self cleaning oven section OVE...

Страница 14: ...pull it toward you tilt the front end up and pull it out To replace place the end of the rack stop locks on the support tilt up the front and push the rack in CAUTION When you are using a rack in the...

Страница 15: ...and positioning the oven rack one position higher ge com Safety Instructions Operating Instructions Care and Cleaning Troubleshooting Tips Consumer Support Broiling Guide Quantity and Rack First Side...

Страница 16: ...Touch the BAKE pad Touch the number pads to set the desired oven temperature Touch the COOKING TIME pad NOTE If your recipe requires preheating you may need to add additional time to the length of the...

Страница 17: ...ug when inserting and removing them from the food and outlet To avoid damaging your probe do not use tongs to pull on the cable when removing it To avoid breaking the probe make sure food is completel...

Страница 18: ...tchen Timer is a minute timer only The Kitchen Timer does not control oven operations The maximum setting on the Kitchen Timer is 9 hours and 59 minutes To Reset the Kitchen Timer If the display is st...

Страница 19: ...re The type of margarine will affect baking performance Most recipes for baking have been developed using high fat products such as butter or margarine 80 fat If you decrease the fat the recipe may no...

Страница 20: ...f foods that can be baked in the lower oven drawer is 31 2 Do not put liquid or water in the lower oven drawer Never place plastics paper canned foods or combustible material in the lower oven drawer...

Страница 21: ...on below 1 RACK for convection cooking on one rack only Touch the CONVECTION BAKE MULTI 1 RACK pad twice See the 1 Rack Convection Baking section below Introduction Convection Fan Operation In a conve...

Страница 22: ...tion Cooking Before using your convection oven check to see if your cookware leaves room for air circulation in the oven If you are baking with several pans leave space between them Also be sure the p...

Страница 23: ...tarting at 100 F The temperature display will start to change once the oven temprature reaches 100 F When the oven reaches the temperature you set 3 beeps will sound NOTE If the Auto Recipe Conversion...

Страница 24: ...to set the time of day you want the oven to turn on and start cooking Touch the START pad NOTE An attention tone will sound if you are using timed baking or roasting and do not touch the START pad NO...

Страница 25: ...a self cleaning cycle Do not store the probe in the oven Probe not for use in Broil or Self Clean functions For best results when roasting large turkeys and roasts we recommend using the probe includ...

Страница 26: ...ver some of the cooked food items Remove serving spoons etc before placing containers in the oven Do not use plastic containers lids or plastic wrap CAUTION Plastic containers lids or plastic wrap wil...

Страница 27: ...recommend venting your kitchen with an open window or using a ventilation fan or hood during the first self clean cycle Remove broiler pan broiler grid probe all cookware and any aluminum foil from t...

Страница 28: ...dges of the oven racks with the paper towel How to Delay the Start of Cleaning Touch the SELF CLEAN STD LO pad once for a 4 hour clean time or twice for a 3 hour clean time A 3 hour self clean time is...

Страница 29: ...elsius Touch the START pad Tones at the End of a Timed Cycle At the end of a timed cycle 3 short beeps will sound followed by one beep every 6 seconds until the CLEAR OFF pad is touched This continual...

Страница 30: ...til the display shows SF Touch the CLOCK pad once The display will show 12 hr If this is the choice you want touch the START pad Touch the CLOCK pad again to change to the 24 hour military time clock...

Страница 31: ...s the START pad the display will show CON and the converted temperature of 325 F To deactivate the feature Press the BAKE and BROIL HI LO pads at the same time until the display shows SF Press the CON...

Страница 32: ...pears in the display Touch the START pad and will appear in the display Touch the COOKING TIME pad Touch the number pads to set the desired length of cooking time between 1 minute and 9 hours and 99 m...

Страница 33: ...parts It cannot be removed if it is baked on Control Knobs The control knobs may be removed for easier cleaning Make sure the knobs are in the OFF positions and pull them straight off the stems for cl...

Страница 34: ...lly open the door If the door will not fully open the indentation is not seated correctly in the bottom edge of the slot Push the hinge locks up against the front frame of the oven cavity to the locke...

Страница 35: ...the upper oven Lower oven drawer has a removable pan for easy cleaning Clean with hot soapy water and a sponge or dish towel Dry with a clean cloth Replace the pan in the lower oven drawer NOTE For m...

Страница 36: ...e drawer back until it stops Lift the front of the drawer and push back until the stops clear the guides Lower the front of the drawer and push back until it closes Stop guide Rail Oven Light Replacem...

Страница 37: ...cle but they will lose their luster and become hard to slide It will be necessary to grease all oven rack side edges with a light coating of vegetable oil after cleaning them by hand or in the oven Th...

Страница 38: ...due has been removed polish the entire surface with CERAMA BRYTE Ceramic Cooktop Cleaner and a paper towel The CERAMA BRYTE Ceramic Cooktop Scraper and all recommended supplies are available through o...

Страница 39: ...using the CERAMA BRYTE Ceramic Cooktop Cleaner with the CERAMA BRYTE Cleaning Pad for Ceramic Cooktops If pots with a thin overlay of aluminum or copper are allowed to boil dry the overlay may leave...

Страница 40: ...f cookware are clean salt or sand were between before use and use cookware with smooth bottoms the cookware and the surface of the cooktop Cookware has been slid across the cooktop surface Areas of di...

Страница 41: ...l element for 10 minutes voltage may be low Broil for the longest period of time recommended in the Broiling Guide Oven temperature Oven thermostat See the Adjust the oven thermostat Do it yourself to...

Страница 42: ...ions Excessive smoking Excessive soil Touch the CLEAR OFF pad Open the windows to during a clean cycle rid the room of smoke Wait until the LOCKED light goes off Wipe up the excess soil and reset the...

Страница 43: ...er outage or surge Reset the clock If the oven was in use you must reset clock flashes it by touching the CLEAR OFF pad setting the clock and resetting any cooking function Steam from the vent When us...

Страница 44: ...See the Care and cleaning of the range section Drawer is over loaded or Reduce weight Redistribute drawer contents load is unbalanced Lower oven drawer or A fuse in your home may be Replace the fuse o...

Страница 45: ...tection or you may request your money back on the remaining value of your contract No questions asked It s that simple Protect your refrigerator dishwasher washer and dryer range TV VCR and much more...

Страница 46: ...ere Complete and mail your Consumer Product Ownership Registration today Have the peace of mind of knowing we can contact you in the unlikely event of a safety modification After mailing the registrat...

Страница 47: ...Notes Safety Instructions Operating Instructions Care and Cleaning Troubleshooting Tips Consumer Support 47...

Страница 48: ...Notes 48 Consumer Support Troubleshooting Tips Care and Cleaning Operating Instructions Safety Instructions...

Страница 49: ...Notes Safety Instructions Operating Instructions Care and Cleaning Troubleshooting Tips Consumer Support 49...

Страница 50: ...ing normal business hours Have your model number ready Tired of discolored racks Wishing you had extra heavy duty oven racks NOW AVAILABLE for your range GE s innovative self cleanable porcelain coate...

Страница 51: ...mmercially Damage to the glass cooktop caused by use of cleaners other than the recommended cleaning creams and pads Damage to the glass cooktop caused by hardened spills of sugary materials or melted...

Страница 52: ...while your warranty is still in effect You can purchase it on line anytime or call 800 626 2224 during normal business hours GE Consumer Home Services will still be there after your warranty expires P...

Отзывы: