background image

28

49-85221-2

Oven Door

NOTE: 

The glass cover should be removed only when 

cold. Wearing latex gloves may offer a better grip.
Before replacing the bulb, disconnect electrical power to 
the oven at the main fuse or circuit breaker panel. Let 
the bulb cool completely before removing it. For your 
safety do not touch a hot bulb with a damp cloth. If you 
do the bulb may break.

To remove: 

7XUQWKHJODVVFRYHUFRXQWHUFORFNZLVHWXUQXQWLOWKH

tabs of the glass cover clear the grooves of the socket 
and pull the cover off. Remove the bulb.

To replace: 

3XWLQDQHZZDWWDSSOLDQFHEXOE3ODFHWKHWDEVRI

the glass cover into the grooves of the socket. Turn the 

JODVVFRYHUFORFNZLVHWXUQ

NOTE:


Ŷ 

$ZDWWDSSOLDQFH

bulb is smaller than 

DVWDQGDUGZDWW

household bulb.

Ŷ 

Reconnect electrical 
power to the oven once 
the new bulb is installed.

Ŷ 

For improved lighting 
inside the oven, 
clean the glass cover 
frequently using a wet 
cloth. This should be 
done when the oven is 
completely cool.

Bulb

Socket

Tab

3

»

2

Max 

length

Glass cover

The door is very heavy. Be careful when removing and lifting the door. Do not lift door by the handle.

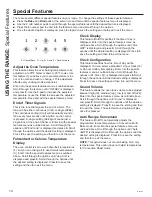
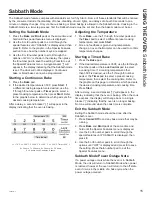
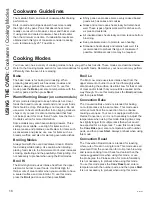
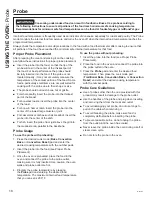
To Remove the Door:

 )XOO\RSHQWKHGRRU
 3XOOWKHKLQJHORFNVXSDQGDZD\IURPWKHUDQJH

frame to the unlocked position.

3.  Firmly grasp both sides of the door near the top.
4.  Close door until the top of the door is approximately 

6” from the range frame.

5.  Lift door up and away from the range until both hinge 

arms are clear of the slots in the range frame.

To Replace the Door: 

 )LUPO\JUDVSERWKVLGHVRI WKHGRRUQHDUWKHWRS

2.  With the door at the same angle as the removal 

position, rest the notch on the underside of the left 
hinge arm on the bottom edge of the left hinge slot. 
The notch in the hinge arm must be fully seated into 
the bottom of the slot. Repeat for the right side.

3.  Fully open the door. If the door will not fully open, the 

notches in the bottoms of the hinge arms have not 
seated correctly in the bottom edge of the slot. Lift the 
door off the range and repeat previous step.

 3XVKWKHKLQJHORFNVWRZDUGWKHUDQJHFDYLW\DQG

down to the locked position.

5.  Close the oven door.

Removal position

3XOOKLQJHORFNVXSWRXQORFN

3XVKKLQJHORFNVGRZQWRORFN

Rest notch on bottom edge 

of hinge slot

Notch

Bottom 

edge of 

slot

Hinge arm

WARNING

  SHOCK OR BURN HAZARD:

 Before replacing oven light bulb, disconnect the electrical power to the 

range at the main fuse or circuit breaker panel. Failure to do so may result in electric shock or burn.

CAUTION

  BURN HAZARD:

 The glass cover and bulb should be removed when cool. Touching hot glass with 

bare hands or a damp cloth can cause burns.

Oven Light

CARE 

AND CLEANING: 

2YHQ

/LJKW

2YHQ

'RRU

Содержание PGB940

Страница 1: ...e of a Power Failure 8 Surface Burners 8 Griddle 10 Oven Controls 12 Special Features 14 Sabbath Mode 15 Cookware Guidelines 16 Cooking Modes 16 Oven Racks 17 Probe 18 Cooking Guide 19 Warming Drawer...

Страница 2: ...nto every GE Appliances product and we think you will too Among other things registration of your appliance ensures that we can deliver important product information and warranty details when you need...

Страница 3: ...e secured to the anti tip device properly WARNING If the information in this manual is not followed exactly a fire or explosion may result causing property damage personal injury or death Do not store...

Страница 4: ...UDWFKLQJ RU LPSDFWLQJ JODVV GRRUV cooktops or control panels Doing so may lead to glass breakage Do not cook on a product with broken glass Shock fire or cuts may occur R QRW OHDYH FKLOGUHQ DORQH RU X...

Страница 5: ...in fire that could spread to surrounding cabinets 1HYHU OHDYH RLO XQDWWHQGHG ZKLOH IU LQJ I DOORZHG to heat beyond its smoking point oil may ignite resulting in fire that may spread to surrounding FD...

Страница 6: ...XFWV SODVWLFV FDQQHG food or combustible materials in the drawer They may ignite R QRW WRXFK WKH KHDWLQJ HOHPHQW RU WKH LQWHULRU surface of the drawer These surfaces may be hot enough to cause burns 8...

Страница 7: ...the equipment off and on the user is encouraged to try to correct the interference by one or more of the following measures 5HRULHQW RU UHORFDWH WKH UHFHLYLQJ DQWHQQD QFUHDVH WKH VHSDUDWLRQ EHWZHHQ W...

Страница 8: ...KHDU D FOLFNLQJ QRLVH the sound of the electric spark igniting the burner When one burner is turned to LITE all burners will spark Sparking will continue as long as the knob remains at LITE Once gas i...

Страница 9: ...ide levels above allowable standards This could be hazardous to your health 8VH D IODW ERWWRPHG ZRN Do not use stove top grills Top of Range Cookware Aluminum Medium weight cookware is recommended bec...

Страница 10: ...oking surface for meats pancakes and other foods usually prepared in a skillet Before first use rinse with hot water and dry WKRURXJKO 3UHSDUH WKH VXUIDFH ZLWK FRRNLQJ VSUD RU vegetable oil Griddle Pr...

Страница 11: ...RU URXJK sharp edges which might damage the griddle surface 6WRUH FDUHIXOO WR SUHYHQW VFUDWFKLQJ R QRW SODFH WKH JULGGOH LQ D PLFURZDYH RYHQ I VRPHWKLQJ KDV VSLOOHG XQGHU WKH JULGGOH LW VKRXOG EH cle...

Страница 12: ...49 85221 2 Convection and Remote Enable Convection 2 5 4 6 3 8 1 7 9 11 14 15 12 16 10 13 2 5 4 3 8 1 7 6 9 11 12 16 13 USING THE OVEN Oven Controls Oven Controls...

Страница 13: ...cause heat from the bulb will speed harmful bacteria growth 10 Probe on some models Monitors internal food temperature and turns the oven off when the food reaches the programmed temperature Insert th...

Страница 14: ...temperatures EXW RX FDQ FKDQJH LW WR XVH HOVLXV WHPSHUDWXUHV QWHU LQWR WKH VSHFLDO IHDWXUHV PHQX DV RXWOLQHG DERYH 6FUROO WKURXJK WKH RSWLRQV XQWLO GHJ 8QLW LV displayed and press 0 Scroll through th...

Страница 15: ...t a different preset cooking temperature and press Start 2 Since no feedback is given during temperature change an oven thermometer can be used to confirm temperature changes Starting a Timed Bake 3UH...

Страница 16: ...ZRXOG OLNH FRRNHG DOO WKH way through To use this mode press the Broil pad twice and then press Start Convection Bake The Convection Bake mode is intended for baking on multiple racks at the same tim...

Страница 17: ...provided with your oven Remove the rack from the oven remove debris in the side tracks with a paper towel shake the graphite lubricant and place 4 small drops on the two bottom tracks of the left and...

Страница 18: ...Convection Roast SDG DQG HQWHU WKH desired cooking temperature with the number pads QVHUW WKH SUREH LQWR WKH IRRG VHH 3URSHU 3UREH 3ODFHPHQW 3 Once the oven is preheated place the food in the oven and...

Страница 19: ...chicken breasts legs thighs Broil Lo Bake 3 or 4 If breaded or coated in sauce avoid Broil Hi modes Broil skin side down first Watch food closely when broiling Boneless chicken breasts Broil Lo Bake 4...

Страница 20: ...ne china CAUTION Dishes will be hot Use pot holders or mitts when removing hot dishes CAUTION Do not use any type of foil or oven liner to cover the oven bottom These items can trap heat or melt resul...

Страница 21: ...KRQH RU WDEOHW YLVLW GEAppliances com connect to learn more about connected appliance features and to download the appropriate app 2 Follow the app onscreen instructions to connect your GE Appliances...

Страница 22: ...and water solution Rinse with clean water and dry with a soft cloth When cleaning surfaces make sure that they are at room temperature and not in direct sunlight If stain on the door vent trim is pers...

Страница 23: ...f this manual before using the Self Clean Mode Self Clean uses very high temperatures to clean the oven interior For a moderately soiled oven run a 3 hour self clean cycle For a heavily soiled oven ru...

Страница 24: ...urner Head Electrode Dual Oval Burner Caps 1RQ 5HPRYDEOH Round Burner Cap 5HPRYDEOH Round Burner Head Multi Ring Burner on some models Inner Burner Cap 5HPRYDEOH Outer Burner Cap 5HPRYDEOH Round Burne...

Страница 25: ...es for an even unhampered flame Clogged or dirty burner ports or electrodes will not allow the burner to operate properly For proper ignition make sure the small hole in the notch that fits over the e...

Страница 26: ...the oven using the self clean cycle Do not attempt to clean your grates in the oven if your grates have rubber bumpers Doing so will destroy the rubber bumpers and may affect the function of your sur...

Страница 27: ...WUDLJKW RXW XQWLO LW VWRSV 2 Continue to pull the drawer until it is detached from the oven Replacing the Storage Drawer 5HVW WKH OHIW GUDZHU UDLO DURXQG WKH LQQHU OHIW UDLO JXLGH and slide it in slig...

Страница 28: ...n 3 Firmly grasp both sides of the door near the top 4 Close door until the top of the door is approximately 6 from the range frame 5 Lift door up and away from the range until both hinge arms are cle...

Страница 29: ...inum foil on broil pan wrap tightly and add slits conforming to those in the pan to allow grease to drain Oven temperature too hot or too cold Oven temperature needs adjustment See the Special Feature...

Страница 30: ...oven to cool below the locking temperature LOCK DOOR flashes in the display The self clean cycle has been selected but the door is not closed Close the oven door F and a number or letter flash in the...

Страница 31: ...broil burners do not Gas to the oven burners may have been shut off The oven gas shut off is located on the gas regulator near the gas line attachment to your range Locate it and flip the lever My ove...

Страница 32: ...32 49 85221 2 Notes...

Страница 33: ...49 85221 2 33 Notes...

Страница 34: ...TY GE Appliances Gas Range Limited Warranty EXCLUSION OF IMPLIED WARRANTIES Your sole and exclusive remedy is product repair as provided in this Limited Warranty Any implied warranties including the i...

Страница 35: ...rmation The following products and more are available Accessories Accessories Nickel Flat Rack Reinforced Nickel Flat Rack Self Clean Flat Rack Nickel Extension Rack Self Clean Extension Rack URLOHU 3...

Страница 36: ...O GLVFRXQWV WKDW DUH DYDLODEOH ZKLOH RXU warranty is still in effect You can purchase it on line anytime GE Appliances Services will still be there after your ZDUUDQW H SLUHV Q WKH 86 GEAppliances com...

Отзывы: