GE PGB930 Скачать руководство пользователя страница 61

49-85221-2

25

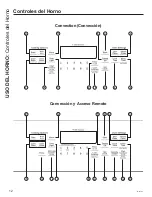
Limpieza de los Quemadores Superficiales (Cont.)

Limpieza de las Tapas de los Quemadores

Lave las tapas de los quemadores en agua caliente con jabón 
y enjuague con agua limpia. Puede fregar con u na base de 
fregado plástica para eliminar partículas de comida quemadas. 
Las tapas redondas de los quemadores también se pueden 
limpiar en un lavavajillas.

Limpieza de las Cabezas de los Quemadores

Limpie las cabezas de los quemadores de forma rutinaria, 
especialmente luego de derrames importantes, que podrían 
bloquear las aberturas del quemador. Retire los quemadores 
cuando estén fríos. Lave los mismos con agua caliente y 
jabón. Enjuague con agua limpia. Para eliminar las manchas 
más rebeldes, use un cepillo con cerda plástica.

NOTA:

 No use lana de acero ni estropajos para limpiar las 

partes del quemador, ya que podrán bloquear las aberturas. 
Nunca lave las cabezas de los quemadores en el lavavajillas. 
Esto podrá hacer que se descoloren.
Las hendiduras de las cabezas de los quemadores se deben 
mantener limpias en todo momento para obtener una llama 
pareja y sin obstrucción.
Las partes bloqueadas o sucias de los quemadores o los 
electrodos no permitirán que el quemador funcione de forma 
correcta.

Para un encendido adecuado, asegúrese de que el agujero 
pequeño en la sección que coincide con el electrodo se 
mantenga abierto. Puede usar una aguja de coser o un precinto 
para desbloquearlo.

Reemplazo de los Quemadores Superficiales

Antes de colocar las tapas y cabezas de los quemadores y el 

HQVDPEOHGHODFDEH]DWDSDQXHYDPHQWHHVFXUUDHOH[FHVR

de agua y luego seque las mismas totalmente.
Vuelva a colocar las cabezas de los quemadores en las 
ubicaciones correctas, de acuerdo con sus tamaños. 
Asegúrese de que cada tapa quede correctamente apoyada 
sobre la cabeza del quemador, como se muestra a 
continuación.

PRECAUCIÓN


No use la parte superior de la 

cocina sin que todas las partes de los quemadores y las 
parrillas estén en sus respectivos lugares.

Cualquier derrame en o alrededor de un electrodo se deberá 
limpiar de forma cuidadosa. Evite golpear el electrodo con 
cualquier cosa dura, ya que podrá ser dañado.

El electrodo del encendedor de la chispa es 
expuesto cuando la cabeza del quemador es 
retirada. Cuando un quemador se gira a 

LITE

todos los quemadores hacen chispa. No intente 
desensamblar ni limpiar un quemador mientras 
otro quemador está encendido.

El agujero redondo en la 
cabeza del quemador se 

deberá mantener limpio.

Electrodo

La tapa del 

quemador está 

correctamente 

colocada.

La tapa del 

quemador NO está 

correctamente 

colocada.

La tapa del 

quemador NO está 

correctamente 

colocada.

CUIDADO 

Y

 LIMPIEZA: 

Placa de Cocción

Placa de Cocción (Cont.)

Содержание PGB930

Страница 1: ...e of a Power Failure 8 Surface Burners 8 Griddle 10 Oven Controls 12 Special Features 14 Sabbath Mode 15 Cookware Guidelines 16 Cooking Modes 16 Oven Racks 17 Probe 18 Cooking Guide 19 Warming Drawer...

Страница 2: ...nto every GE Appliances product and we think you will too Among other things registration of your appliance ensures that we can deliver important product information and warranty details when you need...

Страница 3: ...e secured to the anti tip device properly WARNING If the information in this manual is not followed exactly a fire or explosion may result causing property damage personal injury or death Do not store...

Страница 4: ...UDWFKLQJ RU LPSDFWLQJ JODVV GRRUV cooktops or control panels Doing so may lead to glass breakage Do not cook on a product with broken glass Shock fire or cuts may occur R QRW OHDYH FKLOGUHQ DORQH RU X...

Страница 5: ...in fire that could spread to surrounding cabinets 1HYHU OHDYH RLO XQDWWHQGHG ZKLOH IU LQJ I DOORZHG to heat beyond its smoking point oil may ignite resulting in fire that may spread to surrounding FD...

Страница 6: ...XFWV SODVWLFV FDQQHG food or combustible materials in the drawer They may ignite R QRW WRXFK WKH KHDWLQJ HOHPHQW RU WKH LQWHULRU surface of the drawer These surfaces may be hot enough to cause burns 8...

Страница 7: ...the equipment off and on the user is encouraged to try to correct the interference by one or more of the following measures 5HRULHQW RU UHORFDWH WKH UHFHLYLQJ DQWHQQD QFUHDVH WKH VHSDUDWLRQ EHWZHHQ W...

Страница 8: ...KHDU D FOLFNLQJ QRLVH the sound of the electric spark igniting the burner When one burner is turned to LITE all burners will spark Sparking will continue as long as the knob remains at LITE Once gas i...

Страница 9: ...ide levels above allowable standards This could be hazardous to your health 8VH D IODW ERWWRPHG ZRN Do not use stove top grills Top of Range Cookware Aluminum Medium weight cookware is recommended bec...

Страница 10: ...oking surface for meats pancakes and other foods usually prepared in a skillet Before first use rinse with hot water and dry WKRURXJKO 3UHSDUH WKH VXUIDFH ZLWK FRRNLQJ VSUD RU vegetable oil Griddle Pr...

Страница 11: ...RU URXJK sharp edges which might damage the griddle surface 6WRUH FDUHIXOO WR SUHYHQW VFUDWFKLQJ R QRW SODFH WKH JULGGOH LQ D PLFURZDYH RYHQ I VRPHWKLQJ KDV VSLOOHG XQGHU WKH JULGGOH LW VKRXOG EH cle...

Страница 12: ...49 85221 2 Convection and Remote Enable Convection 2 5 4 6 3 8 1 7 9 11 14 15 12 16 10 13 2 5 4 3 8 1 7 6 9 11 12 16 13 USING THE OVEN Oven Controls Oven Controls...

Страница 13: ...cause heat from the bulb will speed harmful bacteria growth 10 Probe on some models Monitors internal food temperature and turns the oven off when the food reaches the programmed temperature Insert th...

Страница 14: ...temperatures EXW RX FDQ FKDQJH LW WR XVH HOVLXV WHPSHUDWXUHV QWHU LQWR WKH VSHFLDO IHDWXUHV PHQX DV RXWOLQHG DERYH 6FUROO WKURXJK WKH RSWLRQV XQWLO GHJ 8QLW LV displayed and press 0 Scroll through th...

Страница 15: ...t a different preset cooking temperature and press Start 2 Since no feedback is given during temperature change an oven thermometer can be used to confirm temperature changes Starting a Timed Bake 3UH...

Страница 16: ...ZRXOG OLNH FRRNHG DOO WKH way through To use this mode press the Broil pad twice and then press Start Convection Bake The Convection Bake mode is intended for baking on multiple racks at the same tim...

Страница 17: ...provided with your oven Remove the rack from the oven remove debris in the side tracks with a paper towel shake the graphite lubricant and place 4 small drops on the two bottom tracks of the left and...

Страница 18: ...Convection Roast SDG DQG HQWHU WKH desired cooking temperature with the number pads QVHUW WKH SUREH LQWR WKH IRRG VHH 3URSHU 3UREH 3ODFHPHQW 3 Once the oven is preheated place the food in the oven and...

Страница 19: ...chicken breasts legs thighs Broil Lo Bake 3 or 4 If breaded or coated in sauce avoid Broil Hi modes Broil skin side down first Watch food closely when broiling Boneless chicken breasts Broil Lo Bake 4...

Страница 20: ...ne china CAUTION Dishes will be hot Use pot holders or mitts when removing hot dishes CAUTION Do not use any type of foil or oven liner to cover the oven bottom These items can trap heat or melt resul...

Страница 21: ...KRQH RU WDEOHW YLVLW GEAppliances com connect to learn more about connected appliance features and to download the appropriate app 2 Follow the app onscreen instructions to connect your GE Appliances...

Страница 22: ...and water solution Rinse with clean water and dry with a soft cloth When cleaning surfaces make sure that they are at room temperature and not in direct sunlight If stain on the door vent trim is pers...

Страница 23: ...f this manual before using the Self Clean Mode Self Clean uses very high temperatures to clean the oven interior For a moderately soiled oven run a 3 hour self clean cycle For a heavily soiled oven ru...

Страница 24: ...urner Head Electrode Dual Oval Burner Caps 1RQ 5HPRYDEOH Round Burner Cap 5HPRYDEOH Round Burner Head Multi Ring Burner on some models Inner Burner Cap 5HPRYDEOH Outer Burner Cap 5HPRYDEOH Round Burne...

Страница 25: ...es for an even unhampered flame Clogged or dirty burner ports or electrodes will not allow the burner to operate properly For proper ignition make sure the small hole in the notch that fits over the e...

Страница 26: ...the oven using the self clean cycle Do not attempt to clean your grates in the oven if your grates have rubber bumpers Doing so will destroy the rubber bumpers and may affect the function of your sur...

Страница 27: ...WUDLJKW RXW XQWLO LW VWRSV 2 Continue to pull the drawer until it is detached from the oven Replacing the Storage Drawer 5HVW WKH OHIW GUDZHU UDLO DURXQG WKH LQQHU OHIW UDLO JXLGH and slide it in slig...

Страница 28: ...n 3 Firmly grasp both sides of the door near the top 4 Close door until the top of the door is approximately 6 from the range frame 5 Lift door up and away from the range until both hinge arms are cle...

Страница 29: ...inum foil on broil pan wrap tightly and add slits conforming to those in the pan to allow grease to drain Oven temperature too hot or too cold Oven temperature needs adjustment See the Special Feature...

Страница 30: ...oven to cool below the locking temperature LOCK DOOR flashes in the display The self clean cycle has been selected but the door is not closed Close the oven door F and a number or letter flash in the...

Страница 31: ...broil burners do not Gas to the oven burners may have been shut off The oven gas shut off is located on the gas regulator near the gas line attachment to your range Locate it and flip the lever My ove...

Страница 32: ...32 49 85221 2 Notes...

Страница 33: ...49 85221 2 33 Notes...

Страница 34: ...TY GE Appliances Gas Range Limited Warranty EXCLUSION OF IMPLIED WARRANTIES Your sole and exclusive remedy is product repair as provided in this Limited Warranty Any implied warranties including the i...

Страница 35: ...rmation The following products and more are available Accessories Accessories Nickel Flat Rack Reinforced Nickel Flat Rack Self Clean Flat Rack Nickel Extension Rack Self Clean Extension Rack URLOHU 3...

Страница 36: ...O GLVFRXQWV WKDW DUH DYDLODEOH ZKLOH RXU warranty is still in effect You can purchase it on line anytime GE Appliances Services will still be there after your ZDUUDQW H SLUHV Q WKH 86 GEAppliances com...

Страница 37: ...COCINA En Caso de Corte de Corriente 8 Quemadores 8 Plancha 10 Controles del Horno 12 Funciones Especiales 14 Modo Sab tico 15 Pautas de Uso de Utensilios 16 Modos de Cocci n 16 Estantes del Horno 17...

Страница 38: ...creemos que usted tambi n Entre otras cosas el registro de su electrodom stico asegura que podamos entregarle informaci n importante del producto y detalles de la garant a cuando los necesite Registre...

Страница 39: ...todas las instrucciones de seguridad antes de utilizar este producto No seguir estas instrucciones puede generar un incendio una descarga el ctrica lesiones corporales o la muerte LEA Y GUARDE ESTAS I...

Страница 40: ...con un vidrio roto Es posible que se produzcan descargas incendio o cortes 1R GHMH D ORV QLxRV VRORV R IXHUD GH VX UDGLR GH DWHQFLyQ en el rea donde el electrodom stico se encuentre en uso Nunca se l...

Страница 41: ...nando una p rdida de gas y riesgo de incendio O LQKDELOLWDU HO ORTXHR GHO RQWURO GH DV HQ DOJXQRV PRGHORV DVHJ UHVH GH TXH ORV FRQWUROHV GH VXSHUILFLH VH HQFXHQWUHQ HQ OD SRVLFLyQ 2 SDJDGR VWR evitar...

Страница 42: ...ador por m s de 2 horas Si no se siguen estas instrucciones se podr n producir enfermedades generadas en la comida 1R GHMH SURGXFWRV GH SDSHO SOiVWLFRV FRPLGD HQODWDGD R materiales combustibles en el...

Страница 43: ...l equipo se aconseja al usuario que intente corregir la interferencia con una de las siguientes medidas 5HRULHQWH R UHXELTXH OD DQWHQD UHFHSWRUD XPHQWH OD VHSDUDFLyQ HQWUH HO HTXLSR HO UHFHSWRU RQHFWH...

Страница 44: ...a que absorba el calor No intente desensamblar un quemador mientras otro quemador est encendido Es posible que se produzca una descarga el ctrica lo cual podr a hacer que vuelque un utensilio de cocin...

Страница 45: ...ios de esmalte DMR FLHUWDV FRQGLFLRQHV HO HVPDOWH de algunos utensilios de cocina se pueden derretir Siga las recomendaciones sobre m todos de cocci n del fabricante de utensilios de cocina Vidrio Exi...

Страница 46: ...ueques y otras comidas normalmente preparadas en una sart n Antes del primer uso enjuague la misma con agua caliente y s quela completamente Prepare la superficie con espray de cocina o aceite vegetal...

Страница 47: ...SURQXQFLDGDV R extremos muy filosos que podr an da ar la superficie de la plancha XDUGH FRQ FXLGDGR SDUD HYLWDU UDOODGXUDV 1R FRORTXH OD SODQFKD HQ XQ KRUQR PLFURRQGDV 6L DOJR VH GHUUDPy GHEDMR GH OD...

Страница 48: ...12 49 85221 2 2 2 5 5 Convecci n y Acceso Remoto Convection Convecci n 4 4 6 3 3 8 8 1 1 7 7 6 9 9 11 11 14 15 12 12 16 16 10 13 13 USO DEL HORNO Controles del Horno Controles del Horno...

Страница 49: ...el desarrollo de bacterias nocivas Aseg rese de que la luz del horno est apagada ya que el calor de la l mpara acelerar el crecimiento de bacterias nocivas 10 Probe Sonda en algunos modelos Monitorea...

Страница 50: ...a configuraci n actual presione nuevamente para modificar la configuraci n Ingrese en el men de funciones especiales como se detalla m s arriba Alterne HQWUH ODV RSFLRQHV KDVWD TXH OD IXQFLyQ GHJ 8QLW...

Страница 51: ...ninguna indicaci n durante el cambio de temperatura se puede usar un term metro para horno para confirmar los cambios de temperatura Inicie un Horneado por Tiempo 1 Presione la tecla Bake Hornear 2 S...

Страница 52: ...presione la tecla Broil Asar dos veces y luego presione Start Iniciar Convection Bake Hornear por Convecci n O PRGR RQYHFWLRQ DNH RUQHDU SRU RQYHFFLyQ HVWi pensado para honear en m ltiples estantes al...

Страница 53: ...ecorrido deslizable con una toalla de papel agite el lubricante de grafito y coloque 4 gotitas en los dos recorridos inferiores de los lados izquierdo y derecho Abra y cierre el estante varias veces p...

Страница 54: ...LFDFLyQ RUUHFWD GH OD 6RQGD 8QD YH TXH HO KRUQR IXH SUHFDOHQWDGR FRORTXH OD FRPLGD en el mismo y conecte la sonda en su correspondiente tomacorriente asegur ndose de que est completamente insertada Te...

Страница 55: ...3 Deje sin cubrir use una olla chata tal como una olla para asar Pechugas patas muslos con huesos VDGR DMR Hornear 3 o 4 6L VH HPSDQy R FXEULy FRQ VDOVD HYLWH ORV PRGRV URLO L VDU OWR VH GHO ODGR GH O...

Страница 56: ...fina Gu a del Caj n para Calentar en algunos modelos USO DEL HORNO XtD GHO DMyQ SDUD DOHQWDU 3DSHO GH OXPLQLR REHUWRUHV GHO RUQR PRECAUCI N Los platos estar n calientes Use sostenedores de ollas o gu...

Страница 57: ...iances 1 A trav s de su tel fono inteligente o tableta visite GEAppliances com connect para aprender m s sobre las funciones del electrodom stico conectado y para descargar la aplicaci n correspondien...

Страница 58: ...seque con una tela seca Al limpiar supeficies aseg rese de que est n a temperatura ambiente y fuera del contacto con la luz solar Si las manchas en el borde de la ventana de la puerta son persistente...

Страница 59: ...H PRGR XVD temperaturas muy altas para limpiar el interior del horno Para un horno moderadamente sucio use un ciclo de limpieza autom tica de 3 horas S lo los estantes del horno de limpieza DXWRPiWLFD...

Страница 60: ...PDGRU 5HGRQGR WUDtEOH Cabeza del 4XHPDGRU Redondo Placa de Cocci n CUIDADO Y LIMPIEZA 6RQGD 3UREH 3ODFD GH RFFLyQ 4XHPDGRU GH P OWLSOHV DQLOORV en algunos modelos 7DSD GHO 4XHPDGRU 5HGRQGR WUDtEOH Cab...

Страница 61: ...uado aseg rese de que el agujero peque o en la secci n que coincide con el electrodo se mantenga abierto Puede usar una aguja de coser o un precinto para desbloquearlo Reemplazo de los Quemadores Supe...

Страница 62: ...ores de goma Hacer esto destruir los protectores de goma afectando el funcionamiento de los quemadores Las rejillas cubiertas de porcelana se podr n volver gradualmente speras si son expuestas de form...

Страница 63: ...n hacia afuera hasta que se detenga 2 Contin e empujando el caj n hasta que salga del horno Reemplazo del Caj n de Almacenamiento 1 Coloque el riel izquierdo del caj n alrededor de la gu a del riel i...

Страница 64: ...e la puerta hacia arriba y afuera de la cocina hasta que ambos brazos de las bisagras est n fuera de las ranuras de la estructura de la cocina Para reemplazar la puerta 1 Firmemente tome ambos lados d...

Страница 65: ...aquellos en la olla para permitir que la grasa sea drenada La temperatura del horno es demasiado caliente o demasiado fr a La temperatura del horno debe ser ajustada Consulte la secci n Funciones Esp...

Страница 66: ...f Cancelar Apagar Espere a que el horno se enfr e por debajo de la temperatura de bloqueo TRABA DE LA PUERTA titila en la pantalla El ciclo de limpieza autom tica fue seleccionado pero la puerta no es...

Страница 67: ...ear y asar no Es posible que los quemadores de gas del horno hayan sido apagados El apagado del gas del horno est ubicado en el regulador de gas cerca GH OD DGKHUHQFLD GH OD WXEHUtD GH JDV D OD FRFLQD...

Страница 68: ...32 49 85221 2 Notas...

Страница 69: ...49 85221 2 33 Notas...

Страница 70: ...6ROLFLWH HO VHUYLFLR WpFQLFR SDUD UHSDUDU R UHHPSOD DU ODV l mparas excepto las l mparas LED EXCLUSI N DE GARANT AS IMPL CITAS Su nica y exclusiva alternativa es la reparaci n del producto como se in...

Страница 71: ...ibles Accesorios Accesorios Estante Plano de N quel Estante Plano Reforzado de N quel Estante Plano con Limpieza Autom tica Estante Extensible de N quel Estante Extensible con Limpieza Autom tica 2OOD...

Страница 72: ...ntras su garant a a n est vigente La puede adquirir en cualquier momento a trav s de Internet Los servicios de GE Appliances a n estar n all cuando su garant a caduque Q 88 GEAppliances com extended w...

Отзывы: