background image

GEI-56128H 


IV.  OPERATION 


A.  Steps Prior to Starting 


WARNING

:  

If the motor has been in 

a  damp  location,  dry  it  out 
thoroughly  before  operating.  Before 
energizing the motor for the first 


time or after an extended shut down, it is advisable 
to  check  the  insulation  resistance,  power  supply 
and mechanical freedom of the motor. 


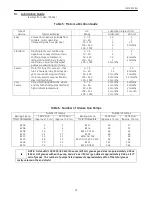
In  accordance  with  established  standards,  the 

recommended  minimum  insulation  resistance  for  the 

stator  winding  when  measured  with  a  500  volt  DC 

direct  indicating  ohmmeter  with  self-contained power 

supply (megger), shall not be less than 5 mega-ohms at 
40

°

C for a motor rated under 1000 volts, and not less 

than  100  mega-ohms  at  40

°

C  for  a  motor  rated  over 

1000  volts.    If  the  insulation  resistance  is  lower  than 

this  value,  it  is  advisable  to  eliminate  the  moisture  in 

one of the following ways. 


1.  Dry  the  winding  in  an  air-circulating 

oven  with  the  air  surrounding  the  winding  at  110

°

C, 

+5/-15

°

C  until  the  part  has  been  above  90

°

C  for  at 

least  four  hours.    Then  the  air  temperature  may  be 
raised to 150

°

C, +5

°

C/-15

°

C.  Continue to heat until the 

insulation  resistance  is  constant  for  a  one-half-hour 

period. 


2.  Enclose  the  motor  with  canvas  or 

similar covering, leave a hole at the top for moisture to 

escape.  Insert heating units or lamps and leave them 

on until the insulation resistance is constant for a one-

half hour period. 


3.  With the rotor locked mechanically and 

using  approximately  10%  of  rated  voltage,  pass  a 

current  through  the  stator  windings.    Increase  the 

current  gradually  until  the  winding  temperature 
reaches  90

°

C.    Do  not  exceed  this  temperature.  

Maintain  a  temperature  of  90

°

C  until  the  insulation 

resistance  becomes  constant  for  a  one-half  hour 

period. 


B.  Initial Start 


WARNING:   

Be  sure  the  motor  is  not 

running  and  the  power  supply  is 
disconnected.


1.  For sleeve-bearing motors, flush out all 

sleeve  bearings  with  kerosene  to  remove  any  dust  or 

grit which may have accumulated during storage.   


Make  sure  that  the  oil  plugs  are  tight  and  fill  the  oil 

wells  with  the  oil  recommended  in  the  “Maintenance” 

section under “Sleeve Bearings” of this book to center 

of  the  oil  level  sight  gauges.    The  oil  level  should  be 

checked only when the machine is not running. 


Do  not  flush  out  anti-friction  bearings.    The  bearing 

grease supplied is sufficient for initial operation. 


2.  Whenever possible, examine the interior 

of  the  motor  for  loose  objects  or  debris  which  may 

have accumulated and remove any foreign material. 


3.  If possible, turn the rotor by hand to be 

sure that it rotates freely. 


4.  Check  all  connections  with  the 

connection  diagram.    Check  all  accessible  factory 

made connections for tightness to make sure none has 

become loose during shipment. 


5.  When  the  driven  load  is  likely  to  be 

damaged by the wrong direction of rotation, it is best 

to  uncouple  the  motor  from  its  load  during  the  initial 

start  and  make  certain  it  rotates  in  the  correct 

direction.    If  it  is  necessary  to  change  rotation, 

interchange any two line leads. 


Some  motors  are  designed  for  unidirectional  rotation.  

Rotation  of  these motors must be in accordance with 

the  rotation  indicated  on  the  motor’s  nameplate  and 

the outline furnished with the equipment.  Connection 

plates  on  the  motor  have  been  furnished  to  assist  in 

obtaining the proper rotation. 


6.  After  inspecting  the  motor  carefully, 

make the initial start by following the regular sequence 

of  starting  operations  in  the  motor  starter  control 

instructions. 


7.  For  sleeve-bearing  machines,  after 

starting verify that the oil rings are operating properly 

and that oil is being fed to the shaft. 


The  temperature  of  the  sleeve  bearings,  as  measured 

by  bearing  temperature  detectors,  should  not  exceed 
93

°

C (200

°

F).   


At  initial  start,  the  rate  of  rise  of  the  bearing 

temperature is more indicative of trouble than is total 

temperature.    When  starting  a  machine  for  the  first 

time, the bearing temperature should be observed for 

a  minimum  of  2  hours.    If  at  any  time  the  rate  of 
temperature  rise  exceeds  2

°

C/minute,  shut  down  the 

motor immediately and make an investigation of lineup 

conditions,  and  if  necessary,  the  bearing  and  oil  ring 

assembly. 


8.  For  anti-friction  bearings  check  motor 

operation under load for an initial period of at least one 

hour  to  observe  whether  any  unusual  noise  or  hot 

spots develop. 


9  In  the  event  of  excessive  vibration  or 

unusual noise disconnect the motor from the load and 

check the mounting and alignment. 


Содержание NEMA 140

Страница 1: ...GE Energy NEMA 140 to 500 Frame Horizontal AC Small Industrial Motors Motor Installation And Maintenance Instructions GEI 56128H ...

Страница 2: ...Mounting 6 C Sleeve Bearing Endplay 8 D Power Supply and Connections 8 IV Operation 9 A Steps Prior to Starting 9 B Initial Start 9 C Jogging and Repeated Starts 10 V Maintenance 10 A General 10 B General Cleanliness 10 C Division 1 Explosion Proof Motors 10 D Insulation and Windings 10 E Vacuum and Compressed Air Cleaning 10 F Cleaning with Water and Detergent 11 G Anti Friction Bearings and Lubr...

Страница 3: ... for lifting motors they must be securely tightened and the direction of the lift must not exceed a 15 angle from the shank of the eyebolt Do not use eyebolts in an ambient below 0 F At temperatures below 0 F the eyebolt could fail resulting in injury to personnel and or damage to equipment Drop forged eyebolts per American Society of Testing Materials A489 or equivalent must be used Do not use th...

Страница 4: ... can be hot and should not be touched without taking proper precautions This symbol instructs one to read the manufacturer s instruction manual before installation operation and maintenance This symbol identifies a terminal which is intended for connection to an external grounding conductor for protection against electric shock in case of a fault The use of a small case i enclosed in a square indi...

Страница 5: ...e motor has been exposed to low temperatures unpack it only after it has reached the temperature of the room in which it will be unpacked Otherwise the motor windings will be exposed to condensing moisture B Temporary Storage Up to 6 Months If the motor will not be put into service immediately certain precautions should be taken to protect the motor while in storage It is recommended the motor be ...

Страница 6: ...nably free of dirt and moisture 2 General Purpose enclosed motors can be used where they are exposed to dirt moisture and most outdoor conditions 3 Severe duty enclosed motors can be used in highly corrosive or excessively moist areas 4 Zone 2 Hazardous Locations All motors marked with an IECEx or ATEX designation are suitable for Zone 2 locations Before the motor is install in the hazardous locat...

Страница 7: ...e drain plugs from the frame or end shields of enclosed motors used outdoors or in other high moisture areas 2 On motors with dual mounting holes use the holes indicated per Figure 2A and 2B Figure 2A Mounting Figure 2B Mounting ...

Страница 8: ...enter distances less than the diameter of the large sheave should be referred to the Company Make certain that the minimum allowed diameter of the motor pulley and the maximum belt tension are not exceed because an excessive pull may cause bearing trouble and shaft failures Tighten belts only enough to prevent slippage Belt speeds should not exceed 5000 feet per minute 25 meters per second When V ...

Страница 9: ...the oil level sight gauges The oil level should be checked only when the machine is not running Do not flush out anti friction bearings The bearing grease supplied is sufficient for initial operation 2 Whenever possible examine the interior of the motor for loose objects or debris which may have accumulated and remove any foreign material 3 If possible turn the rotor by hand to be sure that it rot...

Страница 10: ... up to check periodically the following items 1 General cleanliness 2 Insulation and windings 3 Lubrication and bearings B General Cleanliness The interior and exterior of the motor should be kept free from dirt oil and grease and conducting dust Paper textile or dusts may build up and block off ventilation Any of these contaminants can lead to early motor failure C Division 1 Explosion Proof Moto...

Страница 11: ...s Exxon Mobil Polyrex EM General Electric Specification D6A2C23 polyurea grease should be used for lubrication unless special grease is specified on the motor s nameplate See Section XI Lubrication Guide for greasing frequency and recommended quantity of grease If in doubt refer to GE Energy CAUTION Failure to use polyurea base NLGI Grade 2 or known compatible grease could result in premature bear...

Страница 12: ...eplacement Extreme care is required in the disassembly of a bearing to prevent nicking or burring of the bearing or machined surfaces In addition the surfaces of the journal and the bearing must be protected from damage when exposed during the process of disassembly Remove all bearing sensors prior to disassembly of the bearing a The drive end and opposite drive end sleeve bearing may be replaced ...

Страница 13: ...rument Excessive Current Unbalanced AC current Improper or restricted ventilation Excessive ambient temperature Short circuited coil or windings Dirty windings Unbalanced voltage Bearings Overheating Calibration of measuring instrument Worn out or dirty oil Rough journal Oil rings jammed Insufficient Oil Misalignment Excessive end thrust or radial loading Shaft currents Excessive or insufficient g...

Страница 14: ...ng of BS EN 60079 1 and BS EN 60079 15 standards The motor has been designed to meet the rigid requirements of these standards Repair or alteration of the motor may result in the motor no longer meeting the requirements of these standards If major repairs are undertaken such as rewinding a stator proper facilities should be made available and suitable precautions observed Recommended tightening to...

Страница 15: ... 8 1 4 in Grade 8 Fan Cover Mounting 100 145 11 16 5 16 in Bearing Cap 78 120 8 8 14 5 16 in All Parts except Bearing Cap 170 250 19 28 3 8 Low Carbon Steel Conduit Box Cover 180 240 20 27 3 8 in All Parts except Conduit Box Cover 250 370 28 42 1 2 in All Parts 610 920 70 100 3 4 in All Parts 2150 3200 240 360 Table 4B Tightening Torque Range Stainless Steel SAE Hardware Property Class 50 Screw Bo...

Страница 16: ...GEI 56128H 16 Typical 210 to 440 Frame Dripproof Construction ...

Страница 17: ...GEI 56128H 17 Typical 140 to 440 Frame TEFC Construction ...

Страница 18: ...GEI 56128H 18 Typical 500 Frame TEFC Construction Ball Bearing Typical 500 Frame TEFC Construction Sleeve Bearing ...

Страница 19: ...6 months 3 months 1 5 6 months 3 months 1 5 months Very Severe Dirty vibrating applications where end of shaft is hot pumps and fans high ambient temperature 1 7 5 10 40 50 150 200 350 400 1000 9 months 4 months 4 months 3 months 2 months 6 months 3 months 2 months 1 month Table 6 Number of Grease Gun Pumps Number of Pumps Number of Pumps Bearing Size on 16 Oz Gun 24 Oz Gun Bearing Size on 16 Oz G...

Страница 20: ...n History Rev Date Author ISAAC Description 0 09 01 99 G Garver N A Conversion from PageMaker 1 02 19 03 S Long 02 3231 Revised to remove references to vertical oil lubed motors 2 06 22 10 M Bruin 10 0443 Added Quantum 315 and IECEx ...

Отзывы: