background image

Maintenance

Replacing the Paper Tray Assembly

Use the following procedure to replace the paper tray assembly of your system.

1.

Disconnect the system from AC power.

2.

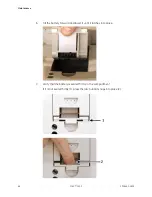
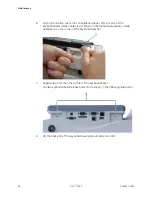
Press down on the paper tray release button and pull up on the roller holder.

3.

Pull out the paper tray until it stops.

4.

Press and hold the release tab (1) on the base plastic. Then pull the paper tray to
remove it completely from the device.

5.

Reassemble the paper tray assembly by reversing the steps for removal.

6.

Perform the applicable checkout procedures.

Refer to

“Functional Checkout” on page 99

.

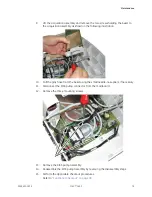
Replacing the Battery

Use the following procedure to replace the battery in your device.

1.

Disconnect the system from AC power.

2.

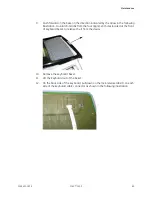
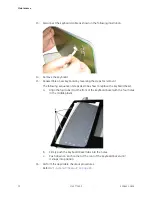
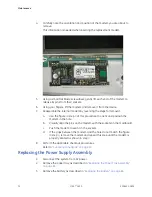
Remove the paper tray assembly as described in

Replacing the Paper Tray

Assembly” on page 64

.

64

MAC™ 1600

2028451-183E

Содержание MAC 1600

Страница 1: ...lthcare MAC 1600 ECG Analysis System Product Code SDE Service Manual Software Version 1 0 4 2028451 183 Revision E MAC 1600 ECG Analysis System English 2008 2012 General Electric Company All Rights Re...

Страница 2: ...ument s update level The revision history of this document is summarized in the following table Revision History PN 2028451 183 Revision Date Comment A 10 April 2008 Initial release of document B 14 J...

Страница 3: ...r 9 Responsibility of the Purchaser Customer 9 Symbols 10 Training 13 Equipment Identification 13 Product Label 13 Serial Number Format 14 Product Codes 14 Service Information 15 Service Requirements...

Страница 4: ...ires 46 Equipment Problems ECG Data Noise 46 Error Codes 47 Acquisition Error Codes 47 Printer Error Codes 49 Frequently Asked Questions 50 Maintenance 50 System Setup 53 Clinical 55 Navigating the Us...

Страница 5: ...sembly FRU Kit PN 2035700 001 118 Printer Board Assembly FRU Kit PN 2036813 001 119 KISS Pump Assembly FRU Kit PN 2036814 001 119 KISS Pump Hardware FRU Kit PN 2036815 001 119 Internal Modem FRU Kit P...

Страница 6: ...Value Accessories 142 Thermal Papers 142 Country Specific Power Cords 143 Optional Accessories 143 6 MAC 1600 2028451 183E...

Страница 7: ...dult and pediatric populations This data can then be computer analyzed with various algorithms such as interpretive ECG and signal averaging for presentation to the user This device is intended for us...

Страница 8: ...hazards and to designate a degree or level of seriousness Familiarize yourself with the following definitions and their significance Definitions of Safety Conventions Safety Convention Definition DAN...

Страница 9: ...icinity is defined as a space within a location intended for the examination and treatment of patients extending 6 ft 1 83 m beyond the normal location of the bed chair table treadmill or other device...

Страница 10: ...urers OEM manuals Defibrillation proof type BF equipment Equipotential ground point Protective earth terminal Attention see instructions for use Consult instructions for use Catalogue part number Seri...

Страница 11: ...Introduction This way up Recyclable Atmospheric limits Temperature limits Humidity limits Keep dry Fragile Do not throw or dispose of in fire 2028451 183E MAC 1600 11...

Страница 12: ...tting 6 powerful jetting 7 temporary immersion 8 continuous immersion Secure Digital SD Card Batch or lot number Authorized representative in a European country CCC Mark China Compulsory Certification...

Страница 13: ...ducation Store at www gehealthcare com educationstore Equipment Identification Every GE Healthcare device has a product label that identifies the product name part number manufacturing information and...

Страница 14: ...in January 4 Product Sequence Four digit number identifying the order in which this device was manufactured Values range from 000 to 9999 5 Manufacturing Site One letter code identifying the site whe...

Страница 15: ...required Additional Assistance GE Healthcare maintains a trained staff of application and technical experts to answer questions and respond to issues and problems that may arise during the installatio...

Страница 16: ...the string Enter Indicates that you must press the Enter or Return key on the keyboard Do not type Enter The greater than symbol or right angle bracket is a concise method to indicate a sequence of m...

Страница 17: ...d Documents You can find additional information in the following documents Documents Related to this manual Part Number Document Title 2028451 182 MAC 1600 ECG Analysis System Operator s Manual 202845...

Страница 18: ...Introduction 18 MAC 1600 2028451 183E...

Страница 19: ...diagonal display active patient cable and battery operation There are also options for communication capabilities Front View Front View of the System Item Name Description 1 Display Presents waveform...

Страница 20: ...ry is neither charging nor low 4 Keyboard Input device for controlling the system or entering data See Keyboard on page 22 for more information 5 Writer Prints reports Side View Side View of the Syste...

Страница 21: ...or connection to an external modem 4 Phone jack RJ11 connector from the internal modem to an analog phone line 5 AC power connection Standard connector for the AC power cable 6 USB connector Standard...

Страница 22: ...ratios the image may appear distorted on some LCD monitors Consult the operating guide for your LCD monitor 10 Equipotential grounding lug Connect non grounded peripheral devices to ensure equipotent...

Страница 23: ...red and you cannot transmit them 7 Stop key Use to stop the writer from printing 8 Enter key Use to advance the focus in a window or to select items from the screen 9 Trimpad Press the arrows to move...

Страница 24: ...tage Automatic stage sequencing stops Press again to return to stage sequencing 6 Speed W key Press to manually increase the treadmill belt speed or the ergometer load 7 Grade key Press to increase th...

Страница 25: ...on 14 Medians key Press to print a medians report 15 12ld key Press to print a 12 lead report 10 seconds of acquired data 16 Recall key Press to print a one page rhythm strip using the previous 10 sec...

Страница 26: ...Equipment Overview Block Diagram 26 MAC 1600 2028451 183E...

Страница 27: ...Equipment Overview Hardware Firmware Architecture The hardware subsystems include the following CPU core Display Keyboard ECG Acquisition Thermal printer Power supply Housing 2028451 183E MAC 1600 27...

Страница 28: ...Equipment Overview 28 MAC 1600 2028451 183E...

Страница 29: ...e selected in System Configuration The Resting ECG mode is the default Power Up mode If the equipment is not working properly consider the following Is the unit turned on Have there been any changes i...

Страница 30: ...ake the time to make all the recommended visual checks before starting any detailed troubleshooting procedures Visual Inspection Checklist Area Look for the following problems I O connectors and cable...

Страница 31: ...ezel that impair viewing Battery pack Cracked swollen or leaky battery pack enclosure Debris on battery pack electrical contacts SD card Cracked SD card Broken gold contacts Dirt scratches or debris o...

Страница 32: ...disable event logging To enable event logging select the Key Event Logging check box or To disable event logging deselect the Key Event Logging check box 7 Select a level of severity to log from the L...

Страница 33: ...ice requests the Event Log for troubleshooting an issue send the file as an email attachment Performing Diagnostic Tests Verify that the system operates properly by running the diagnostic tests These...

Страница 34: ...es not include the letters prod type 7763 and press F6 OK The Service Setup menu opens 5 Use the Trimpad to highlight the System Diagnostics button and press Enter The DIAGNOSTIC TESTS window opens Th...

Страница 35: ...e the color bars horizontally across the screen 5 Verify that the color band pattern red green blue white scrolls across the screen Pass the test if the pattern is replicated without discoloration 6 P...

Страница 36: ...y as described in Replacing the Display Assembly on page 71 Testing the Speaker Use the Speaker Test to determine if the speaker is working properly 1 Open the Diagnostic Tests window as described in...

Страница 37: ...ppears on the screen when the corresponding key is pressed 4 To test for sticky keys continue to press keys that already have an asterisk on the screen and verify that the screen representation of the...

Страница 38: ...b If the test still fails after re seating the board and checking the harnesses replace the acquisition board as described in Replacing the Acquisition Board Assembly on page 75 c Repeat the acquisit...

Страница 39: ...s of Battery Life Remaining display time with 100 Battery Charge Remaining If the numbers displayed in this window are less you may require more frequent battery charging or you may wish to replace th...

Страница 40: ...an allowable tolerance of 1 0 mm the test passes If this criteria is not met the test fails d If the test passed press F4 Yes If the test failed press F5 No 4 Repeat the previous step for the other sp...

Страница 41: ...Up to 5 mm of blank paper is allowable at the top and bottom of the page When the page is done printing the following window opens If there are no gaps in the lines on the printed report press F4 Yes...

Страница 42: ...embly Refer to on page Faulty cables in printer assembly Refer to Replacing the Printer Assembly on page 83 Paper moves but lines do not print Replace the printhead Refer to Replacing the Printhead on...

Страница 43: ...t for COM 2 6 When the test is done press Esc or F6 Cancel to close the results window If either test failed replace the mainboard ETE module as described in on page Testing the LAN Option Use the LAN...

Страница 44: ...agnostics Function on page 33 3 Select Modem Test The following window opens Testing the Internal Modem Test the internal modem as described in the following steps 1 Select Internal Modem Test press E...

Страница 45: ...the USB port on the rear panel of the device NOTE The USB keyboard used for this test must match the language that is selected in setup 3 Select USB Test The following window opens 4 Press any key on...

Страница 46: ...ad wire passed the test Connected If the following message is displayed the lead wire failed the test Disconnected 6 when the test is done press Esc or F6 Cancel 7 Replace every lead wire that failed...

Страница 47: ...ot attempt the next solution in the list Acquisition Error Codes Error Code Cause Solution Acquisition Error 4 Invalid command sent to acquisition driver 1 Check the cables 2 Self correcting internal...

Страница 48: ...ce the ASSY MAC1600 MAINBOARD AND ETE MODULE 2035704 001 Acquisition Error 3 Sequence Number error in 100 ms ECG Packet 1 Check the cables 2 Replace the CABLE ASSY MAC1600 ACQ TO MAINBOARD found in th...

Страница 49: ...Y MAC1600 MAINBOARD AND ETE MODULE 2035704 001 Acquisition Error 10 Acquisition driver communication error 1 Replace the CABLE ASSY MAC1600 ACQ TO MAINBOARD found in the Cable Harness Kit PN 2035707 2...

Страница 50: ...e the Printer Assembly FRU PN 2035702 001 Printer Internal Error 6 Printer driver miscellaneous error 1 Check the cables Replace the cables if necessary 2 Replace the Printer Assembly FRU PN 2035702 0...

Страница 51: ...F6 More F6 More F3 Export Setup 5 On the list on left side of the window highlight the setup file you want to save to the SD card 6 Press F1 Export The Configuration was successfully exported window o...

Страница 52: ...eed to re activate the options on my device Where can I find the option codes A The option codes for the device are not part of the System Configuration settings These codes are listed on the last pag...

Страница 53: ...need to provide the MAC address of the device to the network administrator to enable the LAN communication option How do I obtain the MAC address A Follow these steps to obtain the MAC address 1 Open...

Страница 54: ...Q The system was setup for High Security Mode and I forgot my password How do I access the system A Use the following steps to access the system 1 Contact GE Healthcare Technical Support and provide...

Страница 55: ...the edited record to the MUSE system as an unconfirmed record A If you edit demographic information only the record is still transmitted to the MUSE system as an unconfirmed record If you edit the int...

Страница 56: ...te from the power up screen to the Main Menu for the various system configurations Use the steps that apply to your system configuration settings If your system is configured to power up in the Restin...

Страница 57: ...F5 Main Menu Arrhythmia Power Up Mode These steps describe how to navigate to the Main Menu after powering on the device when Arrhythmia is selected for Power up mode in Basic Setup NOTE If you need...

Страница 58: ...Menu is displayed after powering up the system You do not need to press any other keys in order to display the Main Menu Stress ECG Power Up Mode These steps describe how to navigate to the Main Menu...

Страница 59: ...s system to implement the recommended maintenance schedule may cause equipment failure and possible health hazards The sole responsibility rests with the individuals hospitals or institutions utilizin...

Страница 60: ...perator s Manual FRU Replacement Procedures This section describes the Field Replaceable Units FRUs that are part of your system High Level FRU Identification Item Description 1 paper tray assembly 2...

Страница 61: ...g field replaceable units 1 Power off the system 2 Disconnect the device from the AC wall outlet 3 Disconnect the power cord from the rear panel connector 4 Disconnect the patient cable from the devic...

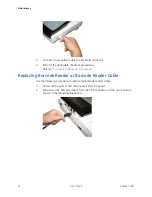
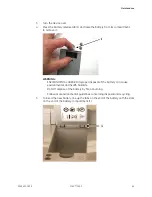
Страница 62: ...al Checkout on page 99 Replacing Barcode Reader or Barcode Reader Cable Use the following procedure to replace the barcode reader cable 1 Power off the system and disconnect it from AC power 2 Disconn...

Страница 63: ...b While pushing the tool into the hole pull the cable to remove it from the base of the barcode reader 4 Using a new cable reverse the disassembly procedures to reassemble the cable Insert the USB con...

Страница 64: ...release tab 1 on the base plastic Then pull the paper tray to remove it completely from the device 5 Reassemble the paper tray assembly by reversing the steps for removal 6 Perform the applicable che...

Страница 65: ...RD Improper disposal of the battery can cause environmental and health hazards Do NOT dispose of the battery by fire or burning Follow local environmental guidelines concerning disposal and recycling...

Страница 66: ...he battery forward and lower it until it latches into place 7 Verify that the battery is seated firmly in the compartment If it is not seated firmly 1 press the latch until it snaps into place 2 66 MA...

Страница 67: ...ge 99 Replacing the Keyboard 1 Disconnect the system from AC power 2 Remove the paper tray as described in Replacing the Paper Tray Assembly on page 64 3 Remove the battery as described in Replacing t...

Страница 68: ...hown in the following illustration while pushing up on the corner of the keyboard bezel 2 7 Repeat step 6 for the other corner of the keyboard bezel The two keyboard bezel release holes 1 are shown in...

Страница 69: ...ur alignment holes located at the front of keyboard bezel to release the it from the device 10 Remove the keyboard bezel 11 Lift the keyboard out of the bezel 12 On the back side of the keyboard pull...

Страница 70: ...s describes how to replace the keyboard bezel a Align the four tabs 1 at the front of the keyboard bezel with the four holes in the middle plastic b Firmly push the keyboard bezel tabs into the holes...

Страница 71: ...e 67 5 Remove the four screws 1 that hold the display assembly in place 6 Lift the display out of the assembly 7 Reassemble the display by reversing the steps for removal 8 Perform the applicable chec...

Страница 72: ...nd position the modem in the hole b Visually align the pins on the modem with the sockets on the mainboard c Push the modem to seat it in the sockets d If the gaps between the modem and the hole do no...

Страница 73: ...d loosen the eight screws shown in the following illustration 5 Pull the base plastic housing 1 away from the middle plastic housing 2 Push inward on the AC power connector 3 while separating the two...

Страница 74: ...following illustration and identify the power supply assembly 1 9 Using a small needle nose pliers disconnect pink ground connector from AC outlet 10 Lift the power supply assembly A in the previous...

Страница 75: ...efer to Functional Checkout on page 99 Replacing the Acquisition Board Assembly 1 Separate the middle plastic and base plastic assemblies as described in Replacing the Power Supply Assembly on page 72...

Страница 76: ...e gray hose from the luer fitting 7 Remove the acquisition board assembly 8 Reassemble the acquisition board assembly If the system does not have the KISS option go to step 9 If the system has the KIS...

Страница 77: ...ray hose to the luer connector item 37 e Reverse the disassembly steps to reassemble 11 Perform the applicable checkout procedures Refer to Functional Checkout on page 99 Replacing the KISS Pump Assem...

Страница 78: ...yboard as described in Replacing the Keyboard on page 67 NOTE Removing the keyboard is recommended to minimize strain on the keyboard ribbon cable during the remaining steps in this procedure 8 Turn t...

Страница 79: ...se from the bezel using the small needle nose pliers if necessary 11 Disconnect the KISS pump connector from the mainboard 12 Remove the three mounting screws 13 Remove the KISS pump assembly 14 Reass...

Страница 80: ...teps 1 through 8 2 Using the following illustration identify the printer 1 3 Using the side cutter pliers snip the tie wrap 2 that holds the printer cable harness to the base plastic 3 4 Disconnect th...

Страница 81: ...Maintenance 6 Remove the two mounting screws that hold the right printhead holder in place 7 Repeat step 6 to remove the two mounting screws on the left printhead holder 2028451 183E MAC 1600 81...

Страница 82: ...pproximately 1 2 inch 13 mm to the right to provide access to the printer motor connector 1 9 Lift the printer motor connector straight up to remove it from the base plastic 10 Remove the printer asse...

Страница 83: ...1 between the printer board and the printhead 2 Lower the printer assembly in position Place the printer motor connector into its guide rails while routing the four wires in the channel 1 as shown in...

Страница 84: ...mounting screws Ensure the wires are not pinched Use a small needle nose pliers to hold the screw while driving it into place 5 Replace the remaining three mounting screws 6 Connect the ribbon cable t...

Страница 85: ...the main top plastic assembly 8 Reverse all remaining disassembly steps to complete the reassembly 9 Configure the Printhead Resistance as follows a From the Main Menu press F5 System Configuration b...

Страница 86: ...inter board Removing the Printer Board Use the following procedure to remove the printer board 1 Remove the printer assembly as described in Removing the Printer Assembly on page 80 2 Release the top...

Страница 87: ...remove the printer board Replacing the Printer Board Use the following procedure to replace the printer board 1 Reconnect the black harness to the printer assembly and to the replacement printer board...

Страница 88: ...Use the following procedures to remove and reassemble the printhead Removing the Printhead Use the following steps to remove the printhead from the printer 1 Remove the printer board as described in R...

Страница 89: ...der the two tabs 1 shown in the following illustration 2 Stand the assembly on the right plastic printhead holder the side with no queue sensor and reassemble the left printhead holder by performing t...

Страница 90: ...3 Reattach the three cables 1 shown in the following illustration 4 Reconnect the six grounding straps 5 Replace the printer board as described in Replacing the Printer Board on page 86 90 MAC 1600 2...

Страница 91: ...Printhead Resistance as follows a On the Main Menu press F5 System Configuration b Press F6 More F6 More F5 Service Setup c When prompted enter the Service Password If you do not know the password co...

Страница 92: ...Sensor The queue hole sensor performs the paper queuing function if you are using the thermal paper with queue holes Use the following procedure to replace the queue hole sensor 1 Separate the middle...

Страница 93: ...s shown in the following illustration 7 When reassembling re insert the queue sensor into the queue sensor holder 8 Reverse all remaining disassembly steps to complete the reassembly 9 Perform the app...

Страница 94: ...and pull it to remove it from the printhead holder 3 Reverse all remaining disassembly steps to complete the reassembly 4 Perform the applicable checkout procedures Refer to Functional Checkout on pa...

Страница 95: ...of the device 2 On the Main Menu press F5 System Configuration 3 Press F6 More F6 More F3 Export Setup 4 Highlight the system setup file you want to export to the SD card 5 Press F1 Export 6 When the...

Страница 96: ...in Replacing the Internal Modem Option on page 71 7 Remove the rear connector panel 8 Separate the middle plastic and base plastic assemblies 9 Remove the power supply as described in Replacing the Po...

Страница 97: ...of Removing the Mainboard on page 96 4 Reconnect the three cables that were disconnected in step 11 of Removing the Mainboard on page 96 5 If the KISS option is installed do the following a Replace t...

Страница 98: ...SD card before the new mainboard was installed a Insert the SD card with the saved system setups in to the SD card slot b On the Main Menu press F5 System Configuration c Press F6 More F6 More F2 Imp...

Страница 99: ...r to Functional Checkout on page 99 Functional Checkout The following checkout procedures apply to your system NOTE The FRU checkout procedure for any listed FRU also applies to its internal PCBs and...

Страница 100: ...cription Visual Inspection Functional Checkout Procedures No parts replaced 4 5 7 8 1 2 3 4 5 6 Software Update n a 1 2 3 4 5 6 Hardware Upgrade 7 8 1 2 3 4 5 6 Annual Electrical Safety Checkout 1 3 4...

Страница 101: ...Checks 1 Verify that the system passes the power up self test Refer to Power Up Self Test on page 29 for more information If a software update was performed verify that the new version of software is...

Страница 102: ...atus on page 38 for more information 7 Verify that the LAN test was successful Refer to Testing the LAN Option on page 43 for more information 8 Verify that the modem test was successful Refer to on p...

Страница 103: ...0 A 5 Neutral open Reverse Polarity SFC ______ A Pass Fail 300 A 6 Reverse Polarity NC ______ A Pass Fail 100 A Patient Leakage Current to Ground 1 Forward Polarity NC ______ A Pass Fail 10 A 2 Neutra...

Страница 104: ...tion N A Not Applicable 2 UUT Unit Under Test Updating Software Software updates are provided on an SD card Perform a software update as described in this section 1 Power up the system with the system...

Страница 105: ...assword and press F6 OK If you do not know the password contact GE Healthcare Technical Support The following window opens 6 Move the focus to Software Update and press Enter The following window open...

Страница 106: ...rge discharge charge cycle You can condition the battery pack while it is installed in a device that you are not currently using to record tests on a patient 1 Disconnect the AC power from the device...

Страница 107: ...emove the AC power and turn on the device 7 Leave the device on and allow the battery to discharge until the device shuts off 8 Reconnect the AC power to the device leaving it turned off and allow the...

Страница 108: ...Maintenance 108 MAC 1600 2028451 183E...

Страница 109: ...detail for you to order parts for the assemblies stand alone FRUs and FRU kits considered field serviceable Only items assemblies and kits which have part numbers given in this chapter are available...

Страница 110: ...Parts Lists Field Replaceable Units FRUs MAC 1600 Upper Level Assembly PN 2032093 110 MAC 1600 2028451 183E...

Страница 111: ...Parts Lists 2028451 183E MAC 1600 111...

Страница 112: ...Parts Lists 112 MAC 1600 2028451 183E...

Страница 113: ...Parts Lists 2028451 183E MAC 1600 113...

Страница 114: ...ber Item Description Included in 10 SCR DIN7985 M3X5 4 8 Z A2F ISO7045 KISS Pump Assembly FRU Kit KISS Pump Hardware FRU Kit Fastener Hardware FRU Kit 17 SCR F PLASTIC 3X10 ST A2F PANHEAD Z Fastener H...

Страница 115: ...sembly FRU Kit 31 CABLE ASSY MAC1600 INTERNAL KISS PUMP KISS Pump Assembly FRU Kit KISS Pump Hardware Kit 32 CABLE ASSY MAC1600 PWR SUPPLY TO MAIN BD Cable Harness FRU Kit 33 PWR SPLY MAC 1600 Power S...

Страница 116: ...Base Plastic FRU Kit 61 LABEL PRODUCT SERIAL BARCODE DATE SIZE A 62 PRINTER MAC 1600 63 PACKAGING INSERT FRONT FOAM 64 PACKAGING INSERT REAR FOAM 65 PLASTIC BAG ESD 66 DESICCANT BAG B 67 PACKAGING BO...

Страница 117: ...tion Assembly FRU Kit PN 2035705 001 Acquisition Assembly FRU Kit 2035705 001 Item Qty ASSY ACQUISITION BOARD MAC 1600 1 LABEL LUER MAC 1600 1 CONNECTOR LUER FEMALE 1 NUT LOCK 1 PLUG LUER MALE 1 Cable...

Страница 118: ...2F ISO7045 10 SPRING CPRSN 6 5X8X0 7 4 PRESS STRIP 1 SCR DIN965 M3X8 4 8 Z A2F ISO7046 2 CABLE ASSY MAC1600 PRINTER TO MITSUBISHI 1 CABLE FFC 20POS 1 25MM 50MM LONG S SIDE 1 PCB MAC1600 PRINTER BOARD...

Страница 119: ...ASSY MAC1600 INTERNAL KISS PUMP 1 HOSE BARB STRAIGHT THRU CONN 1 8 ID 1 TUBING PVC 3X1 GREY 07 M KISS Pump Hardware FRU Kit PN 2036815 001 KISS Pump Hardware FRU Kit 2036815 001 Where Used Qty SCR DIN...

Страница 120: ...ad FRU Kit 2036817 001 Where Used Qty PRINTHEAD MAC1200 WRITER SHEC TPH 1 Optical Sensor And Bracket FRU Kit PN 2036818 001 Optical Sensor Bracket FRU Kit 2036817 001 Where Used Qty SENSOR OPT MAC1100...

Страница 121: ...PN 2035708 001 Item Item Description Where Used Qty 1 ADAPTER REDUCING 1 3 SCR FH 4 40X1 4 ZINC AHNL DIN965 2 5 SCR PLASTIC 2 5X10 V2A PANHEAD Z 2 6 GEAR WHEEL 1 7 BEARING PIN 2 X 15 8 2 8 SCR DIN7985...

Страница 122: ...E STRIP 92 X 2 4 MM 6 NOTE Items in the kit are not available as individual FRUs They can be obtained by purchasing the entire FRU kit Items shown above are not drawn to relative scale Figures are pro...

Страница 123: ...YBOARD ASSEMBLY SPA 2035699 005 FRU MAC1600 KEYBOARD ASSEMBLY SWE 2035699 006 FRU MAC1600 KEYBOARD ASSEMBLY ITA 2035699 007 FRU MAC1600 KEYBOARD ASSEMBLY JAP 2035699 008 FRU MAC1600 KEYBOARD ASSEMBLY...

Страница 124: ...YBOARD ASSY W STRESS SWE 2035699 106 FRU MAC1600 KEYBOARD ASSY W STRESS ITA 2035699 107 FRU MAC1600 KEYBOARD ASSY W STRESS JAP 2035699 108 FRU MAC1600 KEYBOARD ASSY W STRESS DUT 2035699 109 FRU MAC160...

Страница 125: ...KIT USB DATA MATRIX BARCODE SCANNER ENG 2035979 002 KIT USB DATA MATRIX BARCODE SCANNER GER 2035979 003 KIT USB DATA MATRIX BARCODE SCANNER FRE 2035979 004 KIT USB DATA MATRIX BARCODE SCANNER SPA 2035...

Страница 126: ...979 019 KIT USB DATA MATRIX BARCODE SCANNER KOR 2035979 020 KIT USB DATA MATRIX BARCODE SCANNER FIN MAC 1600 Data Matrix Barcode Scanner Cable Part Number Description 2035628 001 1 CABLE USB BARCODE S...

Страница 127: ...Number Description 401855 107 PWR SPLY CRD ST SWISS 10A 250V 2 5M 401855 108 PWR SPLY CRD RA INDIAN 10A 250V 2 5M 401855 018 PWR CRD ST CHINA RA PLUG 10A 250V 2 5M 405535 011 PWR SPLY CRD ST RA PSE 10...

Страница 128: ...Parts Lists 128 MAC 1600 2028451 183E...

Страница 129: ...sis 500 samples sec or 1000 samples sec Display 7 inch 18 cm diagonal viewing display 16 9 aspect ratio 800 x 480 pixels Color VGA resolution VGA out port for optional Stress testing Memory Internal 1...

Страница 130: ...SE system option Keyboard Localized alphanumeric keyboard Application Options Stress Testing ergometer sold separately Pharma package 21 CFR part 11 audit tool and CT Data Guard Languages English Germ...

Страница 131: ...echargeable Lithium Ion Capacity 50 single page reports typical or three hours continuous display without printing Charge time Approximately 2 5 hours from total discharge with display off Temperature...

Страница 132: ...agnetic Compatibility IEC 60601 1 4 2000 Requirements for Collateral Standard Programmable Electrical Medical Systems IEC 60601 2 25 1993 A1 1999 Safety of Electrocardiographs IEC 60601 2 51 2003 Safe...

Страница 133: ...cy RF emitting equipment near the system may cause unexpected or adverse operation WARNING EQUIPMENT MALFUNCTION The equipment or system should not be used adjacent to or stacked with other equipment...

Страница 134: ...ble for use in all establishments including domestic establishments and those directly connected to the public low voltage power supply network that supplies buildings used for domestic purposes Harmo...

Страница 135: ...e 2 kV common mode Mains power should be that of a typical commercial or hospital environment Voltage dips short interruptions and voltage variations on power supply input lines IEC 60601 1 2 2007 IEC...

Страница 136: ...o the equation applicable to the frequency of the transmitter Recommended separation distance Conducted RF IEC 60601 1 2 2007 IEC 61000 4 6 2006 3 Vrms 150 KHz to 80 MHz 2 Hz mod Multilink Lead set 3...

Страница 137: ...c environment due to fixed RF transmitters and electromagnetic site survey should be considered If the measured field strength in the location in which the device is used exceeds the applicable RF com...

Страница 138: ...Hz d 1 2 P 800 MHz to 2 5 GHz d 2 3 P 0 01 0 12 0 35 0 70 0 1 3 7 1 1 2 2 1 11 3 5 7 0 10 36 11 22 100 116 35 70 For transmitters rated at a maximum output power not listed above the recommended separ...

Страница 139: ...commended separation distance KISS Lead Set d 11 6 P where P is the maximum output power rating of the transmitter in watts W according to the transmitter manufacturer and d is the recommended separat...

Страница 140: ...Electromagnetic Compatibility 140 MAC 1600 2028451 183E...

Страница 141: ...cable 10 lead AHA 21714401 Suction Electrodes Blue each 21730701 Electrode Spray 38401816 Set of lead wires 4mm connector 10 leads defibrillator proof IEC 38401817 Set of lead wires 4mm connector 10...

Страница 142: ...k 150 sheets pack 1500 sheets case 22616606 CONTRAST Paper Full Page Red Grid 8 5 x 11 in Queue Mark 150 sheets pack 1500 sheets case Premium Papers Part Number Description 2020314 001 Premium Paper R...

Страница 143: ...CRD ST SWISS 10A 250V 2 5M 401855 108 India PWR SPLY CRD ST INDIAN 10A 250V 2 5M 405535 006 US PWR SPLY CRD RA HOSP GRD 13A 125V 10FT 405535 011 Japan PWR SPLY CRD ST RA PSE 10A 250V 10FT Optional Acc...

Страница 144: ...EMC Compliant Supplies Accessories Part Number Description 2035628 001 Barcode Reader Cable 3700031 002 LAN Cable 2038704 001 Internal Modem 416070 001 External VGA Cable 144 MAC 1600 2028451 183E...

Страница 145: ......

Страница 146: ...GmbH Munzinger Stra e 5 D 79111 Freiburg Germany Tel 49 761 45 43 0 Fax 49 761 45 43 233 GE Medical Systems Information Technologies Inc Asia GE China Co Ltd No 1 Huatuo Road Zhangjiang Hi tech Park P...

Отзывы: