


31
Installation Instructions
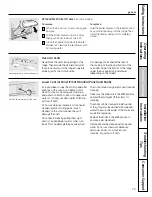
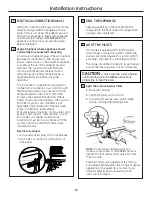
WARNING!
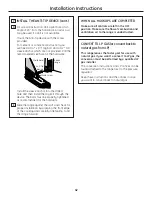
ANTI-TIP DEVICE
All ranges can tip and injury could
result.
To prevent accidental tipping of the
range, attach an approved Anti-Tip
device to the wall. (See
Installing the
Anti-Tip Device
in this section.) To
check if the device is installed and
engaged properly, carefully tip the
range forward. The Anti-Tip device
should engage and prevent the range
from tipping over.
If you pull the range out from the wall
for any reason, make sure the Anti-Tip
device is engaged when you push the
range back against the wall.
•
For your safety, never use your range for
warming or heating the room. Your oven and
cooktop are not designed to heat your kitchen.
Top burners should not be operated without
cookware on the grate. Such abuse could result
in fire and damage to your range and will void
your warranty.
•
Do not store or use combustible materials,
gasoline or other flammable vapors and liquids
in the vicinity of this or any other appliance.
Explosions or fires could result.
•
Do not use oven for a storage area. Items stored
in the oven can ignite.
•
Do not let cooking grease or other flammable
materials accumulate in or near the range.
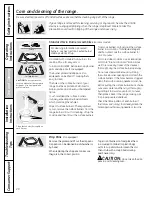
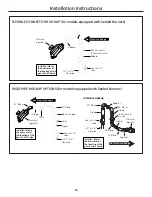
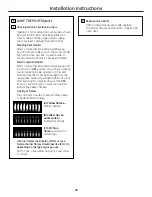
MODEL AND SERIAL NUMBER LOCATION
Depending on your range, you’ll find the model
and serial numbers on a label on the front frame of
the range, behind the kick panel or broiler drawer.
LOCATION
Do not locate the range where it may be subject
to strong drafts. Any openings in the floor or
wall behind the range should be sealed. Make
sure the openings around the base of the range
that supply fresh air for combustion and
ventilation are not obstructed by carpeting
or woodwork.
Your range, like many other household items, is
heavy and can settle into soft floor coverings such
as cushioned vinyl or carpeting. Use care when
moving the range on this type of flooring. It is
recommended that the following simple and
inexpensive instructions be followed to protect
your floor.
The range should be installed on a sheet of
plywood (or similar material). When the floor
covering ends at the front of the range, the area
that the range will rest on should be built up with
plywood to the same level or higher than the floor
covering.
This will allow the range to be moved for cleaning
or servicing. Also, make sure your floor covering
will withstand 180°F. (See the
Installation Safety
Instructions
section.)
Make sure the wall coverings around your range
can withstand the heat generated (up to 200°F) by
the range. (See the
Installation Safety Instructions
section.)
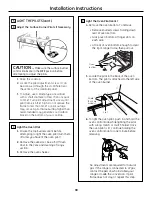
IMPORTANT!
Remove all tape and packaging. Make sure the
burners are properly seated and level.
Lift up the cooktop (on models with standard
twin burners) and remove any packing material
under it.
Take the accessory pack out of the oven and/or
drawer.
Check to be sure that no range parts have come
loose during shipping.


