GE JGBP35GXAWW Скачать руководство пользователя страница 15

Using the timed baking and roasting features.

NOTE: 

Foods that spoil easily—such as milk, eggs, fish, stuffings, poultry and pork—should not be allowed to sit for more

than 1 hour before or after cooking. Room temperature promotes the growth of harmful bacteria. Be sure that the oven
light is off because heat from the bulb will speed harmful bacteria growth.

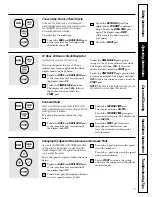
How to Set an Immediate Start and Automatic Stop

The oven will turn on immediately and cook for a
selected length of time. At the end of the cooking
time, the oven will turn off automatically.

Touch the 

BAKE

pad.

Using the 

+

and 

pads, enter the

desired temperature.

Touch the 

COOKING TIME

pad.

NOTE: 

If your recipe requires preheating, you may

need to add additional time to the length of the
cooking time.

Using the 

+

and 

pads, enter the

desired baking time. Maximum time
that can be entered in minutes is 59.
Cooking times more than 59 minutes
should be changed to hours and
minutes. For example, enter 
90 minutes as 1 hour, 30 minutes. 
The oven temperature and the
cooking time that you entered will 
be displayed.

Touch the 

START

pad.

The display shows the current oven
temperature and the cooking time
countdown.

The oven will continue to cook for the
programmed amount of time, then shut 
off automatically.

Touch the 

CLEAR/OFF

pad to clear the

display.

How to Set a Delayed Start and Automatic Stop

You can set the oven control to delay-start the oven,
cook for a specific length of time and then turn off
automatically.

Make sure the clock shows the correct time
of day. 

Touch the 

BAKE

pad.

Using the 

+

and 

pads, enter the

desired temperature.

Touch the 

COOKING TIME

pad.

NOTE: 

If your recipe requires preheating, you may

need to add additional time to the length of the
cooking time.

Using the 

+

and 

pads, enter the

desired baking time. Maximum time
that can be entered in minutes is 59.
Cooking times more than 59 minutes
should be changed to hours and
minutes. For example, enter 
90 minutes as 1 hour, 30 minutes. 
The oven temperature and the
cooking time that you entered will 
be displayed. 

Touch the 

DELAY START

pad.

Using the 

+

and 

pads, enter the time

of day you want the oven to turn on
and start cooking.

Touch the 

START

pad.

NOTE: 

An attention tone will sound if you are using

timed baking and do not touch the 

START

pad after

entering the baking temperature.

If you would like to check the times you
have set, touch the 

DELAY START

pad to

check the start time you have set or touch
the 

COOKING TIME

pad to check the length

of cooking time you have set.

When the oven turns on at the time of day
you have set, the display will show the
changing temperature (starting at 100°F)
and the cooking time countdown.

At the end of timed baking, the oven will
turn off. The end of cycle tone will sound.

Touch the 

CLEAR/OFF

pad to clear the

display.

15

Tr

oubleshooting T

ips

Operating Instructions

Safety Instructions

Care and Cleaning

Installation Instructions

Содержание JGBP35GXAWW

Страница 1: ...Adjustment 18 Timed Baking and Roasting 15 Surface Cooking 8 9 Care and Cleaning Broiler Pan and Grid 24 Burner Assembly 21 22 Burner Grates 23 Control Panel and Knobs 25 Cooktop Surface 23 Door Remo...

Страница 2: ...manual must be followed to minimize the risk of fire or explosion electric shock or to prevent property damage personal injury or loss of life All ranges can tip and injury could result To prevent acc...

Страница 3: ...rounded outlet replaced with a properly grounded outlet SAFETY PRECAUTIONS IMPORTANT SAFETY NOTICE The California Safe Drinking Water and Toxic Enforcement Act requires the Governor of California to p...

Страница 4: ...ets over the range Flammable material could be ignited if brought in contact with flame or hot oven surfaces and may cause severe burns Do not store flammable materials in an oven a range storage draw...

Страница 5: ...heating or as fats melt slowly Use a deep fat thermometer whenever possible to prevent overheating fat beyond the smoking point Use the least possible amount of fat for effective shallow or deep fat...

Страница 6: ...e in gas ovens Always remove the broiler pan from range as soon as you finish broiling Grease left in the pan can catch fire if oven is used without removing the grease from the broiler pan When broil...

Страница 7: ...damage or move the gasket Clean only parts listed in this Owner s Manual If the self cleaning mode malfunctions turn the oven off and disconnect the power supply Have it serviced by a qualified techni...

Страница 8: ...n the grate may chip without cookware to absorb the heat Be sure the burners and grates are cool before you place your hand a pot holder cleaning cloths or other materials on them Sealed Gas Burners Y...

Страница 9: ...y are used with medium heat as the manufacturer recommends Stove Top Grills Do not use stove top grills on your sealed gas burners If you use the stove top grill on the sealed gas burner it will cause...

Страница 10: ...as run out DELAY START Pad Touch this pad and the or pads to delay the starting of your oven up to 9 hours and 59 minutes OVEN LIGHT Pad Touch this pad to turn the oven light on or off TIMER CLOCK Pad...

Страница 11: ...ports A through E they will stop before coming completely out and will not tilt When placing and removing cookware pull the shelf out to the bump on the shelf support To remove a shelf pull it toward...

Страница 12: ...ng is complete Type of Food Shelf Position Frozen pies on cookie sheet B or C Angel food cake B bundt or pound cakes Biscuits muffins brownies C cookies cupcakes layer cakes pies Casseroles B or C Roa...

Страница 13: ...wning Well Done C 13 8 9 Pan frying is recommended Slash fat Rare 11 2 thick C 10 6 7 Medium 2 to 21 2 lbs C 12 15 10 12 Well Done C 25 16 18 Chicken 1 whole B 30 35 15 20 Brush each side with melted...

Страница 14: ...one beep every 6 seconds until the TIMER CLOCK pad is touched The 6 second tone can be canceled by following the steps in the Special features of your oven control section under Tones at the End of a...

Страница 15: ...op You can set the oven control to delay start the oven cook for a specific length of time and then turn off automatically Make sure the clock shows the correct time of day Touch the BAKE pad Using th...

Страница 16: ...t in this special features mode Fahrenheit or Celsius Temperature Selection Your oven control is set to use the Fahrenheit temperature selections but you may change this to use the Celsius selections...

Страница 17: ...ntrol is set to use a 12 hour clock If you would prefer to have a 24 hour military time clock or black out the clock display follow the steps below Touch the BAKE and BROIL HI LO pads at the same time...

Страница 18: ...spread product the more noticeable these differences become Federal standards require products labeled margarine to contain at least 80 fat by weight Low fat spreads on the other hand contain less fat...

Страница 19: ...Forcing the handle will damage the door lock mechanism The oven door must be closed and all controls set correctly for the cycle to work properly Using the self cleaning oven Before a Clean Cycle Wipe...

Страница 20: ...NG TIME pad If the shelves become hard to slide apply a small amount of vegetable oil or cooking oil to a paper towel and wipe the edges of the oven shelves with the paper towel Using the self cleanin...

Страница 21: ...urner Assemblies Turn all controls OFF before removing the burner parts and drip pans The burner grates caps burner heads and drip pans can be lifted off making them easy to clean CAUTION Do not opera...

Страница 22: ...tergent and hot water for 20 30 minutes For more stubborn stains use a toothbrush After cleaning Before putting the burner caps and heads back shake out excess water and then dry them thoroughly by se...

Страница 23: ...lighter color grates NOTE Do not clean the grates in a self cleaning oven Cooktop Surface To avoid damaging the porcelain enamel surface of the cooktop and to prevent it from becoming dull clean up s...

Страница 24: ...lovers by placing a cookie sheet on the shelf below the shelf you are cooking on This is particularly important when baking a fruit pie or other foods with a high acid content Hot fruit fillings or ot...

Страница 25: ...obs It s a good idea to wipe the control panel after each use of the oven Use a damp cloth to clean or rinse For cleaning use mild soap and water or a 50 50 solution of vinegar and water For rinsing u...

Страница 26: ...r so it doesn t fall when released With fingers of the same hand firmly push back the wire cover holder Lift off the cover Do not remove any screws to remove the cover Do not touch hot bulb with a wet...

Страница 27: ...rly grounded Servicer The electrical diagram is in an envelope attached to the back of the range Skill level Installation of this appliance requires basic mechanical skills Proper installation is the...

Страница 28: ...the range up to 200 F Avoid placing cabinets above the range To reduce the hazard caused by reaching over the open flames of operating burners install a ventilation hood over the range that projects f...

Страница 29: ...equirements The range may be placed with 0 clearance flush at the back wall 29 To cabinets below cooktop and at the range back 30 30 2 Minimum 13 Minimum to wall on either side Maximum depth for cabin...

Страница 30: ...e range where it may be subject to strong drafts Any openings in the floor or wall behind the range should be sealed Make sure the openings around the base of the range that supply fresh air for combu...

Страница 31: ...sition and turn on the main gas supply valve Use a liquid leak detector at all joints and connections to check for leaks in the system When using test pressures greater than 1 2 psig to pressure test...

Страница 32: ...or flush range installation with through the wall connection of pipe stub shut off valve and rear wall 220V outlet This area allows for flush range installation with through the floor connection of pi...

Страница 33: ...ressure regulator 45 Elbow Nipple Union 90 Elbow Black iron pipe Union Nipple Gas shut off valve 1 2 or 3 4 Gas pipe Gas Flow into Range Installer Inform the consumer of the location of the gas shut o...

Страница 34: ...ent in a circuit and automatically switch off power when a threshold leakage level is detected These devices must be manually reset by the consumer The National Electrical Code requires the use of GFC...

Страница 35: ...cating proper operation of the spark module Once the air has been purged from the supply lines burners should light within 4 seconds After burner lights rotate knob out of the LITE position Try each b...

Страница 36: ...ind the storage drawer Remove the drawer See the Care and cleaning of the range section To adjust the flow of air to either burner loosen the Phillips head screw and rotate the shutter toward open or...

Страница 37: ...must be properly tightened as recommended for the hardware E Slide the range against the wall and check for proper installation by grasping the front edge of the cooktop and carefully attempting to ti...

Страница 38: ...ter a bake Touch the BAKE pad and desired temperature or entering cooking time temperature or cleaning time the SELF CLEAN pad and desired clean time or start time Clock and timer Plug on range is not...

Страница 39: ...grounded outlet Oven will not self clean The oven temperature is too Allow the range to cool to room temperature and high to set a self clean operation reset the controls Oven controls improperly set...

Страница 40: ...latch The latch may have been moved even if only slightly letter flash in the display if a function error code appears from the locked position Make sure the latch is moved during the self cleaning cy...

Страница 41: ...the insulation This is temporary around the inside of the oven is normal for the first few times the oven is used Drawer does not slide The drawer is out of alignment Fully extend the drawer and push...

Страница 42: ...42 Notes Operating Instructions Safety Instructions Care and Cleaning Installation Instructions Troubleshooting Tips...

Страница 43: ...43 Notes Troubleshooting Tips Operating Instructions Safety Instructions Care and Cleaning Installation Instructions...
Страница 44: ...business hours Have your model number ready Tired of discolored racks Wishing you had extra heavy duty oven racks NOW AVAILABLE for your range GE s innovative self cleanable porcelain coated oven rac...

Отзывы: