GE JCD968 Скачать руководство пользователя страница 37

37

S

a

fe

ty

 In

st

ru

c

tio

n

s

O

p

e

ra

tin

g

 In

st

ru

c

tio

n

s

C

a

re

 a

n

d

 C

le

a

n

in

g

Tr

o

u

b

le

sh

o

o

tin

g

 T

ip

s

C

o

n

su

m

e

r S

u

p

p

o

rt

Before You Call For Service…

Troubleshooting Tips 
Save time and money! Review the charts on the following
pages first and you may not need to call for service.

Problem

Possible Causes

What To Do

Surface units will not

Improper cookware 

Use pans which are flat and match the diameter of 

maintain a rolling boil

being used.

the surface unit selected.

or cooking is not 
fast enough

Surface units do not 

The self-clean cycle has

• During a self-clean cycle, the surface units will not 

work or they do not

been set.

work. Press the 

RESET/OFF

pad to stop the self-clean 

work properly

cycle or wait until the self-clean cycle is finished to set
and use the surface units. See the 

About the radiant 

surface units

section.

A fuse in your home may be 

Replace the fuse or reset the circuit breaker.

blown or the circuit breaker 
tripped.

Cooktop controls 

Check to see the correct control is set for the surface

improperly set.

unit you are using.

Scratches (may appear

Incorrect cleaning 

Scratches are not removable. Tiny scratches will 

as cracks) on cooktop

methods being used.

become less visible in time as a result of cleaning.

glass surface

Cookware with rough bottoms

To avoid scratches, use the recommended cleaning

being used or coarse particles

procedures. Make sure bottoms of cookware are clean 

(salt or sand) were between

before use, and use cookware with smooth bottoms.

the cookware and the surface
of the cooktop.
Cookware has been slid
across the cooktop surface

.

Areas of discoloration 

Food spillovers not cleaned

See the 

Cleaning the glass cooktop

section.

on the cooktop

before next use.

Hot surface on a model

This is normal. The surface may appear discolored 

with a light-colored cooktop.

when it is hot. This is temporary and will disappear 
as the glass cools.

Plastic melted to 

Hot cooktop came into

See the 

Glass surface – potential for permanent damage

the surface

contact with plastic placed

section in the 

Cleaning the glass cooktop 

section.

on the hot cooktop.

Pitting (or indentation)

Hot sugar mixture spilled 

Call a qualified technician for replacement.

of the cooktop

on the cooktop.

Frequent cycling 

Improper cookware 

Use only flat cookware to minimize cycling.

off and on of 

being used.

surface units

Oven light does 

Light bulb is loose or defective.

Tighten or replace the bulb.

not work

Switch operating

Call for service.

light is broken.

Oven will not work

Plug on range is not completely

Make sure electrical plug is plugged into a live, 

inserted in the electrical outlet.

properly grounded outlet.

A fuse in your home may be 

Replace the fuse or reset the circuit breaker.

blown or the circuit 
breaker tripped.

Oven controls improperly set.

See the 

Using the oven

section.

Содержание JCD968

Страница 1: ...Control Panel 30 Door 31 Floor 32 Glass Cooktop 35 36 Knobs 30 Light Bulb 33 Packaging Tape 30 Racks 32 Storage Drawer 32 Surfaces 34 Vent 30 Troubleshooting Tips 37 40 Accessories 44 Consumer Support...

Страница 2: ...this manual All other servicing should be referred to a qualified technician Before performing any service disconnect the range power supply at the household distribution panel by removing the fuse or...

Страница 3: ...or surface of the oven These surfaces may be hot enough to burn even though they are dark in color During and after use do not touch or let clothing or other flammable materials contact the surface un...

Страница 4: ...as it heats Use a deep fat thermometer whenever possible to prevent overheating fat beyond the smoking point Avoid scratching the glass cooktop The cooktop can be scratched with items such as sharp in...

Страница 5: ...il may result in a risk of electric shock or fire Stand away from the range when opening the oven door Hot air or steam which escapes can cause burns to hands face and or eyes WARNING OVEN READ AND FO...

Страница 6: ...cooktop surface will keep hot cooked food at serving temperature Always start with hot food Do not use to heat cold food Placing uncooked or cold food on the WARMING ZONE could result in food borne il...

Страница 7: ...clean cycle is finished and could result in an on unattended surface unit Wait until the self clean cycle is finished to set and use the surface units The radiant cooktop features heating units benea...

Страница 8: ...is cookware is recommended Caution is recommended for cast iron cookware that is not completely covered with smooth porcelain enamel since it may scratch the glass ceramic cooktop Glass Ceramic usable...

Страница 9: ...able from the manufacturer of your canner manufacturers of glass jars for canning such as Ball and Kerr brand and the United States Department of Agriculture Extension Service Remember that canning is...

Страница 10: ...function See the Using the self cleaning oven section Light Pad Touch to turn the oven light on or off START TIME Pad Use along with COOK TIME or CLEAN STD LOW pads to set the oven to start and stop a...

Страница 11: ...See the Using the self cleaning oven section Light Pad Touch to turn the oven light on or off DELAY START Pad Use along with COOK TIME or CLEAN pads to set the oven to start and stop automatically at...

Страница 12: ...to use caution when pulling the rack out We recommend that you pull the rack out several inches and then using two pot holders pull the rack out by holding the sides of it The rack is low and you cou...

Страница 13: ...f 1 lb 0 45 kg 4 patties E 9 6 Space evenly Up to 8 Well Done 1 2 to 3 4 E 11 10 patties take about the 1 3 cm to 1 9 cm thick same time Beef Steaks Rare 1 2 5 cm thick F 7 5 Steaks less than 1 Medium...

Страница 14: ...ed by following the steps in the Special features of your oven control section under Tones at the End of a Timed Cycle The timer is a minute timer only The timer does not control oven operations The m...

Страница 15: ...How to Set a Delayed Start and Automatic Stop You can set the oven control to delay start the oven cook for a specific length of time and then turn off automatically Make sure the clock shows the corr...

Страница 16: ...nnot use timed oven operations while using the probe Using the probe For many foods especially roasts and poultry internal food temperature is the best test for doneness The temperature probe takes th...

Страница 17: ...t results in this oven preheat the oven and use the temperature on the package Convection Fan In a convection oven a fan circulates hot air over under and around the food This circulating hot air is e...

Страница 18: ...e oven If you are baking with several pans leave space between them Also be sure the pans do not touch each other or the walls of the oven Paper and Plastic Heat resistant paper and plastic containers...

Страница 19: ...TION BAKE 1 GRILLE mode for one rack convection baking This mode is used for cooking food items on only one rack in convection bake Touch the CONVECTION ROAST pad for convection roasting Touch the num...

Страница 20: ...ional time to the length of the cooking time Touch the number pads to set the desired cooking time Touch the START TIME or DELAY START pad Touch the number pads to set the time of day you want the ove...

Страница 21: ...Roasting Guide Meats Minutes lb kg Oven Temp Internal Temp Beef Rib Boneless Rib Rare 20 24 44 53 325 F 163 C 140 F 60 C Top Sirloin Medium 24 28 53 62 325 F 163 C 160 F 71 C 3 to 5 lbs 1 36 kg to 2 2...

Страница 22: ...T will show in the display How to Set the Oven For Warming The warm feature keeps cooked foods warm for up to 3 hours after the cooking function is finished or it can be activated independently to kee...

Страница 23: ...9 C hotter or 35 F 19 C cooler Touch the number pads the same way you read them For example to change the oven temperature 15 F 8 C touch 1 and 5 When you have made the adjustment touch the START pad...

Страница 24: ...is in place and the oven light is off IMPORTANT The health of some birds is extremely sensitive to the fumes given off during the self cleaning cycle of any range Move birds to another well ventilate...

Страница 25: ...cycle to work properly How to Delay the Start of Cleaning Touch the CLEAN pad once for a 4 hour clean time or twice for a 3 hour clean time A 3 hour self clean time is recommended for use when cleani...

Страница 26: ...play shows SF Touch the START TIME or DELAY START pad until no shdn no shut off appears in the display Touch the START pad to activate the no shut off and leave the control set in this special feature...

Страница 27: ...n using convection bake the Auto Recipe Conversion feature will automatically convert entered regular baking temperatures to convection baking temperatures This feature is activated so the display wil...

Страница 28: ...ter the new temperature using the number pads and touch the START pad NOTE The RESET OFF and COOK TIME pads are active during the Sabbath feature How to Set for Timed Baking Roasting Immediate Start a...

Страница 29: ...ad until 12 shdn or no shdn appears in the display 12 shdn indicates that the oven will automatically turn off after 12 hours no shdn indicates that the oven will not automatically turn off Touch the...

Страница 30: ...knobs in the OFF position to ensure proper placement WARNING If your range is removed for cleaning servicing or any reason be sure the anti tip device is reengaged properly when the range is replaced...

Страница 31: ...outside of the door Lift Off Oven Door Cleaning the Oven Door The door is very heavy Be careful when removing and lifting the door Do not lift the door by the handle To remove the door Fully open the...

Страница 32: ...ess down and pull out Removable Oven Floor To remove the oven floor Remove the oven door using the instructions in the Lift Off Oven Door section Press down and pull out the removable oven floor Clean...

Страница 33: ...wise 1 4 turn until the tabs of the glass cover clear the grooves of the socket Wearing latex gloves may offer a better grip Using gloves or a dry cloth remove the bulb by pulling it straight out To r...

Страница 34: ...llow the cleaner instructions for cleaning the stainless steel surface To inquire about purchasing stainless steel appliance cleaner or polish or to find the location of a dealer or Mabe Parts Store n...

Страница 35: ...op Cleaner will help keep the cooktop looking new Shake the cleaning cream well Apply a few drops of Ceramic Cooktop Cleaner directly to the cooktop Use a paper towel or Cleaning Pad for Ceramic Cookt...

Страница 36: ...ross your cooktop It will leave metal markings on the cooktop surface These marks are removable using the Ceramic Cooktop Cleaner with the Cleaning Pad for Ceramic Cooktops If pots with a thin overlay...

Страница 37: ...commended cleaning being used or coarse particles procedures Make sure bottoms of cookware are clean salt or sand were between before use and use cookware with smooth bottoms the cookware and the surf...

Страница 38: ...in the oven In some areas the power Preheat the broil element for 10 minutes voltage may be low Broil for the longest period of time recommended in the Broiling Guide Oven temperature Oven thermostat...

Страница 39: ...Touch the RESET OFF pad Open the windows to rid the during a clean cycle room of smoke Wait until the LOCKED light goes off Wipe up the excess soil and reset the clean cycle Oven door will not Oven t...

Страница 40: ...or surge Reset the clock If the oven was in use you must clock flashes reset it by touching the RESET OFF pad setting the clock and resetting any cooking function Steam from the vent When using the c...

Страница 41: ...41 Notes www GEAppliances ca Safety Instructions Operating Instructions Care and Cleaning Troubleshooting Tips Consumer Support...

Страница 42: ...42 Notes Consumer Support Troubleshooting Tips Care and Cleaning Operating Instructions Safety Instructions...

Страница 43: ...43 Notes www GEAppliances ca Safety Instructions Operating Instructions Care and Cleaning Troubleshooting Tips Consumer Support...

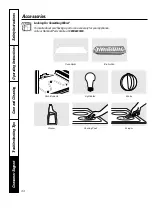
Страница 44: ...ance call our National Parts Centre at 1 800 661 1616 FRONT REAR SURFACE UNIT FRONT REAR REAR OVEN Oven Racks Broiler Pan Oven Elements Light Bulbs Knobs Cleaner Cleaning Pads Scraper Accessories Cons...

Страница 45: ...45 OWNERSHIP REGISTRATION P O BOX 1780 MISSISSAUGA ONTARIO L4Y 4G1 FOR CANADIAN CONSUMERS ONLY Please place in envelope and mail to Veuillez mettre dans une enveloppe et envoyez...

Страница 46: ...46...

Страница 47: ...leaners other than the recommended cleaning creams Damage to the glass cooktop if included caused by hardened spills of sugary materials or melted plastic that are not cleaned according to the directi...

Страница 48: ...g a part or an accessory for your appliance call our National Parts Centre at 1 800 661 1616 Contact Us www GEAppliances ca If you are not satisfied with the service you receive from GE contact us on...

Отзывы: