background image

All ranges can tip and injury could result. 

To prevent accidental tipping of the range, attach it to the
wall and floor by installing the Anti-Tip device supplied. 

To check if the device is installed and engaged properly,
remove the storage drawer and inspect the rear leveling leg.
Make sure it fits securely into the slot.

If you pull the range out from the wall for any 
reason, make sure the device is properly engaged 
when you push the range back against the wall. If it is
not, there is a possible risk of the range tipping over
and causing injury if you or a child stand, sit or lean on
an open door.

Please refer to the Anti-Tip device information in this
manual. Failure to take this precaution could result in
tipping of the range and injury.

IMPORTANT SAFETY INFORMATION.
READ ALL INSTRUCTIONS BEFORE USING.

4

WARNING!

For your safety, the information in this manual must be
followed to minimize the risk of fire or explosion, electric
shock, or to prevent property damage, personal injury, or
loss of life.

Operating Instructions

Installation Instructions

Safety Information

Troubleshooting T

ips

Customer Service

WARNING

ANTI-TIP DEVICE

IMPORTANT SAFETY NOTICE

Fluorescent light bulbs contain mercury. If your model 
has a surface light, you must recycle the fluorescent light
bulb according to local, state and federal codes.

Содержание JBC27

Страница 1: ...GE Appliances GE Answer Center 800 626 2000 Part No 164D3333P036 Pub No 49 8782 JBS03 JBS07 JBS26 JBS27 JBC27 Owner s Manual Ranges Electric 1...

Страница 2: ...range That s important because your new range will be part of your family for many years And we hope you will be part of ours for a long time to come We thank you for buying GE We appreciate your pur...

Страница 3: ...oubleshooting Tips If you do need service you can relax knowing help is only a phone call away A list of toll free customer service numbers is included in the back section Or you can always call the G...

Страница 4: ...child stand sit or lean on an open door Please refer to the Anti Tip device information in this manual Failure to take this precaution could result in tipping of the range and injury IMPORTANT SAFETY...

Страница 5: ...e fuse or switching off the circuit breaker Do not leave children alone children should not be left alone or unattended in an area where an appliance is in use They should never be allowed to sit or s...

Страница 6: ...not use water on grease fires Never pick up a flaming pan Turn the controls off Smother a flaming pan on a surface unit by covering the pan completely with a well fitting lid cookie sheet or flat tra...

Страница 7: ...units the heating elements or the interior surface of the oven These surfaces may be hot enough to burn even though they are dark in color During and after use do not touch or let clothing or other f...

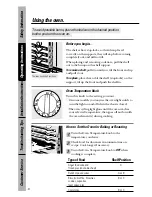
Страница 8: ...he stop lock is a convenience in lifting heavy foods It is also a precaution against burns from touching hot surfaces of the door or oven walls When using cooking or roasting bags in the oven follow t...

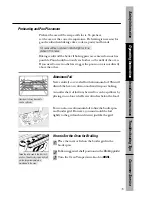
Страница 9: ...e range Only certain types of glass glass ceramic earthenware or other glazed containers are suitable for cooktop service others may break because of the sudden change in temperature To minimize the p...

Страница 10: ...g Filling the pan too full of fat can cause spillovers when food is added If a combination of oils or fats will be used in frying stir together before heating or as fats melt slowly Always heat fat sl...

Страница 11: ...types of woks with or without the ring in place can be dangerous Placing the ring over the surface unit will cause a build up of heat that will damage the porcelain cooktop Do not try to use such wok...

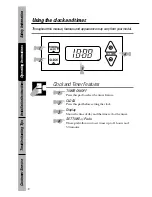
Страница 12: ...tions Safety Information Troubleshooting Tips Customer Service 1 2 3 Clock and Timer Features TIMER ON OFF Press this pad to select the timer feature CLOCK Press this pad before setting the clock Disp...

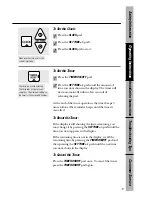
Страница 13: ...eration the timer beeps 3 times followed by reminder beeps until the timer is cancelled To Reset the Timer If the display is still showing the time remaining you may change it by pressing the SET TIME...

Страница 14: ...ooting Tips Customer Service A B C D How to Set the Oven for Baking or Roasting Turn the Oven Temperature knob to the temperature you desire Check food for doneness at minimum time on recipe Cook long...

Страница 15: ...Leave the door open to the broil stop position The door stays open by itself yet the proper temperature is maintained in the oven You can also use aluminum foil to line the broiler pan and broiler gr...

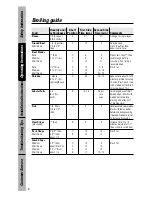
Страница 16: ...5 Chicken 1 whole A 35 10 15 Reduce time about 5 to 10 2 to 21 2 lbs minutes per side for cut up split lengthwise chicken Brush each side with melted butter Broil skin side down first Lobster Tails 2...

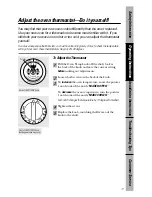
Страница 17: ...look at the back of the knob and note the current setting before making any adjustments Loosen both screws on the back of the knob To increase the oven temperature move the pointer 1 notch toward the...

Страница 18: ...oap and water but do not soak 18 Operating Instructions Installation Instructions Safety Information Troubleshooting Tips Customer Service Pull the knob straight off the stem Oven vent location Oven V...

Страница 19: ...ng with a mild abrasive cleaner Soapy wet metal pads may also be used Do not allow food spills with a high sugar or acid content such as milk tomatoes sauerkraut fruit juices or pie filling to remain...

Страница 20: ...d a hand under the cover so it doesn t fall when released With fingers of the same hand firmly push back the wire cover holder Lift off the cover Do not remove any screws to remove the cover Replace b...

Страница 21: ...be cleaned with a commercial oven cleaner If the grid is grey enamel it can also be cleaned with an oven cleaner If the grid is chrome do not use an oven cleaner to clean it Both the broiler pan and...

Страница 22: ...pinch your fingers To lower the cooktop push the rods back and gently lower the cooktop until it rests in place Operating Instructions Installation Instructions Safety Information Troubleshooting Tips...

Страница 23: ...drip pan and into the receptacle Guide the surface unit into place so it rests evenly Do not immerse the surface units in liquids of any kind Do not clean the surface units in a dishwasher Do not ben...

Страница 24: ...eaving unsightly streaks that require hand cleaning Instead when spatter hits the porous finish it is dispersed and partially absorbed This spreading action increases the exposure of oven soil to heat...

Страница 25: ...isibility may be reduced by operating the oven at 400 F Close the door and set the Oven Temperature knob to 400 F Time for at least 4 hours Repeated cycles may be necessary before improvement in appea...

Страница 26: ...er cleaning Household ammonia may make the cleaning job easier Place 1 2 cup in a shallow glass or pottery container in a cold oven overnight The ammonia fumes will help loosen the burned on grease an...

Страница 27: ...Need Electrical Requirements CAUTION FOR PERSONAL SAFETY DO NOT USE AN EXTENSION CORD WITH THIS APPLIANCE REMOVE HOUSE FUSE OR OPEN CIRCUIT BREAKER BEFORE BEGINNING INSTALLATION This appliance must be...

Страница 28: ...ce risk by installing a range hood that projects horizontally a min of 5 beyond the bottom of the cabinets Make sure the wall covering countertops and cabinets around the range can withstand heat gene...

Страница 29: ...1996 the National Electric Code requires that new construction not existing utilize a 4 conductor connection to an electric range When installing an electric range in new construction follow Steps 3 a...

Страница 30: ...iers to bend the knockout ring away from the bracket and twist until ring is removed Assemble the strain relief in the hole Insert the power cord through the strain relief and tighten Allow enough sla...

Страница 31: ...nector block The power leads must be connected to the outside brass colored terminals Remove the 3 wire terminal screws from the connector block Insert screws through each power cord terminal ring and...

Страница 32: ...st be connected to the frame of the range with the grounding plate and grounding screw Remove the 3 screws from the connector block Remove the grounding screw and strap from the connector block middle...

Страница 33: ...NG Do not connect aluminum wire to the connector block Use copper building wire rated for the correct amperage and voltage to make 3 three 3 copper jumper wires Connect wire as per Step 6 or 7 dependi...

Страница 34: ...wire is used see note below NOTE ALUMINUM WIRING Do not connect aluminum wire to connector block Use copper building wire rated for the correct amperage and voltage to make 3 three 3 copper jumper wi...

Страница 35: ...al Wall plate Leveling the Range The range must be level Leveling feet are located at each corner of the base of the range Remove the storage drawer or kick panel depending on your model and using cha...

Страница 36: ...securely in to make sure the drip pan is the cooktop in the recess in the cooktop and that the opening in the pan lines up with the receptacle The display goes Power surge Disconnect power at the blan...

Страница 37: ...open to the See the Using the broil stop position as oven section recommended Improper shelf position See the Broiling guide being used Food being cooked Use the broiling pan and in a hot pan grid tha...

Страница 38: ...cal outlet A fuse in your home Replace fuse or reset may be blown or the circuit breaker circuit breaker tripped Oven controls See the Using the clock improperly set and timer section Oven door is The...

Страница 39: ...uct if it is abused misused or used for other than the intended purpose or used commercially Replacement of house fuses or resetting of circuit breakers Damage to the product caused by accident fire f...

Страница 40: ...anty expires Service Contracts 800 626 2224 Individuals qualified to service their own appliances can have parts or accessories sent directly to their homes VISA MasterCard and Discover cards are acce...

Отзывы: