GE JB960 Скачать руководство пользователя страница 28

– 26 –

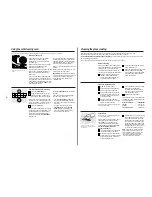
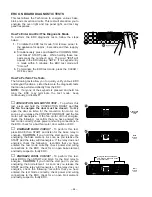
ERC ON BOARD DIAGNOSTIC TESTS

This test allows the Technician to energize various bake, 
broil, and convection circuits.  This test will also allow you to 
energize the oven light and top panel light, and test key 
panel responses.

How To Enter And Exit The Diagnostic Mode

To perform the ERC diagnostic tests, follow the steps 
below:

How To  Perform The Tests

The following tests allow you to quickly verify various ERC 
and keypad functions.  Listed below are the diagnostic tests 
that can be performed directly from the ERC.
NOTE:  If anyone of the keypads is pressed and held too 
long the ERC may terminate the test mode, beep 
continuously, or display F7. 
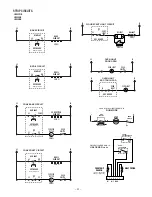
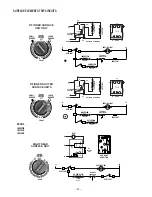
 

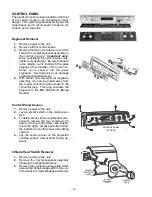
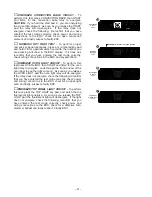
CONVECTION FAN MOTOR TEST - To perform this 

test, press and hold the CONVECTION ROAST pad (for 
the fan to energize the door must be closed
).  Quickly 
open the door an listen for the convection fan motor.  As 
soon as you release the CONVECTON ROAST pad the fan 
motor will deenergize.  If the fan motor did not energize, 
check the following:  reconfirm that you have entered the 
test mode correctly, check power and wiring connections to 
the ERC, check for a bad fan motor, door switch or ERC.


ENERGIZE BAKE CIRCUIT - To perform this test, 

press BAKE then START and listen for the bake relay to 
energize.  CAUTION: If you hold the start pad in, you are 
energizing the bake element.  As soon as you release the 
START pad the relay will deenergize.  If the relay does not 
energize, check the following:  reconfirm that you have 
entered the test mode correctly, check power and wiring 
connections to the ERC, check for an open bake element 
and lastly, suspect a faulty ERC.


ENERGIZE BROIL CIRCUIT - To perform this test, 

press BROIL then START and listen for the broil relay to 
energize.  CAUTION: if you hold the start pad in, you are 
energizing the broil element.  As soon as you release the 
START pad the relay will deenergize.  If the relay does not 
energize, check the following: reconfirm that you have 
entered the test mode corrrectly, check power and wiring 
connections to the ERC, check for an open broil element, 
and lastly, suspect a faulty ERC.

To initiate the ERC test mode, first remove power to 
the appliance for approx.  8 seconds and then reapply 
power.
Simultaneously press and hold the COOKING TIME 
and DELAY START pads.  While holding these two 
pads press the number 8 pad.  The word "tESt" will 
appear in the ERC display.  NOTE:  If no keypad entry 
is made within 5 minutes, the ERC test mode will 
"time out".
To terminate the ERC test mode, press the CLEAR / 
OFF key pad.

1.

2.

3.

Convection

Fan Motor

Test

1

TrueTemp

Convection

OVEN

BAKE

PROBE

SELF

CLEAN

CLEAR

OFF

BAKE

1

2

3

4

5

6

7

8

9

0

CONVECTION

ROAST

CONVECTION

BROIL

CLOCK

START

HI

LO

KITCHEN

TIMER

OVEN
LIGHT

TOP

LIGHT

COOKING

TIME

DELAY
START

TIME CONTROLS

ON

OFF

2

3

Disregard these numbers as
they have no relevance on the
broil circuit test

Bake

Circuit

Test

Broil

Circuit

Test

Содержание JB960

Страница 1: ...g TECHNICAL SERVICE GUIDE 1999 SPECTRA SERIES FREE STANDING ELECTRIC RANGES W TRUETEMP TM 03 99 MODEL SERIES JB960_B JB940_B JBP79_B JBP78_B JBP63_B JBP64_B JBP66_B JBP60_B JBP48_B JBP35_B JBP30_B JBP...

Страница 2: ...ition and properly fastened IMPORTANT SAFETY NOTICE The information in this service guide is intended for use by individuals possessing adequate backgrounds of electrical electronic and mechanical exp...

Страница 3: ...al Cooktop Removal Bake Element Removal Door Switch Removal Oven Liner Removal Control Console Access Infinite Heat Controls Thermal Limiter Switch ERC Special Features ERC Fault Code Memory Test ERC...

Страница 4: ...ance Series JB960AB Almond on almond Largest oven in America Self cleaning convection oven with dedicated third dual loop heating element Super large 4 5 cu ft capacity oven CleanDesign oven interior...

Страница 5: ...nt With the largest most accurate oven in america and a variety of cooktop elements the GE Spectra Range lets you cook exactly what you want to cook And with CleanDesign cleanup has never been easier...

Страница 6: ...0 W RF LARGE 2500 W BOTH ELEMENTS RR 1500 W LF SINGLE 1800 W LF BRIDGE 2600 W LF CENTER LR 1800 W LOCATION WATTAGE COOKTOP CONFIGURATION H I 8 8 HI 6 6 4 2 LO LO 2 4 BRIDGE BURNER OFF FRONT BURNER FRO...

Страница 7: ...Oven function icons Glass touch controls Digipad numeric entry Convection conversion Delay bake Oven light pad Control lock capability Start pad Self clean cool down time display Auto self clean Delay...

Страница 8: ...JBP79WB AB BB 29 7 8 46 1 2 25 3 8 47 5 8 JBP78WB AB BB 29 7 8 44 7 16 25 3 8 47 5 8 JBP66WB AB BB 29 7 8 44 7 16 25 3 8 47 5 8 JBP64BB 29 7 8 44 7 16 25 3 8 47 5 8 JBP63BB 29 7 8 44 1 2 25 7 16 46 1...

Страница 9: ...d cooktop Clean Well Cooktop System Lift up cooktop w dual support rods 8 heating elements 2 6 turns 2 6 turns 2 6 turns 2 5 turns 2 5 turns 2 5 turns 1 5 turns 6 heating elements 2 5 turns 2 5 turns...

Страница 10: ...1 6 turns 1 6 turns 1 6 turns 1 6 turns 6 heating elements 2 5 turns 3 5 turns 2 5 turns 3 5 turns 3 5 turns 3 5 turns 3 5 turns Infinite heat controls Plug in Calrod heating elements Removable 1 pie...

Страница 11: ...g on the underside of the meat or poultry Place the shelf in the lowest shelf position A Place the grid on the broiler pan and put the roasting rack over them making sure the posts on the roasting rac...

Страница 12: ...ure of the food reaches 100 F the changing internal temp erature will show in the display When the internal temperature of the food reaches the number you have set the probe and the oven turn off and...

Страница 13: ...Convection Roasting Guide Meats Minutes Lb Oven Temp Internal Temp Beef Rib 3 to 5 lbs Rare 20 24 325 F 140 F Medium 24 28 325 F 160 F Well 28 32 325 F 170 F Boneless Rib Top Sirloin Rare 20 24 325 F...

Страница 14: ...o not continue to use the soiled surface unit until all of the spillover has been removed Follow the steps underHeavy Burned On Soil to continue the cleaning process NOTE If pots with a thin overlay o...

Страница 15: ...en door is locked to the range cabinet with hinge locks located on top of both door hinges To Remove The Oven Door 1 Fully open the oven door 2 Push the hinge locks down toward the door frame to the u...

Страница 16: ...A lower right 6 While holding the front of the cooktop up ward lower the rear of the cooktop in or der to disengage the cooktop hinges from the hinge pins see illustration B lower right 7 Once the coo...

Страница 17: ...by removing the stor age drawer From inside the storage drawer area located just above the left front leveling leg as you face the unit are two 1 inch holes If you shine a light into the top hole you...

Страница 18: ...h cov ers the side of the range and roll it upwards to the top of the range Tuck the end of it under the brace which runs from the front of the oven to the back of the oven This will hold the insulati...

Страница 19: ...fit flush against the frame and will protrude enough that you will not be able to re mount it to the frame Tip The bottom area of the bake ele ment housing bows slightly upward in the center this is d...

Страница 20: ...replace the oven liner customer damage you can do so following the steps listed below 1 Remove the cooktop 2 Remove both side panels and metal cov ers metal insulation covers 3 Remove the bake element...

Страница 21: ...ly and oven lamp assembly still mounted to the liner OVEN LINER REINSTALLATION 1 After transfering the convenction fan as sembly lamp assembly sensor and broil element to the new liner slide the new l...

Страница 22: ...emoved the keypanel assembly can now be pulled away from the control console to gain access to the connector plug This plug connects the keypanel to the ERC Electronic Range Control Control Panel Acce...

Страница 23: ...nergized when the cycling contacts are closed THERMAL LIMITER SWITCH Attached to each surface element is a thermal limit switch This switch serves two purposes 1 Controls cooktop surface HOT light op...

Страница 24: ...shows SF Press the CLOCK pad once The display will show 12 hr Press the CLOCK pad again to change to the 24 hour military time clock The display will show 24 hr If this is your choice press START Pre...

Страница 25: ...me for 2 seconds until the display shows SF Press and hold both the CLOCK and KITCHEN TIMER pads until the display starts scrolling HELPFUL USE AND CARE INFORMATION CLOCK The clock must be set before...

Страница 26: ...ce unless separated by a different fault code In this example F3 repeats itself twice the resulting fault code memory display only shows one 3 The same would also be true if F3 repeated itself four ti...

Страница 27: ...circuit Ham radio cordless phone etc the door circuit in the unlock mode Control senses oven temperature above 930 F with the door in the door locked mode F3 F4 Open sensor circuit over 2700 ohms Sho...

Страница 28: ...release the START pad the relay will deenergize If the relay does not energize check the following reconfirm that you have entered the test mode correctly check power and wiring connections to the ER...

Страница 29: ...T CIRCUIT To perform this test press OVEN LIGHT then START and listen for the oven light relay to energize Look through the front window of the oven door to see the light come on As soon as you releas...

Страница 30: ...cle of operation testing lock motor operation and front and rear latch switch contacts To perform this test push and hold the SELF CLEAN key pad make sure that the oven door is closed light switch dep...

Страница 31: ...UE TEMP PREVIOUS MODELS ERC V TrueTemp with on board SmartLogic man ages and maintains the oven temperature you select ERC controls with TrueTemp SmartLogic can be identi fied by the words TrueTemp lo...

Страница 32: ...LF INNER ELEM 23 0 57 6 22 2 72 0 32 0 SURFACE ELEMENTS Q2 K2 BR ERC K4 CV K3 BA RR BR TR RF GY LF GY TR LR O TR 02 Q1 K2 K3 K4 COM NDL CONV BA BR LI LI GND N N N BAL LAST FLO LIGHT OV LIGHT DOOR JAM...

Страница 33: ...p 2850 at Clean Temp Latch circuit shown in UNLOCKED mode MEAT PROBE W 1 2 3 4 5 6 7 8 W Y O BU OVEN TEMP SENSOR L COM MDL LOCK MOTOR DOOR SWITCH N NC C NO ERC K1 Relay Lock motor circuit shown in RUN...

Страница 34: ...B JB960AB JB960BB 31 0 70 0 SURF IND LIGHT LF SURF ELEM LI L2 SURF CONT THERMAL LIMITER SW 5 2 L2 5 N 2 3 L1 L1 H1 TOP 4 P L2 H2 N 4 3 2 GRND 5 P H2 H1 GRND CYCLING CONTACT 10 45 K VOLTAGE SENSITIVE H...

Страница 35: ...LIMITER SW 5 2 L2 5 N 2 3 L1 L1 H1 TOP 4 P L2 H2 N 4 3 2 GRND 5 P H2 H1 GRND CYCLING CONTACT 10 45 K VOLTAGE SENSITIVE RF INNER SURFACE UNIT ONLY 3 4 OUTER ELEM INNER ELEMENT OUTER ELEMENT FRONT 37 0...

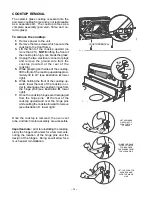
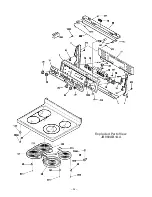
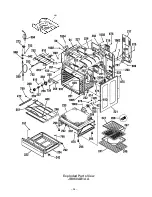
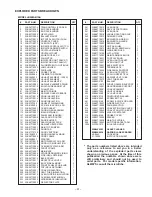
Страница 36: ...34 Exploded Parts View JB960AB1AA...

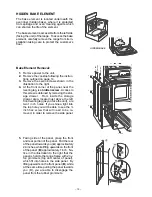
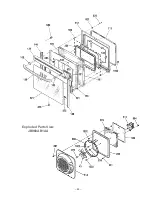
Страница 37: ...35 Exploded Parts View JB960AB1AA...

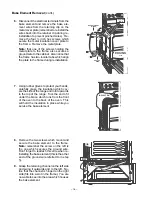
Страница 38: ...36 Exploded Parts View JB960AB1AA...

Страница 39: ...NT PANEL STOR ALMD 1 227 WB02T10029 TOP INSUL RETAINER 1 229 WB35T10021 CONVX INSULATION 1 229 WB35T10017 VENT TUBE INSULATION 1 231 WB35T10012 OVEN TOP SIDE INSULATION 1 232 WB35T10023 OVEN BLACK BTM...

Отзывы: