background image

10

These systems conform to ANSI/NSF 44 for the specific capacity claims as verified and substantiated by test data.
*

Testing was performed using pellet grade sodium chloride as the regenerant salt.

** Efficiency rating is valid only at the lowest stated salt dosage. These softeners were efficiency rated according to

ANSI/NSF 44.

*** Extent of iron removal may vary with conditions. Use of Diamond Crystal

®

Red•Out

®

or Super Iron Out

®

will

improve iron removal. Refer to 

Cleaning Iron Out of the Water Softening System 

section.

3

3

8

OUTLET

INLET

INLET–OUTLET

47

1

2

41

1

4

16

Step-by-step installation instructions.

Sanitizing Procedures

To complete the installation, do the following
sanitizing procedures.

Care is taken at the factory to keep your 
water softener clean and sanitary. Materials
used to make the softener will not infect or
contaminate your water supply and will not
cause bacteria to form or grow. However,
during shipping, storage, installing and
operating, bacteria could get into the 
softener. For this reason, sanitizing as 
follows is suggested when installing.

NOTE: 

Sanitizing is recommended by the 

Water Quality Association for disinfecting.

1. 

Be sure to complete all installation steps,
including programming the control.

2. 

Pour about 3/4 oz. (1

1

2

tablespoons) of

common 5.25% unscented household bleach
(Clorox, Linco, Bo Peep, White Sail, Eagle,
etc.) into the 

brinewell

. Refer to illustration

on page 5.

3. IMPORTANT: 

Press and hold for 3 seconds 

the faceplate 

RECHARGE

button to start 

an immediate recharge. 

RECHARGE

begins 

to flash in the display. The bleach will be
drawn through the water softener, and out
the drain. This process takes approximately 
2 hours.

4. 

If, after sanitization, water from the house
faucet tastes salty or has a slight color, this is 
a preservative from the resin tank. Turn on 
the cold soft water faucets and drain for a 
few minutes or until clear.

NOTE: 

When the sanitizing recharge is over,

your house 

COLD

water supply is fully soft

immediately. However, your water heater is
filled with hard water and as hot water is used,
it will refill with soft water. When all the hard
water is replaced in the water heater, hot only
and mixed hot and cold water will be fully soft.
If you want totally soft water immediately, after
the above recharge, drain the water heater
until the water runs cold.

WARNING:

If you do drain the

water heater, use extreme care as the hot
water could cause burns. Turn the water
heater off prior to draining.

Specifications/Dimensions

19

GXSF27E

GXSF31E

Rated Capacity*

(See rating label on water softener)

Rated Efficiency**

(See rating label on water softener)

Amount of High Capacity Resin (lbs/cu. ft)

37.4/0.72

43.7/0.84

Resin Tank Nominal Size (in., dia. x height)

8 x 40

9 x 40

Service Flow Rate (gpm)

8.0

9.0

Water Supply Maximum Hardness (gpg)

95

100

Water Supply Maximum Clear Water Iron (ppm)***

4

5

Water Pressure Limits (min.–max. psi)

20–125

20–125

Pressure Drop at Rated Service Flow (psig)

14

15

Water Temperature Limits (min.–max. °F)

40–120

40–120

Maximum Flow Rate to Drain (gpm)

1.8

1.8

Содержание GXSF31E

Страница 1: ...t Back Cover Parts list catalog 22 25 Warranty U S 26 Warranty Canada 27 Modelos GXSF27E GXSF31E Manual del Propietario e Instrucciones de Instalaci n La secci n en espa ol empieza en la p gina 29 Sis...

Страница 2: ...OPER INSTALLATION Install or store where it will not be exposed to temperatures below freezing or exposed to any type of weather Water freezing in the system will break it Do not attempt to treat wate...

Страница 3: ...all sweat solder connections as required by state and federal codes Connect the softener to the main water supply pipe before or ahead of the water heater DO NOT RUN HOT WATER THROUGH THE SOFTENER Te...

Страница 4: ...onnect Be sure the electric outlet and transformer are in an inside location to protect from wet weather Be sure the outlet is unswitched to prevent accidental shutoff If installing in an outside loca...

Страница 5: ...1 NPT male threads of the bypass valve Nut 2 Copper tube 3 4 2 Washer 2 Installation adapter 2 see above NOTE Fittings supplied are for 3 4 copper plumbing If you have 1 plumbing do not use the copper...

Страница 6: ...ALVE INLET PORT If house water flow is from the left use a plumbing crossover as shown in Fig 1 page 5 If house water flows up from the floor level turn the bypass valve upside down as shown in Fig 3C...

Страница 7: ...ts be sure to do the following steps in exact order Fully open 2 cold soft water faucets nearby the softener Place bypass valve in bypass position by pushing the stem inward Fully open the house main...

Страница 8: ...utton until HARDNESS appears in the display 2 Press UP or DOWN button to set your water hardness number in the display DOWN decreases the hardness value UP increases the hardness value NOTE Each press...

Страница 9: ...difference between these two cycles is highly dependent on the water usage and hardness at a particular installation NOTE California Regulations require this feature to be ON for installations in Cali...

Страница 10: ...ORTANT Press and hold for 3 seconds the faceplate RECHARGE button to start an immediate recharge RECHARGE begins to flash in the display The bleach will be drawn through the water softener and out the...

Страница 11: ...ter will fill with the hard water Automatic Hard Water Bypass During Recharge Fill Salt dissolved in water is called brine Brine is needed to clean the hard minerals from resin beads To make the brine...

Страница 12: ...he resin tank during recharge If it becomes plugged with sand dirt etc the water softening system will not work and you will get hard water To get to the nozzle and venturi remove the water softening...

Страница 13: ...ening system begins an immediate recharge and when over in about two hours you will have a new supply of soft water Once started you cannot cancel this recharge Feature Optional Recharge Controls Feat...

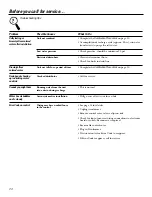
Страница 14: ...Do manual diagnostics NO POWER POWER OK REPAIR AS NEEDED CONTROL DEFECTIVE Do manual diagnostics to verify proper function Electrical power was off Reset the correct time of day Investigate reason fo...

Страница 15: ...the computer from the first time electrical power is applied to the control Press and hold the UP button to display the number of days this control has had electrical power applied Press and hold the...

Страница 16: ...om contacting salt See Care and cleaning of the water softening system section If the water softening system does not draw brine check nozzle and or venturi dirty or defective defective nozzle and ven...

Страница 17: ...salt Checking the Salt Storage Level and Refilling Your water softening system takes hardness minerals calcium and magnesium out of the water Also it can control some see the Specification Guidelines...

Страница 18: ...ion Electrical outlet on a circuit that can NOTE The electrical outlet for the softener should be continuously be switched off live so it cannot be accidentally switched off Manual bypass valve in byp...

Страница 19: ...em section page 12 Water is blue color Acidic water in copper plumbing Have the water tested at once after water softening system was installed WARNING Do not drink the water until problem has been co...

Страница 20: ...beads showing Cracked distributor Call for service up in drinking water and sink Sounds you might hear Running water from the unit This is normal into a drain during recharge Water has air bubbles Ai...

Страница 21: ...21 Notes GEAppliances com...

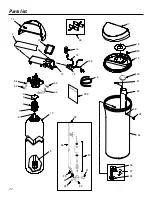
Страница 22: ...22 3 3 3 7 8 9 10 11 12 56 55 15 16 17 18 19 20 21 22 23 24 25 26 27 13 146 28 29 30 31 32 33 34 35 36 4 55 56 999 5 37 39 38 Parts list...

Страница 23: ...3 GEAppliances com 151 152 101 102 103 104 105 106 107 108 109 110 111 112 113 116 117 118 114 115 124 119 120 121 122 123 130 132 133 134 135 25 136 137 138 139 140 141 142 143 144 145 153 146 147 15...

Страница 24: ...023 WS02X10027 SCREW 1 1 0024 WS32X10016 TANK BRINE ROUND 1 1 0025 WS18X10003 CLAMP HOSE 2 2 0026 WS22X10016 ADAPTER HOSE 1 1 0027 WS22X10017 GROMMET 1 1 0028 WS35X10035 GROUND CLAMP KIT 1 1 0029 WS15...

Страница 25: ...TURI ASM 1 1 0130 WS35X10005 SEAL KIT 3 4 1 1 0132 WS22X10023 ADAPTER DRAIN HOSE 1 1 0133 WS03X10021 O RING 5 8 X 13 16 1 1 0134 WS03X10022 PLUG FLOW RINSE CONTROL 1 1 0135 WS03X10023 CLIP 1 1 0136 WS...

Страница 26: ...ommercial or industrial applications Filters membranes or batteries Replacement of house fuses or resetting of circuit breakers Damage to the product caused by accident fire floods or acts of God Inci...

Страница 27: ...IAL DAMAGES Warrantor CAMCO INC For The Period Of We Will Replace One Year Any part of the Water Softening System which fails due to a defect in materials or workmanship From the date of the During th...

Страница 28: ...Notes 28...

Страница 29: ...ones 43 Servicio 40 44 46 Sistema de descalcificaci n de agua 40 46 Cuidado y limpieza 47 Consejos para la soluci n de aver as 48 50 Soporte al cliente Garant a 58 Lista de partes cat logo 54 57 Sopor...

Страница 30: ...quede expuesto a temperaturas por debajo del punto de congelaci n ni est expuesto a ning n tipo de inclemencias atmosf ricas Si el agua llega a congelarse dentro del sistema ste podr a romperse No in...

Страница 31: ...ones de condensaci n soldadas seg n los c digos estatales y federales aplicables Conecte el descalcificador en la tuber a de suministro principal antes del calentador de agua NO HAGA PASAR AGUA CALIEN...

Страница 32: ...icador son tubos de cobre de condensaci n de 3 4 1 91 cm nominal Debe mantener un tama o igual o mayor de tubos que los tubos del suministro del agua hacia la entrada y salida del descalcificador Use...

Страница 33: ...pass Tuerca 2 Tubo de cobre de 3 4 1 91 cm 2 Arandela 2 Adaptador de instalaci n 2 ver arriba NOTA Los accesorios proporcionados son para plomer a de cobre de 3 4 1 91 cm Si usted tiene plomer a de 1...

Страница 34: ...Cerci rese de que la superficie de instalaci n se encuentre nivelada y lisa Cualquier objeto cortante debajo del tanque podr a causar una hendidura en el mismo Si es necesario coloque el tanque sobre...

Страница 35: ...nte las generaciones 4A C MO CONECTAR UN TUBO DE DRENAJE DE V LVULA R GIDA Para adaptar un tubo de drenaje de cobre al descalcificador use una sierra de arco para cortar el extremo de p a del accesori...

Страница 36: ...a o tiene un sabor salado permita que el sistema funcione por unos minutos m s o hasta que se aclare Cierre todos los grifos de agua Inspeccione en b squeda de fugas en la tuber a que se acaba de llev...

Страница 37: ...prima los botones UP o DOWN para ajustar la dureza del agua en la pantalla DOWN disminuye el nivel de dureza UP aumenta el nivel de dureza NOTA Cada vez que usted oprime un bot n la visualizaci n camb...

Страница 38: ...o de diferencia entre estos dos ciclos depende en gran medida del uso del agua y de la dureza en una instalaci n en particular NOTA La regulaci nes de California exige que esta funci n est en la posic...

Страница 39: ...l calentador se llena con agua descalcificada Cuando toda el agua dura se reemplace en el calentador de agua el agua caliente y el agua mezclada caliente y fr a estar n completamente descalcificadas S...

Страница 40: ...urante la recarga Llenado La sal disuelta en agua es llamada salmuera La salmuera es necesaria para limpiar los minerales duros de las diminutas part culas de resina Para formar la salmuera el agua fl...

Страница 41: ...n puente de sal La sal debe estar floja desde arriba hasta el fondo del tanque Tome un palo de escoba o algo parecido y con cuidado emp jelo hacia el interior del dep sito de sal introduci ndolo y sac...

Страница 42: ...hasta que est n limpios Si es necesario use un cepillo peque o para remover el hierro o la suciedad Tambi n inspeccione y limpie la junta NOTA Algunos modelos tienen un peque o tap n de flujo localiza...

Страница 43: ...a una recarga inmediata y cuando termine en unas dos horas usted tendr un nuevo suministro de agua descalcificada Una vez haya iniciado usted no puede cancelar la recarga Funci n Controles opcionales...

Страница 44: ...uiente procedimiento para encontrar la fuente del problema Primero realice las siguientes inspecciones visuales INSPECCIONES VISUALES 1 Hay energ a el ctrica entrando hacia el tomacorriente en el cual...

Страница 45: ...adora la primera vez que la energ a el ctrica es proporcionada al control Oprima y sostenga oprimido el bot n UP hacia arriba para visualizar el n mero de d as que el control ha tenido la energ a el c...

Страница 46: ...y limpieza del sistema de descalcificaci n de agua Si el sistema de descalcificaci n de agua no extrae salmuera inspeccione Que la boquilla y o el Venturi no est n sucios o defectuosos Que el empaque...

Страница 47: ...ccione el nivel de almacenamiento de la sal y el rellenado Su sistema de descalcificaci n de agua toma la dureza de los materiales calcio y magnesio y la extrae del agua Tambi n puede controlar una ca...

Страница 48: ...interruptor del El tomacorriente est en un circuito que descalcificador debe estar permanentemente conectado para que no no puede ser desconectado pueda ser desconectado accidentalmente La v lvula de...

Страница 49: ...ua El sistema de El sistema de descalcificaci n de No usa tanta sal para regenerarse es muy eficiente descalcificaci n de agua agua es una unidad de demanda no est usando ninguna sal Posible puente de...

Страница 50: ...oras haga circular agua a trav s de los grifos para purgar el agua salada Baja presi n del agua Inspeccione la presi n debe estar a un m nimo de 20 psi Manguera de drenaje restringida Limpie y reconec...

Страница 51: ...51 Notas GEAppliances com...

Страница 52: ...52 Notas...

Страница 53: ...53 Notas GEAppliances com...

Страница 54: ...54 3 3 3 7 8 9 10 11 12 56 55 15 16 17 18 19 20 21 22 23 24 25 26 27 13 146 28 29 30 31 32 33 34 35 36 4 55 56 999 5 37 39 38 Lista de partes...

Страница 55: ...5 151 152 101 102 103 104 105 106 107 108 109 110 111 112 113 116 117 118 114 115 124 119 120 121 122 123 130 132 133 134 135 25 136 137 138 139 140 141 142 143 144 145 153 146 147 150 GEAppliances co...

Страница 56: ...LMUERA 0021 WS02X10009 TUERCA 1 1 0022 WS32X10002 DEP SITO DE LA SALMUERA 1 1 0023 WS02X10027 TORNILLO 1 1 0024 WS32X10016 TANQUE DE SALMUERA 1 1 REDONDO 0025 WS18X10003 ABRAZADERA DE LA MANGUERA 2 2...

Страница 57: ...X10020 RESORTE 1 1 0123 WS22X10022 TAP N SELLO DEL DRENAJE 1 1 0124 WS15X10009 ENSAMBLADURA DE LA BOQUILLA 1 1 VENTURI 0130 WS35X10005 KIT DEL SELLO 3 4 1 1 0132 WS22X10023 ADAPTADOR MANGUERA DE 1 1 D...

Страница 58: ...plicaciones comerciales o industriales Filtros membranas o bater as Reemplazo de los fusibles de la casa o reajustes de los circuitos de interrupci n Da o del producto causado por accidentes incendios...

Страница 59: ...lles sobre descuentos especiales disponibles mientras su garant a est a n activa Puede comprarla en l nea en cualquier momento o llamar al 800 626 2224 durante horas normales de oficina GE Consumer Ho...

Страница 60: ...ended warranty and learn about special discounts that are available while your warranty is still in effect You can purchase it on line anytime or call 800 626 2224 during normal business hours GE Cons...

Отзывы: