GE GFXP1308FWW Скачать руководство пользователя страница 2

3


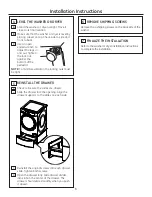
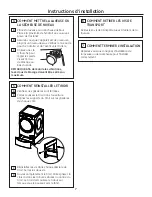
 INSTALL THE PEDESTAL TO THE 

WASHER OR DRYER

A

   Place the pedestal against the bottom of the 

unit. Check to be sure the drawer front is at 

the front of the washer.

To attach to the dryer:

B

   Align the holes in the pedestal with the holes 

in the bottom of the unit. Use a Phillips 

screwdriver to install the 4 screws through the 

pedestal and into the unit – do not tighten.

C

  Slide the pedestal toward the unit until it is 

aligned front to back. Use an 8 mm socket 

wrench to securely tighten the screws.
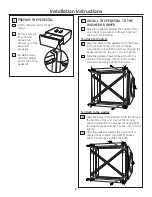
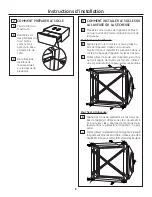
2


PREPARE THE PEDESTAL

A

   Pull the drawer out as far as it  

will go.

B


Remove screws 

from drawer 

slides. Slide 

drawer out of the 

base and  

set aside.

C


Do 

not

 remove 

the foam blocks 

on the top of the 

pedestal.  

Installation Instructions

2

7RDWWDFKWRWKHZDVKHU

B

   Align the holes in the pedestal with the holes in 

the bottom of the unit. Use a 9/16” socket 

wrench to install the 4 washer mounting bolts 

through the pedestal and into the unit – do not 

tighten.

C

  Slide the pedestal toward the unit until it is 

aligned front to back. Use a 9/16” socket 

wrench to securely tighten the bolts.

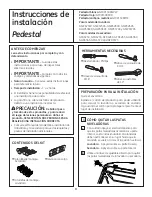
Содержание GFXP1308FWW

Страница 1: ...for local inspector s use IMPORTANT Observe all governing codes and ordinances Note to Consumer Keep these instructions for future reference Completion time 1 to 2 hours Proper installation is the re...

Страница 2: ...ck Use an 8 mm socket wrench to securely tighten the screws 2 PREPARE THE PEDESTAL A Pull the drawer out as far as it will go B Remove screws from drawer slides Slide drawer out of the base and set as...

Страница 3: ...nuts must be tight 6 REMOVE SHIPPING SCREWS Remove the 4 shipping screws on the back side of the washer 5 REINSTALL THE DRAWER A Check to be sure the slides are closed B Slide the drawer into the open...

Страница 4: ...4 Notes...

Страница 5: ...ECTU E PAR DEUX PERSONNES Reportez vous aux Manuel d utilisation et d installation de la laveuse et de la s cheuse pour les directiveset exigences suppl mentaires d installation 4 Vis d assemblage S c...

Страница 6: ...vant sur l arri re Utilisez une cl douille 8 mm pour serrer les boulons 2 COMMENT PR PARER LE SOCLE A Tirez le tiroir au maximum B Retirez les vis des glissi res du tiroir Faites sortir le tiroir hors...

Страница 7: ...RER LES VIS DE TRANSPORT Retirez les 4 vis de transport situ es l arri re de la laveuse 5 COMMENT R INSTALLER LE TIROIR A V rifiez si les glissi res sont ferm es B Faites coulisser le tiroir dans l ou...

Страница 8: ...8 Notes...

Страница 9: ...del propietario e instalaci n de la lavadora y la secadora para ver losrequisitos y pautas de instalaci n adicionales 4 tornillos de montaje Secadora 4 tornillos de montaje Lavadora Divisi n de caj n...

Страница 10: ...a llave de casquillo de 8 mm para ajustar bien los pernos 2 PREPARE EL PEDESTAL A Abra el caj n hasta el m ximo B Quite los tornillos de los deslizadores del caj n Quite el caj n de la base y deje a u...

Страница 11: ...fijaci n deben estar bien ajustadas 6 QUITE LOS TORNILLOS DE EMPAQUE Quite los 4 tornillos de embalaje ubicados en la parte trasera de la lavadora 5 C MO VOLVER A INSTALAR EL CAJ N A Verifique que lo...

Страница 12: ...12 GE Appliances General Electric Company Louisville Kentucky 40225 GEAppliances com SPECIFICATIONS SUBJECT TO CHANGE WITHOUT NOTICE...

Отзывы: