background image

49-55117 

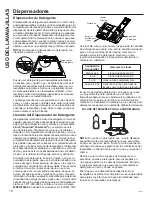
USO DEL

 LA

V

A

V

AJILLAS

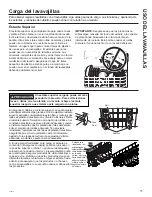
Carga del lavavajillas

Para obtener mejores resultados con el lavavajillas, siga estas pautas de carga. Las funciones y apariencia de los 
estantes y canastas de cubiertos pueden variar con relación a su modelo.

Estante Inferior

El estante inferior es más conveniente para platos, platitos 
y utensilios. Los productos grandes, tales como bandejas 
para asar y estantes para hornear deberán estar a los 

FRVWDGRVGHOHVWDQWH'HVHUQHFHVDULRORVYDVRV\

tazones de tamaños muy grandes podrán ser ubicados en 
el estante inferior, a fin de maximizar la flexibilidad de la 
carga. Los platos, platitos y productos similares deberían 
ser colocados entre los brazos en la dirección que permita 
que el producto permanezca seguro en el estante.

IMPORTANTE: 

Es importante asegurar que los productos 

no sobresalgan más allá del fondo del estante o la canasta 
de plata (en algunos modelos) 
donde bloquearán la rotación del 
brazo inferior de rociado. Además, 
asegúrese de que los platos 
grandes, ollas o ítems altos no 
golpeen el brazo intermedio de 
rociado. Esto podría ocasionar ruidos

Estante inférieur

-Configuraciones de 

8 lugares


- GDF510 & GDT535

Estante inférieur

-Configuraciones de  

12 lugares


- GDF520, GDF610, 

GDT545 & GDT625

Estante inférieur

-Configuraciones de  

8 lugares


- GDF520, GDF610, 

GDT545 & GDT625

Estante inférieur

-Configuraciones de 

12 lugares


- GDF620 & GDT635

Estante inférieur

-Configuraciones de  

8 lugares


- GDF620 & GDT635

Estante inférieur

-Configuraciones de 

10 lugares


- GDF620 & GDT635

Estante inférieur

-Configuraciones de 

12 lugares


- GDF510 & GDT535

Estante inférieur

-Configuraciones de 

10 lugares


- GDF510 & GDT535

Estante inférieur

-Configuraciones de  

10 lugares


- GDF520, GDF610, 

GDT545 & GDT625

Содержание GDF500-620 Series

Страница 1: ...f the General Electric Company Manufactured under trademark license OWNER S MANUAL DISHWASHERS 49 55117 05 17 GEA ENGLISH FRANÇAIS ESPAÑOL GDF500 620 Series GDT535 635 Series SAFETY INFORMATION 4 USING THE DISHWASHER Getting Started 6 Dispensers 9 Loading 11 CARE AND CLEANING 15 TROUBLESHOOTING TIPS 17 WARRANTY 21 CONSUMER SUPPORT 22 FRONT CONTROL MODELS TOP CONTROL MODELS ...

Страница 2: ...nto every GE Appliances product and we think you will too Among other things registration of your appliance ensures that we can deliver important product information and warranty details when you need them Register your GE appliance now online Helpful websites and phone numbers are available in the Consumer Support section of this Owner s Manual You may also mail in the pre printed registration ca...

Страница 3: ...49 55117 3 WELCOME Notes ...

Страница 4: ...risk of fire and personal injury Ŷ To minimize the possibility of electric shock disconnect this appliance from the power supply before attempting any maintenance NOTE Turning the dishwasher off does not disconnect the appliance from the power supply We recommend having a qualified technician service your appliance WARNING WHEN USING YOUR DISHWASHER FOLLOW BASIC PRECAUTIONS INCLUDING THE FOLLOWING...

Страница 5: ...tact with the heating element and be damaged WARNING RISK OF CHILD ENTRAPMENT PROPER DISPOSAL OF THE DISHWASHER Junked or abandoned dishwashers are dangerous even if they will sit for just a few days If you are getting rid of your dishwasher please follow the instructions below to help prevent accidents Ŷ Do not allow children to play with on or inside this or any discarded appliance Ŷ Take off th...

Страница 6: ...pical use to completely wash a full load of normally soiled dishes and is designed to conserve both water and energy NOTE Normal was used to rate the energy efficiency of this dishwasher Light This cycle is for light to medium soiled dishes It is safe for china and crystal with no options selected Rinse on some models For rinsing partial loads that will be washed later Do not use detergent Deterge...

Страница 7: ...soiled and or dried on baked on soils This option MUST be selected PRIOR to starting the cycle The Steam option adds up to 30 minutes to the cycle time This option is available with Heavy AutoSense and Normal cycles Wash Zones on some models Selecting either the Upper or Lower Wash Zones will target dishwashing of just one rack This will shorten the cycle time and conserve energy This option shoul...

Страница 8: ...beep sound and the wash cycle light will turn OFF 6 Cycle Indicator Lights and Sounds Sanitized Displayed at end of the cycle when Wash Temp Sani Sanitize has been selected and dishwasher has met requirements for sanitization See Wash Temp Sani Sanitize for complete description Opening the door or pressing any key while the door is closed will turn off the light Clean Displayed when a wash cycle i...

Страница 9: ...der normal conditions this will last approximately one month 1 Make sure the dishwasher door is fully open 2 Open the rinse agent dispenser door 3 Slowly add rinse agent until the cup is full You may need to pause several times to allow rinse aid to settle NOTE Indicator window does not light up 4 Clean up any spilled rinse agent with a damp cloth to prevent foam from forming inside the dishwasher...

Страница 10: ...very poor as a result If you choose to use detergent in powder liquid or gel form the amount of detergent you use will be determined by the hardness of your water the temperature of your water and the food soil load inside the dishwasher Contact your water company to get information about the hardness of the water in your area Water hardness is measured in grains per gallon Use this information an...

Страница 11: ...r than anticipated To prevent minor injury or damage to the contents do not raise or lower the upper rack after the rack is loaded CAUTION On some models the upper rack may be adjusted to accommodate larger items To adjust the upper rack fully extend the upper rack and remove the two plastic end caps on the front of the rails Remove the upper rack Select the set of rollers on the side of the rack ...

Страница 12: ...to clean hard to reach areas Clips can be installed or removed by simply slipping the clip opening over the top of the nozzle USING THE DISHWASHER Loading For best dishwashing results follow these loading guidelines Features and appearance of racks and silverware baskets may vary from your model Upper Rack 10 Place Settings GDF510 610 GDT535 545 GDT625 Upper Rack 12 Place Settings GDF510 610 GDT53...

Страница 13: ...of the rack or the silverware basket where they will block the rotation of the lower spray arm This could result in noise during operation and or poor wash performance For best dishwashing results follow these loading guidelines Features and appearance of racks and silverware baskets may vary from your model Lower Rack 10 Place Settings GDF510 GDT535 Lower Rack 8 Place Settings GDF510 GDT535 Lower...

Страница 14: ...ems such as spoons with the handles facing down Avoid allowing items to nest together which may keep them from being properly washed When loading distribute items evenly in the basket The silverware and accessory baskets on some models may also be used for small items such as measuring spoons baby bottle nipples plastic lids or corn cob holders The silverware basket covers on some models can be cl...

Страница 15: ...number ends with BB CC WW SA or ES then you have a painted door panel If your model number ends with SS then you have a Stainless Steel door panel If your model number ends with II then you have an Integrated door panel Follow the instructions below for cleaning the door panel for your specific model Painted Door Panel model numbers ending in BB black CC bisque WW white SA silver or ES slate Use a...

Страница 16: ...lastic cap under the cover and clean with a toothpick 3 Replace the cap and cover when the air gap is clean Check the air gap any time your dishwasher isn t draining well Air gap Ultra Fine Filter To clean the Ultra Fine Filter remove the bottom rack Twist the Ultra Fine Filter counterclockwise and lift to remove Rinse filter with warm soapy water and use a sponge to carefully remove any stubborn ...

Страница 17: ...her should be 20 120 psi Air gap or disposer clogged Clean the air gap or flush the disposer High drain loop or air gap not installed Refer to the Installation Instructions for proper drain line installation Improper rack loading Make sure large dishware does not block the detergent dispenser or the wash arms See the Loading section When large utensils are placed in the silverware basket do not mo...

Страница 18: ...dry Low inlet water temperature Make sure inlet water temperature is at least 120 F Select Heated Dry Use Wash Temp Boost Select a higher cycle such as Wash Temp Sani Sanitize Temp or Heavy Rinse agent dispenser is empty Check the rinse agent dispenser and fill as required Cycle selection If using Light cycle which uses lower water temperature and thus limited dry performance switch to a different...

Страница 19: ...ely purchase Finish Dishwasher Cleaner and follow the directions on the label Dishwasher won t run Fuse is blown or circuit breaker is tripped Replace fuse or reset circuit breaker Remove any other appliances from the circuit Power is turned off In some installations the power to the dishwasher is provided through a wall switch often located next to the disposer switch Make sure it is on Control p...

Страница 20: ...nst door during wash Tall utensils may be placed in the upper rack to avoid bumping against inner door during wash cycle A white film on glassware dishware and the interior This problem is likely caused by a low quality phosphate free dishwasher detergent To remove the white film run your dishes through a dishwasher cycle with citric acid Use a WD35X151 citric acid kit found online Otherwise use F...

Страница 21: ... this limited one year warranty GE Appliances will provide free of charge all labor and in home service to replace the defective part Staple your receipt here Proof of the original purchase date is needed to obtain service under the warranty What GE Appliances will not cover for customers in Canada Ŷ Service trips to your home to teach you how to use the product Ŷ Improper installation If you have...

Страница 22: ...is still in effect You can purchase it on line anytime GE Appliances Services will still be there after your warranty expires In the US GEAppliances com ge service and support shop for extended service plans htm or call 800 626 2224 during normal business hours Remote Connectivity For assistance with wireless network connectivity for models with remote enable visit our website at GEAppliances com ...

Страница 23: ...ée de General Electric Company Fabriqué sous licence de marque MANUEL D UTILISATION LAVE VAISSELLE CONSIGNES DE SÉCURITÉ 4 UTILISATION DU LAVE VAISSELLE Comment démarrer 6 Distributeurs 9 Chargement 11 ENTRETIEN ET NETTOYAGE 15 CONSEILS DE DÉPANNAGE 17 GARANTIE 21 SERVICE À LA CLIENTÈLE 22 GDF500 620 Séries GDT535 635 Séries Modèles avec commandes à l avant Modèles avec commandes sur le dessus ...

Страница 24: ...Appliances et nous pensons que vous le serez aussi Dans cette optique nous vous rappelons que l enregistrement de votre électroménager vous assure la communication de renseignements importants sur le produit et la garantie lorsque vous en avez besoin Enregistrez votre électroménager GE en ligne dès maintenant Des sites Web et des numéros de téléphone utiles figurent dans la section Soutien au cons...

Страница 25: ...49 55117 3 BIENVENUE Notes ...

Страница 26: ...r l entretien REMARQUE Le fait d arrêter le lave vaisselle ne coupe l alimentation électrique de l appareil Nous vous recommandons de confier la réparation de votre électroménager à un technicien qualifié AVERTISSEMENT LORS DU FONCTIONNEMENT DE VOTRE LAVE VAISSELLE PRENEZ LES PRÉCAUTIONS DE BASE NOTAMMENT LES SUIVANTES Ŷ 1 XWLOLVH FHW DSSDUHLO TXH SRXU O XVDJH SRXU OHTXHO LO D été conçu comme expl...

Страница 27: ...pourrait les endommager AVERTISSEMENT RISQUE DE SUFFOCATION POUR UN ENFANT COINCÉ À L INT RIEUR DE L APPAREIL ÉLIMINATION APPROPRIÉE DU LAVE VAISSELLE Les lave vaisselle jetés ou abandonnés sont dangereux même si vous ne les laissez là que pour quelques jours Si vous voulez jeter votre lave vaisselle veuillez suivre les directives ci dessous pour éviter les accidents Ŷ 1H ODLVVH SDV OHV HQIDQWV MR...

Страница 28: ...elect Cycle s allumera pour indiquer le cycle qui a été choisi REMARQUE La durée des cycles dépend du degré de saleté de la température de l eau et des options sélectionnées H F FOH SHXW rWUH VpOHFWLRQQp PrPH VL OD SRUWH HVW RXYHUWH 3RXU GpPDUUHU OH F FOH LO IDXW DEVROXPHQW appuyer sur le bouton Start et fermer la porte en moins de 4 secondes AutoSense certains modèles Ce cycle détecte automatique...

Страница 29: ...IT être sélectionnée AVANT de démarrer le cycle L option Steam ajoute 30 minutes à la durée du cycle Cette option est disponible avec les cycles Heavy Très sale AutoSense et Normal Wash Zones Zones de lavage certains modèles La sélection de la zone de lavage supérieure ou inférieure dirigera le lavage sur un panier seulement La durée du cycle sera ainsi raccourcie et l énergie sera économisée Cett...

Страница 30: ...dangera émettra un bip et le voyant du cycle de lavage s éteindra 6 Voyants et sonorités des indicateurs de cycle Sanitized Hygiénique Voyant allumé à la fin du cycle lorsque Wash Temp Sani Sanitize a été sélectionné et que le lave vaisselle a satisfait aux critères de désinfection Consultez la rubrique Wash Temp Sani Sanitize pour une description complète de l option Le voyant s éteindra dès l ou...

Страница 31: ...nviron un mois selon le réglage 1 Assurez vous que la porte du lave vaisselle est entièrement ouverte 2 Ouvrez le couvercle du distributeur de produit de rinçage 3 Ajoutez lentement le produit de rinçage jusqu à remplir le contenant Il se peut que vous deviez vous arrêter à quelques reprises pour permettre la décantation REMARQUE La fenêtre indicatrice ne s allume pas 4 Nettoyez le produit de rinç...

Страница 32: ... vous choisissez d utiliser un détergent en poudre liquide ou en gel la quantité utilisée sera fonction de la dureté et de la température de votre eau ainsi que de degré de salissure de vitre vaisselle Contactez votre compagnie distributrice des eaux pour obtenir des informations sur la dureté de l eau dans votre région La GXUHWp GH O HDX VH PHVXUH HQ JUDLQV SDU JDOORQ 8WLOLVH cette information et...

Страница 33: ... ODYDJH GH SLqWUH qualité Capuchon d extrémité Roulettes Rail Sur certains modèles le panier supérieur peut être ajusté SRXU UHFHYRLU OHV DUWLFOHV GH SOXV JUDQGH WDLOOH 3RXU DMXVWHU OH panier supérieur l allonger complètement et enlever les deux capuchons d extrémité en plastique à l avant des rails Enlever OH SDQLHU VXSpULHXU 6pOHFWLRQQH OH MHX GH URXOHWWHV VXU OH F Wp du panier qui procure la ha...

Страница 34: ...dre l intérieur des bouteilles afin de nettoyer les zones d accès difficile Les pinces peuvent être placées ou retirées simplement en glissant l orifice de la pince sur le dessus de la buse UTILISATION DU LAVE VAISSELLE Chargement 3RXU XQ ODYDJH RSWLPDO YHXLOOH VXLYUH OHV OLJQHV GLUHFWULFHV FL GHVVRXV SRXU OH FKDUJHPHQW GHV SDQLHUV HV caractéristiques et l apparence des paniers et du panier à couv...

Страница 35: ...ettes les soucoupes et les articles similaires doivent être placés entre les tiges dans la direction qui permet un appui sûr IMPORTANTE Il est important de faire en sorte que les articles ne dépassent pas du bas du panier ou du panier à couverts certains modèles pour ne pas gêner la rotation du bras gicleur inférieur Cette situation pourrait causer du bruit pendant le IRQFWLRQQHPHQW HW RX XQ ODYDJ...

Страница 36: ...icles tels que cuillères à mesurer suces de bouteille pour bébé capuchons de plastique ou porte épis de maïs Les couvercles du panier amovible certains modèles peuvent être fermés pour contenir les petits articles Le panier à couverts monté sur la porte certains modèles peut être fixé sur la porte à l aide des deux pitons de montage ou sur le panier en se servant des saillies dans la broche à l av...

Страница 37: ...pareil est doté d un panneau de porte peint Si votre numéro de modèle se termine par les lettres SS votre appareil est doté d un panneau de porte en acier inoxydable Si votre numéro de modèle se termine par II alors il est doté d un panneau de porte intégré Veuillez suivre les directives ci dessous pour nettoyer le panneau de porte de votre modèle Panneau de porte peint numéro de modèle se termina...

Страница 38: ...levez le couvercle de la coupure antirefoulement 2 Enlevez le capuchon en plastique sous le couvercle et nettoyez le à l aide d un cure dents 3 Replacez le capuchon et le couvercle une fois la coupure antirefoulement nettoyée Vérifiez la coupure antirefoulement dès que votre lave vaisselle ne se vide pas bien Coupure antirefoulement Filtre ultra fin 3RXU QHWWR HU OH LOWUH XOWUD ILQ UHWLUH OH SDQLH...

Страница 39: ...OOH GRLW VH VLWXHU HQ HW OE SR Coupure anti refoulement ou broyeur à dèchets obstruès Nettoyez la coupure anti refoulement ou rincez le broyeur à dèchets Boucle de drainage secondaires ou la coupure anti refoulement n est pas installé Reportez vous aux instructions d installation pour l installation du tuyau d évacuation adéquat Chargement incorrect des paniers Assurez vous que les articles de gra...

Страница 40: ... le lave vaisselle atteint au moins 49 C 120 F Sélectionnez l option Heated Dry Sélectionnez les options Wash Temp Boost Sélectionnez un programme dont l action de lavage est plus puissante comme Wash Temp Sani Sanitize Temp or Heavy Le robinet d eau chaude est peut être fermé Assurez vous que le robinet d eau chaude habituellement situé sous l évier est ouvert Choix du cycle Il faut changer de cy...

Страница 41: ...HQVHLJQHPHQWV SRXU FRPPDQGHU UHSRUWH YRXV j la dernière page Sinon acheter Finish Dishwasher Cleaner et suivez les instructions sur l étiquette Le lave vaisselle ne fonctionne pas Un fusible est grillé ou le disjoncteur est déclenché Remplacez le fusible ou réenclenchez le disjoncteur Débranchez tous les autres électroménagers du circuit L alimentation électrique est coupée Dans certaines installa...

Страница 42: ... porte pendant le lavage Les ustensiles de grande taille peuvent être placés dans le panier supérieur pour éviter qu ils percutent contre la porte intérieure durant le cycle de lavage Une pellicule blanche sur la verrerie la vaisselle et les surfaces internes du lave vaisselle Ce problème est probablement par une qualité détergent lave vaisselle sans phosphate bas 3RXU pOLPLQHU FHWWH SHOOLFXOH EOD...

Страница 43: ...ibles de la maison ou tout rebranchement des disjoncteurs Ŷ Tout dommage occasionné par un accident un incendie une inondation ou un acte de Dieu Ŷ Tout dommage subi après la livraison Ŷ Le service s il est impossible d avoir accès au produit pour ce faire GARANTIE Garantie GE Appliances sur les lave vaisselle Pour une période de GE Appliances remplacera Un an 8Q DQ j SDUWLU GH OD date d achat ini...

Страница 44: ...WLH X eWDWV 8QLV GEAppliances com ge service and support shop for extended service plans htm ou composez le 800 626 2224 durant les heures normales de bureau X DQDGD GEAppliances ca en support purchase extended warranty ou composez le 800 290 9029 Connectivité à distance 3RXU GH O DVVLVWDQFH FRQFHUQDQW OD FRQQHFWLYLWp DX UpVHDX VDQV ILO SRXU OHV PRGqOHV pTXLSpV GH FHWWH IRQFWLRQ visitez notre site...

Страница 45: ... General Electric Company Fabricado bajo licencia de marca MANUAL DEL PROPIETARIO LAVAVAJILLAS INSTRUCCIONES DE SEGURIDAD 4 USO DEL LAVAVAJILLAS Puesta en Marcha 6 Dispensadores 9 Carga del lavavajillas 11 CUIDADO Y LIMPIEZA 15 CONSEJOS PARA LA SOLUCIÓN DE PROBLEMAS 17 GARANTÍA 21 SOPORTE AL CLIENTE 22 GDF500 620 Serie GDT535 635 Serie MODELOS DE CONTROL FRONTAL MODELOS DE CONTROL SUPERIOR ...

Страница 46: ...creemos que usted también Entre otras cosas el registro de su electrodoméstico asegura que podamos entregarle información importante del producto y detalles de la garantía cuando los necesite Registre su electrodoméstico GE ahora a través de Internet Sitios Web y números telefónicos útiles están disponibles en la sección de Soporte para el Consumidor de este Manual del Propietario También puede en...

Страница 47: ...49 55117 3 BIENVENIDO Notas ...

Страница 48: ...ente antes de intentar cualquier mantenimiento NOTA Apagar el lavavajillas no desconecta el electrodoméstico del suministro de corriente Le recomendamos que el servicio técnico de su electrodoméstico sea realizado por un técnico calificado ADVERTENCIA AL USAR SU LAVAVAJILLAS SIGA LAS PRECAUCIONES BÁSICAS INCLUYENDO LO SIGUIENTE Ŷ 8VH HVWH HOHFWURGRPpVWLFR VyOR SDUD VX SURSyVLWR original como se de...

Страница 49: ...tacto con el calentador y sean dañados ADVERTENCIA RIESGO DE QUE UN NIÑO QUEDE ATRAPADO FORMA ADECUADA DE DESCARTAR EL LAVAVAJILLAS Los lavavajillas tirados o abandonados son peligrosos incluso aunque se conserven por sólo unos pocos días Si se deshará de su lavavajilla siga las siguientes instrucciones a fin de evitar accidentes Ŷ 1R SHUPLWD TXH ORV QLxRV MXHJXHQ FRQ HQ R GHQWUR GH pVWH R FXDOTXL...

Страница 50: ...dida para indicar qué ciclo de lavado ha sido seleccionado NOTA Los tiempos del ciclo varían de acuerdo con el nivel de suciedad la temperatura del agua y las opciones seleccionadas El ciclo puede ser seleccionado con la puerta en la posición abierta Este ciclo no se iniciará hasta que el botón Start Iniciar sea presionado y la puerta sea cerrada dentro de los 4 segundos AutoSense algunos modelos ...

Страница 51: ...ANTES de comenzar el ciclo La opción Steam 9DSRU DJUHJD KDVWD minutos al tiempo del ciclo Esta opción está disponible con los ciclos Heavy Pesado Auto Sense Sensor Automático y Normal Wash Zones Áreas de Lavado algunos modelos Seleccionar las Áreas de Lavado Superior o Inferior apuntará al lavado de un solo estante Esto acortará el tiempo del ciclo y ahorrará energía Esta opción debería ser usada ...

Страница 52: ...dará en OFF Apagado Luces y Sonidos del Ciclo Indicador Sanitized Desinfectado Se muestra al final del ciclo cuando la función Wash Temp Sani Sanitize HVLQIHFWDU KD D sido seleccionada y el lavavajillas haya cumplido con los requisitos de desinfección Para una descripción completa de esta opción lea Wash Temp Sani Sanitize HVLQIHFWDU Abrir la puerta o presionar cualquier tecla mientras la puerta e...

Страница 53: ...rta del dispensador del agente de enjuague 3 Lentamente agregue el agente de enjuague hasta que la taza esté llena Es posible que se deba pausar varias veces para permitir que la ayuda para el enjuague se asiente NOTA La ventana indicadora no se enciende 4 Limpie cualquier derrame producido por el agente de enjuague con una tela seca a fin de evitar que haya espuma dentro del lavavajillas 5 Cierre...

Страница 54: ... resultado de esto el rendimiento del lavado será muy deficiente Si decide usar detergente en polvo líquido o en gel la cantidad de detergente que use será determinada por la dureza del agua la temperatura del agua y la carga de suciedad de comida dentro del lavavajillas Para acceder a información sobre la dureza del agua en su área comuníquese con su compañía proveedora de agua La GXUH D GHO DJXD...

Страница 55: ...os más grandes A fin de ajustar el estante superior extienda completamente este último y retire las dos tapas de plástico del extremo en el frente de los rieles Retire el estante superior Seleccione el conjunto de rodillos en el constado del estante que provea la altura deseada y vuelva a instalar el estante superior guiando los rieles del estante entre el conjunto de rodillos adecuado Con el esta...

Страница 56: ...áreas difíciles de alcanzar Los sujetadores pueden ser instalados o retirados simplemente deslizando la abertura de los sujetadores sobre la parte superior de la boquilla USO DEL LAVAVAJILLAS Carga del lavavajillas Para obtener mejores resultados con el lavavajillas siga estas pautas de carga Las funciones y apariencia de los estantes y canastas de cubiertos pueden variar con relación a su modelo ...

Страница 57: ... el estante IMPORTANTE Es importante asegurar que los productos no sobresalgan más allá del fondo del estante o la canasta de plata en algunos modelos donde bloquearán la rotación del brazo inferior de rociado Además asegúrese de que los platos grandes ollas o ítems altos no golpeen el brazo intermedio de rociado Esto podría ocasionar ruidos Estante inférieur Configuraciones de 8 lugares GDF510 GD...

Страница 58: ...os podrán también ser usadas para utensilios pequeños tales como cucharas de medición tetinas de biberones tapas de plástico o recipientes de maíz Las tapas de las canastas de cubiertos en algunos modelos se pueden cerrar con utensilios pequeños adentro La canasta de cubiertos montada en la puerta en algunos modelos podrá ser posicionada tanto sobre la puerta asegurando la canasta a la puerta a tr...

Страница 59: ...o Si su número de modelo termina en SS entonces el panel de su puerta es de acero inoxidable Si su número de modelo termina en II entonces el panel de su puerta es integrado Siga las siguientes instrucciones para la limpieza del panel de la puerta correspondientes a su modelo específico Panel de la Puerta Pintado números de modelo con WHUPLQDFLyQ HQ 1HJUR JDOOHWD EODQFR SA plateado o ES pizarra Li...

Страница 60: ...la tapa cuando el espacio de aire esté limpio Controle el espacio de aire en cualquier momento en que su lavavajillas no esté drenando de forma correcta Espacio de aire Filtro Ultra Fino 3DUD OLPSLDU HO LOWUR 8OWUD LQR UHWLUH HO HVWDQWH LQIHULRU 7XHU D HO LOWUR 8OWUD LQR HQ GLUHFFLyQ FRQWUDULD D las agujas del reloj y levante el mismo para retirarlo Enjuague el filtro con agua caliente y jabón y u...

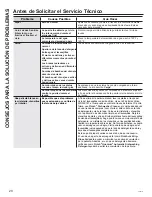
Страница 61: ...lida de residuos están atascados Limpie el espacio de aire o despeje la salida de residuos El bucle de drenaje alto o el espacio de aire no fueron instalados Consulte las Instrucciones de Instalación para instalar una línea de drenaje adecuada Carga inadecuada del estante Asegúrese de que los utensilios grandes no bloqueen el dispensador de detergente o los brazos de lavado Lea la sección de Carga...

Страница 62: ... Heated Dry Secado en Caliente 8VH OD RSFLyQ Wash Temp Boost Aumento de la Temperatura de Lavado Seleccione un ciclo más alto tal como Wash Temp Sani o Sanitize Temp 7HPSHUDWXUD GH DYDGR SDUD HVLQIHFWDU R Heavy Pesado El dispensador del agente de enjuague está vacío Controle el dispensador del agente de enjuague y llene como se requiere Selección ciclo Si usará la función Light cycle Ciclo con sua...

Страница 63: ...n sobre cómo ordenar lea la FRQWUDWDSD H IRUPD DOWHUQDWLYD DGTXLHUD Finish Dishwasher Cleaner y siga las instrucciones en la etiqueta El lavavajillas no funciona Se quemó el fusible o el disyuntor está desactivado Reemplace el fusible o reinicie el disyuntor Retire cualquier otro electrodoméstico del circuito El encendido está apagado En algunas instalaciones el encendido del lavavajillas es provi...

Страница 64: ...cados en el estante superior a fin de evitar el bombeo contra la puerta interna durante el ciclo de lavado Una película blanca en la cristalería utensilios y el interior Es posible que este problema sea ocasionado por un libre de fosfato de baja calidad A fin de eliminar la película blanca lave los platos a través del FLFOR GHO ODYDYDMLOODV FRQ iFLGR FtWULFR 8VH HO NLW GH iFLGR FtWULFR HO FXDO SXH...

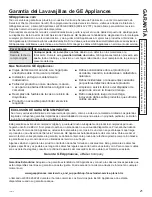
Страница 65: ...s o la IDEULFDFLyQ XUDQWH HVWD garantía limitada de un año GE Appliances también proveerá sin costo todo el trabajo y el servicio en el shogar relacionado con el reemplazo de la pieza que presente defectos Esta garantía se extiende al comprador original y a cualquier dueño subsiguiente de productos comprados para uso KRJDUHxR GHQWUR GH 88 6L HO SURGXFWR HVWi HQ XQ iUHD GRQGH QR VH HQFXHQWUD GLVSRQ...

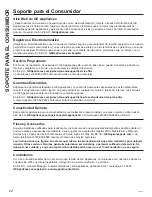
Страница 66: ...tá vigente La puede adquirir en cualquier momento a través de Internet Los servicios de GE Appliances aún estarán allí cuando su garantía caduque Q 88 GEAppliances com ge service and support shop for extended service plans htm R FRPXQtTXHVH DO GXUDQWH HO KRUDULR GH DWHQFLyQ FRPHUFLDO Conectividad Remota Para solicitar asistencia para la conectividad de red inalámbrica para modelos con acceso remot...

Отзывы: