background image

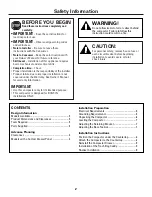
Safety Information

CAUTION:

For personal safety, remove house fuse or
oven circuit breaker before beginning
installation to avoid severe or fatal 
shock injury.

BEFORE YOU BEGIN

Read these instructions completely and 
carefully.

• IMPORTANT

– 

Save these instructions for 

local inspector’s use.

• IMPORTANT

– 

Observe all governing codes 

and ordinances.

Note to Installer

– Be sure to leave these 

instructions with the Consumer.

Note to Consumer

– Keep these instructions with

your Owner’s Manual for future reference.

Skill Level 

– Installation of this appliance requires

basic mechanical and electrical skills.

Completion time

– 1 hour.

• Proper installation is the responsibility of the installer.
• Product failure due to improper installation is not

covered under the Warranty. See Owner’s Manual 
for warranty information

.

IMPORTANT

• Use this compactor only for its intended purpose.
• This compactor is designed for BUILT-IN

installations ONLY.

2

CONTENTS

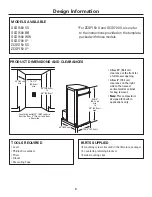
Design Information

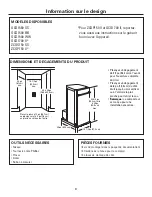
Models Available .............................................................. 3
Product Dimensions and Clearances............................ 3
Tools Required .................................................................. 3
Parts Supplied  .................................................................. 3

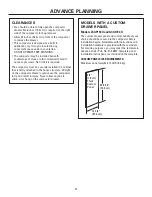
Advance Planning

Clearances ........................................................................ 4
Models with a Custom Drawer Panel .......................... 4

Installation Preparation 

Electrical Requirements  ................................................ 5
Grounding Requirements ................................................ 5
Unpacking the Compactor .............................................. 6
Leveling the Compactor .................................................. 7
Adjusting the Retaining Bracket .................................... 7
Adjusting the Base Toekick ............................................ 7

Installation Instructions

Position the Compactor under the Countertop............ 8
Attach the Compactor to the Countertop .................... 8
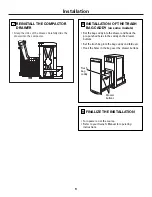
Reinstall the Compactor Drawer.................................... 9
Installation of the Trash Bag Caddy .............................. 9
Finalize Installation .......................................................... 9

WARNING!

Do not allow items to fall or collect behind
the compactor. Failure to follow this
instruction could result in a fire.

Содержание GCG1500 BB

Страница 1: ... Instructions 15 Built In Compactors GCG1580 SS GCG1500 BB GCG1500 WW GCG1700 II ZCGS150 SS ZCGP150 II For ZCGP150 II and GCG1700 II also refer to the instructions provided on the template packed with those models ...

Страница 2: ...ation is not covered under the Warranty See Owner s Manual for warranty information IMPORTANT Use this compactor only for its intended purpose This compactor is designed for BUILT IN installations ONLY 2 CONTENTS Design Information Models Available 3 Product Dimensions and Clearances 3 Tools Required 3 Parts Supplied 3 Advance Planning Clearances 4 Models with a Custom Drawer Panel 4 Installation ...

Страница 3: ...D 6 mounting screws located in the literature package 2 countertop retaining brackets 2 side mounting clips 34 86 4 cm to 35 88 9 cm 15 1 8 38 4 cm min 24 61 cm min Locate the outlet 18 45 7 cm min from the floor 3 7 6 cm min from either side 33 3 4 85 8 cm min to 35 88 9 cm max 14 7 8 37 8 cm 23 58 4 cm Allow 23 58 4 cm clearance at the front for a full drawer opening Allow 6 15 2 cm clearance on...

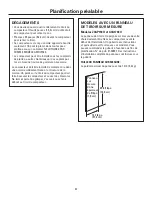
Страница 4: ...e compactor drawer Six inches 15 2 cm is required on the right side of the compactor for bag removal Allow 23 inches 58 4 cm in front of the compactor to remove the drawer This compactor is designed as a built in appliance only It may be located in any convenient space under a countertop DO NOT OPERATE FREE STANDING The compactor may be installed beneath countertops of stone or other materials tha...

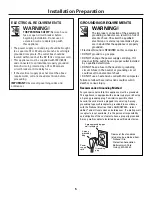
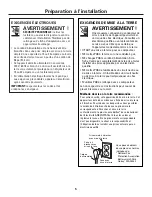
Страница 5: ...ompactor DO NOT ground to a gas pipe DO NOT change the power supply cord plug If it does not fit the outlet have a proper outlet installed by a qualified electrician DO NOT have a fuse in the neutral or grounding circuit A fuse in the neutral or grounding circuit could result in an electrical shock DO NOT use an extension cord with this compactor Failure to follow these instructions could result i...

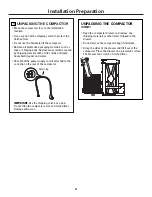
Страница 6: ... liquid household cleaner and water Check that the power supply cord is attached to the cord clip on the rear of the compactor IMPORTANT Use the shipping carton as a pad Do not slide the compactor across a finished floor Damage will occur Cord clip UNPACKING THE COMPACTOR CONT Open the compactor drawer and remove any shipping materials or other items shipped in the drawer Do not remove the compact...

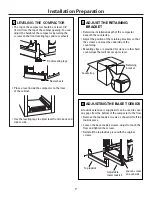
Страница 7: ... of the compactor beneath the countertop Adjust the position of the retaining brackets so that the screws can meet the underside of the countertop Mounting clips are provided for stone or other hard countertops that will not accept screws Retaining bracket Countertop ADJUSTING THE BASE TOEKICK 4 A toekick extension is supplied It can be used to cover any gaps from the bottom of the compactor to th...

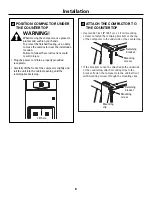
Страница 8: ...OR UNDER THE COUNTERTOP 5 WARNING When moving the compactor use gloves to protect and cushion your hands To protect the finished flooring use a dolly to move the compactor near the installation location Failure to follow these instructions could result in injury Plug the power cord into a properly grounded receptacle Carefully lift the front of the compactor slightly and roll the unit into the cab...

Страница 9: ...nd hook the pre punched holes in the caddy on the drawer buttons Set the trash bag into the bag caddy and fold over Hook the holes in the bag over the drawer buttons INSTALLATION OF THE TRASH BAG CADDY on some models 8 Drawer buttons Trash bag caddy Turn power on at the source Refer to your Owner s Manual for operating instructions FINALIZE THE INSTALLATION 9 ...

Страница 10: ...10 Notes ...

Страница 11: ...11 Notes ...

Страница 12: ...ed in this book safety glasses or goggles should be worn NOTE Product improvement is a continuing endeavor at General Electric Therefore materials appearance and specifications are subject to change without notice GE Consumer Industrial Appliances General Electric Company Louisville KY 40225 ge com ...

Страница 13: ...installation Compacteur intégré de 38 cm 15 po GCG1580 SS GCG1500 BB GCG1500 WW GCG1700 II ZCGS150 SS ZCGP150 II Pour ZCGP150 II et GCG1700 II reportez vous aussi aux instructions sur le gabarit fourni avec l appareil ...

Страница 14: ...mauvaise installation n est pas couverte par la garantie Consultez le manuel du propriétaire pour l information sur la garantie IMPORTANT Utilisez ce compacteur seulement aux fins prévues Ce compacteur est conçu SEULEMENT pour des installations ENCASTRÉES 2 CONTENU Information sur le design Modèles disponibles 3 Dimensions et dégagements du produit 3 Outils nécessaires 3 Pièces fournies 3 Planific...

Страница 15: ...ocumentation 2 fixations de retenue pour le comptoir 2 pinces de montage de côté 34 à 35 po 86 4 à 88 9 cm 15 1 8 po 38 4 cm min 24 po 61 cm min Placez la prise à 18 po 45 7 cm ou plus du sol et à 3 po 7 6 cm ou plus d un côté ou de l autre 33 3 4 po 85 8 cm min à 35 po 88 9 cm max 14 7 8 po 37 8 cm 23 po 58 4 cm Prévoyez un dégagement de 23 po 58 4 cm à l avant pour l ouverture complète du tiroir...

Страница 16: ...Il faut 6 pouces 15 2 cm du côté droit du compacteur pour retirer le sac Prévoyez 23 pouces 58 4 cm devant le compacteur pour retirer le tiroir Ce compacteur est conçu comme appareil encastré seulement On peut le placer dans tout espace pratique sous un comptoir NE L UTILISEZ PAS COMME MODÈLE AMOVIBLE Le compacteur peut être installé sous les comptoirs de pierre ou autres matériaux qui n acceptent...

Страница 17: ...re pour ce compacteur NE mettez PAS à la terre sur une conduite à gaz NE changez PAS le cordon d alimentation Si la fiche n entre pas complètement dans la prise faites installer une prise appropriée par un électricien qualifié NE mettez PAS de fusible dans un circuit neutre ou de mise à la terre Un fusible dans un circuit neutre ou de mise à la terre pourrait provoquer un choc électrique N utilise...

Страница 18: ...douce de nettoyant domestique et d eau Vérifiez que le cordon est fixé à la pince du cordon à l arrière du compacteur IMPORTANT utilisez le carton d expédition comme coussin Ne glissez pas le compacteur sur un plancher fini Cela causera des dommages Pince de cordon DÉBALLAGE DU COMPACTEUR SUITE Ouvrez le tiroir du compacteur et retirez tout matériau d expédition et autres articles expédiés dans le...

Страница 19: ...installation du compacteur sous le comptoir Ajustez la position des fixations de retenue pour que les vis puissent atteindre le dessous du comptoir Les pinces de montage sont fournies pour les comptoirs de pierre ou autres surfaces dures qui n acceptent pas les vis Fixation de retenue Comptoir AJUSTEMENT DE LA PLINTHE DE BASE 4 Une rallonge de plinthe est fournie Elle peut servir à couvrir tous le...

Страница 20: ...TISSEMENT En déplaçant le compacteur portez des gants pour protéger et matelasser les mains Pour protéger le fini du plancher utilisez un chariot pour déplacer le compacteur et le rapprocher du site d installation Le non respect de ces instructions peut mener à des blessures Branchez le cordon dans une prise correctement mise à la terre Soulevez soigneusement l avant du compacteur et roulez l appa...

Страница 21: ...ans le chariot sur les boutons du tiroir Déposez le sac d ordures dans le chariot du sac et repliez Accrochez les trous du sac sur les boutons du tiroir INSTALLATION DU CHARIOT DE SAC D ORDURES sur certains modèles 8 Boutons de tiroir Chariot de sac d ordures ménagères Coupez le courant à la source Reportez vous aux instructions de fonctionnement du manuel du propriétaire FINALISATION DE L INSTALL...

Страница 22: ...10 Remarques ...

Страница 23: ...11 Remarques ...

Страница 24: ...dans ce manuel portez des lunettes de sécurité REMARQUE l amélioration des produits est une recherche continue chez General Electric Donc le matériel l apparence et les spécifications sont sujets à changement sans préavis GE Consumer Industrial Appliances General Electric Company Louisville KY 40225 ge com ...

Отзывы: