background image

2

Notice

The materials contained in this document are intended for educational purposes only. This document does not 
establish specifications, operating procedures or maintenance methods for any of the products referenced.  
Always refer to the official written materials (labeling) provided with the product for specifications, operating 
procedures and maintenance requirements. No diagnostic statements are inferred or included in this material.  
All clinical diagnoses should be made by a trained physician or clinician.

Содержание CARESCAPE R860

Страница 1: ...gehealthcare com CARESCAPE R860 Ventilator O2 Therapy Quick Guide...

Страница 2: ...dures or maintenance methods for any of the products referenced Always refer to the official written materials labeling provided with the product for specifications operating procedures and maintenanc...

Страница 3: ...ow Oxygen Therapy After System Start up 8 Starting O2 Therapy from Invasive or Noninvasive Ventilation 10 Navigating O2 Therapy Present View 11 Stopping High Flow Oxygen Therapy 11 Stopping High Flow...

Страница 4: ...nt interface High flow oxygen therapy offers a number of physiological benefits such as pharyngeal dead space washout work of breathing reduction PEEP effect constant FiO2 and improvement of mucocilia...

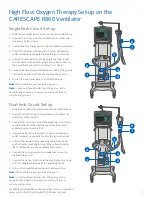
Страница 5: ...to the humidifier base 2 Connect Circuit Dry Line to humidification chamber and Inspiratory Safety Guard 3 Connect the inspiratory limb of the breathing circuit to the humidification chamber and the e...

Страница 6: ...te An inspiratory safety guard must be installed on the inspiratory port and any accessories that will be used Do not attach any accessories that prevent attachment of the patient wye to the occlusion...

Страница 7: ...e installed on the inspiratory port and any accessories that will be used 4 Select Start 5 Select the information icon to see the System Check Details menu a As the system check is running the results...

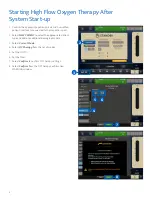
Страница 8: ...to the inspiratory port 2 Select NEW PATIENT to select the appropriate patient type and add any additional demographic data 3 Select Current Mode 4 Select O2 Therapy from the list of modes 5 Set the F...

Страница 9: ...ing High Flow Oxygen Therapy After System Start up cont 9 Complete a SYSTEM CHECK for the appropriate circuit type 10 Select START O2 THERAPY Note The system delivers Oxygen and the O2 Therapy Present...

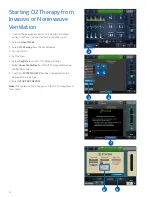
Страница 10: ...nt Mode 3 Select O2 Therapy from the list of Modes 4 Set the FiO2 5 Set the Flow 6 Select Confirm to confirm O2 Therapy settings 7 Select Pause Ventilationfromthe O2Therapy confirmation WARNING window...

Страница 11: ...graph is not patient airway pressure The pressure represents the resistance to flow provided by the cannula and the applied patient interface and may indicate an occlusion to the patient interface dur...

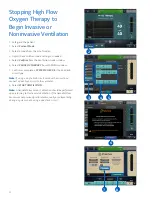
Страница 12: ...E O2 THERAPY from WARNING window 7 Confirm or complete a SYSTEM CHECK for the dual limb circuit type Note If using a single limb circuit remove the circuit and connect a dual limb circuit to the venti...

Страница 13: ...out notice or obligation To determine whether individual features are standard or optional consult with your GE Healthcare sales representative for the most current information GE the GE Monogram and...

Отзывы: