


8837 User Guide (BB2091-D)
Starting Imaging
7
Starting Imaging
All equipment must be cleaned and disinfected before use.
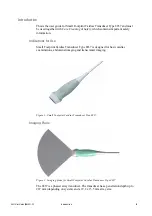
Connecting the Transducer
The transducer is connected to the system using the array transducer socket on the
system. To connect, the transducer plug’s locking lever should first be in a horizontal
position. Align the plug to the system socket and insert securely. Turn the locking
lever clockwise to lock in place.
When connected, the transducer complies with Type BF requirements of EN60601-1
(IEC 60601-1).
Changing Frequency
The multifrequency Imaging (MFI) facility enables you to select the imaging
frequency. See the applicable system user guide for instructions. The selected
frequency is displayed at the top of the screen.
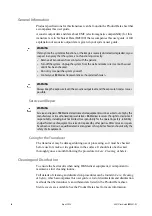
Using a Transducer Cover
The transducer should be enclosed in a transducer cover or a standard condom. See
the Product Data sheet for a list of available transducer covers.
Apply sterile gel to the tip of the transducer or fill the cover with 1 to 2 ml of sterile
water. This improves the screen images by preventing image artifacts caused by air
bubbles.
Pull the transducer cover over the transducer.
Gel also creates a good acoustic contact between the skin and the transducer;
therefore, apply a small amount to the outside of the cover prior to imaging. Re-apply
the gel frequently to ensure good screen images.
WARNING
Users of this equipment have an obligation and responsibility to provide the highest degree
of infection control possible to patients, co-workers and themselves. To avoid cross
contamination, follow all infection control policies for personnel and equipment established
for your office, department, or hospital.
WARNING
Keep all plugs and sockets absolutely dry at all times.
WARNING
Because of reports of severe allergic reactions to medical devices containing latex ( natural
rubber), FDA is advising health-care professionals to identify their latex-sensitive patients
and be prepared to treat allergic reactions promptly.


