background image


ATS125x 4-Door DGP Installation Manual 

11 

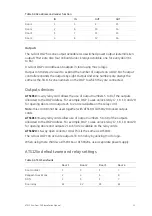
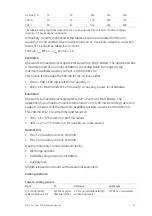
Table 5: RAS address and reader function 


IN IN OUT 

OUT 

Door 

1  1 5 9 13 

Door 

2  2 6 10 14 

Door 

3  3 7 11 15 

Door 

4  4 8 12 16 


Outputs 

The 4-door DGP has one output available as a switched power output (external siren 
output). There are also four onboard unlock relays available, one for every door (K1 
to K4). 
A 4-door DGP can address 48 outputs in total using macro logic. 
Output controllers are used to expand the number of outputs on a DGP. Each output 
controller expands the outputs by eight. Output and zone numbers are always the 
same as the first 16 zone numbers on the DGP to which they are connected. 

Outputs devices 

ATS1810:

 4-way relay card allows the use of output numbers 5 to 8 of the outputs 

allocated to the DGP address. For example, DGP 1 uses unlock relay 17, 18, 19, and 20 
for opening doors, and outputs 21 to 24 are available on the relay card. 

Note: 

this card cannot be used together with ATS1811/ATS1820 clocked output 

cards. 

ATS1811:

 8-way relay cards allow use of output numbers 5 to 48 of the outputs 

allocated to the DGP address. For example, DGP 1 uses unlock relay 17, 18, 19, and 20 
for opening doors and outputs 21 to 63 are available on the relay cards. 

ATS1820: 

16-way open collector card. This is the same as ATS1811. 

The 4-door DGP can activate outputs 33 to 63 only by utilizing macro logic. 
When using more than two ATS1811s or ATS1820s, use a separate power supply. 

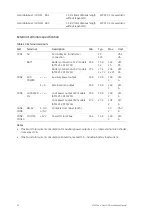
ATS125x default zone and relay settings 

Table 6: ATS125x defaults 


Door 1 

Door 2 

Door 3 

Door 4 

Door 

contact 

1 3 5 7 

Request-to-exit 

zone 

2 4 6 8 

DOTL 

1 3 5 7 

Door 

relay 

K1 K2 K3 K4 


Содержание ATS125 Series

Страница 1: ...GE Security ATS125x 4 Door DGP Installation Manual P N 1065711 REV 1 0 ISS 28APR09 ...

Страница 2: ... logo are trademarks of GE Security Other trade names used in this document may be trademarks or registered trademarks of the manufacturers or vendors of the respective products Intended use Use this product only for the purpose it was designed for refer to the data sheet and user documentation for details For the latest product information contact your local supplier or visit us online at www ges...

Страница 3: ...onnection 7 ATS125x local databus and earth connection 7 DIP switch settings 7 Connection diagrams 8 Zones RASs and outputs 10 Numbering 10 Outputs devices 11 ATS125x default zone and relay settings 11 Door numbering 12 Setup procedure 13 How to access the ATS125x programming menu 13 ATS125x programming menus 14 Initialise the database 14 Poll connected RASs 15 Troubleshooting 16 ATS system data b...

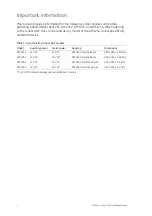
Страница 4: ...as any model of the ATS125x unless specifically stated otherwise Table 1 List of existing 4 door DGP models Model Auxiliary power Locks power Housing Dimensions ATS1251 12 V 12 V ATS1642 big enclosure 480 x 464 x 160 mm ATS1252 12 V 24 V ATS1642 big enclosure 480 x 464 x 160 mm ATS1253 12 V 12 V ATS1640 small enclosure 445 x 315 x 90 mm ATS1254 12 V 24 V ATS1640 small enclosure 445 x 315 x 90 mm F...

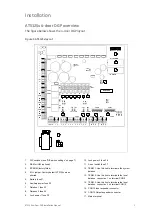
Страница 5: ...L RST 1 2 3 4 5 6 7 8 9 10 11 12 13 14 15 16 17 L N 1 DIP switches see DIP switch settings on page 7 2 RAM or IUM optional 3 EPROM factory fitted 4 KILL jumper Factory default ATS125x when shorted 5 Battery fuse F1 6 Auxiliary power fuse F2 7 Databus 1 fuse F3 8 Databus 2 fuse F4 9 Lock power 1 fuse F5 10 Lock power 2 fuse F6 11 Siren switch fuse F7 12 TERM 1 Use this link to terminate the system ...

Страница 6: ...mmon CON9 12V 0V D D Local databus to connect RASs and DGPs see page 7 for details CON10 12V 0V D D Local databus to connect RASs and DGPs see page 7 for details For 24 VDC models always use two batteries in series External siren output is a supervised output Typical EOL resistor is 1 kΩ Mains power connection Use the mains terminal to connect the mains supply A fixed cable or a flexible mains lea...

Страница 7: ...t or contact technical support for information on replacement batteries Important notes on mounting Mount the unit using screws or bolts through the four mounting holes in the base Ensure that the unit is mounted on a flat solid vertical surface so that the base will not flex or warp when the mounting screws or bolts are tightened Allow 50 mm clearance between equipment enclosures mounted side by ...

Страница 8: ...mains power connection use the mains connector terminal either through a permanent wiring or a flexible mains cable to an earthed mains outlet Always use cable ties to fix the mains cable at the dedicated fixing point provided near the mains terminal connector a In case when installing permanent fixed wiring insert an easily accessible dedicated bipolar circuit breaker in the power distribution ne...

Страница 9: ...is more than 100 m from the nearest panel or DGP Connect the negative terminal of the power supply to the wire of the databus 8 ATS125x TERM link fitted last device on system databus 9 ATS125x 4 Door DGP Note The local databus not shown has the same requirements The local databus is connected to CON9 CON10 of the ATS125x See ATS system databus connection ATS125x local databus and earth connection ...

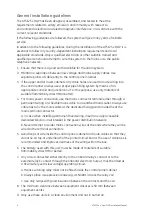
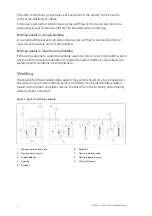
Страница 10: ...ings use more than one common earth system Use the ATS1740 isolator repeaters to isolate the system databus This protects the system against variations in earth potential Shielding The shield of all the shielded cables used in the system should only be connected on one side to one common earthing point in a building If a shielded databus cable is routed via more than one plastic device the shield ...

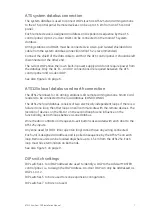
Страница 11: ... ATS125x allows for 16 arming stations LCD remote arming stations Smart Card readers to be connected to the local databus CON9 CON10 The ATS125x local databus consists of two electrically independent loops If there is a failure in one loop the other loop can still communicate with the remote devices The location of devices on the first or on the second loop has no influence on the functionality as...

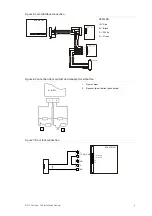
Страница 12: ... 3 4 1 ON SD 2 3 4 1 ON SD 2 3 4 DGP 9 DGP 10 1 ON SD 2 3 4 DGP 11 1 ON SD 2 3 4 1 ON SD 2 3 4 1 ON SD 2 3 4 1 ON SD 2 3 4 DGP 12 1 ON SD 2 3 4 1 ON SD 2 3 4 1 ON SD 2 3 4 1 ON SD 2 3 4 8 onboard inputs no expanders 8 onboard inputs 1 x ATS1202 8 onboard inputs 2 x ATS1202 8 onboard inputs 3 x ATS1202 Connection diagrams Figure 4 System databus connection PCB ATS125x 0V D D 8 ATS125x 4 Door DGP In...

Страница 13: ... 0V Black D White D Green Figure 6 Connection door contact and request to exit button ATS125x 1 C 2 1 2 1 Door contact 2 Request to exit button push button Figure 7 Door lock connection PCB ATS125x NO C NC NO C NC LOCK1 PWR LOCK2 PWR LOCK1 PWR ATS125x 4 Door DGP Installation Manual 9 ...

Страница 14: ... the ATS control panel identifies as zones 17 to 32 If all 32 zones are used the next DGP address is not available For example DGP1 zones 17 48 DGP2 is not available DGP3 zones 49 64 See ATS125x default zone and relay settings on page 11 for more details on default zone and unlock relay settings Note The ATS125x 4 door DGP has only 8 zones onboard Another 24 zones can be connected with ATS1202 zon...

Страница 15: ...of output numbers 5 to 8 of the outputs allocated to the DGP address For example DGP 1 uses unlock relay 17 18 19 and 20 for opening doors and outputs 21 to 24 are available on the relay card Note this card cannot be used together with ATS1811 ATS1820 clocked output cards ATS1811 8 way relay cards allow use of output numbers 5 to 48 of the outputs allocated to the DGP address For example DGP 1 use...

Страница 16: ...16 are reserved for RAS 1 to 16 and are connected to the ATS system databus These only provide basic access control door opening Doors 17 to 64 are used for door numbers and are controlled by a 4 door DGP ATS125x These doors provide enhanced access control functions such as anti passback Table 7 Door numbers allocated per DGP Device address Door number RAS 1 to 16 1 to 16 door open only Door 1 2 3...

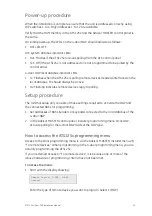
Страница 17: ... active Rx Flashing indicates remote devices reply to polling Setup procedure The minimal setup only consists of those settings required to activate the DGP and the connected RASs for programming 1 Set addresses of RASs readers or keypads connected to the local databus of the 4 Door DGP 2 In the Advisor MASTER control panel installer programming menu 19 4 DGP activate polling for the 4 Door DGP an...

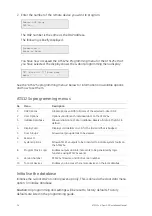
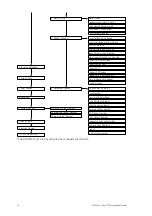
Страница 18: ...or on the ATS125x 3 Initialise Database Allows initialisation of door database Resets all data in the DGP to default 4 Display Card Displays card details on LCD for the last card that is badged 5 Door Groups Allows door group details to be viewed 6 Reserved 7 System Options Allows ATS125x outputs to be activated to indicate system faults on the ATS125x 8 Program Macro Logic Enables outputs and int...

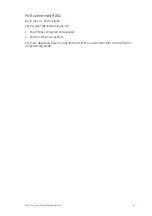
Страница 19: ...5 Poll connected RASs Go to menu 1 DGP options Set or select the following options 1 Enter RASs connected to be polled 2 Enter LCD RAS connected For more details on how to program the ATS125x 4 door DGP refer to the ATS125x Programming Guide ...

Страница 20: ...d in the control panel or has the wrong address Check if the DGP connected to the data bus has the correct address Check that the DGP is being polled ATS control Menu 19 4 4 door DGP local data bus indicator LEDs Tx The red Tx LED flashes when the ATS125x is polling remote devices readers and interfaces on the local databus The Tx LED should always be active Rx The yellow Rx LED flashes to indicat...

Страница 21: ...ng Time Low Security Timezone In Reader Card PIN Out Reader Card PIN In Reader No PIN If TZ Anti Pass Back In Region Out Region In Reader Two Cards Out Reader Two Cards 2 Request to Exit Options RTE Timezone In RTE Disabled When Armed Out RTE Disabled When Armed RTE Times Door Open RTE Reporting Select Door x x x x Shunt Until Door CLosed Cancel Shunt After Door Secures Out Reader No PIN If TZ In ...

Страница 22: ... 10 To Local Devices Zone Holds Door Unlocked Unlock Timezone Unlock Timezone After Entry Report Door closed locked Report Door Open Close Report DOTL Reader LED Options Pulsed Lock Unlock Relays Time Attendance Reader Reader Duress Door Unlocked Until Door Opens Map Open Unlocked to Unlocked Unlock Relay Number Zone Number Forced Output Number Shunt Zone Number s Warning Output Number DOTL Zone N...

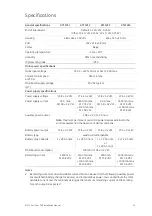
Страница 23: ...13 8 0 2 V 1600 mA max 27 6 V 1100 mA max 13 8 V Auxiliary power output 13 8 0 2 V 2 A max Note Maximum permanent current to power devices external to the control equipment in the absence of alarm conditions Battery power output 13 8 0 2 V 27 6 0 2 V 13 8 0 2 V 27 6 0 2 V Battery type Lead acid rechargeable Battery max capacity 1 x 26 Ah nom 2 x 26 Ah nom 1 x 7 2 Ah nom or 1 x 18 Ah nom 2 x 7 2 Ah...

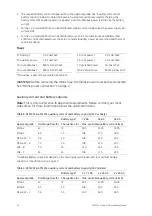
Страница 24: ...x5 Mains fuse is part of the mains terminal block WARNING Before removing the mains fuse the mains power must be disconnected See Mains power connection on page 2 Auxiliary current and battery capacity Note This is only a reference to approval requirements Please contact your local sales office for more information about the valid certification Table 8 ATS1251 ATS1253 auxiliary current and battery...

Страница 25: ...4 locks either 1400 800 600 mA is left 24 V auxiliary or 600 x 1 6 960 mA left 12 V auxiliary i e auxiliary power local databus Example 2 One wants to meet Approval grade NF A2P 2 with an 18 Ah battery The application has a maximum local comms load 12 V of 200 mA According Table 9 on page 20 it means that the maximum available auxiliary current is 400 mA 24 V This 200 mA 12 V local comms load resu...

Страница 26: ... V Ah Battery connection 24 V models ATS1252 ATS1254 27 4 27 6 2 x 7 2 27 8 2 x 25 V Ah CON2 AUX POWER Auxiliary power output 13 6 13 8 14 0 2 V A S S External siren output 13 6 13 8 14 0 1 V A CON3 LOCK PWR 1 2 Lock power output 12V models ATS1251 ATS1253 13 6 13 8 14 0 2 V A Lock power output 24V models ATS1252 ATS1254 27 4 27 6 27 8 2 V A CON4 CON5 RELAY C NO or NC Contacts door relays each 30 ...

Страница 27: ...ATS125x 4 Door DGP Installation Manual 23 ...

Страница 28: ...24 ATS125x 4 Door DGP Installation Manual ...

Отзывы: