background image

22

49-85209-1

Troubleshooting tips ...

 Before you call for service

TR

OUBLESHOO

TING TIPS

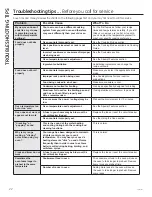
Save time and money! Review the charts on the following pages first and you may not need to call for service.

Problem

Possible Cause

What To Do

My new oven doesn't 
cook like my old one. 
Is something wrong 
with the temperature 
settings?

Your new oven has a different cooking 
system from your old oven and therefore 
may cook differently than your old oven.

For the first few uses, follow your recipe 
times and temperatures carefully. If you still 
think your new oven is too hot or too cold, 
you can adjust the temperature yourself to 
meet your specific cooking preference. 

Food does not bake 
properly

Oven controls improperly set.

See the Cooking Modes section.

Rack position is incorrect or rack is not 
level.

See the Cooking Modes section and Cooking 
Guide.

Incorrect cookware or cookware of improper 
size being used.

See the Cookware section.

Oven temperature needs adjustment.

See the Special Features section

.

Ingredient substitution

Substituting ingredients can change the 
recipe outcome.

Food does not broil 
properly

Oven controls improperly set.

Make sure you select the appropriate broil 
mode. 

Improper rack position being used.

See Cooking Guide for rack location 
suggestions.

Food being cooked in a hot pan.

Make sure cookware is cool.

Cookware not suited for broiling.

Use a pan specifically designed for broiling.

Aluminum foil used on the broiling pan and 
grid has not been fitted properly and  
slit as recommended.

If using aluminum foil conform to pan slits. 

In some areas the power  (voltage) may be 
low.

Preheat the broil element for 10 minutes.

Oven temperature too 
hot or too cold

Oven temperature needs adjustment.

See the Special Features section.

Oven does not work or 
appears not to work

A fuse in your home may be blown or the 
circuit breaker tripped.

Replace the fuse or reset the circuit breaker.

Oven controls improperly set.

See the Using the Oven section.

“Crackling” or 
“popping” sound

This is the sound of the metal heating 
and cooling during both the cooking and 
cleaning functions.

This is normal. 

Why is my range 
making a "clicking" 
noise when using my 
oven?

Your range has been designed to maintain 
a tighter control over your oven's 
temperature. You may hear your oven's 
heating elements "click" on and off more 
frequently than in older ovens to achieve 
better results during baking, broiling, and 
self-clean cycles.

This is normal.

Clock and timer do not 
work

A fuse in your home may be blown or the 
circuit breaker tripped.

Replace the fuse or reset the circuit breaker.

Sometimes the 
oven takes longer to 
preheat to the same 
temperature

Cookware or food in oven

The cookware or food in the oven will cause 
the oven to take longer to preheat. Remove 
items to reduce preheat time.

Number of racks in oven

Adding more racks to the oven will cause 
the oven to take longer to preheat. Remove 
some racks.

Содержание Artistry AGBS45DEFBS

Страница 1: ...e Cooktop 18 Cleaning The Door and Drawer 20 Maintenance 21 Troubleshooting Tips 22 Ranges Thermostat Gas Write the model and serial numbers here Model __________________ Serial ___________________ You can find them on a label on the side trim or on the front of the lower oven behind the oven door In Canada contact us at www GEAppliances ca For a Spanish version of this manual visit our Website at...

Страница 2: ... underneath the range to see that the rear leveling leg is engaged in the bracket On some models the storage drawer or kick panel can be removed for easy inspection If visual inspection is not possible slide the range forward confirm the anti tip bracket is securely attached to the floor or wall and slide the range back so the rear leveling leg is under the anti tip bracket If the range is pulled ...

Страница 3: ... gas If required these adjustments must be made by a qualified technician in accordance with the installation instructions and local codes The agency performing this work assumes responsibility for the conversion Have the installer show you the location of the range gas shut off valve and how to turn it off if necessary Ŷ Plug your range into a 120 volt grounded outlet only Do not remove the round...

Страница 4: ...nd bottom of the oven door and at the bottom of the range under the broil drawer lower oven drawer or kick panel Use only dry pot holders moist or damp pot holders on hot surfaces may result in burns from steam Do not let pot holders touch surface burners burner grate or oven heating element Do not use a towel or other bulky cloth in place of pot holders Do not touch the heating elements or the in...

Страница 5: ...zen foods with excessive amounts of ice Use proper pan size and avoid pans that are unstable or easily tipped Select cookware that is matched to the size of the burner Burner flames should be adjusted so that they do not extend beyond the bottom of the pan Excessive flame may be hazardous Always use the LITE position when igniting the top burners and make sure the burners have ignited When using g...

Страница 6: ...ms stored in an oven can ignite Do not leave items on the cooktop near the oven vent which is in the center of the backguard Items may overheat resulting in a risk of fire or burns When using cooking or roasting bags in the oven follow the manufacturer s directions Never broil with door open Open door broiling is not permitted due to overheating of control knobs The self cleaning feature on some m...

Страница 7: ...lness Do not leave paper products plastics canned food or combustible materials in the drawer They may ignite Do not touch the heating element or the interior surface of the drawer These surfaces may be hot enough to cause burns Use care when opening the drawer Open the drawer a crack and let hot air or steam escape before removing or replacing food Hot air or steam that escapes can cause burns to...

Страница 8: ...ions EXCLUSION OF IMPLIED WARRANTIES Your sole and exclusive remedy is product repair as provided in this Limited Warranty Any implied warranties including the implied warranties of merchantability or fitness for a particular purpose are limited to one year or the shortest period allowed by law This warranty is extended to the original purchaser and any succeeding owner for products purchased for ...

Страница 9: ...CCESSORIES Try the GE Appliances Website www geappliances com service_and_support 24 hours a day any day of the year For greater convenience and faster service you can now download Owner s Manuals order parts or even schedule service on line Have a question or need assistance with your appliance Accessories Looking For Something More GE offers a variety of accessories to improve your cooking and m...

Страница 10: ...ou will hear a clicking noise the sound of the electric spark igniting the burner When one burner is turned to LITE all burners will spark Sparking will continue as long as the knob remains at LITE Once gas is ignited turn the knob to adjust the flame size Use of the Surface Burners Your gas rangetop has sealed gas burners They offer convenience cleanability and flexibility for a wide range of coo...

Страница 11: ...er surface or oven cooking It conducts heat very slowly and cools very slowly Check cookware manufacturer s directions to be sure it can be used on gas ranges Stove Top Grills Do not use an after market stove top grill on your gas surface burners A stove top grill will cause incomplete combustion resulting in carbon monoxide levels above allowable standards This could be hazardous to your health U...

Страница 12: ...nts down a signal will indicate when one minute is left After this signal the display will count down in seconds When time runs out a final signal will sound Press the KITCHEN TIMER ON OFF pad to stop the signal To Change or Cancel the Kitchen Timer Setting When the timer is counting down use the and pad to change the remaining time or press the KITCHEN TIMER ON OFF pad to stop the timer The timer...

Страница 13: ...moving them down next time When baking with multiple pans and on multiple racks ensure there is sufficient space between pans to allow air to flow Oven Racks When placing and removing cookware pull the rack out to the bump stop position on the rack support To remove a rack pull it toward you tilt the front end up and pull it out To replace place the curved end of the rack stop locks onto the oven ...

Страница 14: ...he knob facing you hold the outer edge of the knob with one hand and turn the front of the knob with the other hand To increase the oven temperature move the top screw toward the right You ll hear a click for each notch you move the knob To decrease the oven temperature move the top screw toward the left Each click will change the oven temperature approximately 10 F Range is plus or minus 60 F fro...

Страница 15: ...through should be broiled on a rack position farther from the burner Cookware Cookware Guidelines The material finish and size of cookware affect baking performance Dark coated and dull pans absorb heat more readily than light shiny pans Pans that absorb heat more readily can result in a browner crisper and thicker crust If using dark and coated cookware check food earlier than minimum cook time I...

Страница 16: ...le chicken Bake 1 or 2 Leave uncovered use a low sided pan such as a broil pan Bone in chicken breasts legs thighs Broil Hi Bake B Broil skin side down first Watch food closely when broiling Boneless chicken breasts Broil Hi Bake B Move food down for more doneness less searing and up for greater searing browning when broiling Whole turkey Bake R or 1 Leave uncovered use a low sided pan such as a b...

Страница 17: ...soft cloth When cleaning surfaces make sure that they are at room temperature and not in direct sunlight If a stain on the door vent trim is persistent use a mild abrasive cleaner and a sponge scrubber for best results Spillage of marinades fruit juices tomato sauces and basting liquids containing acids may cause discoloration and should be wiped up immediately Let hot surfaces cool then clean and...

Страница 18: ...racks in and out of the oven Self Clean Mode on some models Read Self Cleaning Oven Safety Instructions at the beginning of this manual before using Self Clean Mode Self clean uses very high temperatures to clean the oven interior The oven door will lock when using this feature Before operating the self clean cycle pre wash inner door and inside window before self cleaning Wipe inner black door be...

Страница 19: ...s will discolor your burners The ports in the burner heads must be kept clean at all times for an even unhampered flame Clogged or dirty burner ports or electrodes will not allow the burner to operate properly For proper ignition make sure the small hole in the notch that fits over the electrode is kept open A sewing needle or wire twist tie works well to unclog it After cleaning Before putting th...

Страница 20: ...hing detergent over any baked on spatters on the glass Use a single sided safety razor blade to clean it off Then wipe over the glass with a soapy cloth to remove any residue and dry off The area outside the gasket can be cleaned with a soap filled plastic scouring pad Removable Broiler Drawer on some models To remove 1 When the broiler is cool remove the grid and pan 2 Pull the broiler drawer out...

Страница 21: ...is completely cool Bulb Socket Tab 31ø2 Max length Glass cover Maintenance CARE AND CLEANING Maintenance To Remove the Door 1 Fully open the oven door 2 On each hinge slide the hinge lock up making sure it snaps into its fully raised position 3 Firmly grasp both sides of the door at near the top 4 Close door until the top of the door is approximately 3 from the range frame 5 Lift door up and away ...

Страница 22: ... broiling Use a pan specifically designed for broiling Aluminum foil used on the broiling pan and grid has not been fitted properly and slit as recommended If using aluminum foil conform to pan slits In some areas the power voltage may be low Preheat the broil element for 10 minutes Oven temperature too hot or too cold Oven temperature needs adjustment See the Special Features section Oven does no...

Страница 23: ...ow locking temperature Oven not clean after a clean cycle Oven controls improperly set See the Cleaning the Oven section Oven was heavily soiled Clean up heavy spillovers before starting the clean cycle Heavily soiled ovens may need to self clean again Burning or oily odor emitting from the vent This is normal in a new oven and will disappear in time See the Cleaning the Oven section This is tempo...

Страница 24: ... cleaning of the range section For lower oven drawer models remove the rear access panel by unscrewing the thumb screws in the upper left and right corners Look for the gas shut off lever at the back of the range Burners do not light Plug on range is not completely inserted in the electrical outlet Make sure electrical plug is plugged into a live properly grounded outlet Gas supply not connected o...

Отзывы: