background image

InStaLLIng tHE WaSHEr

1.

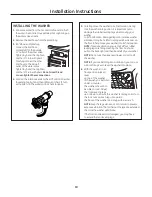
Run some water from the hot and cold faucets to flush

the water lines and remove particles that might clog up

the water valve screens.

2.

Remove the inlet hoses from the plastic bag.

3.

(90° elbow end) Carefully

connect the inlet hose

marked HOT to the outside

“H” outlet of the water valve.

Tighten by hand, then tighten

another 2/3 turn with pliers.

Carefully connect the other

inlet hose to the inside “C”

outlet of the water valve.

Tighten by hand; then tighten

another 2/3 turn with pliers. 

Do not crossthread 

or over-tighten these connections.

4.

Connect the inlet hose ends to the HOT and COLD water

faucets tightly by hand, then tighten another 2/3 turn

with pliers. Turn the water on and check for leaks.

5.

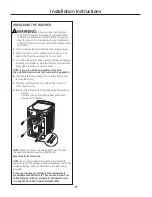
Carefully move the washer to its final location. Gently

rock the washer into position. It is important not to

damage the rubber leveling legs when moving your

washer 

to its final location. Damaged legs can increase washer

vibration. It may be helpful to spray window cleaner on

the floor to help move your washer into its final position.

nOtE: 

To reduce vibration, ensure that all four rubber

leveling legs are firmly touching the floor. Push and 

pull on the back right and then back left of your washer.

nOtE: 

Do not use the dispenser drawer or door to lift 

the washer.

nOtE: 

If you are installing into a drain pan, you can use 

a 24-inch long 2x4 to lever the washer into place.

6.

With the washer in its

final position, place a

level 

on top of the washer 

(if the washer is installed

under a counter, 

the washer should not

be able to rock). Adjust

the front leveling legs 

up or down to ensure the washer is resting solid. Turn

the lock nuts on each leg up towards 

the base of the washer and snug with a wrench.

nOtE: 

Keep the leg extension at a minimum to prevent

excessive vibration. The farther out the legs are extended,

the more the washer will vibrate.
If the floor is not level or is damaged, you may have 

to extend the rear leveling legs.

19

Installation Instructions

Содержание Appliances WBVH5300

Страница 1: ...uirements 18 Electrical Requirements 18 Water Supply Requirements 18 Installing the Washer 19 20 Replacement Parts 20 Troubleshooting Tips 21 24 Consumer Support Warranty 25 Service Telephone Numbers 26 Owner s Manual Installation Instructions Write the model and serial numbers here Model __________________ Serial __________________ You can find them on a label on the side of the washer As an EnEr...
Страница 2: ...drogen gas can be explosive under these circumstances If the hot water has not been used for two weeks or more prevent the possibility of damage or injury by turning on all hot water faucets and allowing them to run for several minutes Do this before using any electrical appliance which is connected to the hot water system This simple procedure will allow any built up hydrogen gas to escape Since ...

Страница 3: ...es NOT disconnect the appliance from the power supply n Never attempt to operate this appliance if it is damaged malfunctioning partially disassembled or has missing or broken parts including a damaged cord or plug n Do not slam the washer door closed Do not try to force the door open when locked LOCKED indicator ON This could result in damage to the washer n The washer is equipped with an electri...

Страница 4: ...ind the illustration that closely matches your model and see the cycle descriptions starting on page 6 for details Consumer Support Troubleshooting Tips Operating Instructions Safety Instructions Installation Instructions On some models ...

Страница 5: ...5 Consumer Support Troubleshooting Tips Operating Instructions Safety Instructions Installation Instructions GEAppliances com ...
Страница 6: ...hes EaSy CarE For wrinkle free and permanent press items PErMa PrESS some models aCtIVE WEar For active sports exercise and some casual wear clothes Fabrics include modern some models technology finishes and fibers such as spandex stretch and micro fibers DELICatES For lingerie and special care fabrics with light to normal soil Provides gentle some models tumbling and soak during wash and rinse Ha...

Страница 7: ...reached the desired setting The Sanitized wash temperature is not available on certain cycles such as Delicates When selecting the Sanitize wash temperature on some models the washer increases the water temperature to sanitize and kill more than 99 of many common bacteria found in home laundry The sanitize wash temperature is only available on Stain Wash and Whites wash cycles For best results sel...

Страница 8: ... restart the countdown Lock You can lock the controls to prevent any selections from being made Or you can lock the controls after you have started a cycle children cannot accidentally start the washer by touching pads with this option selected To lock the washer press and hold the DELAY START button for 3 seconds on some models use SIGNAL button To unlock the washer controls press and hold the DE...

Страница 9: ...HE detergent settings You must reduce the amount of detergent for 2x or 3x detergent per bottle instructions Move the insert by pulling it up and replace it by sliding it down between either the rear or front detergent compartment molded rails as desired for powder or liquid detergent n Add measured detergent to the front left detergent compartment of the dispenser drawer n Detergent is flushed fr...

Страница 10: ...mptly wash wet or stained garments to maximize results n mix garments using recommended maximum load sizes on page 11 n use nylon mesh garment bags to wash small items n Wash multiple garments at one time for best results Sort laundry into loads that can be washed together Follow these steps to maximize garment care Consumer Support Troubleshooting Tips Operating Instructions Safety Instructions I...

Страница 11: ...structions WOrkWEar 4 Jeans 5 Workwear Shirts 5 Workwear Pants LInEnS 2 Bath Sheets 10 Bath Towels 12 Washcloths 7 Hand Towels 2 Terrycloth Bath Mats Or 2 Flat queen Sized Sheets 2 Fitted queen Sized Sheets 4 Pillowcases MIxED LOaD 4 Pillowcases 2 Hand Towels 2 Flat Sheets 2 Fitted Sheets 2 Bath Towels 4 Washcloths Or 6 Shirts Men s or Women s 4 Pair Pants Khakis or Twills 5 T Shirts 7 Pairs of Bo...

Страница 12: ...d not flood the floor BasketClean may be interrupted by pressing the START PAUSE button in between cycles A power outage in the house might also interrupt the cycle When the power supply is back the BasketClean cycle resumes where it had stopped When interrupted be sure to run a complete BasketClean cycle before using the washer If the POWER button is pressed during BasketClean the cycle will be l...

Страница 13: ...ain 5 Clean the debris from the filter 6 Replace the filter and turn clockwise Tighten securely 7 Flip up the pour spout 8 Close the access door Pour spout Pour spout Cleaning the Door Gasket Open the washer door Using both hands press down the door gasket Remove any foreign objects if found trapped inside the gasket Make sure there is nothing blocking the holes behind the gasket While holding dow...

Страница 14: ...leach and fabric softener compartments and the detergent insert Rinse the inserts and the drawer with hot water to remove traces of accumulated laundry products n To clean the drawer opening use a small brush to clean the recess Remove all residue from the upper and lower parts of the recess n Return inserts to the proper compartments Replace the dispenser drawer Lock tab is visible only after dra...

Страница 15: ...rly grounded and installed as described in these Installation Instructions Do not install or store the appliance in an area where it will be exposed to water weather See the Location of Your Washer section nOtE this appliance must be properly grounded and electrical service to the washer must conform with local codes and ordinances and the latest edition of the national Electrical Code anSI nFPa 7...

Страница 16: ...brate or move you may have to reinforce the floor nOtE If floor is in poor condition use 3 4 impregnated plywood sheet solidly attached to the existing floor covering IMPOrtant Minimum Installation Clearances When installed in alcove Sides Rear Top 0 0 cm When installed in closet Sides Rear Top 0 0 cm Front 1 2 54 cm Closet door ventilation openings required 2 louvers each 60 square in 387 cm2 loc...

Страница 17: ...uctions that come with the pedestal 4 Carefully return the washer to an upright position and remove the carton 5 Carefully move the washer to within 4 feet 122 cm of the final location 6 Remove the following from the back side of the washer 4 bolts 4 plastic spacers including rubber grommets 4 power cord retainers nOtE Failure to remove the shipping braces can cause the washer to become severely u...

Страница 18: ...r the grounding prong on the power supply cord In situations where a two slot receptacle is present it is the owner s responsibility to have a licensed electrician replace it with a properly grounded three prong grounding type receptacle read these instructions completely and carefully grOUnDIng rEQUIrEMEntS WatEr SUPPLy rEQUIrEMEntS Hot and cold water faucets MUSt be installed within 42 inches 10...
Страница 19: ...to its final location Damaged legs can increase washer vibration It may be helpful to spray window cleaner on the floor to help move your washer into its final position nOtE To reduce vibration ensure that all four rubber leveling legs are firmly touching the floor Push and pull on the back right and then back left of your washer nOtE Do not use the dispenser drawer or door to lift the washer nOtE...

Страница 20: ...It contains valuable and helpful information that will save you time and money 11 Before starting the washer check to make sure o Main power is turned on o The washer is plugged in o The water faucets are turned on o The unit is level and all four leveling legs are firmly on the floor o The shipping support hardware is removed and saved o The drain hose is properly tied up o There are no leaks at ...

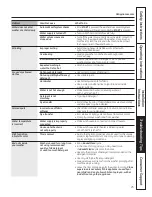
Страница 21: ...ain hose is Make sure hose connections are tight at washer and improperly connected faucets and make sure end of drain hose is correctly inserted in and secured to drain facility Household drain may Check household plumbing You may need to call be clogged a plumber Dispenser clogged Powder soap may cause clogs inside the dispenser and cause water to leak out the front of the dispenser Remove drawe...

Страница 22: ...t working or dead Water supply is turned off Turn both hot and cold faucets fully on Circuit breaker fuse is Check house circuit breakers fuses Replace fuses or tripped blown reset breaker Washer should have separate outlet automatic self system checks First time the washer is plugged in automatic checks occur It may take up to 20 seconds before you can use your washer This is normal operation Sna...

Страница 23: ...ter is delivering water at 120 140 F 48 60 C Detergent is not Try a liquid detergent dissolving Dye transfer Sort clothes by color If fabric label states wash separately unstable dyes may be indicated Colored spots Incorrect use of fabric Check fabric softener package for instructions and follow softener directions for using dispenser Dye transfer Sort whites or lightly colored items from dark col...

Страница 24: ...ver put detergent above max line this is normal It is normal operation to see detergent leak on door gasket about 20 seconds after filling the dispenser Improper dispensing of Dispenser clogged Monthly clean the dispenser drawer to remove buildup softener or bleach of chemicals Softener or bleach is filled above Make sure to have the correct amount of softener or bleach the max line Softener or bl...

Страница 25: ...te consumer affairs office or your state s attorney General n Service trips to your home to teach you how to use the product n Improper installation delivery or maintenance n Failure of the product if it is abused misused or used for other than the intended purpose or used commercially n Damage after delivery n replacement of house fuses or resetting of circuit breakers n Damage to the product cau...

Страница 26: ...that are available while your warranty is still in effect You can purchase it on line anytime or call 800 626 2224 during normal business hours GE Consumer Home Services will still be there after your warranty expires Parts and accessories GEAppliances com Individuals qualified to service their own appliances can have parts or accessories sent directly to their homes VISA MasterCard and Discover c...

Страница 27: ... 8 10 Carga y uso de la lavadora 10 11 Limpieza de la lavadora 12 14 Instrucciones de instalación 15 20 Preparación para la instalación de la lavadora 15 Dimensiones aproximadas 16 Ubicación de la lavadora 16 Desembalaje de la lavadora 17 Requisitos de desagüe 18 Requisitos de suministro de agua 18 Requisitos eléctricos 18 Instalación de la lavadora 19 20 Piezas de repuesto 20 Consejos para la sol...

Страница 28: ...eno puede resultar explosivo en determinadas circunstancias Si el agua caliente no se ha utilizado por dos semanas o más prevenga la posibilidad de sufrir daños o lesiones abriendo todos los grifos de agua caliente y dejándola correr durante varios minutos Realice este proceso antes de utilizar cualquier electrodoméstico que se conecte al sistema de agua caliente Este sencillo procedimiento le per...

Страница 29: ...ado NO se desconecta la lavadora de la corriente n No intente en ningún caso utilizar la lavadora si está dañada funciona incorrectamente está parcialmente desmontada le faltan piezas o algunas están rotas incluidos el cable o el enchufe n No cierre la puerta bruscamente No intente forzar la puerta para abrirla cuando esté bloqueada el indicador LOCKED Bloqueada está ENCENDIDO Puede dañar la lavad...

Страница 30: ...ajusta a su modelo y para más detalles vea las descripciones de ciclo que comienzan en la página 6 Servicio al consumidor Consejos para la solución de problemas Instrucciones de funcionamiento Instrucciones de seguridad Instrucciones de instalación 4 en algunos modelos ...

Страница 31: ...Servicio al consumidor Consejos para la solución de problemas Instrucciones de funcionamiento Instrucciones de seguridad Instrucciones de instalación GEAppliances com 5 ...

Страница 32: ...do un planchado permanente peRmanente algunos modelos Ropa de ejeRcicio Para prendas que se utilicen a la hora de practicar deportes ejercicios algunos modelos así como algunas prendas sport Entre los tejidos se incluyen acabados y fibras de última tecnología como spandex telas elásticas y microfibras pRendas deLicadas Para lencería y telas de cuidado especiales con poca o normal suciedad algunos ...

Страница 33: ... La temperatura de lavado de desinfección no está disponible en determinados ciclos como Delicates Prendas delicadas Al seleccionar la temperatura de Sanitize Esterilización en algunos modelos la lavadora aumenta la temperatura del agua para esterilizar y eliminar más del 99 de las bacterias que aparecen de forma frecuente en los lavados hogareños La temperatura de esterilización está disponible e...

Страница 34: ...el ciclo que prefiera establezca los valores deseados para los ajustes de ciclo de lavado nivel de suciedad velocidad de giro y temperatura de lavado y mantenga pulsado el botón MY CYCLE Mi ciclo durante 3 segundos Sonará un pitido para indicar que el ciclo se ha guardado Para utilizar el ciclo personalizado pulse el botón MY CYCLE Mi ciclo antes de lavar una carga Para cambiar el ciclo guardado e...

Страница 35: ...ción 2x ó 3x usted deberá reducir la cantidad de detergente según las instrucciones del envase Mueva la pieza sacándola y deslizándola entre las ranuras del compartimento de detergente delantero o trasero según desee para detergente líquido o en polvo n Añada la medida de detergente al compartimento de detergente delantero izquierdo del depósito n El detergente se añade desde el depósito al comien...

Страница 36: ...ierta la cantidad recomendada de suavizante líquido en el compartimento con la etiqueta Fabric Softener Suavizante Utilice sólo suavizante líquido en el depósito dilúyalo con agua hasta la línea de llenado máximo no sobrepase la línea de llenado máximo Un llenado excesivo puede hacer que el suavizante se administre demasiado pronto y manche las prendas NOTA no vierta directamente el suavizante sob...

Страница 37: ...Instrucciones de instalación GEAppliances com Ropa de tRabajo 4 Jeans 5 camisas de trabajo 5 pantalones de trabajo Ropa de cama 2 toallones grandes 10 toallas de baño 12 toallitas 7 toallas de mano 2 alfombras de baño de toalla o 2 sábanas rectas tamaño Queen 2 sábanas ajustables tamaño Queen 4 fundas de almohada caRga miXta 4 fundas de almohada 2 toallas de mano 2 sábanas rectas 2sábanasajustable...

Страница 38: ...e la lavadora y verifique que el tambor de la lavadora se encuentre vacío 2 Abra la puerta de la lavadora y vierta en la canasta una taza o 250 ml de líquido blanqueador u otro limpiador para lavadoras 3 Cierre la puerta por completo y vuelva a iniciar el ciclo BasketClean Presione el botón START inicio 4 Cuando el ciclo BasketClean se encuentra en funcionamiento podrá verse CLn en la pantalla El ...

Страница 39: ...car el filtro y gire en sentido de las agujas del reloj Ajuste bien 7 Eleve el pico vertedor 8 Cierre la puerta de acceso Pico vertedor Pico vertedor Cómo limpiar la junta de la puerta Abra la puerta de la lavadora Usando ambas manos presione la junta de la puerta hacia abajo Quite los objetos extraños que encuentre atrapados dentro de la junta Asegúrese de que no haya ningún objeto bloqueando los...

Страница 40: ... detergente Lave las piezas y el depósito con agua caliente para eliminar los restos de productos de limpieza acumulados n Para limpiar la abertura del depósito utilice un cepillo pequeño a fin de limpiar los huecos Retire todos los restos de las partes superior e inferior del hueco n Vuelva a colocar las piezas en los compartimentos correspondientes Introduzca de nuevo el depósito de detergente L...

Страница 41: ... debe conectar a tierra e instalar correctamente tal y como se describe en estas Instrucciones de instalación No instale ni guarde este electrodoméstico en una zona en la que esté expuesto al agua o al exterior Consulte la sección Ubicación de la lavadora nota este electrodoméstico debe estar correctamente conectado a tierra y la corriente eléctrica de la lavadora debe cumplir los códigos y ordena...

Страница 42: ... suelo se encuentra en mal estado utilice una plancha con 3 4 de contrachapado bien fija al revestimiento existente en el suelo impoRtante distancias mínimas de separación para la instalación Cuando se instale en alcoba costados parte trasera parte superior 0 0 cm Cuando se instale en un armario costados parte trasera parte superior 0 0 cm parte delantera 1 2 54 cm Aberturas de ventilación necesar...

Страница 43: ...trucciones de instalación correspondientes de la misma 4 Vuelva a levantar la lavadora con cuidado y retire la caja de cartón 5 Desplace poco a poco la lavadora hasta 4 pies 122 cm de su ubicación definitiva 6 Quite las siguientes piezas de la parte trasera de la lavadora 4 pernos 4 separadores de plástico incluidas las arandelas de goma 4 sujeciones del cable de alimentación nota Si se retiran in...

Страница 44: ...ro mínimo de tubería vertical de 1 1 4 3 18 cm 3 La altura de la tubería vertical desde el suelo debe ser Altura mínima 24 61 cm Altura máxima 96 244 cm nota La tubería de desagüe de la lavadora puede alcanzar la altura de una tubería vertical de 58 147 cm Para una tubería vertical más alta póngase en contacto con un distribuidor de piezas autorizado 96 in 244 cm Max 24 in 61 cm Min PARTE TRASERA ...

Страница 45: ...final Si las patas se dañan podría aumentar la vibración de la lavadora Podría ser útil rociar el piso con limpiador para ventanas a fin de trasladar más fácilmente su lavadora a su ubicación final nota Para reducir la vibración asegúrese de que cada una de las cuatro patas niveladoras estén en contacto con el piso Empuje y tire de la parte posterior derecha y luego de la parte posterior izquierda...

Страница 46: ...itar en Estados Unidos a través del sitio Web GEAppliances com o llamando a 800 GE CARES piezas de Repuesto 9 Conecte la alimentación a un interruptor caja de fusibles 10 Lea el resto del Manual del propietario Contiene información valiosa y útil que supondrá un ahorro de tiempo y dinero 11 antes de poner en funcionamiento la lavadora asegúrese de comprobar lo siguiente o La alimentación está cone...

Страница 47: ... podría gotear de la puerta cuando la misma no está dañada está abierta Esto forma parte del funcionamiento normal Con cuidado limpie el burlete de la puerta A veces en el mismo queda suciedad o ropa que pueden provocar un pequeño goteo Revise la parte posterior Si esta área se encuentra mojada existe una condición izquierda de la lavadora para de espuma excesiva Utilice menos cantidad de verifica...

Страница 48: ...ibuido la carga once o quince veces Esto forma parte del funcionamiento normal No debe hacer nada la máquina terminará el ciclo de lavado obstrucción de la bomba Para obtener información sobre la limpieza del Filtro de la Bomba lea la página 13 La tubería de desagüe está torcida Enderece la tubería de desagüe y asegúrese de que o no se ha conectado correctamente la lavadora no está situada sobre l...

Страница 49: ...or La lavadora se detiene obstrucción de la bomba Para obtener información sobre la limpieza del Filtro de o se debe reiniciar o la Bomba lea la página 13 la puerta de la lavadora lavadora está bloqueada y no se abre La puerta no se destraba esto es normal Las lavadoras con tapa frontal comienzan su o presiona START inicio y funcionamiento de manera diferente que las lavadoras la máquina no funcio...

Страница 50: ...lo BasketClean de la lavadora un período prolongado En caso de un fuerte olor puede necesitarse no se utiliza una calidad el funcionamiento del ciclo BasketClean más de una vez recomendada de detergentes Use sólo la cantidad de detergente recomendada he alta eficiencia o se está en el recipiente del detergente usando demasiado detergente Use sólo detergente HE alta eficiencia Siempre quite rápidam...

Страница 51: ... mostrarle cómo utilizar el producto n instalación envío o mantenimiento incorrectos n fallas del producto por manipulación uso incorrecto o distinto al destinado o previsto comercialmente n daños tras la entrega n sustitución de los fusibles de la vivienda o restablecimiento de los interruptores n daños causados por accidentes incendios inundaciones o fenómenos naturales n daños emergentes o fort...

Страница 52: ... cualquier momento o llamar al 800 626 2224 durante horas normales de oficina GE Consumer Home Services estará aún ahí cuando su garantía termine Piezas y accesorios GEAppliances com Aquellos individuos con la calificación necesaria para reparar sus propios electrodomésticos pueden pedir que se les manden las piezas o accesorios directamente a sus hogares aceptamos las tarjetas VISA MasterCard y D...

Отзывы: