background image

Содержание Appliances JGBS04

Страница 1: ...Assemble Surface Burners 43 44 Checking Burner Ignition 44 Connecting the Range to Gas 39 42 Dimensions and Clearances 38 Electrical Connections 43 Leveling the Range 46 LP 39 Troubleshooting Tips 47...

Страница 2: ...anti tip arm attached to the side panel is engaged in the bracket On some models the storage drawer or kick panel can be removed for easier inspection If visual inspection is not possible slide the r...

Страница 3: ...ved from the range before operating to prevent ignition of these materials _ Avoid scratching or impacting glass doors cooktops or control panels Doing so may lead to glass breakage Do not cook on a p...

Страница 4: ...ns IA WARNING iCOOKTOP SAFETY INSTRUCTIONS Never leave the surface burners unattended at medium or high heat settings Foods especially oily foods may ignite resulting in fire that could spread to surr...

Страница 5: ...iny metal oven racks and other utensils from the oven Only porcelain coated oven racks may be left in the oven Do not use self clean to clean other parts such as grates Before operating the self clean...

Страница 6: ...ll the burners spark Do not attempt to disassemble or clean around any burner while another burner is on An electric shock may result which could cause you to knock over hot cookware Medium Small Larg...

Страница 7: ...e sure it can be used on gas ranges Stainless Steel This metal alone has poor heating properties and is usually combined with copper aluminum or other metals for improved heat distribution Combination...

Страница 8: ...may have been moved even if only slightly from the latchedposition Makesure the latch is moved to the right as far as it will go Touch the Clear Off pad Allow the oven to cool for one hour Put the ov...

Страница 9: ...this point Glowswhen the oven is in the self cleancycle After the self clean cycle the light will turn off Unlatch the door Clear Off Pad Touch this pad to cancel ALL oven operations except the clock...

Страница 10: ...essingand continuing to hold the pad increases the setting 10 minutes at a time Once you have set your timer pressthe KITCHENTIMERON OFFpad to start timing As the timer counts down a signal will indic...

Страница 11: ...shelf R position Plastic items on the cooktop may melt if left too close to the vent Vent appearance and location vary Upper Oven Vent Your oven is vented through ducts at the rear of the range Do no...

Страница 12: ...mplete NOTE A cooling fan may automatically turn on and off to cool internal parts Thisis normal and the fan may continue to run even after the oven is turned off When baking on o single rack baking r...

Страница 13: ...s the oven continues to heat up Ifyour model has a door latch do not lock the oven door with the latch during broiling The latch is used for self cleaning only On some models your range has a compartm...

Страница 14: ...oasting Food Beef Steaks or ground beef patties Desired Doneness Rare Medium Rare Medium Well Done Broil Rack Comments Setting Position Hi E Hi D E Hi D Steaks less than 1 thick may cook through befor...

Страница 15: ...cing food close to the burner increases exterior browning of the food but also increases splattering and the possibility of fats igniting Thicker foods and _ Closethe oven and broiler compartment door...

Страница 16: ...f you have several clocks in your kitchen you may wish to turn off the time of day clock display on your range ry Touch the Clock pad once to turn off the time of day display Although you will not be...

Страница 17: ...the display recall the remaining time by touching the Kitchen Timer On Off pad and then touching the or pads to enter the new time you want To Cancel the Timer Touch the Kitchen Timer On Off pad twic...

Страница 18: ...rammed amount of time then turn off automatically r_ Touch the Clear Offpad to clear the display if necessary Remove the food from the oven Remember even though the oven shuts off automatically foods...

Страница 19: ...stment feature are also Special Features but they are addressed separately in the following sections 12 Hour Shut Off __Bake_ _ Broil_ With thisfeature should you forget and leave r_ omp Rooo _Lo the...

Страница 20: ...Bake pad and tap the or pads to increase or decrease the temperature in 25 increments Touch the Start On pad NOTE The Clear Off and Cooking Time pads are active during the Sabbath feature How to Set...

Страница 21: ...ld both the Bake and Broil Hi Lo pads at the same time until the display shows SF _ Tap the Clock pad until ON or OFFappears in the display ON indicates that the oven will automatically turn off after...

Страница 22: ...ide To make an adjustment loosen approximately one turn but do not completely remove the two screws on the back of the knob With the back of the knob facing you hold the outer edge of the knob with on...

Страница 23: ...at cold food other than crisping crackers chips or dry cereal Allow approximately 25 minutes for the worming drawer to preheat Do not put liquid or water in the warming drawer All foods placed in the...

Страница 24: ...needed To Warm Serving Bowls and Plates To warm serving bowls and plates set the control on LOll ACAUTION l Disheswill be hot Usepot holders or mitts when removing hot dishes Useonly heat safe dishes...

Страница 25: ...lf cleaning cycle of any range Move birds to another well ventilated room NOTE Usecaution when opening the upper oven after the self clean cycle has ended The oven may still be hot How to Set the Oven...

Страница 26: ...you can touch the Clock pad to display the time of day To return to the clean countdown touch the Self Clean pad The oven shuts off automatically when the clean cycle is complete and 0 00will flash in...

Страница 27: ...burner heads can be lifted off making them easy to clean The electrodes are not removable Sealed Burner Assemblies fan some models ACAUTION i _o not operote the cooktop without all burner parts and gr...

Страница 28: ...ool because it will clog the surface burner openings and scratch the surface burners If the holes become clogged clean them with a sewing needle or twist tie Before putting the surface burner back sha...

Страница 29: ...Heed Cup Assembly The burner heads and the oval burner head cap assemblyare removable Simply lift them off the range for cleaning For proper ignition make sure the small hole in the section that fits...

Страница 30: ...d let them soak several hours or overnight Wash rinse well and dry Although they are durable the grates will gradually lose their shine regardless of the best care you can give them This is due to the...

Страница 31: ...ls have dual support rods that will hold the cooktop up while you clean underneath it Lift Up Cooktop on models with standard twin burners Clean the area under the cooktop often Built up soil especial...

Страница 32: ...ttom of the door squarely over the hinges _ Lower the door slowly and evenly over both hinges at the same time If the hinges snap back against the oven frame pull them back out Oven Racks All oven rac...

Страница 33: ...pliances ca Canada iA i WARNING ln I Shock or Burn Hazard Before replacing oven light bulb disconnect the electrical power to the range at the main fuse or circuit breaker panel Failure to do so may r...

Страница 34: ...Slide drawer evenly and straight back so that the railS inthe range are engaged Grid Pan Broiler Pan and Grid After broiling remove the broiler pun from the oven Removethe grid from the pun Carefully...

Страница 35: ...play r_ When the Steam Clean cycle is complete the oven control will beep and the Steam Clean light will blink Pressthe Clear Off pad and open the door The oven bottom and remaining water will still b...

Страница 36: ...he range Proper installation is the responsibility of the installer Product failure due to improper installation is not covered under the Warranty Mobile Home Additional Installation Requirements The...

Страница 37: ...uce the hazard caused by reaching over the open flames of operating burners install a ventilation hood over the range that projects forward at least 5 beyond the front of the cabinets The ventilating...

Страница 38: ...d 3 in minimum from cutout to side edges of countertop 8 Minimumto cabinets on either side of the range 3 0 30 Minimum _ l to wall on either side standard burner mad 2 to wall on either side sealed bu...

Страница 39: ...converting back to natural gas from LP This range leaves the factory set for use with natural gas If you want to convert to LP gas the conversion must be performed by a qualified LP gas installer The...

Страница 40: ...the front remove the 90 elbow for easier installation C Install male 2 or 3 4 flare union adapter to the NPT internal thread of the manual shut off valve taking care to back up the shut off valve to k...

Страница 41: ...X T II I Black f_ S _ Nipple _IAi _ ironpipe un o U 0 _ x Pressure _ Union _ _ regulator jp Nipple Installer Inform _ Gas the consumer of I _J_ shut off the Iocotion of the _1_ t_ _ vai_ e gas shut o...

Страница 42: ...lpe _ _ Flex connector __ i_ 6 feet maximum U Adapter _ _Gas shut off 1 2 or 3 4 _ _L IJ _ valve Gas pipe RIGID PIPE HOOKUP for models equipped with Standard Twin Burners Pressure regulator IVla ni_o_...

Страница 43: ...ommended for gas range receptacles Ground Fault Circuit Interrupters GFCI s are devices that sense leakage of current in a circuit and automatically switch off power when a threshold leakage level is...

Страница 44: ...ellow tipping With most LP gas small yellow tips at the end of outer cones are normal Flames should not lift off burner ports If lifting is observed gradually reduce air shutter opening until flames a...

Страница 45: ...G OVEN IF NECESSARY CONT The shutter for the bottom oven burner is near the back wall behind the warming drawer Remove the drawer See the Care and cleaning of the range section To adjust the flow of a...

Страница 46: ...e range is level slide the range away from the wall so that the Anti Tip device can be installed _ INSTALLING THE ANTI TIP DEVICE AWARNING ANTI TIP DEVICE All ranges can tip BURNSor other SERIOUSINJUR...

Страница 47: ...er models remove the moving rear access panel by unscrewing the thumb screws in the upper left and right corners Look for the gas shut off lever at the buck of the range shownclosed Sealed burner mode...

Страница 48: ...selfl section Clock and timer Plug on range is not completely Hake sure electrical plug is plugged into a live properly do not work inserted in the electrical outlet grounded outlet A fuse in your hom...

Страница 49: ...oor is not closed and on models with a latch the latch was not moved all the way to the right The oven door is locked because the temperature inside the oven has not dropped below the locking temperat...

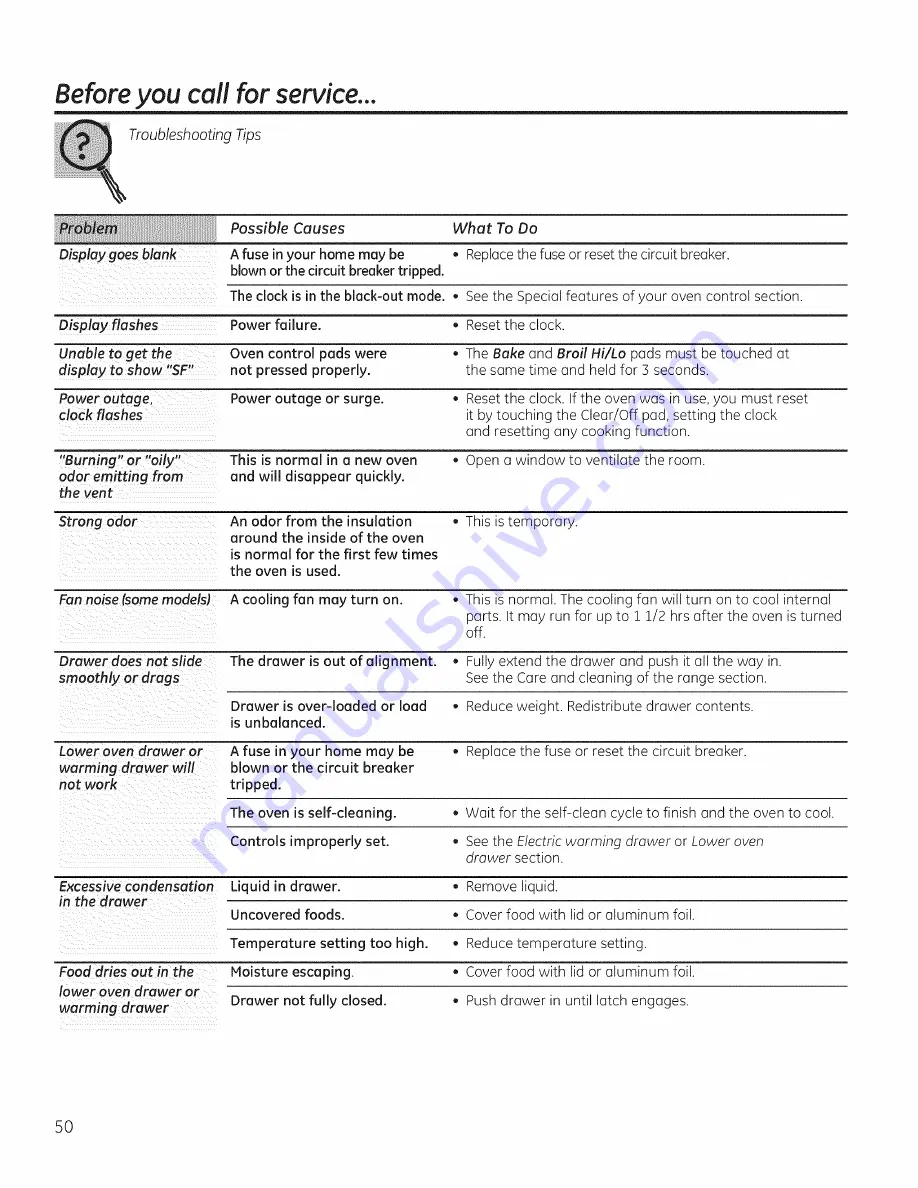
Страница 50: ...few times the oven is used Fan noise somemodels A cooling fan may turn on This is normal The cooling fan will turn on to cool internal parts It may run for up to 1 1 2 hrs after the oven is turned of...

Страница 51: ...gers seafood steaks vegetables bacon chops and so much more The pan below catches the excessfats and oils GenuineGEPart EasyTo Clean One YearWarranty Limited Time Offer Free Shipping When you order yo...

Страница 52: ...Notes 52...

Страница 53: ...GEAppliances com 53...

Страница 54: ...consequential damage caused by possible defects with this appliance Damage caused after delivery Product not accessible to provide required service Replacement of battery on cordless models EXCLUSION...

Страница 55: ...e product Improper installation delivery or maintenance Product damage or failure of the product if it is abused misused modified used for other than the intended purpose or used commercially Replacem...

Страница 56: ...626 2224during normal business hours GEConsumer Home Serviceswill still be there after your warranty expires In Canada call 1 888 261 2133 Partsand Accessories In the U S GEApplianceParts com Individu...

Страница 57: ...4 Ventiladores del Horno 30 Estantes del Homo 33 Hornos de Auto Limpieza 25 26 Superficies de Acero Inoxidable 33 Escriba los n _meros de modelo y de serie aqui N de Modelo N de Serie Los puede encont...

Страница 58: ...acia adelante confirme que el soporte anti volcaduras est6 ajustado de farina segura al piso o la pared y deslice la cocina hacia atras de modo que el brazo anti volteo se deslice par debajo del sopor...

Страница 59: ...Hacer esto podr6 producir la rotura de vidrios No cocine un producto con un vidrio rata Es posible que se produzcan descargas incendio o cortes iii iil iii iiili_ iii iiili_ iii iiili_ Nodeje a los ni...

Страница 60: ...E LA COCINA _ Nunca pierda de vista losquemadores cuando se encuentren en lasconfiguraciones de calor media o alta Lascomidas especialmente lasque se preparan con aceite se pueden incendiar Io cual pu...

Страница 61: ...ire los Si el modo de auto limpieza funciona de forma alias estantes de metal brillante del horno y otros utensilios que haya dentro del mismo 61ose pueden dejar dentro del homo los estantes para homo...

Страница 62: ...dormientraas otro quemaadorest _encendido Esposible que se produzcaa unaa descaargaa el6ctricaa Io cuaal podrfaa haacer que vuelque un utensilio de cocinaa caaliente Mediono Peque_o Grande Centro Extr...

Страница 63: ...d si se puede usar con cocinas a gas Acero Inoxidable Este metal posee propiedades de calentamiento limitadas y normalmente se combina con cobre aluminio u otros materiales para una mejor distribuci6n...

Страница 64: ...se haya movido incluso aunques61ohaya side levemente de la posici6n de bloqueo AsegOresede que la troba sea movida hacia la derecha tanto coma sea posible Presione la tecla Clear Off Borrar Apagar Pe...

Страница 65: ...de auto limpieza Luegodel ciclode auto limpieza la luzse apagar Destrabela puerta TeclaClear Off Borrar Apagar Presioneesta tecla para cancelar TODASlas operaciones del homo excepto el relojy el temp...

Страница 66: ...OFF Encendido Apagado del Temporizador de la Cocina para iniciar el conteo A medida que el temporizador realice la cuenta regresiva una sehal dar6 una indicaci6n cuando falte un minuto Luego de la se...

Страница 67: ...ilaci6n Lo oporiencia y la ubicoci6n de la ventilaci6n vonon Ventilaci6n del Horno Superior Suhomoesventilado a trav s deconductosen lapartetraserade lacocina Nobloquee estos conductos alcocinarenelho...

Страница 68: ...ecesario _ Presionela tecla Clear Off Borrar Apagad cuando la cocci6n est6completa NOTA Esposible que el ventilador se encienda y apague de forma autom6tica para enfriar las partes interiores Estoes n...

Страница 69: ...siga calentando Si su modelo cuenta con una traba para puerto no bloquee la puerto con la traba durante el asado Lo trabo se usa paro la funci6n de auto limpieza Onicamente En algunos modelos su coci...

Страница 70: ...sas de carne picada Preparaci6n Deseada Posici6n del Estante Confi_lu raclon para Asar Alto Alto Alto Jugoso media E T mino media D E Bien cocido D Polio Alto C Pescado Alto D Costillas de Alto D cerd...

Страница 71: ...mida en la rejillay posicione la cacerola para asar en el estante apropiado del homo odel compartimiento para asar Cierre la puerta del homo y del compartimiento para asar D Girela perilla OVENCONTROL...

Страница 72: ...loj una vez para apagar la pantalla de la hora del dia Aunque no la podr6 ver el reloj mantiene la hora correcta del dia r_ Presionela tecla CLOCK Reloj dos veces para regresar a la pantalla del reloj...

Страница 73: ...esionando la tecla KitchenTimer On Off Encendido Apagado del Temporizador de Cocina y luego presionando las teclas num6ricas para ingresar el nuevo tiempo que desee Para Cancelar el Temporizador Presi...

Страница 74: ...la cantidad de tiempo programada y luego de apagar _de forma automc_tica _ PresioneIoteclo Clear Off BorrariApagar paraapagarla pantallasi esnecesario Retire la comidadelhomo Recuerde quaaunque elhomo...

Страница 75: ...idn FuncionesEspeciales pero sedetallan de forma separada en los siguientessecciones DELAY START Corte de 12 Horas Conesta funci6n en caso de olvidarsey dejar el homo prendido elcontrol apagar6 deform...

Страница 76: ...rnear y presione las teclas o para incrementar o reducir la temperatura par incrementos de 25 Presione latecla Start On Iniciar Encendefl NOTA Las teclas Clear Off BorrariApagafl y Cooking Time Tiempo...

Страница 77: ...k Relojl hasta que aparezca ON Encender u OFF Apagad en lapantalla ON Encended indicaqueelhomo seapagaradeformaautom ica luegode 12 horas OFF_pagafl indica que el horno no se apagara de forma autom ic...

Страница 78: ...ra de la perilla _ Con la porte trasera del tornillo hacia usted sostenga el extremo exterior de la perilla con una mona y gire elfrente de la misma con a otra para incrementar la temperatura del homo...

Страница 79: ...ente No Io use para calentar comida fria excepto galletas crujientes papas fritas o cereales secos Deje que el caj6n calentador se precaliente durante aproximadamente 25 minutos No coloque liquido ni...

Страница 80: ...necesario Para Calentar Tazones y Platos para Servir Para calentar tazones y platos para servir configure el control en LO 1 BAJO 1 APRECAUCi6Nj Losplatos estardn calientes Usesostenedores de ollas o...

Страница 81: ...ra habitaci6n bien ventilada NOTA Tenga cuidado al abrir el homo superior una vez que el ciclo de auto limpieza haya finalizado Es posible que el homo a m est6 caliente C6mo Configurur el Homo pure su...

Страница 82: ...a puede presionar la tecla Clock Relojl para visualizar la hora del dia Para regresar a la cuenta regresiva de limpieza presione la tecla Self Clean AutoLimpieza Elhorno se apaga de forma autom6tica c...

Страница 83: ...electrodo del quemador no se puede retirar Latapa interna del quemador de tres anillos se puede levantar para su limpieza Latapa externa y el ensamble de la base se pueden levantar de la parte superio...

Страница 84: ...e la estufa y luego levante las cabezas de los quemadores Para retirar comida quemada moje las cabezas de los quemadores en una soluci6n de detergente liquido suave y agua caliente Hoje la cabeza del...

Страница 85: ...de Quemador Ovalado Central Loscabezas delosquemadores y elensamble dela cabezo tapa de quemadorovaladosepuedenretirar Simplemente levante losmismasdelacocinapardsu limpieza Paraunencendidoadecuado a...

Страница 86: ...son durables las parrillas perderdn gradualmente su brillo mds alld del mejor cuidado que les pueda dar Estose debe a la exposici6n continua a altas temperaturas Observardesto antes con parrillas de...

Страница 87: ...abrasivos amoniacos c_cidoso limpiadores para hornos comerciales Sequecon una tela seca NOTE Las perillas no se pueden cambiar de lugar Aseg_rese de volver a instalar las perillas en sus ubicaciones o...

Страница 88: ...n de detenci6n para asar y totalmente cerrada Levante la puerta hacia arriba y hacia afuera hasta que el brazo de la bisagra est6fuera de la ranura Para reemplazar la puerta Firmemente tome ambos lado...

Страница 89: ...puerta Eldefame de adobo jugos de fruta salsasde tomate y materiales glaseados que contengan ckidos pueden ocasionar descoloraci6n y se deber6n limpiar de inmediato Cuando la supeFicie est6fria lave...

Страница 90: ...osde40watts Para reemplazar la tapa r _ Coloque la misma ranura del recept6culo de la luz Empuje el cable hacia adelante haste el centro de la tapa hasta que entre en el lager correcto Una vez en su l...

Страница 91: ...Labande a para asar y la re iliatambi6n se podr6n limpiar en un lavava illas No guarde la bande a para asar y la re ilia en ninguna porte de la cocina APRECAUC16N i o o bandeja pare asar ni la rejill...

Страница 92: ...atura ambiente antes de verter agua en el agua No vierta agua sobre las ranuras reaintermedia e iniciar otro ciclo de vapor de los quemadores en el fondo del homo No abra la puerta durante el ciclo St...

Страница 93: ...a cocina La correcta instalaci6n del producto es responsabilidad del instalador Sise producen folios en el producto debido a una instalaci6n inadecuada la Garantfa no cubrird los mismas Casa Rodante R...

Страница 94: ...rtas de los quemadores en funcionamiento instale una campana de ventilaci6n sobre la cocina que se proyecte hacia adelante por Io menos a S del frente de los gabinetes La campana de ventilaci6n deber6...

Страница 95: ...imo de 3 entre la abertura y los extremos laterales de la mesada ivlinimo paro gabinetes en cada lado de la porrilla 18 t 1l k 30 30 Minimo Pora gabinetes debajo de Io porte superior I de la codna _ _...

Страница 96: ...ECUADO Su cocina fue dise_ada para funcionar con una presi6n del colector de S sobre una columna de agua a gas natural o si se desea usar con gas LP propano y butano una columna de agua de 10 AsegOres...

Страница 97: ...para una instalaci6n m6s f6cil C Instale un adaptador para uni6n c6nica de 1 2 o sA a la rosca interna de NPTde la v61vula de cierre manual procurando evitar que la v61vula de cierre no gire D Conect...

Страница 98: ...ro roscada Uni6n U 0 _ Regulador _4 Uni6n _ _ de presi6n Fl _ Boquilla lnstalador lnforme I Jr roscodo al consumidor sobre _ v6lvula la ubicaci6n de le j LJ_ decierre v6lvula de cierre de _ I_Jl degas...

Страница 99: ...umidor __ __ sobre la ubicaci6n V61vula de de la v61vula de Tuber a de gas cierre de gas cierre de gas de 1 2 o CONECTOR DE TUBERIA RIGIDA para modelos equipados con Quemadores Dobles Est6ndar Regulad...

Страница 100: ...autom6ticamente apagan la corriente cuando el Ifmite del nivel de p didu es detectado Elconsumidor deber6 reiniciar estos dispositivos de forma manual El C6digo Nacional de Electricidad requiere el us...

Страница 101: ...ntroldel Homo Ajuste el Obturador de Ajuste de Aire del Quemador para Hornear en Modelos con un Caj6n para Asar si es Necesario Determine si las llamas del quemador inferior se estdn quemando de forma...

Страница 102: ...Normal para gas natural Si las llamas del quemador se ven coma en A flame al servicio t_cnico El aspecto de ia llama normai seve coma en B o C dependJendo dei tJpo de gas que use Con gas LP es normal...

Страница 103: ...desde la parte superior enalgunos modelos o desde la parte inferior 81NIVELACI6N DE LA COClNA CONT D Use una Ilave de tuercas o ajustable para ajustar las patas niveladoras hasta que la cocina est6 ni...

Страница 104: ...l panel de acceso trasero desenroscando los tornillos de pulgar en las esquinas superior izquierda y derecha Busque la palanca de cierre del gas en la parte trasera de la cocina shownclosed PULLTO OPE...

Страница 105: ...la codna no est6 Aseg0rese de que el cable de electricidad est6 enchufado dor no _ uncionan completamente insertado en el en un tomacorriente correctamente conectado a tierra tomacorriente el6ctrico...

Страница 106: ...o la puerto no est6 cerrada yen modelos con traba la misma no se movi6 totalmente a la derecha Cierre la puerta del homo y en modelos con traba mueva la traba totalmente hacia la derecha La puerto del...

Страница 107: ...or de convecci6n funcionGra an algunos modelos v ventilador par convecci6n dependi hGstG que IGfunci6n finolice o Io puerto se obro endo de la funci6n que est_ usando se podrOn encender El cajon no se...

Страница 108: ...6strofes naturales DaBos consecuentes o incidentales causados par posibles defectos sabre este producto DaBo causado despu_s de la entrega Producto no accesible para brindar el servicio requerido Reem...

Страница 109: ...Notes 53...

Страница 110: ...asar hamburguesas frutos de mar filetes vegetales panceta costillas y mucho mc_s La bandeja inferior retiene el exceso de grasas y aceites PiezaGEgenuina Fc_cil de limpiar Garantia de un a_o iOferta d...

Страница 111: ...Viojes del t_cnico del servicio a su hogar para enseharle a user el producto Instaled6n inadecueda entrega o mentenimiento Folios o dahos del producto en case de abuse real use o use pare prop6sitos d...

Страница 112: ...te el horatio comercial habitual LosServicios para elConsumidor Hogareflo de GEa0n estaran all cuando su garantfa caduque EnCanad6 Ilame al 1 888 261 2133 Piezasy Accesorios En EE UU GEApplianceParts...

Отзывы: