background image

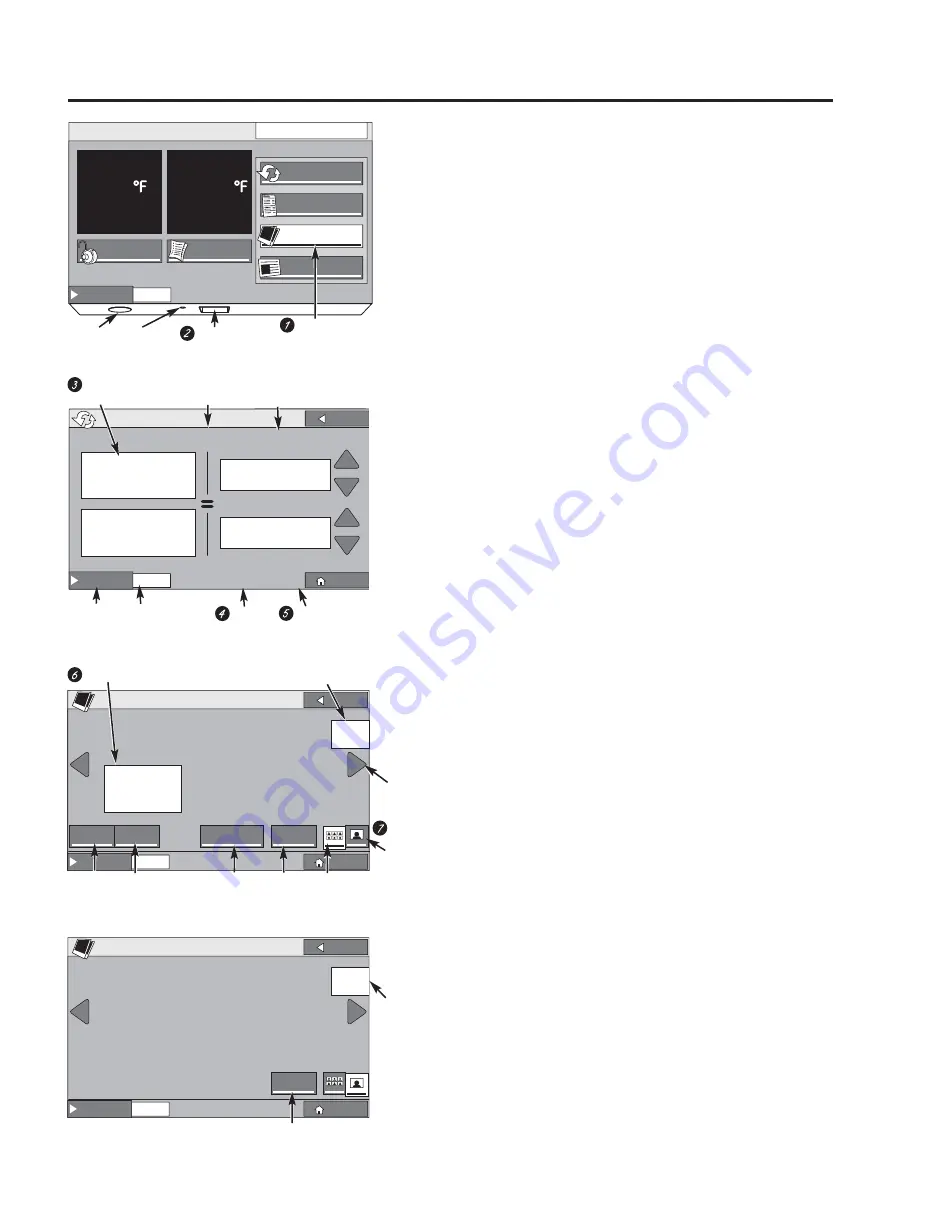
Use the PHOTOS button to upload and display favorite photos that can 

be used as a 15-minute slide show or as a screen saver. The screen saver

shows on the LCD screen after 2 minutes of inactivity. After 15 minutes,

the backlight will go out. If the slide show is selected instead of the screen

saver, the photos will scroll through in a slide show for 15 minutes before

the backlight goes out. 
Select the PHOTOS button on the HOME screen to see default photos and

to begin the process of uploading photos.

UPLOADING PHOTOS
To upload photos, insert an SD card into the slot below the display. 

Up to 100 photos (6 per page) from the SD card are displayed as

thumbnails in chronological order. Up to 30 photos can be uploaded.

Photos can be selected one at a time on the screen or by using the 

ALL button if all photos (30 max) from the SD card are to be uploaded. 

To deselect all photos, select the NONE button. When photos have 

been selected, press the UPLOAD button. Uploading 30 photos will 

take between 3 and 16 minutes. The CANCEL button can be pressed

at any time to stop the uploading process. When the upload is complete,

the display will show UPLOAD COMPLETE. Select the EJECT button to eject

the SD card and wait to be prompted to remove the card. If the card 

is removed without pressing the EJECT button, there is the possibility 

of damaging the files on the SD card. When the SD card is removed, 

the display returns to the PHOTOS screen.
NOTE: The dispenser will not work during photo upload. 

SELECTING PHOTOS
The PHOTOS screen will display 6 thumbnail photos or you can

choose the full screen option. Navigate between screens using

the LEFT and RIGHT arrow keys on the sides of the display. 

On the thumbnail screen, select photos one at a time by

touching that photo, select all of the photos by selecting 

the ALL button or deselect all by selecting the NONE button. 

SLIDESHOW
Select SLIDE SHOW on the PHOTOS screen to view uploaded

photos in a slide show from newest to oldest. (This does NOT set

the slide show as the screen saver. That is done in the SYSTEMS

section.)

DELETING PHOTOS
With photos selected that you want to delete, select the DELETE

button from either the thumbnail screen or the full screen. 

The ALL button can be used with the DELETE feature. You 

will be given an opportunity to CANCEL the action before 

the photos are deleted.

7

GEAppliances.com

PHOTOS

F

REEZER

-2

F

RESH 

F

OOD

38

L

OCK

S

UBSTITUTIONS

P

HOTOS

N

UTRITION 

F

ACTS

C

ONVERSIONS

S

ETTINGS

12:00 PM

HOLD 3 SECONDS

W

ATER

D

ISPENSER

W

ATER 

F

ILTER: 

G

OOD

E

XTRAS

W

ATER

D

ISPENSER

B

ACK

H

OME

P

HOTOS

A

LL

N

ONE

S

LIDE 

S

HOW

D

ELETE

S

ELECT

0 /12

selected

V

IEW

PAGE

1

  0F 

2

Number of pages available

DELETE

Button

ALL Button

to Select

All Photos

Number 

of photos

available

W

ATER 

F

ILTER: 

G

OOD

W

ATER

D

ISPENSER

B

ACK

H

OME

C

ONVERSIONS

P

ORTIONS

Half:   3/4 cups

Double:   3 cups

1

1/2

Cups

U

NITS

Ounces:     16

Milliliters:   470

Memory Meter: 

Total number of

photos available 

for upload (Max. 30)

Select

photos

Selected photo

Arrow

Key

SLIDESHOW

Button

W

ATER

D

ISPENSER

B

ACK

H

OME

P

HOTOS

D

ELETE

V

IEW

PHOTO

4

  0F 

12

Photos

stored in

internal

memory

Photos

Button

Insert

SD Card

EJECT

Button

UPLOAD

Button

NONE Button

to Deselect

All Photos 

on SD Card

ALL Button

to Select All

Photos on

SD Card

View

photos 

full screen

NONE Button

to Deselect

All Photos

View photos 

as thumbnails

DELETE

Button

Speaker

Reset

This product includes software which is based in
part on the work of the Independent JPEG Group

Содержание Adora 29

Страница 1: ...onsumer Support Consumer Support Back Cover Owner s Registration for Canadian Customers 43 44 Performance Data Sheet 47 State of California Water Treatment Device Certificate 48 Warranty for Canadian Customers 46 Warranty for U S Customers 45 Réfrigérateurs Congélateur inférieur Refrigeradores Congelador inferior Write the model and serial numbers here Model ____________________ Serial ___________...

Страница 2: ... refrigerator is plugged in Unplug the refrigerator before cleaning and making repairs NOTE We strongly recommend that any servicing be performed by a qualified individual Do not refreeze frozen foods which have thawed completely PROPER DISPOSAL OF THE REFRIGERATOR Child entrapment and suffocation are not problems of the past Junked or abandoned refrigerators are still dangerous even if they will ...

Страница 3: ... to have it replaced with a properly grounded 3 prong wall outlet The refrigerator should always be plugged into its own individual electrical outlet which has a voltage rating that matches the rating plate This provides the best performance and also prevents overloading house wiring circuits which could cause a fire hazard from overheated wires Never unplug your refrigerator by pulling on the pow...

Страница 4: ...temperatures select the desired ice and water dispenser setting and access other functions as listed below To return to this screen at any time press the HOME button in the lower right hand corner of the screen The Home Screen Fresh Food Button Displays actual as well as set temperatures in fresh food compartment When TurboCool is active it will be displayed Status Bar Shows status of water filter...

Страница 5: ...en the dispenser paddle is pushed the light automatically comes on off after 5 seconds when pad is released To turn the light on manually press the LIGHT button The dispenser light will stay on until the LIGHT button is pressed again LOCK To prevent accidental use of the control or dispenser the control is equipped with a lock feature When locked the dispenser and LCD functions are not available P...

Страница 6: ...ze 138g Calories 72 Calories from Fat 0 Total Fat 0g 0 Sat Fat 0g 0 Trans Fat 0g 0 Cholesterol 0g 0 Amount Per Serving DV NUTRITION FACTS Scroll Right Scroll Left Press the NUTRITION FACTS button on the HOME screen to see nutrition information Six options along with an alphabet display are shown on the screen Select one of these ingredients or scroll by page or alphabet character to proceed The LE...

Страница 7: ...en screens using the LEFT and RIGHT arrow keys on the sides of the display On the thumbnail screen select photos one at a time by touching that photo select all of the photos by selecting the ALL button or deselect all by selecting the NONE button SLIDESHOW Select SLIDE SHOW on the PHOTOS screen to view uploaded photos in a slide show from newest to oldest This does NOT set the slide show as the s...

Страница 8: ...WATER DISPENSER WATER FILTER GOOD EXTRAS LOCK Select an ingredient WATER DISPENSER BACK HOME SCREEN SYSTEM WATER FILTER REFRIGERATOR SETTINGS SETTINGS Button REFRIGERATOR Button The SETTINGS feature will give you access to TurboCool settings TurboFreeze settings instructions for changing the water filter access to systems such as door alarm Metric English display REFRIGERATOR Press the REFRIGERATO...

Страница 9: ... open 9 GEAppliances com SETTINGS cont FREEZER 2 FRESH FOOD TURBO COOL LOCK SUBSTITUTIONS PHOTOS NUTRITION FACTS CONVERSIONS SETTINGS 12 00 PM HOLD 3 SECONDS WATER DISPENSER WATER FILTER GOOD EXTRAS WATER DISPENSER BACK HOME SCREEN SYSTEM WATER FILTER REFRIGERATOR SETTINGS WATER FILTER Button WATER DISPENSER BACK HOME TURBO COOL TURBO FREEZE REFRIGERATOR WATER DISPENSER BACK HOME Water Filter Repl...

Страница 10: ...tem in the fresh food and freezer compartments without shutting off the electricity to the refrigerator On the SYSTEM screen select the COOLING SYSTEM button To turn COOLING SYSTEM ON or OFF select COOLING SYSTEM from the SYSTEM screen SET TIME To set the clock select the SET TIME button from the SYSTEM screen To change the hours and minutes use the UP and DOWN arrow keys above and below the numbe...

Страница 11: ...creen to adjust the BRIGHTNESS of the display and to choose a SCREEN SAVER For BRIGHTNESS use the LEFT and RIGHT arrow keys to dim and brighten the screen For SCREEN SAVER use the UP and DOWN arrow keys to choose DEFAULT SLIDE SHOW BACKGROUND or OFF DEFAULT gives a slide show of factory pre loaded pictures at 10 second intervals These pictures are not viewable in the PHOTOS screen and remain even ...

Страница 12: ...red temperature is displayed Once the desired temperature has been set the temperature display will return to the actual refrigerator and freezer temperatures after 10 seconds Several adjustments may be required Each time you adjust controls allow 24 hours for the refrigerator to reach the temperature you have set Changing the Temperature NOTE The refrigerator is shipped with protective film cover...

Страница 13: ...boCool The freezer temperature is not affected during TurboCool Hold 3 sec for Turbo Cool ADJUST REFRIGERATOR How it Works TurboFreeze rapidly cools the freezer compartment in order to more quickly cool foods Use TurboFreeze when adding a large amount of food to the freezer compartment putting away foods after they have been sitting out at room temperature or when putting away warm leftovers It ca...

Страница 14: ... jam the chute or cause the door in the chute to freeze shut If ice is blocking the chute poke it through with a wooden spoon Beverages and foods should not be quick chilled in the ice storage drawer Cans bottles or food packages in the storage drawer may cause the icemaker or auger to jam To keep dispensed ice from missing the glass put the glass close to but not touching the dispenser opening So...

Страница 15: ...dge and the cartridge holder place the top of the new cartridge up inside the holder Do not push it up into the holder Slowly rotate the cartridge clockwise until it stops As you turn the cartridge it will automatically raise itself into position Cartridge will rotate about 1 4 turn Do not overtighten Press and hold the ICE WATER pad for 3 seconds to reset the filter Run water from the dispenser f...

Страница 16: ...special edges to help prevent spills from dripping to lower shelves Shelves in the refrigerator compartment are adjustable Quick Space Shelf This shelf splits in half and slides under itself for storage of tall items on the shelf below This shelf can be removed and replaced or relocated just like spillproof shelves NOTE The location of the upper Quick Space Shelf is not adjustable About the fresh ...

Страница 17: ...le bins can easily be carried from refrigerator to work area To remove Lift bin straight up then pull out To replace or relocate Slide in the bin just above the molded door supports and push down The bin will lock in place Non Adjustable Dairy Bin To remove Lift the dairy bin straight up then pull out To replace Engage the bin in the molded door supports and push down The bin will lock in place Re...

Страница 18: ...uits and vegetables may be damaged using the Deli Drawer setting Do not store lettuce or other leafy produce in this drawer Adora 29 cu ft models The Temperature of the Drawer is around 34 F 1 C NOTE Fruits and vegetables may be damaged using this pantry Do not store lettuce or other leafy produce When the CITRUS button is selected the temperature of the drawer can be kept around 41 F 5 C When the...

Страница 19: ...l the brackets upward until you hear a clicking sound and remove the bin To replace Hook the ends of the bin into both brackets and push down until the bin locks into place 19 To remove Pull the drawer forward and up to remove it from the rails To replace Place the drawer wheels onto the rails and push back as you lower the drawer To remove Pull basket out of the stop position Tilt up the rear of ...

Страница 20: ...u will hear a buzzing sound each time the icemaker fills with water Throw away the first few batches of ice to allow the water line to clear Be sure nothing interferes with the sweep of the feeler arm When the bin fills to the level of the feeler arm the icemaker will stop producing ice It is normal for several cubes to be joined together If ice is not used frequently old ice cubes will become clo...

Страница 21: ...ach may permanently affect the appearance of your new refrigerator Silver accented plastic parts Wash parts with soap or other mild detergents Wipe clean with a sponge damp cloth or paper towel Do not scrub with steel wool pads or other abrasive cleaners Cleaning the Inside To help prevent odors leave an open box of baking soda in the refrigerator and freezer compartments Unplug the refrigerator b...

Страница 22: ...ed coverings and those with embossed surfaces Raise the leveling legs located at the bottom front of the refrigerator Pull the refrigerator straight out and return it to position by pushing it straight in Moving the refrigerator in a side direction may result in damage to the floor covering or refrigerator Lower the leveling legs until they touch the floor When pushing the refrigerator back make s...

Страница 23: ...may be hot Unplug the power cord from the outlet Pull drawer out to the stop position Push the clips in on each side and pull down and forward Turn the bulb counterclockwise Replace with an appliance bulb of the same or lower wattage Replace the shield Plug the refrigerator back in NOTE Appliance bulbs may be ordered from GE Parts and Accessories 800 626 2002 ...

Страница 24: ...lation is not covered under the Warranty PREPARATION MOVING THE REFRIGERATOR INDOORS If the refrigerator will not fit through a doorway the refrigerator door and freezer drawer can be removed To remove the refrigerator door see the Installing the Refrigerator section To remove the freezer drawer see the Removing the Freezer Drawer section WATER SUPPLY TO THE ICEMAKER AND DISPENSER If the refrigera...

Страница 25: ... Instructions 25 Overall Height 70 to Top of Hinge Cover at Max Height Height from Floor 6913 16 to Lower Level of Hinge Cover Case Depth 291 8 without Doors Height to Top 681 2 of Cabinet Overall Exterior 353 4 Case Width Overall Exterior Depth 355 8 Bowed Doors Drawers with Handles All measurements are given with leveling leg fully retracted ...

Страница 26: ...f passageways are less then 31 the leveling legs must be removed as well Start with Step 1 If it is not necessary to remove doors skip to Step 11 Leave tape and all packaging on doors until the refrigerator is in the final location NOTE Use a padded hand truck to move this refrigerator Place the refrigerator on the hand truck with a side against the truck We strongly recommend that TWO PEOPLE move...

Страница 27: ...rench A ATTACH THE FRESH FOOD DOOR HANDLE Stainless steel handle Attach the handle to the handle mounting fasteners and tighten the set screws with a 3 32 Allen wrench Plastic handle Attach the handle to the handle mounting fasteners by aligning the slots with the handle mounting fasteners Slide it down until it is firmly locked into position A A 3 Mounting Fasteners Mounting Fasteners Slots on ba...

Страница 28: ...ury and or damage to the door itself Installation Instructions INSTALLING THE REFRIGERATOR cont E F G A B C D 5 REMOVE THE REFRIGERATOR DOORS cont Lift the door straight up to remove Remove the two bolts using a 3 16 Allen wrench and two Phillips head screws from the center hinge Set the hinge bolts and screw aside REPLACING THE REFRIGERATOR DOORS Install the center hinge on each side Lower the re...

Страница 29: ... on the door is flush against the cabinet and is not folded Make sure the door is straight and the gap between the doors is even across the front While holding the aligned door in place tighten the top hinge bolts Reconnect all connectors at the left and right sides of the top cap Reattach the three Phillips head screws on top Installation Instructions E F G 29 D H 6 REMOVE THE FREEZER DOOR Pull t...

Страница 30: ... ft models Remove the 2 bolts securing the leveling leg bracket to the front of the refrigerator cabinet Do this on both sides 30 7 8 REMOVING THE LEVELING LEGS if applicable cont 29 cu ft models Two people are required to complete this procedure Gently lean the refrigerator back so the front end is off of the floor Remove the 2 bolts securing the leveling leg bracket to the underside of the refri...

Страница 31: ... to secure the leveling leg bracket to the underside of the refrigerator cabinet Do this on both sides 9 REPLACING THE FREEZER DOOR Two people may be required to complete this procedure ATTACH AND SECURE THE DRAWER FRONT TO THE SLIDES Pull out the rail assemblies to the full length on each side of the cabinet CAUTION Make sure to pull out the side rails evenly Hang the freezer door front onto open...

Страница 32: ...the GE SmartConnect tubing the nuts are already assembled to the tubing If you are using copper tubing insert the end of the tubing into the refrigerator connection at the back of the refrigerator as far as possible While holding the tubing tighten the fitting If you are using GE SmartConnect tubing insert the molded end of the tubing into the refrigerator connection at the back of the refrigerato...

Страница 33: ...e firmly touching the floor 14 A Flat Head Screwdriver LEVEL THE REFRIGERATOR DOORS Remember a level refrigerator is necessary for getting the doors perfectly even If you need help review the previous section on leveling the refrigerator If you open the freezer door you can see the center hinge Insert the supplied 4 mm Allen wrench into the shaft of the center hinge Adjust the height by turning cl...

Страница 34: ...the level 16 A B SET THE CONTROLS Set the controls to the recommended setting 17 REMOVE PACKAGING A Remove all tape foam and protective packing from shelves and drawers 18 34 LEVEL THE FREEZER DOOR cont Find the best position to align the door slope After adjustment tighten all the screws 16 C D Example The slope is about 2 mm as shown below Rotate the height adjuster to 2 0 to reduce the door slo...

Страница 35: ...f the refrigerator is operated before the water connection is made to the icemaker press and release the ICE OFF LOCK pad on the control panel to disengage the icemaker When the refrigerator has been connected to the water supply press and release the ICE OFF LOCK pad on the control panel to engage the icemaker For LCD Models If the refrigerator is operated before the water connection is made to t...

Страница 36: ...red fitting with a tube cutter and then use a compression fitting Do not cut formed end from GE SmartConnect Refrigerator tubing Shutoff valve to connect to the cold water line The shutoff valve should have a water inlet with a minimum inside diameter of 5 32 at the point of connection to the COLD WATER LINE Saddle type shutoff valves are included in many water supply kits Before purchasing make s...

Страница 37: ...he tubing until the water is clear Shut the water off at the water valve after about one quart 1 liter of water has been flushed through the tubing FLUSH OUT THE TUBING 8 SmartConnect Tubing Fasten the shutoff valve to the cold water pipe with the pipe clamp NOTE Commonwealth of Massachusetts Plumbing Codes 248CMR shall be adhered to Saddle valves are illegal and use is not permitted in Massachuse...

Страница 38: ...k when starting or stopping the compressor Expansion and contraction of cooling coils during and after defrost can cause a cracking or popping sound On models with an icemaker after an icemaking cycle you may hear the ice cubes dropping into the ice bucket On models with a dispenser during water dispense you may hear the water lines move at initial dispense and after dispenser button is released W...

Страница 39: ...ood Door openings too frequent This is normal frost within package or too long is normal Frequent buzzing Ice Off feature is turned Non LCD models sound off but the water supply Press and release the ICE OFF LOCK pad on the control to the refrigerator has not panel to turn on the Ice Off feature and then the been connected icon will be displayed Keeping the Ice Off feature on will damage the water...

Страница 40: ...gerator periods of high humidity one setting colder Turn off Energy Saver mode Moisture collects inside Too frequent or too This is normal in humid weather air long door openings carries moisture into refrigerator when doors are opened Refrigerator or freezer No power at outlet Replace fuse or reset the breaker compartment light does Light bulb burned out or loose See Replacing the light bulbs not...

Страница 41: ...ting and wait because the controls are set 24 hours If water does not dispense after 24 hours call too cold for service Water spurting from Newly installed filter cartridge Run water from the dispenser for 3 minutes dispenser about 11 2 gallons No water or ice cube Supply line or shutoff valve Call a plumber production is clogged Water filter clogged Replace filter cartridge or remove filter and i...

Страница 42: ...ed instructions Refrigerator beeping This is the door alarm Close door Control setting is not lit On some models the light If the control settings do not light up check to see if non LCD models bulbs at the top of the refrigerator the light bulbs are burned out and replace if necessary compartment light up the temperature control settings LCD screen freezes LCD screen needs to be reset Reset the L...

Страница 43: ...43 OWNERSHIP REGISTRATION P O BOX 1780 MISSISSAUGA ONTARIO L4Y 4G1 FOR CANADIAN CONSUMERS ONLY Please place in envelope and mail to Veuillez mettre dans une enveloppe et envoyez à ...

Страница 44: ...44 ...

Страница 45: ...states do not allow the exclusion or limitation of incidental or consequential damages This warranty gives you specific legal rights and you may also have other rights which vary from state to state To know what your legal rights are consult your local or state consumer affairs office or your state s Attorney General Warrantor General Electric Company Louisville KY 40225 Staple your receipt here P...

Страница 46: ...oduct caused by accident fire floods or acts of God Loss of food due to spoilage Proper use and care of product as listed in the owner s manual proper setting of controls Product not accessible to provide required service Damage caused by a non GE Brand water filter WARRANTOR IS NOT RESPONSIBLE FOR CONSEQUENTIAL DAMAGES IMPORTANT Keep this warranty and your bill of sale as proof of original purcha...

Страница 47: ...installation maintenance and filter replacement requirements be carried out for the product to perform as advertised See Installation Manual for Warranty information Application Guidelines Water Supply Parameters Service Flow 0 5 gpm 1 9 lpm Water Supply Potable Water Water Pressure 40 120 psi 2 8 8 2 bar Water Temperature 33ºF 100ºF 0 6ºC 38ºC Operating Specifications Pressure requirement 40 120 ps...

Страница 48: ...for the following health related contaminants s o t s e b s A s t s y C Lead Mercury Atrazine Benzene Carbofuran Endrin Lindane Tetrachloroethylene Toxaphene 1 4 dichlorobenzene 2 4 D Microbiological Contaminants and Turbidity Inorganic Radiological Contaminants Organic Contaminants Do not use where water is microbiologically unsafe or with water of unknown quality except that systems certified fo...

Страница 49: ...ampoules 71 Installation Installation de la conduite d eau 83 85 Installation du réfrigérateur 74 82 Préparation 72 73 Conseils de dépannage 87 91 Bruits normaux de fonctionnement 87 Soutien au consommateur Feuillet de données relatives à la performance de la cartouche 93 Garantie pour la clientèle au Canada 92 Soutien au consommateur 94 49 Transcrivez les numéros de modèle et de série ici de modè...

Страница 50: ...des enfants Débranchez votre réfrigérateur avant de le nettoyer ou de le réparer REMARQUE Nous vous recommandons vivement de confier toute réparation à un technicien qualifié Ne recongelez pas les aliments surgelés qui ont complètement dégelé 50 COMMENT VOUS DÉBARRASSER CONVENABLEMENT DE VOTRE ANCIEN RÉFRIGÉRATEUR Les enfants pris au piège ou morts d asphyxie sont toujours d actualité Les réfrigér...

Страница 51: ...la terre Le réfrigérateur doit toujours être branché dans sa propre prise de courant dont la tension nominale est identique à celle indiquée sur la plaque signalétique Cette précaution est recommandée pour garantir un rendement optimum et éviter une surcharge des circuits électriques de la résidence ce qui pourrait créer un risque d incendie par surchauffe des fils Ne débranchez jamais le réfrigér...

Страница 52: ...cran L écran Home écran principal Bouton Fresh Food réfrigérateur Affiche la température réelle et réglée du compartiment réfrigérateur Lorsque le TurboCool est en marche il s affiche également Status Bar Barre d état Affiche l état du filtre à eau Conversions Tool Outil de conversion Permet d accéder à la fonction de conversion Nutrition Facts Valeurs nutritionnelles Trouvez des renseignements su...

Страница 53: ...pour que le réfrigérateur atteigne la température désirée DISTRIBUTEUR Le réfrigérateur peut distribuer de l eau de la glace pilée ou des glaçons Pour procéder à une sélection appuyez sur le bouton DISPENSER distributeur puis choisissez WATER eau CRUSHED ICE glace pilée ou CUBED ICE glaçons Après avoir réalisé la sélection pressez un verre contre le bras du distributeur REMARQUE Le bouton DISPENSE...

Страница 54: ...la page Défilement des pages ou de l alphabet WATER DISPENSER HOME BACK Sodium 1mg 0 Total Carbs 19g 6 Dietary Fiber 3g 12 Sugars 14g Protein 0g Vitamin A 75 Vitamin C 63 Calcium 8 Iron 0 17 Percent Daily Values DV are based on a 2 000 calorie diet Apple Serving Size 138g Calories 72 Calories from Fat 0 Total Fat 0g 0 Sat Fat 0g 0 Trans Fat 0g 0 Cholesterol 0g 0 Amount Per Serving DV NUTRITION FAC...

Страница 55: ... SÉLECTION DES PHOTOS L écran PHOTOS affichera 6 photos miniatures ou encore vous pouvez choisir l option plein écran Naviguez entre les écrans en utilisant les touches fléchées LEFT gauche et RIGHT droite qui se trouvent sur les côtés de l afficheur Dans l écran des miniatures sélectionnez les photos une par une en les touchant Sélectionnez toutes les photos en appuyant sur le bouton ALL toutes o...

Страница 56: ...WATER FILTER REFRIGERATOR SETTINGS Bouton SETTINGS Réglages Bouton REFRIGERATOR Réfrigérateur La fonction SETTINGS réglages vous permet de configurer le TurboCoolMD de configurer le TurboFreezeMD d accéder aux instructions pour le remplacement du filtre à eau d accéder à certaines fonctions comme l alarme de porte de changer le système de mesures en métrique ou pouces RÉFRIGÉRATEUR Appuyez sur le ...

Страница 57: ...e ou encore REPLACE Remplacer lorsque le filtre doit être remplacé L état du filtre à eau est également visible sur l écran HOME écran principal dans le coin supérieur droit lorsque la porte est ouverte www electromenagersge ca RÉGLAGES suite WATER DISPENSER BACK HOME SCREEN SYSTEM WATER FILTER REFRIGERATOR SETTINGS Bouton FILTRE À EAU WATER DISPENSER BACK HOME TURBO COOL TURBO FREEZE REFRIGERATOR...

Страница 58: ...timents réfrigérateur et congélateur sans couper l alimentation de l appareil Sur l écran SYSTEM système appuyez sur le bouton COOLING SYSTEM système de refroidissement Pour ACTIVER ou DÉSACTIVER la fonction COOLING SYSTEM sélectionnez la dans l écran SYSTEM système RÉGLAGE DE L HEURE Pour régler l horloge appuyez sur le bouton SET TIME régler l heure sur l écran SYSTEM système Pour régler l heure...

Страница 59: ...RAN Appuyez sur le bouton SCREEN écran sur l écran SETTINGS réglages pour régler la luminosité BRIGHTNESS de l afficheur et choisissez l option SCREEN SAVER écran de veille Pour la luminosité BRIGHTNESS utilisez les touches fléchées LEFT gauche et RIGHT droite pour augmenter et diminuer la luminosité de l écran Pour le SCREEN SAVER écran de veille utilisez les touches fléchées UP haut et DOWN bas ...

Страница 60: ...REFRIGERATOR réglage réfrigérateur jusqu à ce que la température désirée apparaisse Une fois la température souhaitée affichée après 10 secondes la température affichée retournera à celle du réfrigérateur et du congélateur Plusieurs ajustements peuvent être nécessaires Chaque fois que vous ajustez les commandes laissez passer 24 heures pour que le réfrigérateur atteigne la température que vous ave...

Страница 61: ...a pas d effet sur la température du congélateur Hold 3 sec for Turbo Cool ADJUST REFRIGERATOR Hold 3 sec for Turbo Freeze ADJUST FREEZER Fonctionnement La commande TurboFreeze accélère le refroidissement du compartiment congélation afin de refroidir plus rapidement les aliments Utilisez TurboFreeze quand vous ajoutez une grande quantité d aliments dans le compartiment congélation quand vous mettez...

Страница 62: ...Pour éviter que la glace distribuée ne tombe hors du verre placez le verre à proximité de l ouverture du distributeur mais sans le toucher Un peu de glace pilée peut être distribuée même si vous avez sélectionné CUBED ICE glaçon Cela se produit occasionnellement lorsque quelques glaçons sont envoyés directement dans le broyeur par inadvertance Après une distribution de glace pilée un peu d eau peu...

Страница 63: ...ent la cartouche dans le sens des aiguilles d une montre jusqu à ce qu elle s arrête Pendant sa rotation la cartouche atteindra elle même sa position La cartouche tournera d environ 1 4 de tour Ne serrez pas trop fort Appuyez sur la touche Ice Water glace eau et tenez la appuyée pendant 3 secondes pour remettre le filtre Faites couler de l eau du distributeur pendant 3 minutes environ 5 litres pou...

Страница 64: ...layettes anti déversement Les clayettes anti déversement ont des bords spéciaux pour empêcher tout déversement aux clayettes inférieures Clayette escamotable Cette clayette escamotable se divise en deux et les deux parties coulissent l une sous l autre pour permettre le stockage de grands articles sur la clayette inférieure Cette clayette peut être enlevée et remplacée ou déplacée comme les clayet...

Страница 65: ...z vers le bas Le bac se verrouillera en place Bacs non réglables de porte Enlèvement Soulevez le bac droit vers le haut puis enlevez en soulevant Remise en place Engagez le bac dans les soutiens moulés de la porte et poussez vers le bas Il se fixera en place Bac non réglable à produits laitiers Enlèvement Soulevez le bac à produits laitiers vers le haut puis enlevez le Remise en place Insérez le b...

Страница 66: ...sque la touche CITRUS agrumes est sélectionnée la température du bac est maintenue à approximativement 5 C 41 F Lorsque la touche PRODUCE produits est sélectionnée la température du bac est maintenue à approximativement 3 C 37 F Lorsque la touche DELI épicerie fine est sélectionnée la température du bac est maintenue à approximativement 1 C 34 F NOTE Les fruits et les légumes peuvent s abîmer lors...

Страница 67: ...es supports vers le haut jusqu à ce que vous entendiez un clic puis enlevez le bac Remise en place Insérez les extrémités du bac dans les deux supports et poussez le vers le bas jusqu à ce que le bac se verrouille en place Enlèvement Tirez le bac vers vous puis vers le haut pour le retirer des guides Remise en place Placez les roulettes du bac sur les guides et poussez le bac en l abaissant Enlève...

Страница 68: ...a machine à glaçons Un réfrigérateur nouvellement installé prend de 12 à 24 heures pour commencer à produire des glaçons Vous entendrez un bourdonnement chaque fois que la machine à glaçons se remplit d eau Jetez les premiers lots de glaçons pour permettre à la conduite d eau de se purger Assurez vous que rien ne gène la course du bras palpeur Quand le bac se remplit jusqu au niveau du bras palpeu...

Страница 69: ... nouveau réfrigérateur Pièces en matière plastique plaquée argent Lavez ces pièces avec du savon ou un autre détergent doux Essuyez avec une éponge un linge humide ou une serviette en papier Ne frottez jamais avec des tampons en laine d acier ou d autres nettoyants abrasifs Nettoyage de l intérieur Pour aider à empêcher les odeurs laissez une boîte ouverte de bicarbonate de soude dans les comparti...

Страница 70: ...ement ceux qui sont coussinés ou dont la surface est gaufrée Soulevez les pieds d inclinaison situés en bas à l avant de votre réfrigérateur Tirez le réfrigérateur en ligne droite et lorsque vous le remettez en place poussez le vers le mur en ligne droite Les déplacements latéraux du réfrigérateur pourraient endommager le revêtement de sol ou le réfrigérateur Abaissez les pieds d inclinaison jusqu...

Страница 71: ...et abaissez vers l avant Tournez l ampoule dans le sens contraire des aiguilles d une montre Remplacez la par une ampoule de la même puissance ou inférieure Replacez le capot Rebranchez le réfrigérateur NOTE Les ampoules peuvent être commandées au service après vente GE au 800 626 2002 Lumières du compartiment réfrigération Un technicien agréé devra remplacer l éclairage à diode Remplacement des a...

Страница 72: ...açons doit être raccordée à une conduite d eau froide Vous pouvez acheter une trousse d alimentation d eau GE contenant la tuyauterie le robinet d arrêt les joints et les instructions chez votre revendeur ou en vous adressant à notre site Web à l adresse www electromenagersge ca ou à notre service de Pièces et accessoires au numéro de téléphone 1 800 661 1616 PREPARATION suite ALIMENTATION D EAU D...

Страница 73: ...ut 177 8 cm 70 po jusqu au dessus du couvercle supérieur de la charnière à la hauteur maximale Hauteur depuis le sol 177 cm 6913 16 po jusqu au niveau le plus bas du couvercle de la charnière Profondeur de la caisse 74 cm 291 8 po sans les portes Hauteur jusqu au 174 cm 681 2 po dessus de la caisse Largeur hors tout 90 8 cm 353 4 po de la caisse extérieure Profondeur extérieure 90 5 cm 355 8 po ho...

Страница 74: ...our permettre de transporter le réfrigérateur jusqu à cet endroit sans être obligé d enlever les portes et les poignées Si le passage a moins que 36 po de largeur vous risquez vraiment de rayer et d endommager les portes et les poignées de votre réfrigérateur Vous pouvez enlever facilement le capuchon du haut et les portes pour déplacer plus aisément le réfrigérateur chez vous Si les passages sont...

Страница 75: ...de la poignée en alignant les fentes aux fixations de montage de poignée Faites glisser la poignée vers le bas jusqu à ce qu elle soit bien fixée en position A A 3 FIXEZ LA POIGNÉE DE LA PORTE DU COMPARTIMENT CONGÉLATION Poignées en acier inoxydable et en matière plastique Fixez bien la poignée aux fixations de montage de la poignée et resserrez les vis de l ensemble situées en bas de la poignée à...

Страница 76: ...me E F G A B C D INSTALLATION DU RÉFRIGÉRATEUR suite 5 REMONTAGE DES PORTES DU RÉFRIGÉRATEUR Installez la charnière centrale de chaque côté Descendez la porte du réfrigérateur sur la broche de la charnière centrale Assurez vous que le dé plastique de la broche de la charnière soit inséré sur la broche de la charnière centrale ou à l intérieur du trou de la broche de la porte situé dans le dessous ...

Страница 77: ...anchéité sur la porte s applique contre le caisson et qu il n est pas plié Assurez vous que la porte est droite et que l espace entre les portes est le même sur toute la façade Tout en tenant la porte alignée en place serrez les boulons de la charnière supérieure Rebranchez tous les connecteurs aux côtés gauche et droit du capuchon supérieur Rattachez les trois vis cruciformes sur le dessus Instru...

Страница 78: ... du pied de nivellement à l avant du réfrigérateur Répétez cette procédure des deux côtés 8 RETRAIT DES PIEDS DE NIVELLEMENT si nécessaire suite Les modèles de 29 pieds cubes La présence de deux personnes peut être nécessaire pour effectuer cette procédure Faites basculer doucement le réfrigérateur vers l arrière de façon à ce que la partie avant ne touche pas le sol Retirez les deux boulons maint...

Страница 79: ... FIXEZ ET SERREZ L AVANT DU TIROIR AUX GLISSIÈRES Sortez les assemblages de rail de toute leur longueur de chaque côté du caisson MISE EN GARDE Assurez vous de sortir les rails latéraux à la même longueur A 10 79 REMISE EN PLACE DES PIEDS DE NIVELLEMENT si nécessaire suite Les modèles de 29 pieds cubes La présence de deux personnes peut être nécessaire pour effectuer cette procédure Faites bascule...

Страница 80: ...u de plastique pour installer le filtre Si vous utilisez un tuyau de cuivre placez un écrou de compression et une bague manchon à l extrémité du tuyau qui vient de l alimentation d eau froide de la maison Si vous utilisez un tuyau GE SmartConnect les écrous sont déjà assemblés au tuyau 11 A 10 BRANCHEMENT DU RÉFRIGÉRATEUR À LA CONDUITE D EAU DE LA MAISON suite Si vous utilisez un tuyau de cuivre i...

Страница 81: ...ent deux rôles 1 Elles peuvent être réglées de manière à permettre à l appareil de reposer solidement sur le sol 2 Les pieds de nivellement servent de frein de stabilisation pour tenir le réfrigérateur bien en place pendant son fonctionnement et son nettoyage Les pieds d inclinaison empêchent également le réfrigérateur de basculer Tournez les pieds dans le sens des aiguilles d une montre pour fair...

Страница 82: ...porte Après le réglage resserrez toutes les vis 16 C D Exemple L inclinaison est d environ 2 mm comme illustré ci dessous Tournez l ajusteur de hauteur vers 2 0 pour réduire l inclinaison de la porte Plan de référence Inclinaison NIVELLEMENT DE LA PORTE DU CONGÉLATEUR Localisez le réglage de hauteur dans la porte du congélateur Desserrez légèrement les quatre vis cruciformes de chaque côté de la p...

Страница 83: ...glaçons Pour les modèles pourvus d un écran ACL Si le réfrigérateur est utilisé avant de raccorder l eau à la machine à glaçons reportez vous à la section MACHINE À GLAÇONS Fonctions de l écran pour les opérations avec écran ACL puis suivez les instructions à l écran pour désactiver la machine à glaçons N installez jamais les tuyaux de la machine à glaçon dans des endroits où la température risque...

Страница 84: ...4 et 8 1 bar Une perceuse électrique Une clé de 1 2 po ou une clé réglable Un tournevis à lame plate et un tournevis Phillips Deux écrous à compression d un diamètre extérieur de 1 4 po et deux bagues manchons pour brancher le tuyau en cuivre au robinet d arrêt et au robinet d eau du réfrigérateur OU Si vous utilisez une trousse d alimentation d eau GE avec tuyau en matière plastique les garniture...

Страница 85: ...itre 1 quart d eau par le tuyau PURGEZ LE TUYAU 8 Acheminez le tuyau du tuyau d eau froide au réfrigérateur Faites passer le tuyau par un trou percé dans le mur ou le plancher derrière le réfrigérateur ou au niveau de l armoire de cuisine adjacente aussi près du mur que possible ACHEMINEZ LE TUYAU 6 Fixez le robinet d arrêt au tuyau d eau froide à l aide du collier de serrage NOTE Vous devez vous ...

Страница 86: ...Notes 86 ...

Страница 87: ...s congélateur ou réfrigérateur Les ventilateurs permettent de maintenir les bonnes températures Les ventilateurs changent de vitesses pour assurer des économies d énergie et un refroidissement optimaux CLICS et CLAQUEMENTS Vous pouvez entendre des craquements ou des claquements lorsque le réfrigérateur est branché pour la première fois Cela se produit lorsque le réfrigérateur se refroidit à la bon...

Страница 88: ... mais Appuyez et relâchez la touche ICE OFF LOCK glace désactivée l approvisionnement en eau du verrouillage du panneau de contrôle pour activer la fonctionnalité réfrigérateur n est pas branché Ice Off glace désactivée puis l icône s affiche Maintenir activée la fonctionnalité Ice Off glace désactivée endommagera la vanne d eau Modèles ACL Sur l écran ACL sélectionnez SETTING réglages puis SYSTEM...

Страница 89: ...l humidité se forme Vous ouvrez les portes trop C est normal à l intérieur quand souvent ou trop longtemps il fait humide l air transporte de l humidité à l intérieur du réfrigérateur quand vous ouvrez les portes La lumière de compartiment Pas d électricité à la prise Remplacez le fusible ou remettez en marche réfrigération ou congélation le disjoncteur ne s allume pas L ampoule a brûlé ou elle Co...

Страница 90: ... pas réglage est trop froide du distributeur près 24 heures appelez le service L eau jaillit La cartouche du filtre vient Faites couler l eau du distributeur pendant 3 minutes du distributeur d être installée environ 6 litres La machine à glaçons La conduite d eau ou Appelez un plombier ne distribue ni eau le robinet d arrêt est bouché ni glaçons Le filtre à eau est bouché Remplacez la cartouche d...

Страница 91: ...ctriques que les ampoules électriques ne soient pas brûlées Modèles non équipés situées en haut du compartiment et remplacez les le cas échéant d un écran ACL réfrigération allument les réglages de contrôle de la température L écran ACL se bloque Il faut remettre à zéro l écran ACL Remettez à zéro l écran ACL en inérant l extrémité modèles avec ACL d un trombone dans le petit trou situé près de la...

Страница 92: ... sera fourni dans les régions où il est disponible et où Mabe estime raisonnable de le fournir Cette garantie est en sus de toute garantie statutaire EXCLUSIONS DE LA GARANTIE Le propriétaire est responsable de payer les réparations occasionnées par l installation de ce produit et ou les visites nécessaires pour lui apprendre à utiliser ce produit Tout dommage au fini de l appareil doit être signa...

Страница 93: ...ons d utilisation Pression requise 40 120 lb po 2 8 8 2 bar à l épreuve des coups de bélier Température 33 100 F 0 6 38 C Débit 0 5 gpm 1 9 lpm Exigences d installation de fonctionnement de maintenance Rincez la nouvelle cartouche à plein débit avec 6 litres d eau environ trois minutes pour libérer l air Remplacez la cartouche lorsque le débit devient trop faible Protégez contre le gel en retirant...

Страница 94: ...es leurs électroménagers peuvent recevoir pièces et accessoires directement à la maison cartes VISA MasterCard et Discover acceptées Les directives stipulées dans le présent manuel peuvent être effectuées par n importe quel utilisateur Les autres réparations doivent généralement être effectuées par un technicien qualifié Soyez prudent car une réparation inadéquate peut affecter le fonctionnement s...

Страница 95: ... 111 Instrucciones de instalación Instalación de la tubería del agua 129 131 Instalación del refrigerador 120 128 Preparación para instalar el refrigerador 118 119 Solucionar problemas 132 136 Sonidos normales de la operación 132 Servicio al consumidor Garantía para consumidores en los Estados Unidos 137 Hoja de datos de funcionamiento 138 Servicio al consumidor 139 95 Anote aquí los números de mo...

Страница 96: ... mecanismo automático para hacer hielo mientras el refrigerador esté conectado Desconecte el refrigerador antes de limpiarlo o efectuar reparaciones NOTA Recomendamos enfáticamente encargar cualquier servicio a un personal calificado No vuelva a congelar los alimentos congelados una vez que se hayan descongelado 96 DESHACERSE DEBIDAMENTE DE SU REFRIGERADOR El atrapamiento y la sofocación de los ni...

Страница 97: ...gación reemplazarlo por un contacto adecuado para tres puntas con conexión a tierra El refrigerador deberá conectarse siempre en su propio contacto eléctrico individual que tenga un voltaje que vaya de acuerdo con la tabla de clasificación Esto garantiza la mejor ejecución y evita la sobrecarga del circuito eléctrico de la casa y los daños a causa del sobrecalentamiento de los cables Nunca descone...

Страница 98: ...ie el brillo de la pantalla y reemplace el filtro de agua Pestaña del dispensador Seleccione agua hielo triturado o hielo en cubitos También acceda a la luz del dispensador Bloqueo de característica Sostenga durante 3 segundos para evitar el uso accidental del dispensador El cerrojo cambiará de abierto a cerrado para indicar que se han bloqueado el dispensador y los controles Botón del congelador ...

Страница 99: ... o hielo triturado o en cubitos a través del dispensador Para efectuar una selección presione el botón DISPENSER y elija WATER agua CRUSHED ICE hielo triturado o CUBED ICE hielo en cubitos Después de efectuar la selección presione un vaso contra la paleta del dispensador NOTA El botón DISPENSER se encuentra disponible en casi todas las pantallas de funciones LUZ del dispensador La configuración pr...

Страница 100: ... o letra Botón de Conversiones Número de página Busque por página o por letra WATER DISPENSER HOME BACK Sodium 1mg 0 Total Carbs 19g 6 Dietary Fiber 3g 12 Sugars 14g Protein 0g Vitamin A 75 Vitamin C 63 Calcium 8 Iron 0 17 Percent Daily Values DV are based on a 2 000 calorie diet Apple Serving Size 138g Calories 72 Calories from Fat 0 Total Fat 0g 0 Sat Fat 0g 0 Trans Fat 0g 0 Cholesterol 0g 0 Amo...

Страница 101: ... 6 fotos en miniatura o puede elegirse la opción de pantalla completa Desplácese entre pantallas utilizando las teclas de flecha IZQUIERDA y DERECHA ubicadas sobre los lados de la pantalla En la pantalla de miniaturas seleccione las fotos de a una tocando dicha foto seleccione todas las fotos presionando el botón ALL o cancele la selección oprimiendo el botón NONE PRESENTACIÓN DE DIAPOSITIVAS Sele...

Страница 102: ...SUSTITUCIONES Seleccione un ingrediente WATER DISPENSER BACK HOME SCREEN SYSTEM WATER FILTER REFRIGERATOR SETTINGS Botón SETTINGS configuraciones Botón REFRIGERATOR refrigerador La función SETTINGS configuraciones le dará acceso a Configuraciones TurboCool Configuraciones TurboFreeze Instrucciones para cambiar el filtro de agua Acceso a sistemas como la alarma de la puerta Visualización métrica in...

Страница 103: ...a como puede verse en el ejemplo para solicitar o cambiar el filtro de agua El estado del filtro de agua también puede verse en la pantalla HOME inicio ubicado en el extremo superior derecho cuando se abre la puerta GEAppliances com CONFIGURACIONES cont WATER DISPENSER BACK HOME SCREEN SYSTEM WATER FILTER REFRIGERATOR SETTINGS Botón WATER FILTER filtro de agua WATER DISPENSER BACK HOME TURBO COOL ...

Страница 104: ...e enfriamiento Esta función apaga el sistema de enfriamiento de los compartimentos de alimentos frescos y del congelador sin cortar el suministro de electricidad hacia el refrigerador En la pantalla SYSTEM seleccione el botón COOLING SYSTEM sistema de enfriamiento Para encender ON o apagar OFF el SISTEMA DE ENFRIAMIENTO seleccione COOLING SYSTEM de la pantalla SYSTEM SET TIME configurar la hora Pa...

Страница 105: ...de agua está cortado SCREEN pantalla Seleccione el botón SCREEN pantalla de la pantalla SETTINGS configuraciones para ajustar BRIGHTNESS brillo de la pantalla y para elegir SCREEN SAVER protector de pantalla Para BRIGHTNESS utilice las teclas de flecha IZQUIERDA y DERECHA para subir o bajar el brillo de la pantalla Para SCREEN SAVER utilice las teclas de flecha de ARRIBA y ABAJO para elegir DEFAUL...

Страница 106: ...artimento del refrigerador y a 2 F para el compartimento del congelador Deje pasar 24 horas para que la temperatura se estabilice en los niveles preconfigurados Los controles de la temperatura pueden exhibir tanto la temperatura establecida SET como la temperatura real en el refrigerador y en el congelador La temperatura real puede variar ligeramente de la temperatura fijada según su uso y el ambi...

Страница 107: ...o es afectada durante TurboCool Hold 3 sec for Turbo Cool ADJUST REFRIGERATOR Hold 3 sec for Turbo Freeze ADJUST FREEZER Cómo funciona TurboFreeze enfría rápidamente el compartimiento del congelador para enfriar los alimentos más rápidamente Use TurboFreeze cuando agregue grandes cantidades de alimentos al compartimiento del congelador guardando alimentos después de que han estado expuestos a temp...

Страница 108: ...a de los vasos coloque el vaso cerca pero sin tocar la abertura del dispensador Puede dispensarse algo de hielo triturado aunque haya seleccionado CUBED ICE hielo en cubitos Esto sucede ocasionalmente cuando algunos cubitos se dirigen accidentalmente a la trituradora Después de dispensar hielo triturado puede gotear algo de agua desde la tolva A veces se forma una pequeña cantidad de nieve en la p...

Страница 109: ...artucho hacia arriba dentro del soporte No lo empuje dentro del soporte Lentamente gire el cartucho en sentido de las agujas del reloj hasta que se detenga Mientras gira el cartucho se colocará automáticamente en su posición El cartucho girará alrededor de 1 4 de giro No lo apriete demasiado Presione y sostenga el botón ICE WATER hielo y agua durante 3 segundos para reconfigurar el filtro Pase agu...

Страница 110: ...r que las salpicaduras se rieguen a los estantes inferiores Sobre las opciones de almacenamiento de alimentos frescos Los estantes en el compartimiento del refrigerador son ajustables Estante para espacio rápido Este estante se divide en dos y se desliza debajo de sí mismo para almacenamiento de elementos altos sobre el estante inferior Este estante puede quitarse y volverse a colocar o colocarse ...

Страница 111: ...tire hacia afuera Para reemplazar Enganche la gaveta en los soportes moldeados de la puerta y presione hacia abajo La gaveta se trabará en su lugar Compartimientos ajustables en la puerta Los compartimientos ajustables pueden llevarse fácilmente del refrigerador al área de trabajo Para retirar Levante el estante recto y luego hálelo Para reemplazar o cambiar de lugar Deslice el compartimiento just...

Страница 112: ...enerse alrededordelos41 F 5 C Cuando se selecciona el botón PRODUCE verduras y frutas la temperatura del cajón puede mantenerse alrededor de los 37 F 3 C Cuando se selecciona el botón DELI la temperatura del cajón puede mantenerse alrededor de los 34 F 1 C NOTA Las frutas y vegetales pueden dañarse utilizando la configuración DELI No guarde lechuga u otro vegetal de hojas en la configuración DELI ...

Страница 113: ...a Levántela para quitarla Para reemplazar Coloque la canasta sobre el montaje de rieles Remoción de la división de la canasta Ajuste Retiro de la gaveta Gaveta no ajustable en el congelador Para retirar Tire del cajón hacia adelante y arriba para quitarlo de los rieles Para reemplazar Coloque las ruedas del cajón en los rieles y tire hacia atrás a medida que baja el cajón Para retirar Tire la cana...

Страница 114: ...r cubos de hielo Escuchará un zumbido cada vez que la máquina de hielos se llene de agua Deseche los primeros cubos de hielo para permitir que la línea del agua se limpie Asegúrese de que nada interfiera con el movimiento del brazo indicador Cuando el contenedor se llene al nivel del brazo indicador la máquina de hielos dejará de producir hielos Es normal que varios cubos de hielo se junten Si el ...

Страница 115: ...es puede afectar permanentemente la apariencia de su nuevo refrigerador Piezas plásticas plateadas Lave las piezas con jabón u otro detergente suave Limpie con una esponja paño húmedo o toalla de papel No raspe con esponjillas de metal u otros limpiadores abrasivos Limpiar el interior Para evitar olores deje una caja abierta de bicarbonato de sodio en los compartimientos del refrigerador y del con...

Страница 116: ...to de una cucharada 15 ml de bicarbonato por un cuarto 1 litro de agua Deje abiertas las puertas Modelos que no son de LCD Encienda la característica Ice Off apagado hielo presionando y liberado el botón ICE OFF LOCK apagado hielo trabado del panel de control puede verse el ícono y desconecte el suministro de agua hacia el refrigerador Modelos de LCD Apague la máquina de hielo siguiendo las instru...

Страница 117: ... tomacorriente Tire el cajón hacia afuera hasta que se detenga Presione los ganchos hacia adentro sobre cada lado y presione hacia abajo y adelante Gire la bombilla en sentido contrario de las agujas del reloj Coloque una bombilla del artefacto del mismo vataje o menor Vuelva a colocar la pantalla Vuelva a enchufar el refrigerador NOTA Las bombillas del artefacto pueden solicitarse en Piezas y Acc...

Страница 118: ...REFRIGERADOR AL INTERIOR Si el refrigerador no entra por una puerta se pueden retirar la puerta del refrigerador y la gaveta del congelador Para retirar la puerta del refrigerador consulte la sección Instalación del refrigerador Para retirar la gaveta del congelador consulte la sección Cómo retirar la gaveta del congelador SUMINISTRO DE AGUA HACIA LA MÁQUINA DE HIELOS Y EL DISPENSADOR EN ALGUNOS M...

Страница 119: ... total hasta 70 177 8 cm la parte superior de la tapa de la bisagra a la altura máx Altura desde el piso 6913 16 177 cm hasta el nivel más bajo de la tapa de la bisagra Profundidad 291 8 74 cm de la carcasa sin puertas Altura hasta la parte 681 2 174 cm superior del gabinete Ancho total 353 4 90 8 cm de la carcasa exterior Profundidad total 355 8 90 5 cm exterior puertas cajones arqueados con mani...

Страница 120: ...ectadas al refrigerador mientras éste se transporta a la ubicación de la instalación Si los pasillos tiene menos que 36 pulgadas las puertas y las manijas del refrigerador se pueden rayar y dañar con facilidad Se pueden retirar la tapa superior y las puertas para permitir el traslado seguro del refrigerador al interior Si los pasillos miden menos de 31 pulgados también deben quitarse las patas de ...

Страница 121: ... a los tornillos de montaje alinee las ranuras con los tornillos de montaje Deslícela hasta que encaje firmemente en su lugar A A 3 SUJETE LA MANIJA DE LA PUERTA DEL CONGELADOR Manijas de acero inoxidable y plástico Sujete la manija firmemente a los tornillos de montaje y ajuste los tornillos de fijación en la parte inferior de la manija con una llave Allen de 1 8 A 4 A Tornillos de montaje A Torn...

Страница 122: ...e los dos pernos utilizando una llave Allen de 3 16 y los dos tornillos Phillips de la bisagra central Separe la bisagra los pernos y tornillo I H CÓMO QUITAR LAS PUERTAS DEL REFRIGERADOR Abra las puertas del refrigerador Quitelasdostapasfrontalesconundestornilladorde cabezaplana Quite los tres tornillos de la parte superior con un destornillador Phillips Desconecte todos los conectores eléctricos...

Страница 123: ...erda Verifique que la junta de la puerta esté nivelada con el gabinete y que no esté doblada Verifique que la puerta esté derecha y que el espacio entre las puertas esté nivelado en el frente Mientras sostiene la puerta alineada en su lugar ajuste los pernos de la bisagra superior Reconecte todos los conectores sobre los lados izquierdo y derecho de la cubierta superior Vuelva a sujetar los tres t...

Страница 124: ...ite los 2 pernos que fijan el soporte de la pata de nivelación al frente del gabinete del refrigerador Hágalo sobre ambos lados 8 CÓMO QUITAR LAS PATAS DE NIVELACIÓN si corresponde cont Modelos de 29 pies cúbicos Se necesitan dos personas para completar este procedimiento Con cuidado incline el refrigerador hacia atrás de modo que el frente quede hacia arriba Quite los 2 pernos que fijan el soport...

Страница 125: ... dos personas para completar este procedimiento CONECTE Y SUJETE EL FRENTE DEL CAJÓN A LOS DESLIZADORES Estire los montajes de rieles al máximo sobre cada lado del gabinete PRECAUCIÓN Asegúrese de estirar los rieles laterales de manera uniforme A 10 125 CÓMO COLOCAR LAS PATAS DE NIVELACIÓN si corresponde cont Modelos de 29 pies cúbicos Se necesitan dos personas para completar este procedimiento Co...

Страница 126: ...léctrico 13 CÓMO VOLVER A COLOCAR LA PUERTA DEL CONGELADOR cont CÓMO VOLVER A COLOCAR LA GAVETA DEL CONGELADOR Enganche los extremos de la gaveta del congelador dentro de ambos soportes y presione hacia abajo hasta que se traben en su lugar Ver página 113 CÓMO CONECTARELREFRIGERADOR ALALÍNEADEAGUADELACASA Se requiere un suministro de agua fría para la operación de la máquina de hielos Si no existe...

Страница 127: ...ra que las puertas estén bien equilibradas Si necesita ayuda vuelva a ver la sección anterior sobre la nivelación del refrigerador 15 Cuando la puerta izquierda está más baja que la derecha Cuando la puerta izquierda está más alta que la derecha Punto de ajuste Punto de ajuste 127 CÓMO NIVELAR LAS PUERTAS DEL REFRIGERADOR cont Si abre la puerta del congelador usted podrá ver la bisagra central Int...

Страница 128: ...oco los cuatro tornillos Phillips de la puerta sobre cada lado derecho e izquierdo Afloje el tornillo regulador con un destornillador Phillips para ajustar el nivel 16 A B CÓMO NIVELAR LA PUERTA DEL CONGELADOR cont Encuentre la mejor posición para alinear la inclinación de la puerta Después del ajuste apriete todos los tornillos 16 C D Ejemplo La inclinación es de 2 mm como puede verse abajo Gire ...

Страница 129: ... el suministro de agua hacia el refrigerador es desde un Sistema de Filtro de Agua de Ósmosis Inversa Y el refrigerador también tiene un filtro de agua use el tapón de derivación del filtro del refrigerador Usar el cartucho de filtro del agua del refrigerador en conjunto con el filtro de MWF puede resultar en cubos de hielo huecos Esta instalación de la tubería del agua no está garantizada por el ...

Страница 130: ...Antes de comprar asegúrese de que una válvula tipo silla cumple con los códigos de plomería en su localidad Instrucciones para la instalación CIERRE EL SUMINISTRO PRINCIPAL DE AGUA Abra el grifo más cercano por suficiente tiempo para limpiar la tubería del agua Instale la válvula de apagado en la tubería del agua de consumo más frecuentemente utilizada 1 Seleccione una ubicación para la válvula qu...

Страница 131: ...uir los Códigos 248CMR de Plomería para el Estado de Massachusetts Las válvulas tipo silla son ilegales y su uso no está permitido en Massachusetts Consulte con un plomero licenciado CONECTE LA TUBERÍA A LA VÁLVULA 7 Válvula de apagado tipo silla Tuerca de compresión Tuerca de empaque Válvula de salida Férula manga Abra el suministro principal de agua y lave la tubería hasta que el agua esté limpi...

Страница 132: ...s ventiladores cambian la velocidad para suministrar enfriamiento óptimo y ahorrar energía CHASQUIDOS ESTALLIDOS CRUJIDO Puede escuchar sonidos como de crujido o estallidos cuando el refrigerador se conecta por primera vez Esto pasa a medida que el refrigerador se enfría hasta la temperatura correcta El control del congelador produce un chasquido cuando el compresor inicia o para Expansión y contr...

Страница 133: ...uerta Vea Los controles Se dejó abierta la puerta Revise si hay un paquete que mantiene la puerta abierta Escarcha o cristales Se dejó abierta la puerta Revise si hay un paquete que mantiene la puerta abierta de hielo en alimentos Apertura de puertas muy Eso es normal congelados escarcha frecuente o muy prolongada en paquete es normal Formación lenta del hielo Se dejó abierta la puerta Revise si h...

Страница 134: ...ámbiela cada tres meses El interior requiere limpieza Vea Cuidado y limpieza Se forma humedad No es extraño durante Seque la superficie con un paño suave y ajuste el en la superficie del periodos de alta humedad control del refrigerador una marca más hacia lo frío refrigerador Apague el modo Energy Saver ahorro de energía Humedad se forma al Abrir la puerta con mucha Eso es normal interior en clim...

Страница 135: ... los controles más elevada y espere 24 horas Si no sale agua después están configurados a una de 24 horas llame al servicio técnico temperatura muy baja El agua chorrea Cartucho del filtro recién Deje correr el agua desde el dispensador por 3 minutos del dispensador instalado aprox 11 2 galóns No sale agua y el Está tapada la línea de agua Llame a un plomero dispositivo para hacer o la llave de pa...

Страница 136: ...a manija tiene alimentos frescos y Cómo sujetar la manija del congelador una brecha para información más detallada El refrigerador emite Esto es la alarma de la puerta Cierre la puerta un sonido El ajuste de control En algunos modelos las bombillas Si los ajustes de control no se alumbran inspeccione no está encendido en la parte superior del para verificar si existe alguna bombilla quemada Modelo...

Страница 137: ... sedimento excesivo en el suministro de agua Reemplazo de las bombillas si incluidos o los filtros de agua si incluidos Daño al producto causado por accidente fuego inundaciones o actos de Dios Daño incidental o consecuencial causado por posibles defectos con el aparato Daño ocasionado por un filtro de agua de una marca que no es GE Producto no accesible para facilitar el servicio requerido Lo que...

Страница 138: ...a presión del agua supera los 120 psi Si la presión del agua es superior a los 80 psi 552 KPa deberá instalar una válvula limitadora de presión Si no está seguro sobre cómo controlar la presión del agua comuníquese con un plomero profesional No instale cuando se puedan producir condiciones de golpe de ariete Si existen Si no está seguro sobre cómo controlar esta condición comuníquese con un plomer...

Страница 139: ...nea en cualquier momento o llamar al 800 626 2224 durante horas normales de oficina GE Consumer Home Services estará aún ahí cuando su garantía termine Piezas y accesorios GEAppliances com Aquellos individuos con la calificación necesaria para reparar sus propios electrodomésticos pueden pedir que se les manden las piezas o accesorios directamente a sus hogares aceptamos las tarjetas VISA MasterCa...

Страница 140: ...t on line anytime or call 800 626 2224 during normal business hours GE Consumer Home Services will still be there after your warranty expires In Canada call 1 888 261 2133 Parts and Accessories In the U S GEAppliances com Individuals qualified to service their own appliances can have parts or accessories sent directly to their homes VISA MasterCard and Discover cards are accepted Order on line tod...

Отзывы: