GE 225 Скачать руководство пользователя страница 21


GE


OPM_SGS_ISG_M22_M30_0US_V011.doc 

21/38

 Installation 

Guide


SG Series

 225 & 300 kVA 

3.8 WIRING 

CONNECTION 


WARNING! 
UPS installation and connection must be performed by qualified service 
personnel only. 


3.8.1 Power 

connections 

Input/output and DC connections are provided with compression lugs. 
Please refer to chart for torque specifications. 
 
Carefully read the following recommendations before proceeding: 

• 

Ensure that the AC and DC external isolators are OFF and locked to prevent their 
inadvertent operation. 

• 

Do not close any external isolators prior the commissioning of the equipment. 

• 

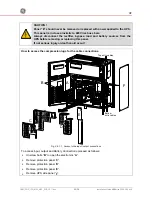
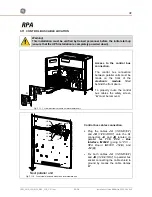
The preferred power cable entry location for installation purposes is from the right side of 
the UPS, either top or bottom. 
To facilitate the terminations remove the right side panel in order to access the input/output 
terminal lugs. 
In case of cable entry from the top of the cabinet, remove the cover plate fitted on the roof 
and provide for a suitable isolated protection cover. 
In case of cable entry from the bottom remove cover plate and perform the same 
procedure. 

• 

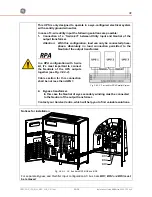
If the UPS is installed in such a way that the accessibility to the right side panel is reduced, 
field wiring connections can be made from the front side by removing the front right side 
panel protection cover/panel ( D ) as indicated in Fig. 3.8.1-1 be advised that installation 
performed from the front position will give the installer reduced visibility to the terminal lugs. 

• 

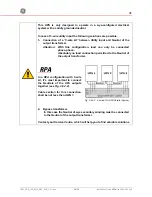
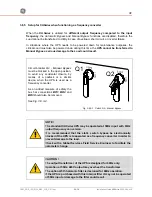
The input/output cables must be connected in clockwise phase rotation for both 

Bypass

 and 

Rectifier Input Terminals

 if separate, taking care to avoid risk of short 

circuit between different poles. 

• 

The grounding and neutral connection of the electrical system must be in accordance with 
local regulations. 

• 

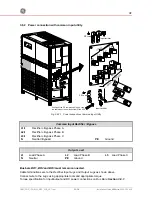
In case of additional cabinets containing batteries, input/ output transformers, etc, their 
ground terminals must be connected to the UPS main ground terminal. 

• 

Once the power cables have been connected, re-install the internal safety shields and close 
the cabinets by re-installing all external panels. 


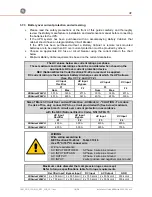
Torque Specifications 

Mechanical Compression Lugs 

Input / Output / Battery and GND 

WIRE SIZE RANGE 


AWG / 

kcmil


Lb - in 


Nm


WIRE SIZE RANGE 


AWG / 

kcmil


Lb - in 


Nm 

6 – 4 

110 12.4 


3/0 – 200 

250 28.2 

3 – 1 

150 19.6 


250 – 350 

325 36.7 

1/0 – 2/0 

180 20.3 


500 – 750 

375 42.4 


Содержание 225

Страница 1: ...INSTALLATION GUIDE UNINTERRUPTIBLE POWER SUPPLY Digital Energy TM SG Series 225 and 300 kVA Series 0 g General Electric Company 2500 Discovery Blvd Rockwall TX 75032 Telephone 972 290 7400 Fax 972 290...

Страница 2: ...ystems All rights reserved The information contained in this publication is intended solely for the purposes indicated The present publication and any other documentation supplied with the UPS system...

Страница 3: ...tion Please carefully read the Installation Guide It contains all the necessary information about the installation of the UPS Thank you for choosing GE START UP AND COMMISSIONING A GE Global Services...

Страница 4: ...ulting from the use of the information contained in this document WARNING SG Series 225 and 300 kVA is a product that needs to be installed by a licensed and knowledgeable contractor We recommend that...

Страница 5: ...izing 18 3 7 3 Battery over current protection and wire sizing 19 3 8 WIRING CONNECTION 21 3 8 1 Power connections 21 3 8 2 Power connection with common input utility 23 3 8 3 Power connection separat...

Страница 6: ...removing the sidewalls of the UPS make sure that all earth connections when reassembling are correctly reattached This UPS is intended for use in a controlled indoor environment free of conductive co...

Страница 7: ...jects and jewelry Do not carry metal objects in your pockets where the objects can fall into the Battery Cabinet 2 Tools must have insulated handles and must be insulated so that they will not short B...

Страница 8: ...ymbols are defined WARNING if instruction is not followed injury or serious equipment damage may occur CAUTION internal parts have dangerous voltage present Risk of electric shock PE Earth GND Ground...

Страница 9: ...rs SGS_225 300_UPS_04 Q2 Q1 2 4 3 1 1 2 3 4 1 3 4 2 XA CR PA XB Fig 2 1 3 SG Series general view with optional 5th harmonic filter and removed protection panels 1 Opening for top cable entry 2 Opening...

Страница 10: ...d damage the UPS If the UPS must be lifted by crane use suitable lifting straps and spreader bars Note of the center of gravity marked on the package Forklift Crane Fig 3 1 1 UPS cabinets moving Check...

Страница 11: ...ay from chemical substances and with a temperature range not exceeding 13 F 25 C to 131 F 55 C Some important functions of the UPS such as the customized functions are defined by parameters stored in...

Страница 12: ...battery life The SG Series UPS can radiate radio frequency energy Although some RFI filtering is inherent to the UPS there is no guarantee that the UPS will not influence sensitive devices such as ca...

Страница 13: ...input and output cables SG Series openings are provided on the top and the bottom of the UPS for the connection of input and output cables Pay attention to the position of these openings when choosin...

Страница 14: ...otely from the UPS a wall mounted DC disconnect device must be installed within line of site to both the UPS and the Battery The optimal room temperature for the Battery is 68 F 20 C to 77 F 25 C The...

Страница 15: ...PS room Do not put anything on the top of the cabinet Air filtration systems could be required when the UPS operates in a dirty environment Contact your Dealer or the nearest Service Center for approp...

Страница 16: ...livered in a wooden crate remove the cabinet from the pallet with care because of the heavy weight of the equipment Take care not to damage the UPS when moving by forklift For parallel systems the del...

Страница 17: ...ectifier Bypass recommended The Bypass and Rectifier Inputs are to be powered from different Utility supplies F1 and F2 inputs In this case when the Rectifier Input Fuses are opened the Bypass and the...

Страница 18: ...ive devices should be sized to allow the transformer magnetization inrush current Caution when using four pole circuit breakers as protection A potential problem exists for situations with Non linear...

Страница 19: ...urrent which the UPS allows See Fig 3 7 1 1 and 3 7 1 2 AC Input Rectifier AC Input Bypass AC Input DC Input F1 F3 Nom Max F2 Nom Max F4 SG Series 225 kVA 301 A 360 A 271 A 301 A 360 A 401 A SG Series...

Страница 20: ...50 55 30 40 45 6 55 65 75 40 50 60 4 70 85 95 55 65 75 3 85 100 110 65 75 85 2 95 115 130 75 90 100 1 110 130 150 85 100 115 1 0 125 150 170 100 120 135 2 0 145 175 195 115 135 150 3 0 165 200 225 13...

Страница 21: ...he same procedure If the UPS is installed in such a way that the accessibility to the right side panel is reduced field wiring connections can be made from the front side by removing the front right s...

Страница 22: ...re removing or replacing this panel If not serious injury or death could occur How to access the compression lugs for the cable connections SGS_225 300_UPS connection_01US Q2 Q1 2 4 3 1 1 2 3 4 D C E...

Страница 23: ...1 Fig 3 8 2 1 Power connections Common Input Utility Common Input Rectifier Bypass L1 1 Rectifier Bypass Phase A L2 1 Rectifier Bypass Phase B L3 1 Rectifier Bypass Phase C N Neutral Bypass PE Ground...

Страница 24: ...figuration load can only be connected phase phase Absolutely no load connection permitted to the Neutral of the output transformer In a RPA configuration with 3 wire kit it s most important to connect...

Страница 25: ...Utility Separate Input Rectifier Bypass L1 1 Rectifier Phase A L1 2 Bypass Phase A L2 1 Rectifier Phase B L2 2 Bypass Phase B L3 1 Rectifier Phase C L3 2 Bypass Phase C N Neutral Bypass PE Ground The...

Страница 26: ...utput transformer In a RPA configuration with 3 wire kit it s most important to connect the Neutrals of the UPS outputs together see Fig 3 8 3 2 Cable section for this connection shall be not less the...

Страница 27: ...ower connections Battery Battery Positive pole of the Battery Negative pole of the Battery Do not insert the Battery Fuses before the commissioning Battery Cable Terminations are to the Positive and N...

Страница 28: ...sure by means of a padlock or a similar device when the UPS is used as a frequency converter As an added measure of safety the bus bar connections BR1 BR2 and BR3 should also be removed See Fig 3 8 3...

Страница 29: ...us bars However it is recommended that a disconnect or isolation switch be inserted in order to totally isolate a unit if needed Verify that power wiring and control wiring are run in separate conduit...

Страница 30: ...ts in case one of the control cables should fail or be accidentally damaged or disconnected The standard length of the control bus cable between two parallel unit is 40 ft 12 m Maximal overall length...

Страница 31: ...JP2 JP3 and JP4 must be inserted JB1 JA1 JP2 JP1 JP3 JP4 JP3 JP2 JP1 JP4 IM 0048 JB2 JA2 SGT5000_100 150_RPA IM0048_03 JA JB Fig 3 10 3 Bus connection on intermediate units Intermediate units On the...

Страница 32: ...ts must be made on the front of the electronic module fitted behind the front doors To properly route the control bus cables the safety screen A must be removed SGT5000_100 150_RPA control bus cable_0...

Страница 33: ...bling and routing the bus cables JA and JB inside the UPS cabinet In case one unit should be removed from the parallel system the bus cables JA and JB must be removed from the cabinet without disconne...

Страница 34: ...O def RL2 1 12 13 2 14 3 15 4 16 5 17 6 18 7 19 8 20 9 21 10 22 11 1 14 9 1 X1 J2 J3 SGS_225 300_Customer interface_01 J5 J4 XA 2 1 1 2 3 4 JP3 XB 1 2 3 4 Fig 4 1 1 Customer interface NO normally open...

Страница 35: ...d operation mode These signals are available either on connector J2 sub D female 25 pin or terminal blocks X1 The meaning of the alarms on the free contacts in standard configuration default is the fo...

Страница 36: ...delay of Battery recharging during the generator operation In a parallel system a separate NO Normally Open contact must be connected individually to each unit 4 1 5 AUX external Maintenance Bypass If...

Страница 37: ...Terminal XB and the Jumper JP3 on P4 Customer Interface when the cables have been already connected on XB or J2 In a parallel system a separate NC Normally Closed contact must be connected individuall...

Страница 38: ...Guide SG Series 225 300 kVA 5 NOTES 5 1 NOTES FORM It is recommended to note in this section Notes with date and short description all the operations performed on the UPS as Maintenance components rep...

Отзывы: