background image

Review important safety instructions before installation.

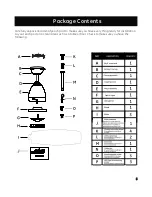
SkyReceptacle

SkyPlug

Outlet Box (not provided)

Ground Wire from Housing

Black Wire 

Wood Screw

Neutral White Wire

Rubber Washer

Outlet Box Screw

Canopy Mounting Screw

Flat Washer

Push Lever

Canopy

Canopy Trim Ring

Downrod

Coupling Cover

3-Pin Connector-Male

Cotter Pin

Clevis Pin

Collar Set Screw

Motor Assembly

Blade Screw

Light Kit Pan

2-Pin Connector-Male

2-Pin Connector-Female

LED Light Kit

Shade

LED Light Kit Mounting Screw

Light Kit Pan Mounting Screw

Blade

3-Pin Connector-Female

6

Fan Installation Drawing

Содержание 21243

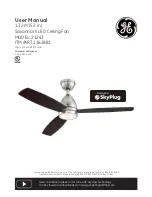
Страница 1: ...ndfans com Contact a qualified electrician or call the Customer Care Service Team at 1 866 885 4649 Customer Service hours of operation are 9 00AM 5 00PM EST Monday Friday 120V 60Hz MADE IN CHINA Customer Assistance 1 866 885 4649 1 32 m 52 in Savanna III LED Ceiling Fan MODEL 21243 ITM ART 1162881 User Manual ...

Страница 2: ...ified licensed electrician 3 WARNING to reduce the risk of electrical shock or fire do not use this fan with any solid state fan speed control device It will permanently damage the electronic circuitry 4 CAUTION To reduce the risk of personal injury use only the screws provided with the outlet box 5 The weight of the fan is 6 7 kg 14 77 lb The outlet box and support structure must be securely mounte...

Страница 3: ...in a receptacle check both outlets each may be controlled by a separate wiring circuit 5 When replacing fuses turn off the main power first Make sure your hands and feet are dry and place one hand behind your back to prevent electricity from making a complete circuit through your chest Touch a plug fuse only by its insulated rim 6 Remove cartridge fuses with fuse puller 7 Use tools with insulated ha...

Страница 4: ...Tools Needed Not Supplied 3 Required Flathead Screwdriver 1 screwhead recommended Philips Screwdriver Safety Glasses Step Ladder Wire Stripper Soft Cloth ...

Страница 5: ...art to make sure you have everything ready for installation Lay out each part on a clean area such as a table or floor Check to make sure you have the following Hardware Bag Blade Balancing Kit x3 x2 x10 x2 x2 x2 x1 x2 4 Hardware Included ...

Страница 6: ... identify each part to make sure you have everything ready for installation Lay out each part on a clean area such as a table or floor Check to make sure you have the following SkyReceptacle 5 Package Contents Light kit pan ...

Страница 7: ...utlet Box Screw Canopy Mounting Screw Flat Washer Push Lever Canopy Canopy Trim Ring Downrod Coupling Cover 3 Pin Connector Male Cotter Pin Clevis Pin Collar Set Screw Motor Assembly Blade Screw Light Kit Pan 2 Pin Connector Male 2 Pin Connector Female LED Light Kit Shade LED Light Kit Mounting Screw Light Kit Pan Mounting Screw Blade 3 Pin Connector Female 6 Fan Installation Drawing ...
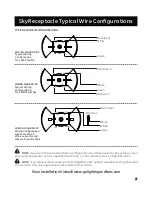
Страница 8: ... WIRING DIAGRAM 3 Wiring Configuration with more than 1 of the same colored wires in the outlet box NOTE If you do not have standard wiring configurations and have questions about the wiring in your outlet box please contact a qualified electrician or call customer service 1 866 885 4649 NOTE If you have multiple wires connected together add a jumper lead and insert jumper lead into terminal Only one...

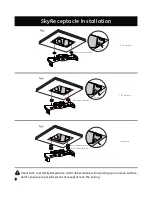
Страница 9: ... rubber washer 7mm rubber washer 4mm rubber washer 0 1 5mm 0 1 5mm Gap 1 5 3mm Gap 3mm Gap 3mm 1 5 3mm Important Install SkyReceptacle with rubber washers to avoid a gap or uneven surface and to ensure proper placement of receptacle on the ceiling 8 ...

Страница 10: ...SkyReceptacle Installation 1 2 12 7mm Outlet Box not Supplied Sky Receptacle Insert wires into terminal tighten screw to secure wires Terminal s Bottom view on Sky Receptacle 1 9 2 OK Not OK Not OK ...

Страница 11: ...eptacle Installation Using the rubber washer when installing receptacle ensures proper placement of the receptacle on the ceiling Rubber Washer Install cover plate if supplied not provided on all models 3 10 ...

Страница 12: ...Fan Installation 4 5 Slide down trim ring from canopy Remove rubber inserts from canopy and discard 11 ...

Страница 13: ...on as shown Initial formation while lifting fan and inserting plug into receptacle Receptacles Slots Receptacles Slots Bracket with Push Lever Final formation after turning fan Insert the plug into the receptacle keeping the lever pushed up while turning fan to the right Let go of the push lever and make sure plug is fully inserted into receptacle Continue to support fan until locked into position...

Страница 14: ...7 8 9 Fan Installation Once installed tighten all 4 screws Reinstall trim ring being careful not to depress the push lever Adjust fan housing so ball is properly seated in bracket 13 ...

Страница 15: ...10 11 12 Fan Installation Install fan blades Install light kit pan Install LED light kit Install shade turn to secure 14 ...

Страница 16: ...Fan Operation 15 Reverse Switch Summer Winter ...

Страница 17: ...16 RFN XQORFN VZLWFK ಯ 2 µ DQG µ GLP VZLWFK RU WKLV IDQ WKH GLP VZLWFK VKRXOG EH LQ WKH µ SRVLWLRQ DOORZLQJ IRU GLPPLQJ RI WKH OLJKW 3ODFH WKH VZLWFK LQ WKH µ SRVLWLRQ WR WXUQ WKH GLPPLQJ IHDWXUH RȺ LI RX GR QRW ZDQW WKH GLPPLQJ IHDWXUH 6 QF µ EXWWRQ 7KLV EXWWRQ DOORZV UHFHLYHU WR SDLU ZLWK WKH FRGH DVVLJQHG E WUDQVPLWWHU 127 RU FRQYHQLHQFH WKH WUDQVPLWWHU KDV EHHQ SUHVHW E IDFWRU DQG LV SODFHG LQ...

Страница 18: ...G RSHUDWLRQ 87 21 Q FKDQJHV RU PRGL FDWLRQV QRW H SUHVVO DSSURYHG E WKH SDUW UHVSRQVLEOH IRU FRPSOLDQFH FRXOG YRLG WKH XVHU V DXWKRULW WR RSHUDWH WKH HTXLSPHQW 1RWH 7KLV HTXLSPHQW KDV EHHQ WHVWHG DQG IRXQG WR FRPSO ZLWK WKH OLPLWV SXUVXDQW WR 566 VVXH 7KHVH OLPLWV DUH GHVLJQHG WR SURYLGH UHDVRQDEOH SURWHFWLRQ DJDLQVW KDUPIXO LQWHUIHUHQFH LQ D UHVLGHQWLDO LQVWDOODWLRQ 7KLV HTXLSPHQW JHQHUDWHV XVHV ...

Страница 19: ... two 1 5 V AAA batteries and make sure the polarity of the batteries is correct 4 Turn on the power isolation switch to ALL fans 5 Press the Sync switch with the corner of the battery cover you can also use a small screwdriver or ballpoint pen to change the frequency settings within 30 seconds after restoring the power The lights will ash on o 3 times and remain bright then the pairing process is ...

Страница 20: ...Blade Wobble Balancing Not OK Not OK OK OK OK X Y A B C X X Y 3mm in Y 3mm in 19 ...

Страница 21: ...when cleaning This could damage the motor the wood or possibly cause an electrical shock There is no need to oil your fan The motor has permanently lubricated sealed ball bearings WARNING Make sure the power is turned off at the electrical panel box before you attempt any repairs NOTE To avoid personal injury or damage to the fan and other items be cautious when working around or cleaning the fan N...

Страница 22: ...otor housing screws are snug Make sure the screws that attach the fan blade bracket to the motor hub is tight Make sure wire nut connections are not rattling against each other or the interior wall of the switch housing Allow a 24 hour breaking in period Most noises associated with a new fan disappear during this time If using a ceiling fan light kit make sure the screws securing the glassware are...

Отзывы: