background image


DFR PS1 


TROUBLESHOOTING 

A.


Should the power lamp on the power supply fail to light, insure that power to 
the line cord is being supplied. If power is on the line cord, check and replace 
the fuse in the fuse holder on the rear of the power supply. As a final measure, 
the power supply should be replaced and returned. 


B.


Should the power LED on all individual plug-in modules fail to light, check the 
following: 


a.


The power lamp on the power supply should be lit.  

b.


The 10-pin connector from the power supply should be firmly connected to 
its mating connector on the back plane and located at slots 15-17 (The 
optional secondary power supply should be located at slot 12-14). 

c.


All Plug-in modules should be firmly seated into their respective 10-pin 
back plane mating connectors. 

If the above conditions have been met, the rack should be replaced and returned.  


C.


Should the power LED on an individual plug-in fail to light, check the following: 
a.


The plug-in module should be firmly seated onto the 10-pin connector on 
the back plane.  

b.


The fuses on the module should be intact. If not, return the module for 
repair. 
 

CAUTION!

 This product is designed for indoor use only. Do not attempt to 

deploy the product for outdoor use. Damage to the product can result. 

Содержание PS1

Страница 1: ...GE Security P N 1069699 REV 01 00 ISS 16JUN10 DFR Card Cage Rack and PS1 Power supply Unit Installation Guide ...

Страница 2: ... latest product information contact your local supplier or visit us online at www gesecurity com FCC compliance This equipment has been tested and found to comply with the limits for a Class A digital device pursuant to part 15 of the FCC Rules These limits are designed to provide reasonable protection against harmful interference when the equipment is operated in a commercial environment This equ...

Страница 3: ...DFR PS1 i Content Safety Instructions 1 Overview 2 Features 2 Model Numbers 4 Hardware 5 Front and Rear Panel 5 LED Indicators 6 Application Drawing 7 TROUBLESHOOTING 9 Specifications 10 ...

Страница 4: ......

Страница 5: ...r when unused for long periods of time 7 Apparatus shall not be exposed to dripping or splashing and no objects filled with liquids shall be placed on the apparatus CONNECTION TO AC OUTLET The power supply should be operated only from a standard outlet with proper grounding connection CAUTION PLUG REPLACEMENT SHOULD BE DONE BY A QUALIFIED ELECTRICIAN PLEASE ENSURE PROPER POLARITY OF THE CONNECTION...

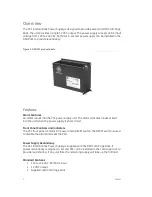
Страница 6: ...e alarm activates a buzzer built into the unit when the power supply is short circuit Front Panel Controls and Indicators The PS1 front panel contains DC power and a RESET switch The RESET switch is used to disable the alarm and reset the PSU Power Supply Redundancy The PS1 Internal Rack Power Supply is supplied with the DFR Card Cage Rack If power redundancy is required a second PS1 can be instal...

Страница 7: ...redundant supply installed Front panel indicator and MUTE switch AC power cord supplied Network management system for rack communications o Status monitoring and operational management o Operational level determination and access control o Network ready for health and connection monitoring ...

Страница 8: ...4 DFR PS1 Model Numbers Model Number Descriptions DFR Rack chassis only PS1 Power supply unit ...

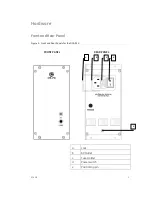
Страница 9: ...DFR PS1 5 Hardware Front and Rear Panel Figure 2 Front and Rear Panels for the DFR PS1 FRONT PANEL REAR PANEL a Lock b AC Outlet c Fuse Holder d Power switch e Positioning pin a b c d e ...

Страница 10: ... failure Reset Button RST a Press this button shortly less than 5 seconds will make the internal alarm buzzer silent upon recognition of the fault b Press and hold the button for more than 5 seconds the PSU will reset the unit to default setting and resume supplying the load when the fault is cleared PS1 can be controlled by NMS For the details please refer to the NMS User Guide ...

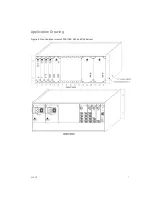
Страница 11: ...DFR PS1 7 Application Drawing Figure 3 Front and rear view of DFR DFR PS1 and DFV Series ...

Страница 12: ...FROM THE PS1 POWER SUPPLY UNIT BACK PLANE The back plane of the rack is for the purpose of distributing voltage to the plug in modules and communication with NETC and plug in module A 10 pin connector is provided from the back plane for each module slot in the rack supplying 12VDC and data exchange by using RS485 PLUG IN MODULES Plug in modules can be installed into a DFR standard 19 485mm chassis...

Страница 13: ...connected to its mating connector on the back plane and located at slots 15 17 The optional secondary power supply should be located at slot 12 14 c All Plug in modules should be firmly seated into their respective 10 pin back plane mating connectors If the above conditions have been met the rack should be replaced and returned C Should the power LED on an individual plug in fail to light check th...

Страница 14: ...250V Slow blow Fuse Size 5x20mm located in pull out tray on back panel Connectors Power input Recessed IEC 320 3 pin male Cable supplied Mechanical Height 158 4 mm Width 75 mm Depth 204 5 mm Weight 1 57kg Construction Aluminum Finish Black semi gloss paint Mounting Four Captive screw Environmental Operating Temperature 20 C to 60 C Operating Relative Humidity 20 to 90 non condensing Storage Temper...

Отзывы: