background image

- 34 -  

November 12, 2016 


Installation Manual for SX-4000 Standalone 

Integrated Media Block™ 

with Enterprise Storage/Enterprise Storage Plus 

7. SERIES 2 PROJECTOR SETUP 


7.2. NEC Series 2 Projector 
 

In order to configure an NEC Series 2 projector to work with SX-4000, the following steps must be 
taken: 

1.  Switch on the projector so that it is in STANDBY mode. 
2.  Use the Digital Cinema Communicator for S2 Windows software provided by NEC to 

connect to the projector. 

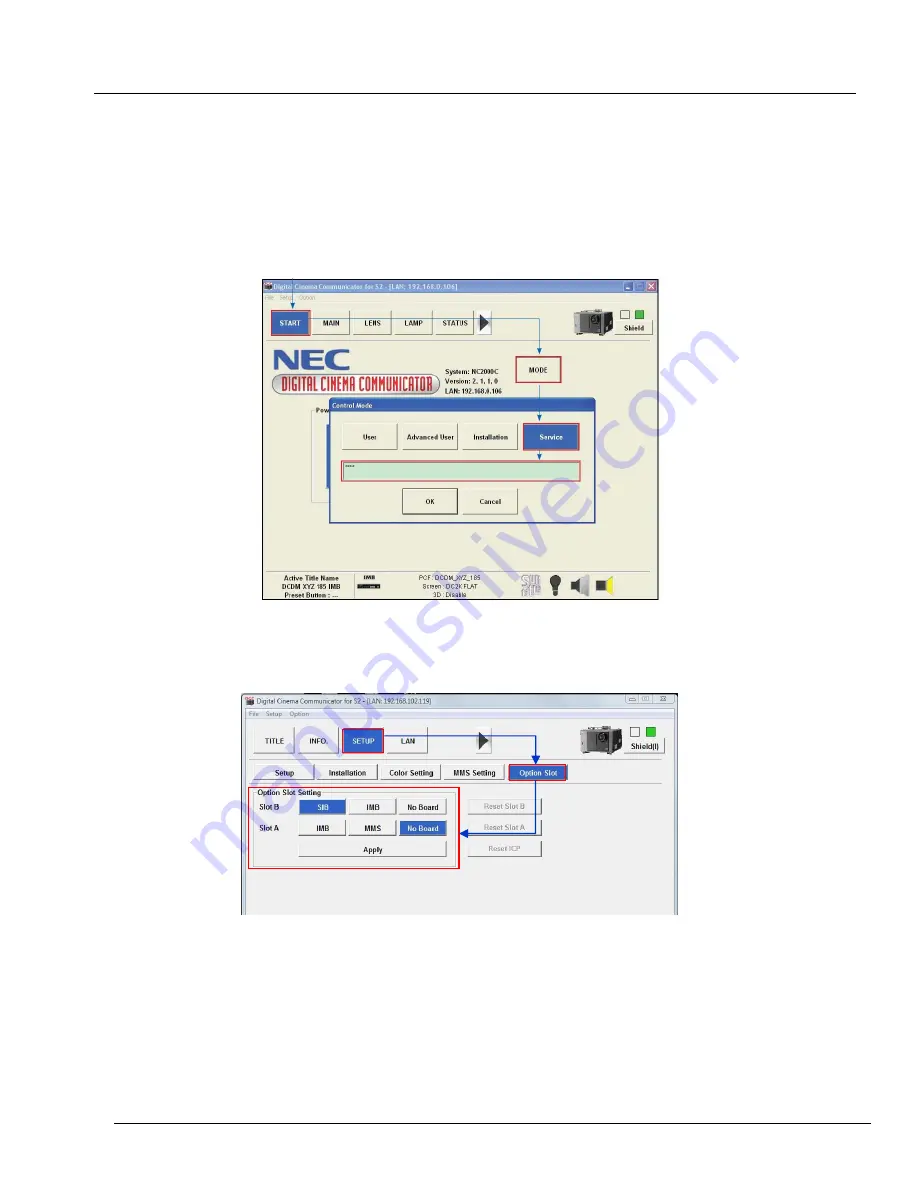
3.  Select 

[Start]


[Mode

]

[Service] 

and enter the Service password to activate 

service mode operation. (as shown in Figure 23) 


Figure 23 Service Mode on NEC Digital Cinema Communicator. 


4.  Select 

[Setup]


[Option Slot Setting] 

on the Digital Cinema Communicator and 

select IMB for Slot B in Option Slot Setting. (as shown in Figure 24) 


Figure 24  Option slot settings on NEC Digital Cinema Communicator. 

5.  Select 

[Start]


[Power] 

[On] 

to power on the projector.  

6.  Clear the Service Door/Marriage Tamper on the server. 

To use SX-4000 for content playback, the INPUT source of the projector macros must be set to 
IMB. 

Содержание SX-4000

Страница 1: ...INSTALLATION MANUAL FOR SX 4000 STANDALONE INTEGRATED MEDIA BLOCK WITH ENTERPRISE STORAGE ENTERPRISE STORAGE PLUS SMS version 10 0 November 12 2016...

Страница 2: ...E STORAGE PLUS 14 4 1 Product Specifications 14 4 2 HDD Tray Lock 14 4 3 Front Panel 15 4 4 Back Panel 16 4 5 Install the Enterprise Storage Enterprise Storage Plus into the Pedestal 17 4 6 eSATA conn...

Страница 3: ...Content ingest from FTP 40 9 2 Selecting an ingest source 40 10 AUDIO SETUP 41 11 SUBTITLES 43 12 AUTOMATION SETUP 44 12 1 Automation setup for server GPIO 44 12 2 Automation setup for projectors 45 1...

Страница 4: ...and specifications stated in this manual are subject to change without notice due to continuous product development and improvements In no other event shall GDC Technology Limited be liable for any lo...

Страница 5: ...Road North Zone HighTech Park Nanshan District Shenzhen China Tel 86 755 8608 6000 Edificio Mercurio V a Augusta 59 desp 607 08006 Barcelona Spain Tel 34 93 159 51 75 Peru Lima USA Los Angeles Brazil...

Страница 6: ...g Kec Grogol Petamburan Jakarta Barat 11440 Indonesia Tel 62 21 2920 4691 3F Kyobashi Chuo Bldg 1 14 7 Kyobashi Chuo ku Tokyo 104 0031 Japan Tel 81 3 5524 2607 Office No B 207 208 Everest Chamber Andh...

Страница 7: ...rise Storage Enterprise Storage Plus with the projector audio system and automation devices used in cinema theatres Note The currently supported software version for SX 4000 server is 10 0 In this man...

Страница 8: ...ation of GDC SX 4000 and Enterprise Storage Enterprise Storage Plus for reference Please contact our sales representative to specify the accessory needed for the installation The SX 4000 Packaging Inc...

Страница 9: ...Enterprise Storage Plus 1 INTRODUCTION The Enterprise Storage Packaging Includes Item Qty Photo Enterprise Storage 1 HDD Tray Key 1 3 5 SATA HDD 5 Power Cord 1 eSATA Cable 1 Manual CD 1 Quick Start Gu...

Страница 10: ...torage Plus 1 INTRODUCTION The Enterprise Storage Plus Packaging Includes Item Qty Photo Enterprise Storage Plus 1 HDD Tray Key 1 Tubular Key 1 3 5 SATA HDD 5 Power Cord 2 eSATA Cable 2 Manual CD 1 Qu...

Страница 11: ...ALLING SX 4000 INTO THE PROJECTOR Note If the projector comes with the GDC IMB pre installed the instructions in Section 2 can be skipped This section of the manual describes the physical installation...

Страница 12: ...interface board placeholders from projector Before installing SX 4000 see the guidelines below to ensure proper placement 2 1 1 Barco Projector Placement Figure 3 shows an interface board with SMPTE 2...

Страница 13: ...ting interface boards or placeholder faceplates from this position before installing SX 4000 Figure 5 SX 4000 Placement on Christie projector 2 1 3 NEC Projector Placement Figure 6 shows the location...

Страница 14: ...once properly inserted Note When installing the SX 4000 into any NEC projector it is recommended to install it into the top slot of the projector If the SX 4000 is installed into the bottom slot the b...

Страница 15: ...Specifications Figure 8 Enterprise Storage Product Specifications Suitable for 3 5 SATA HDD Support Hot Swap Dimension 483 W X 330 D X 89 H mm Figure 9 Enterprise Storage Plus Product Specifications...

Страница 16: ...ck with Enterprise Storage Enterprise Storage Plus 4 INSTALLING ENTERPRISE STORAGE ENTERPRISE SOTRAGE PLUS 4 3 Front Panel Enterprise Storage Enterprise Storage Plus 1 HDD Tray 2 HDD LED 3 Power LED 4...

Страница 17: ...4 INSTALLING ENTERPRISE STORAGE ENTERPRISE SOTRAGE PLUS 4 4 Back Panel Enterprise Storage 1 Power Connector 2 eSATA Connector Enterprise Storage Plus 1 Power Connector 2 eSATA Connector 3 CRU Connect...

Страница 18: ...stall the Enterprise Storage Enterprise Storage Plus into the Pedestal 1 Put the Enterprise Storage Enterprise Storage Plus on the 19 pedestal 2 Tighten four screws to fix the Enterprise Storage Enter...

Страница 19: ...prise Storage Plus 1 Take out the power cord s from the packaging and connect to the power connector of Enterprise Storage Enterprise Storage Plus For Enterprise Storage Plus please make sure that bot...

Страница 20: ...age Plus connect the eSATA cable to eSATA port 1 on the SX 4000 Figure 13 Insert the eSATA cable into SX 4000 eSATA port 1 2 For Enterprise Storage Plus connect another eSATA cable from eSATA CRU port...

Страница 21: ...terprise Storage Enterprise Storage Plus 4 INSTALLING ENTERPRISE STORAGE ENTERPRISE SOTRAGE PLUS 4 7 Procedures to install the HDD 1 Using the HDD tray key provided turn the HDD tray lock to the OPEN...

Страница 22: ...torage Plus 4 INSTALLING ENTERPRISE STORAGE ENTERPRISE SOTRAGE PLUS 3 Put the 3 5 HDD onto the HDD tray tighten 4 screws to fix the HDD with HDD tray on the bottom 4 Insert the HDD tray with HDD insta...

Страница 23: ...STORAGE ENTERPRISE SOTRAGE PLUS 5 Using the tray key provided turn the lock to LOCK position to lock the HDD tray to the Enterprise Storage Enterprise Storage Plus Procedure to uninstall the HDD 1 Af...

Страница 24: ...stallation Manual for SX 4000 Standalone Integrated Media Block with Enterprise Storage Enterprise Storage Plus 4 INSTALLING ENTERPRISE STORAGE ENTERPRISE SOTRAGE PLUS 2 Uninstall the 4 screws in the...

Страница 25: ...sh the HDD tray when inserting to avoid damage to components Do not force the HDD tray into the slot if you think it is installed incorrectly This may damage the Enterprise Storage Enterprise Storage...

Страница 26: ...e Enterprise Storage Enterprise Storage Plus Each drive has a corresponding LED light numbered 1 5 The lights have 2 colors blue and red The LED lights can change from steady to flashing depending on...

Страница 27: ...4 INSTALLING ENTERPRISE STORAGE ENTERPRISE SOTRAGE PLUS Indication of LED Power LED Please see the table below for an explanation of Power LED indicator Green Power LED Steady Powered on Off Powered...

Страница 28: ...ct to turn the buzzer on or off WARNING This is not a reset switch for the buzzer Once the button is toggled to the off position the buzzer will remain silent if any other hard disk fails Please remem...

Страница 29: ...nterprise Storage Enterprise Storage Plus for the Content Storage The SX 4000 must be configured to use the Enterprise Storage Enterprise Storage Plus for content storage 1 Under IMB Storage in Config...

Страница 30: ...thernet 2 and SOM IP address 6 Set the IP address for IMB Ethernet 2 This is the IP address of the Security Manager 7 This is the main IP address of the SX 4000 The SMS interface can be reached at thi...

Страница 31: ...learing Door Tampers from the SX 4000 Please use the following steps below to perform the marriage between the SX 4000 and to clear the door tampers on the SX 4000 1 Enter SMS 2 Click Configuration to...

Страница 32: ...ise Storage Plus 6 SX 4000 NETWORK SETUP 6 The following pop up window will appear Figure 19 IMB Status 7 Click Marry to perform the marriage of the projector and SX 4000 8 Click Close to clear the do...

Страница 33: ...m configuration is required for Barco Series 2 projector to work with SX 4000 The Service Door Marriage Tamper on the server must be cleared before SX 4000 can be used for playback In order to use SX...

Страница 34: ...1 On the Barco touch panel select Control Server The new window Connection Properties will appear as shown in Figure 21 Figure 21 Barco touch panel settings Connection Properties 2 Enter the SOM IP ad...

Страница 35: ...by NEC to connect to the projector 3 Select Start Mode Service and enter the Service password to activate service mode operation as shown in Figure 23 Figure 23 Service Mode on NEC Digital Cinema Com...

Страница 36: ...X 4000 is installed in a Christie Series 2 projector the following steps must be taken in order for the GDC server to play with the Christie Series 2 projector 1 Log in to the Marriage account on the...

Страница 37: ...Enterprise Storage Enterprise Storage Plus 7 SERIES 2 PROJECTOR SETUP 3 Select Menu Administrator Setup Content Devices Configuration as Shown in Figure 27 Figure 27 Content Devices Configuration 4 Se...

Страница 38: ...shows 3D settings on a Christie projector as an example see Figure 29 Figure 29 3D macro settings for Christie Series 2 projectors The settings for 3D output control 3D Sync Polarity Dark Time Output...

Страница 39: ...dmin Panel to access the Admin Panel 3 Click Focus at the far bottom right of the keyboard then click the cursor in the Password text box to enter the password 4 Click Diagnostics Maintenance Configur...

Страница 40: ...t up content ingest sources using other sources 9 1 1 Content ingest from USB disk The following steps describe the setup of a source for ingesting content from an external USB hard drive 1 From SMS c...

Страница 41: ...cription for the FTP server in the Source Name text box In this case we will use the source name FTP 192 Select FTP as the Source Type Figure 33 FTP ingest source setup 3 Enter the respective paramete...

Страница 42: ...s 9 CONTENT INGEST MANAGEMENT SETUP Figure 34 Ingest from USB source 10 AUDIO SETUP The SX 4000 features AES digital audio signal via 2 RJ45 Outputs For compatibility with most audio processors on the...

Страница 43: ...lone Integrated Media Block with Enterprise Storage Enterprise Storage Plus 10 AUDIO SETUP Figure 36 RJ45 DB25 pinout Optional for traditional audio connector Figure 37 RJ45 DB25 pinout Optional for C...

Страница 44: ...ubtitle overlay rather than CineCanvas to display DCP subtitles Subtitle overlay can be enabled with the following steps 1 From the SMS click on Configuration 2 Select Maintenance access from the top...

Страница 45: ...General automation setup Adding event labels and actions and Automation Scheduling please refer to SX 4000 User Manual s Section 2 3 6 Automation for details 12 1 Automation setup for server GPIO The...

Страница 46: ...of the device In this case it is PROJECTOR Set the device type to PROJECTOR see Figure 41 2 Click OK and set up the device parameters for the projector device see Figure 42 3 Enter the IP address of...

Страница 47: ...46 November 12 2016 Installation Manual for SX 4000 Standalone Integrated Media Block with Enterprise Storage Enterprise Storage Plus 12 AUTOMATION SETUP Figure 42 Projector automation device setup 2...

Страница 48: ...utomation interface 1 Click Add on Devices and enter the name of the device In this case it is eCNA Set the device type to eCNA_IO 2 Click OK and set up the device parameters for the eCNA device Figur...

Страница 49: ...tallation Manual for SX 4000 Standalone Integrated Media Block with Enterprise Storage Enterprise Storage Plus 12 AUTOMATION SETUP 5 Click Save to save configured settings Figure 44 Automation setting...

Страница 50: ...e steps below to configure a JNIOR device in the server automation interface 1 Click Add under Devices and enter the name of the device In this case it is JNIOR Set the device type to JNIOR_IO 2 Click...

Страница 51: ...tallation Manual for SX 4000 Standalone Integrated Media Block with Enterprise Storage Enterprise Storage Plus 12 AUTOMATION SETUP 5 Click Save to save configured settings Figure 46 Automation setting...

Страница 52: ...Devices and enter the name of the device In this case it is ChristieACT Set the device type to ChristieACT 2 Click OK and set up the device parameters for the Christie ACT device Figure 47 Christie A...

Страница 53: ...tion Manual for SX 4000 Standalone Integrated Media Block with Enterprise Storage Enterprise Storage Plus 12 AUTOMATION SETUP 6 Click Save to save configured settings Figure 48 Automation settings for...

Страница 54: ...s below to configure a GDC device in the server automation interface For this example the device refers to the GDC XSP 1000 Cinema Processor 1 Click Add under Devices and enter the name of the device...

Страница 55: ...n Manual for SX 4000 Standalone Integrated Media Block with Enterprise Storage Enterprise Storage Plus 12 AUTOMATION SETUP 4 Click Save to save configured settings Figure 50 Automation settings for GD...

Страница 56: ...Follow the steps below to configure a Dolby device in the server automation interface For this example the device refers to the Dolby CP650 Sound Processor 1 Click Add under Devices and enter the name...

Страница 57: ...llation Manual for SX 4000 Standalone Integrated Media Block with Enterprise Storage Enterprise Storage Plus 12 AUTOMATION SETUP 4 Click Save to save configured settings Figure 52 Automation settings...

Страница 58: ...ices The SX 4000 supports automation for USL DAX sound processor Follow the steps below to configure a USL DAX device in the server automation interface 1 Click Add under Devices and enter the name of...

Страница 59: ...tandalone Integrated Media Block with Enterprise Storage Enterprise Storage Plus 12 AUTOMATION SETUP 3 Enter the IP address of the USL DAX device see Figure 54 4 Click Save to save configured settings...

Страница 60: ...Follow the steps below to configure a USL JSD device in the server automation interface 1 Click Add under Devices and enter the name of the device In this case it is JSD Set the device type to USL JSD...

Страница 61: ...allation Manual for SX 4000 Standalone Integrated Media Block with Enterprise Storage Enterprise Storage Plus 12 AUTOMATION SETUP 5 Click Save to save configured settings Figure 56 Automation settings...

Страница 62: ...gger the TA 10 Figure 57 Component Engineering TA 10 wiring diagram 14 TESTING PROCEDURES AFTER INSTALLATION After the installation has been completed it is necessary to test the following to ensure t...

Страница 63: ...ls Vin High min level is 3 5 Volts Vin Low max level is 1 5 Volts Iin min 20 uA Iin max 20 uA Essentially no current flows this is a voltage sensing device The GPI inputs have a 5 62K Ohm resistor pul...

Страница 64: ...86 755 8608 6000 India Mumbai Spain Barcelona Office No B 207 208 Everest Chamber C Esteve Terradas Andheri Kurla Road Marol Andheri n 27 esc D Despacho 1 Mumbai 400 059 India 08023 Barcelona Spain Te...

Отзывы: