background image

Version: 1.0 

2. Installation

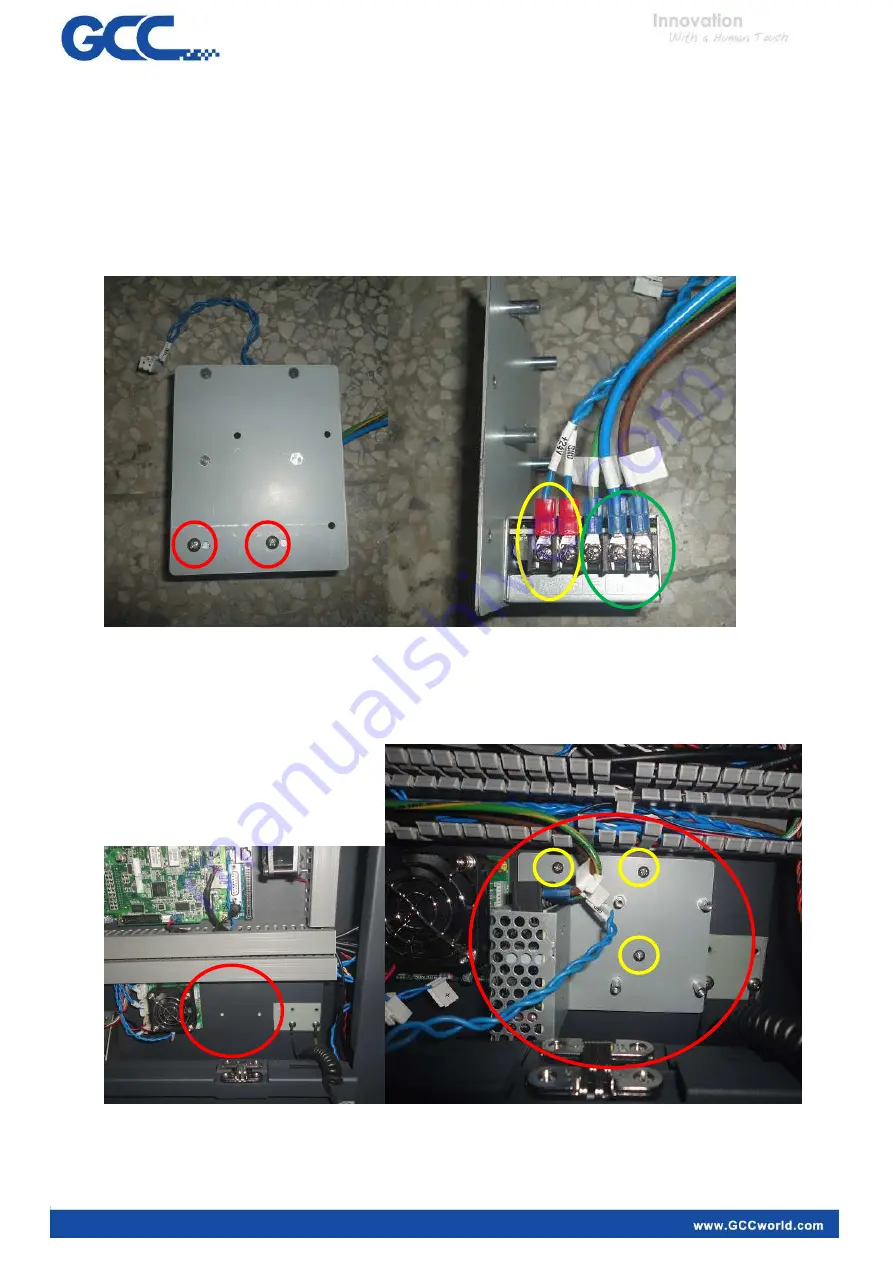
2.1.  Mount 24v power supply(item #1) by using 2 

shorter

 screws(these 2 

shorter

 screws belong to item #1, 

see 2 

red

 circles below for the position) on the back side of bracket (item # 2). Then mount 24v 

power cable (item #7) to the left side of power supply (DC side, see the 

yellow

 circle below). Then 

mount the AC cable (item #6) to the right side of power supply (AC side, see the 

green

 circles 

below). 

Open S400 main board side cover and mount the 24v power supply and bracket on the position 

below. The 2 red circles below are to show the mounting position(two pictures below show the 

same position, the left picture is from a longer distance and right picture is from a closer distance). 

Using 3 screws (item #4, see 3 

yellow 

circles below for screw positions) to mount the bracket.   

Distributed by: Jorlink USA, Inc. | Tel.: (336) 288-1613 | [email protected] | www.JORLINK.com

Содержание LaserPro S400

Страница 1: ...1 12V_24V External I O board Installation Guide S400 Distributed by Jorlink USA Inc Tel 336 288 1613 support jorlink com www JORLINK com...

Страница 2: ...ts for 12v_24v external I O board have items below Notice S400 12v_24v External I O board upgrade kit part number is LGCC 290115510G 1 2 3 4 5 6 7 8 9 Distributed by Jorlink USA Inc Tel 336 288 1613 s...

Страница 3: ...tem 6 to the right side of power supply AC side see the green circles below Open S400 main board side cover and mount the 24v power supply and bracket on the position below The 2 red circles below are...

Страница 4: ...see 4 red circles below for the screw positions Connect the JP33 signal cable item 9 see the yellow circle below The other side of JP33 signal cable item 9 connect to main board see the yellow circle...

Страница 5: ...ide of 24v power cable item 7 If user need to use 12v power then change from 24v power cable item 7 to be 12v power cable item 8 and connect to the positions below the 2 yellow circles point the both...

Страница 6: ...e position One picture is from a longer distance one picture is a closer distance The AC cable screws are not easy to reach so the laser power supply needs to be removed the screws first 4 yellow circ...

Страница 7: ...nnect the cable from JP24 to the JP33 on the mainboard Connect the cable from JP43 to JP34 on the mainboard We can connect the 12V power to the power supply on the laser engraver as show Distributed b...

Страница 8: ...rol Interface definitions Output 1 Normal low On High In the duration of a job the signal is high Output 2 Normal High On Low When Stop button is pressed signal low when processing job is finish signa...

Страница 9: ...Start Stop Triggers the Start Stop function Start Control Modes Switch mode To use under Switch mode we need to set the jumpers as follow Set the jumper of JP8 JP9 to the 1 2 position Set the jumper...

Страница 10: ...on Start Control Modes Electronic Control mode To use under Electronic Control mode we need to set the jumpers as follow Set the jumper of JP8 JP9 to the 2 3 position Set the jumper of JP4 JP5 to the...

Страница 11: ...s Under Electronic Control mode Input I O GND 5V 12V Input 1 High Laser Off Low Laser On Input 2 Activates Start Stop G GN ND D I In np pu ut t 2 2 I In np pu ut t 1 1 Distributed by Jorlink USA Inc T...

Отзывы: