GCC Technologies 12 Скачать руководство пользователя страница 5

5

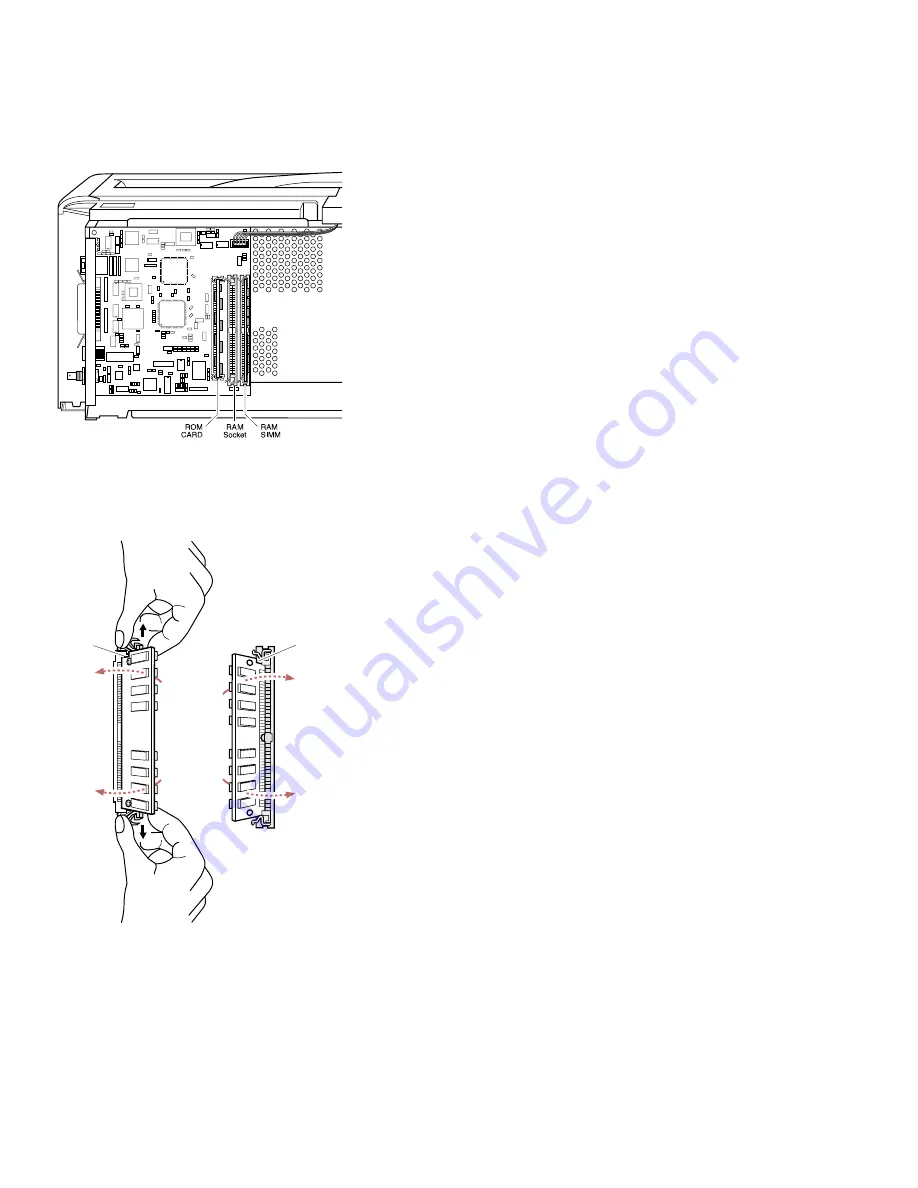
10. The ROM and RAM cards are at the right of the

controller board. Remove the ROM card to get
better access to the RAM slots.

Note: Your controller board may vary from the 
one shown. Some Elite 12 models ship without
a physical ROM card in place.

If your printer has a ROM card in the slot to the
left, remove it as follows:

a.

Place your index fingers under the back 
edge of the ROM card.

b.

Using your thumbs, slowly push the two 
retaining clips outward until the clips clear 
the top surface of the ROM card.

c.

Pivot the ROM card away from the 
retaining clips and remove the ROM card 
from the socket.

d.

The ROM card has a notch in it; this must 
be at the top of the contacts when you 
reinstall it.

e.

Put the ROM card in a safe place; after 
you have installed the RAM you will need 
to reinstall it.

Install
RAM
SIMM or
ROM
Card

Notch

Remove
RAM
SIMM or
ROM
Card

Notch

Содержание 12

Страница 1: ...Introduction 2 Section 2 Installing RAM into the Elite 12 Series 3 Section 3 Installing RAM into the Elite XL 20 Series 8 Section 4 Confirming RAM Installation and Updating Drivers 12 Copyright GCC T...

Страница 2: ...t jobs however may be more complex than the standard RAM is able to handle and therefore require additional RAM Jobs with heavy graphical content and or many font faces will typically require the most...

Страница 3: ...ear access to its left side 4 Remove the paper tray 5 Open the top cover by pressing the release button on the top right of the printer 6 Remove the side cover Unscrew the two thumbscrews at the rear...

Страница 4: ...cover next to the top cover this unlatches the cover and you should be able to slide the cover away from the printer 9 IMPORTANT Attach a grounding wrist strap to the perforated metal chassis or touc...

Страница 5: ...your index fingers under the back edge of the ROM card b Using your thumbs slowly push the two retaining clips outward until the clips clear the top surface of the ROM card c Pivot the ROM card away...

Страница 6: ...you have not inserted the SIMM correctly 12 Reinsert the ROM card if necessary in the same way that you inserted the SIMM Warning If the RAM SIMM and ROM card are not correctly inserted completely int...

Страница 7: ...rinter on If the Ready message still doesn t appear and you are confident that you have installed the ROM card and SIMM correctly contact GCC Technical Support at 781 276 8620 U S only outside the U S...

Страница 8: ...ve the printer so that you have clear access to its left side 4 Remove the side cover Unscrew the two thumbscrews at the rear of the printer as shown If these are tight you may need to use a 2 Phillip...

Страница 9: ...Using your thumbs slowly push the two retaining clips outward until the clips clear the top surface of the ROM card c Pivot the ROM card away from the retaining clips and remove the ROM card from the...

Страница 10: ...clips will not snap into place you have not inserted the SIMM correctly 9 Reinsert the ROM card in the same way that you inserted the SIMM Warning If the RAM SIMM and ROM card are not correctly insert...

Страница 11: ...printer on If the Ready message still doesn t appear and you are confident that you have installed the ROM card and SIMM correctly contact GCC Technical Support at 781 276 8620 U S only outside the U...

Страница 12: ...eady message doesn t appear Updating LaserWriter 8 printer driver Macintosh Only After extra memory is installed the LaserWriter 8 driver configuration must be updated on every Macintosh that uses the...

Страница 13: ...s print commands you must execute this command in DOS 4 Type EXIT and press the Return key to return to Windows The printer will have printed a page which shows Max Suggested VM KB This is the maximum...

Страница 14: ...ck on the Elite 12 Series icon 3 You ll see a menu choose Properties from this list 4 You ll see the Properties tabbed dialog box click on the Device Options tab 5 In the window click on Virtual Memor...

Отзывы: