background image


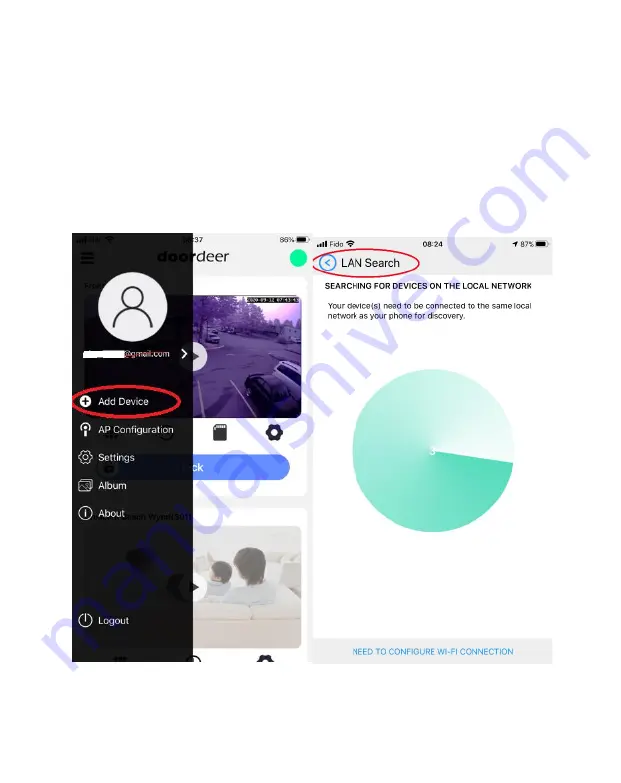
3.2 Adding a configured or wired IP Doorbell


You can add a previously configured or hard wired IP Doorbell device 
using the following method.


1. Connect your mobile device to the Wi-Fi/LAN network which 
contains the IP Doorbell.


2. Clip the top left corn three black line, the menu bar is shown up. 
Click Add Device. Then the LAN Search will automatically start to 
search the new device for you.  


- 17 -

Содержание PL963 Series

Страница 1: ...G B F WiFi IP Doorbell USER MANUAL 411000261...

Страница 2: ...your door from anywhere your mobile device has a WiFi or data connection Please read these instructions carefully and follow all of the required steps during setup to ensure your enjoyment of a fully...

Страница 3: ...Box 1 External Wi Fi Antenna with 3 Cable 1 12VDC Power Supply 1 Relay Push to Exit Wiring Harness 1 Bell Connector Wire Set 1 Varistor blue case see wiring diagrams 4 Screws with Anchors 2 Hex Head...

Страница 4: ...2 1080P Camera Lens Illuminator LED s Customizable Nameplate Access Code Keypad Speaker Bell Button Microphone 1080P Camera Lens Illuminator LED s Customizable Nameplate Speaker Bell Button Microphone...

Страница 5: ...er hole into the wall behind the IP Doorbell to allow for the concealment of the Wi Fi antenna if used within the wall Back Box Mounting Feed the power supply wiring wiring harness s and the Wi Fi Ant...

Страница 6: ...Screws Rain Cover Back case 4...

Страница 7: ...Connections and Connection to Existing Door Chime Optional PL963M PM Lock and Bell Relays are Rated Maximum 3 Amps at 250VAC or 30VDC 1 press and hold for 3 seconds until you hear Di sound device will...

Страница 8: ...Lock Power Supply Electronic Lock POWER CN2 1 2 3 4 5 LAN RESET 2 3 BELL ON 5S OFF 1S 1 PL963M PM Lock and Bell Relays are Rated Maximum 3 Amps at 250VAC or 30VDC Red Black GND Green Normally Open Bl...

Страница 9: ...y reset erases settings stored during the configuration process Do not perform a factory reset after you have configured the IP Doorbell unless absolutely necessary Downloading the App 2 Apply power t...

Страница 10: ...ng the App to be used NOTE It is best practice to restart your phone and disable its cellular data during the initial configuration of the IP Doorbell 1 Make sure your smartphone is connected to the W...

Страница 11: ...ail address is required password password confirmation 5 Read the terms and privacy agreement then click on the checkbox to agree 6 Click on Sign up button If the provided information is valid and the...

Страница 12: ...gged into your account and can see your home Doorbell screen To Proceed with a Wireless Wi Fi installation go to step 3 1 1 android or 3 1 2 iOS To Proceed with a Wired RJ45 installation connect the R...

Страница 13: ...3 WiFI Configuration 3 1 1 Configuration Using the Android or iOS App 1 Inside the app click add device on the menu 11...

Страница 14: ...utomatically search the doorbell at the same network if you use hardwired cable connection you will find your device through LAN Search If you use wifi connection then choose the Need To Configure WiF...

Страница 15: ...3 Click CONTINUE Then the APP will show your local wifi name please carefully input your wifi password and confirm that Then hit START CONFIGURATION 13...

Страница 16: ...g Wi Fi Configuration the APP will search the new device you might hear the doorbell dingdong sound and the searching sound from your phone After that you will see the new doorbell shown on the APP sc...

Страница 17: ...5 Click the Doorbell hhxxxxxx to add your device A popup message will appear showing Device added successfully 15...

Страница 18: ...Once the IP Doorbell has successfully connected to your WiFi and is added in your app you will be able to access the IP Doorbell from anywhere using WiFi or mobile data 3G 4G 16...

Страница 19: ...IP Doorbell device using the following method 1 Connect your mobile device to the Wi Fi LAN network which contains the IP Doorbell 2 Clip the top left corn three black line the menu bar is shown up Cl...

Страница 20: ...3 The new device will be shown on the device list Click the new device and Name your device then click Confirm to add your device successfully on Doordeer APP 18...

Страница 21: ...emporary access code 4 1 Permanent access code Inside the app click setting symbol on the device window The APP shows Configuration Page which you could find your permanent pin code My PIN for this de...

Страница 22: ...2 You could also change your permanent code to any 6 digital number code 3 Press PIN CODE on GBF IP device to unlock your gate 20...

Страница 23: ...In the APP Click keypad symbol on the device window Press to create a new temporary doorcode on the APP You could set access duration for each temporary access code by 1 day Specified time period or...

Страница 24: ...2 You could create multiple temporary access codes for this access keypad 3 Press TEMPORARY ACCESS CODE unlock your gate on GBF IP the device relay to device will trigger 22...

Страница 25: ...5 Other features 5 1 Share Access 1 In the APP go to device setting page to share your device with others Click Device Setting Icon and go to Configuration page you will see Share Access 23...

Страница 26: ...ddress you want to share with Please make sure the person use the same email address to sign up the Doordeer APP login account You could share the device with multiple persons And You could remove the...

Страница 27: ...5 2 Motion Detection 1 In the APP go to device setting page to set Motion Detection if necessary Click Device Setting Icon and go to Configuration page you will see Motion Detection 25...

Страница 28: ...on off the motion detection function You can set the motion detection area by click the area you want to get motion detection You can also set the motion detection Sensitivity by sliding the bar from...

Страница 29: ...5 3 Set device time In the APP go to device setting page to set your device time by clicking Sync Device Time Click Device Setting Icon and go to Configuration page you will see Sync Device Time 27...

Страница 30: ...USER MANUAL GBF Electronics Inc Tech Support 604 278 6896 or 604 285 8721 https gbfelectronics com info gbfelectronics com...

Отзывы: