22
I
FEED TABLE REMOVAL
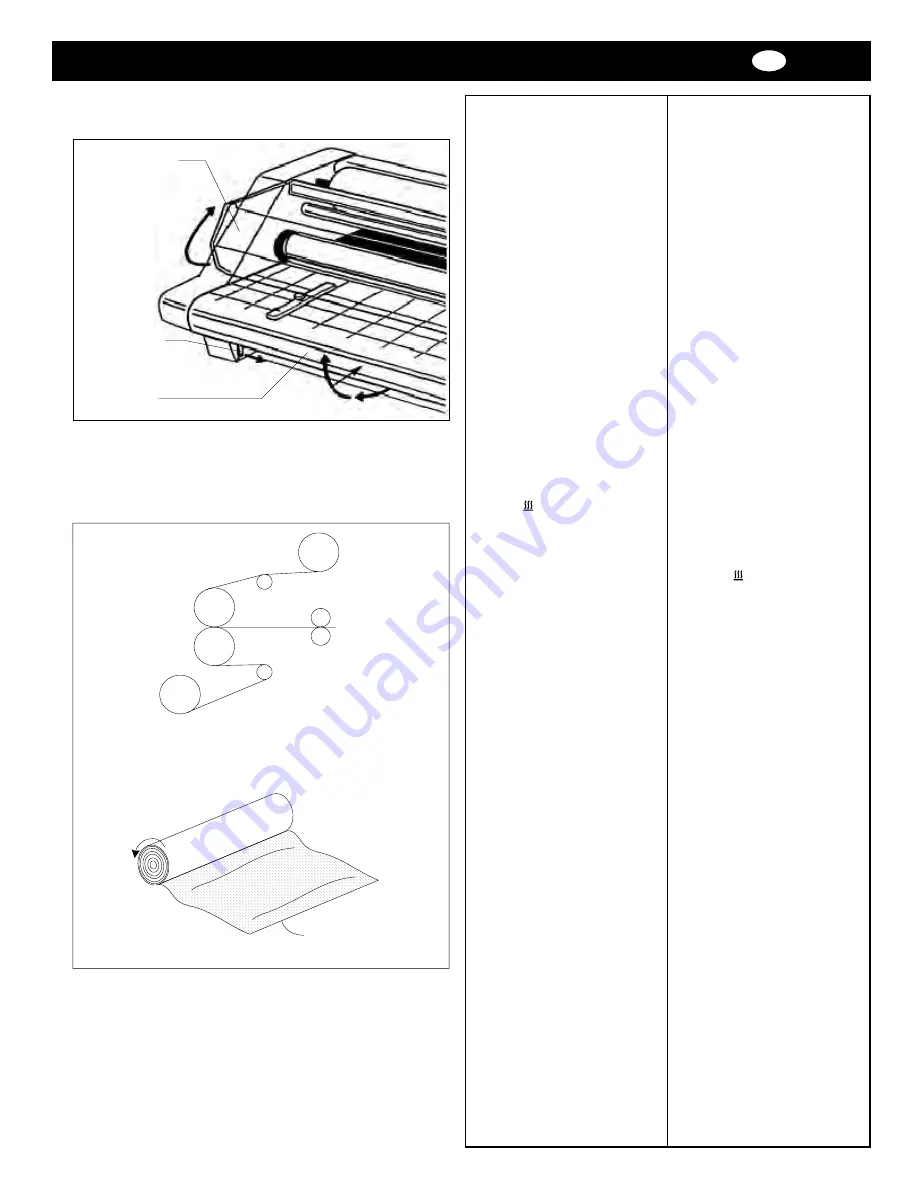
Refer to Fig. 12 and follow the
procedures to remove the feed
table:
1. Lift the safety shield to it’s full
upright position.
2. Slide the Feed Table latch to the
right.
3. Lift the table upwards and away
from the laminator.
FILM LOADING & THREADING
Refer to Fig. 13 or the film threading
diagram on the feed table of the
laminator for illustration of properly
loaded film.
The top and bottom rolls of
laminating film must be of the same
width and be present
simultaneously. A small amount of
adhesive will “squeeze out” during
lamination. Hardened adhesive
deposits can damage the heat
rollers. To avoid any damage, rotate
the rollers at slowest speed when
the
HEAT
lamp is on. Refer to the
section entitled
CARING FOR THE
ULTIMA 65-1 LAMINATOR
for
instructions regarding removal of
the accumulated adhesive.
Adhesive will deposit on the rollers if:
-
Only one roll is used.
-
Different widths of rolls are
loaded together.
-
Either roll is loaded adhesive
side against a heat roller.
-
One or both rolls of film are
allowed to run completely off its
core.
The adhesive side of the film is on
the inner side of the web (Fig. 13).
The shiny side of clear film must
contact the heat rollers. The dull
side of the film contains the
adhesive. Use extreme caution
when loading delustered (matte)
film as both sides appear dull.
Always change the top and bottom
supply rolls at the same time. Near
the end of each roll of GBC
laminating film is a label stating
“Warning-End of Roll”. The
appearance of this label on either
the top or bottom roll requires that
new rolls of film be installed as
soon as the item presently being
laminated completely exits the rear
of the laminator. Do not introduce
any additional items into the
laminator when the warning label is
visible.
Fig. 13
Fig. 12
Raise safety
shield
Slide feed
table latch
Lift up
and away
Po
ly-i
n
Adhes
ive
sur
fac
e
Polyester surface
Poly-in
RIMOZIONE DEL PIANO DI
ALIMENTAZIONE
Per rimuovere il piano di
alimentazione, fare riferimento alla
figura 12 e seguire la procedura
riportata qui di seguito.
1. Sollevare lo schermo protettivo e
mantenerlo dritto.
2. Fare scorrere la chiusura del
piano di alimentazione verso
destra.
3. Sollevare il piano e scostarlo
dalla plastificatrice.
CARICAMENTO ED
INTRODUZIONE DEL FILM
Fare riferimento alla figura 13
oppure al diagramma relativo
all’introduzione del film sul piano di
alimentazione della plastificatrice
per illustrazioni riguardanti il
corretto caricamento del film.
I rulli superiore ed inferiore del film
devono avere la stessa larghezza
ed essere caricati
contemporaneamente. Una piccola
quantità di adesivo verrà espulsa
durante il processo di
plastificazione. Depositi di adesivo
indurito possono danneggiare i rulli
di riscaldamento. Per evitare
qualsiasi danno, girare i rulli alla
velocità più bassa se la spia
HEAT
(CALORE)
è accesa. Far
riferimento al capitolo
MANUTENZIONE
per maggiori
informazioni sulla rimozione di
depositi di adesivo.
L’adesivo si depositerà sui rolli nei
casi in cui:
-
viene utilizzata una sola bobina.
-
bobine di larghezza differente
vengono caricate insieme.
-
una delle due bobine è caricata
con il lato adesivo contro un rullo
di riscaldamento.
-
una o entrambe le bobine sono
terminate fino a scoprire il nucleo.
La parte adesiva del film
corrisponde alla parte interna del
velo (figura 13). La parte più
brillante del film deve entrare in
contatto con i rulli di riscaldamento.
La parte opaca del film contiene
l’adesivo. Fare particolare attenzio-
ne quando viene caricato film
opaco (matt) in quanto entrambi i
lati sono opachi.
Cambiare sempre la bobina
superiore e quella inferiore allo
stesso tempo. Verso la fine di ogni
bobina di film laminante GBC appare
un’etichetta riportante l’avvertenza
“Warning-End of Roll” (Attenzione-
Fine della bobina). La comparsa di
questa etichetta sulla bobina
superiore o su quella inferiore
significa che è necessario caricare
nuove bobine di film non appena la
plastificazione in corso sarà
terminata. Non introdurre nessun
altro articolo nella plastificatrice alla
comparsa di tale etichetta.
Содержание ULTIMA 65-1
Страница 2: ......
Страница 54: ...50 ...
Страница 55: ...51 GBC ULTIMA 65 1 Maintenance Section ...
Страница 56: ...52 ...
Страница 61: ......
Страница 73: ......
Страница 74: ......
Страница 75: ...General Binding Corporation One GBC Plaza Northbrook IL 60062 4195 ...


