background image


Version 17.11.2017 

HW:CAM(V82)GD 

RL3-MIB-4 

P

a

g

e

18


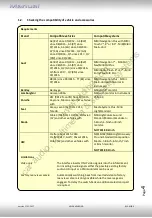
Symptom 

Reason 

Possible solution 

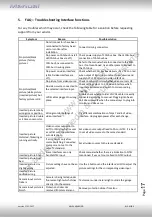
Camera input picture 
black. 

Camera power taken directly 
from reverse gear lamp. 

Use relay or electronics to "clean" reverse gear lamp 
power. Alternatively, if CAN-bus box is compatible 
with the vehicle, camera power can be taken from 
green wire of 6pin to 8pin cable. 

Camera input picture 
has distortion. 

Camera input picture 
settings cannot be 
adjusted. 

Camera input picture settings 
can only be adjusted in AV2 
mode. 

Set dip 3 of video-interface to ON (if not input AV2 is 
not already activated) and connect the camera to AV2. 
Switch to AV2 and adjust settings. Reconnect camera 
to camera input and deactivate AV2 if not used for 
other source. 

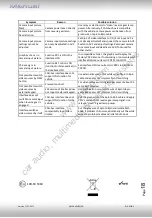
Graphics of a car in 
camera input picture. 

Function PDC is ON in the 
interface OSD. 

In compatible vehicles, the graphics will display the 
factory PDC distance. If not working or not wanted, set 
interface OSD menu item UI-CNTRL to ALLOFF. 

Chinese signs in 
camera input picture 

Function RET or ALL is ON 
(function for Asian market) in 
the interface OSD. 

Set interface OSD menu item UI-CNTRL to ALLOFF or 
PDCON. 

Not possible to switch 
video sources by OEM 
button. 

CAN-bus interface does not 
support this function for 
vehicle. 

Use external keypad or cut white wire of 6pin to 8pin 
cable and apply +12V impulses for AV-switching. 

Pressed too short. 

For video source switching a longer press of about 2.5 
seconds is required.  

Not possible to switch 
video sources by 
external keypad. 

SW-version of interface does 
not support external keypad.  

Use OEM-button or cut white wire of 6pin to 8pin 
cable and apply +12V impulses for AV-switching. 

Interface does not 
switch to camera input 
when reverse gear is 
engaged. 

CAN-bus interface does not 
support this function for the 
vehicles. 

Cut the green wire of the 6pin to 8pin cable and apply 
+12V constant from reverse gear-lamp signal. Use 
relay to "clean" R-gear lamp power. 

Interface switches 
video-sources by itself. 

CAN-bus interface 
compatibility to vehicle is 
limited.  

Cut the grey wire of 6pin to 8pin and isolate both 
ends. If problem still occurs, additionally cut the white 
wire of 6pin to 8pin cable and isolate both ends. 


10R-03 5384    


              www.eldibg.com

car audio, multimedia & security systems

All manuals and user guides at all-guides.com

Содержание MIB-4

Страница 1: ...one more video input Product features Video inserter for factory infotainment monitors Back and front camera CVBS Input CVBS Video Input for after market Video sources e g DVD Player DVB T Tuner Auto...

Страница 2: ...llation 2 2 Connection schema 2 3 Connection to the vehicle s head unit 2 4 Connection and power supply for the video interface 2 5 Connecting of video sources 2 5 1 Audio insertion 2 5 2 After market...

Страница 3: ...ause malfunctions of the interface Up to one year after purchase we offer free software updates for our interfaces To receive a free update the interface has to be sent in at own cost Wages for de and...

Страница 4: ...F from 2013 Toledo Media System Plus MIB High Standard Skoda Fabia3 NJ from 11 2014 Octavia3 A7 and other vehicles with MIB High Columbus und Standard Bolero Amundsen 5 8inch 6 5inch or 8inch monitor...

Страница 5: ...ches on the video interface Dip position down is ON and position up is OFF See the following chapters for detailed information Dip Function ON down OFF up 1 No function set to OFF 2 CVBS Video 1 input...

Страница 6: ...hich sometimes even vary within head units of the same version caused by different monitor specifications It is necessary to try all possible combinations while a working video source is connected to...

Страница 7: ...tion and disconnect the vehicle s battery Please read the owner s manual of the car regarding the battery s disconnection If required enable the car s Sleep mode hibernation mode In case the sleep mod...

Страница 8: ...ion 17 11 2017 HW CAM V82 GD RL3 MIB 4 Page 8 2 2 Connection schema w w w e l d i b g c o m c a r a u d i o m u l t i m e d i a s e c u r i t y s y s t e m s All manuals and user guides at all guides...

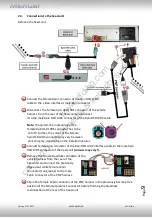
Страница 9: ...tween pink and grey depending on the installed monitor Connect female 4pin connector of the 8pin HSD LVDS interface cable to the male 4pin HSD LVDS connector of the head unit colours may vary Remove t...

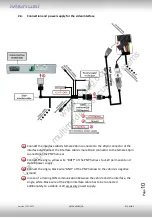
Страница 10: ...single yellow wire BATT of the PNP harness to 12V permanent and stabile power supply Connect the single black wire GND of the PNP harness to the vehicle s negative ground In case of a missing CAN com...

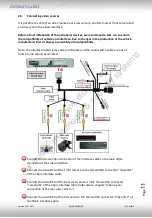
Страница 11: ...audio switch cable are out of function and should be isolated Connect the female 20pin connector of the interface cable to the male 20pin connector of the video interface Connect the video RCA of the...

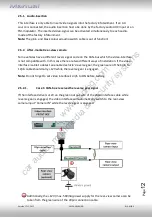
Страница 12: ...ferent ways of installation If the video interface is able to detect an enabled vehicle s reverse gear the green wire of the 6pin to 12pin cable should carry 12V while the reverse gear is engaged Note...

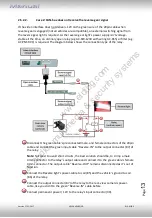
Страница 13: ...le connectors of the 20pin cable and connect the green input cable Reverse IN to the output connector 87 of the relay Note Not least to avoid short circuits the best solution should be to crimp a male...

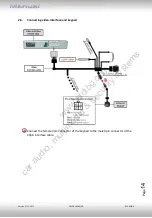
Страница 14: ...video interface and keypad Connect the female 4pin connector of the keypad to the male 4pin connector of the 20pin interface cable w w w e l d i b g c o m c a r a u d i o m u l t i m e d i a s e c u r...

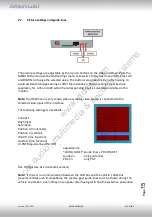
Страница 15: ...video source is connected to the selected video input of the interface The following settings are available Contrast Brightness Saturation Position H horizontal Position V vertical IR AV1 2 no functio...

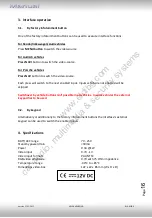
Страница 16: ...led will be skipped Switchover by vehicle buttons isn t possible in all vehicles In some vehicles the external keypad has to be used 3 2 By keypad Alternatively or additionally to the factory infotain...

Страница 17: ...ing into head unit does not work when the manual says to plug into monitor and vice versa Wrong monitor settings of video interface Try different combinations of dips 7 and 8 of video interface Unplug...

Страница 18: ...ace OSD Set interface OSD menu item UI CNTRL to ALLOFF or PDCON Not possible to switch video sources by OEM button CAN bus interface does not support this function for vehicle Use external keypad or c...

Отзывы: