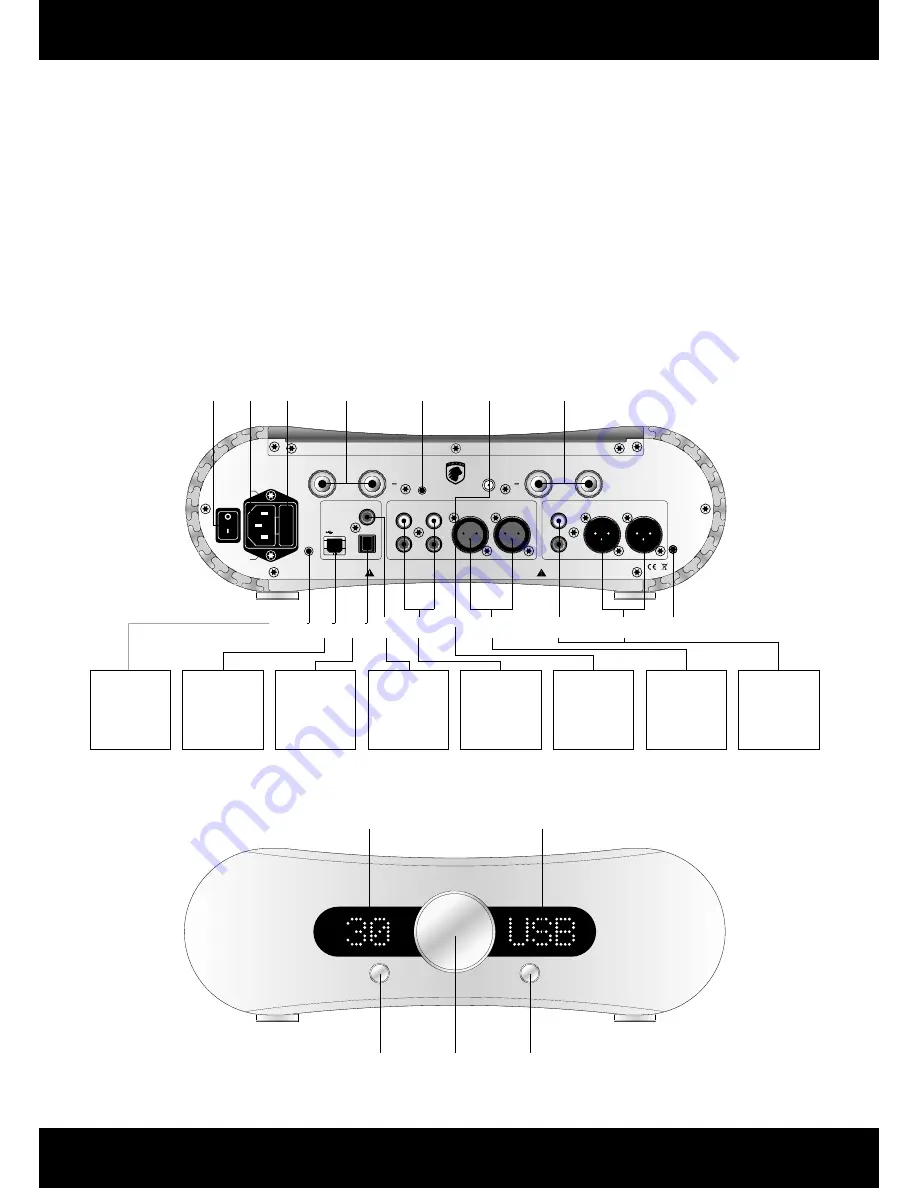
Gato Audio DIA-250S - Integrated Amplifier/DAC
Page 6
Mains
switch
Fuse
compartment
Setting up your amplifier
Basic connection
Follow these steps for setting up your system in this sequence:
1.
Place the DIA-250S as per the instructions on page 4
2.
Connect inputs to the amplifi er
3.
Connect your loudspeakers to the amplifi er
4.
Connect mains power cable to the amplifi er and turn it on
5.
Select input and volume setting. Enjoy!
Overview
L
R
Dim
Made in
Denmark
USB
Coax
Input 1
Input 2
Line out
Balanced
R
Toslink
Link
DO NOT REMOVE COVER. NO USER-SERVICEABLE PARTS INSIDE. REFER SERVICING TO QUALIFIED PERSONNEL.
TO REDUCE THE RISK OF ELECTRICAL SHOCK OR FIRE, DO NOT EXPOSE THIS APPLIANCE TO MOISTURE OR RAIN.
Speaker R
+
Speaker L
+
L
R
L
R
L
Balanced out
R
L
Mains
Live
Neutral
BT
Connect
Antenna
DIA-250S
Input
Standby
Left speaker
terminals
Bluetooth
Antenna
Bluetooth
Connect button
Right speaker
terminals
Mains
socket
Volume control knob
Standby button
Input selection button
Volume read-out
Input / Sample rate read-out
Balanced
input
Balanced
output
Display setting
Analogue
output
Analogue
inputs
USB
input
12 V trigger
Optical
input
Coaxial
input
iPad
Mac
PC
Laptop
Toggle On/Off
External Equipment
Sonos
Squeezebox
CD / DVD / BD-Player
Docking Station
Apple AirPort Express
AppleTV
Harddisk-Player
Streaming-Player
TV or Sat/Cable Receiver
Phono Preamp
Surround Preamp/Receiver
TV
CD / DVD / BD-Player
Docking Station
High End CD-Player
Professional Audio
Equipment
Power Amp
Active Speaker
Subwoofer
Phone
Tablet
Mac
PC
Laptop
Bluetooth


