background image

Replacing convertible notebook components

6

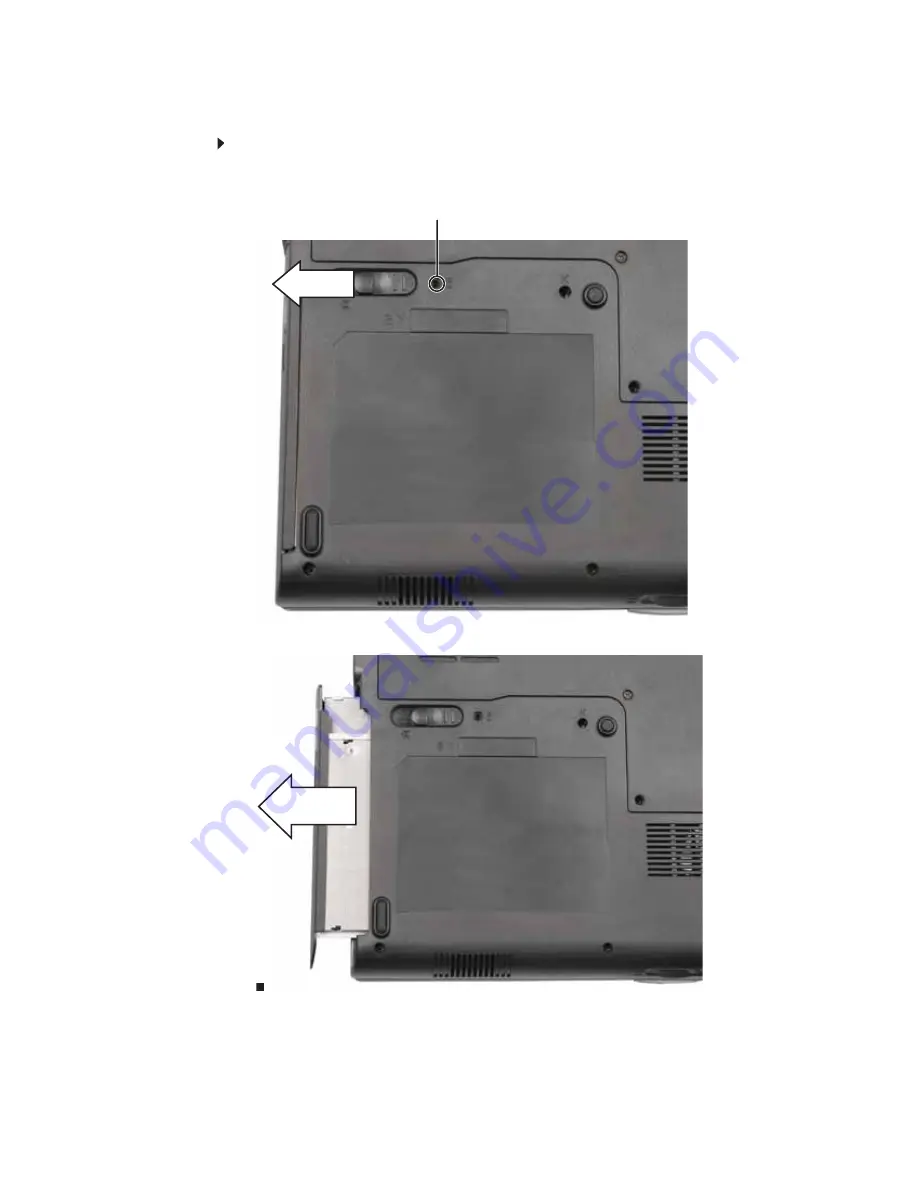
Removing the optional secondary battery

To remove the optional secondary battery:


1

Remove the modular bay lock screw (if one is present), then slide and hold the module bay 
latch. The battery may move out slightly.

2

Slide the battery out.

Modular bay lock screw

Содержание Convertible notebook

Страница 1: ...GATEWAY CONVERTIBLE NOTEBOOK SERVICEGUIDE...

Страница 2: ......

Страница 3: ...d 16 Replacing the CMOS battery 20 Replacing the hard drive 21 Replacing the hinge covers 26 Replacing the keyboard cover 27 Replacing the keyboard 28 Replacing the inverter 31 Replacing the power but...

Страница 4: ...Contents ii...

Страница 5: ...ess card Replacing the CMOS battery Replacing the hard drive Replacing the hinge covers Replacing the keyboard cover Replacing the keyboard Replacing the inverter Replacing the power button board Repl...

Страница 6: ...pictures in this service guide Important This service guide is not intended to be provided to individual users or consumers It cannot be provided to anyone other than an authorized service provider I...

Страница 7: ...grounding ESD wrist strap and use a grounded or dissipative work mat Use a stable and strong table and make sure that the table top is large enough to hold each component as you remove it Use bright l...

Страница 8: ...tible notebook follow these guidelines Avoid static causing surfaces such as carpeted floors plastic and packing foam Remove components from their antistatic bags only when you are ready to use them D...

Страница 9: ...odem cable and network cable if connected to the convertible notebook 6 Disconnect all peripheral devices connected to the convertible notebook and remove any PC Cards and memory cards 7 Remove the ma...

Страница 10: ...ng the optional secondary battery To remove the optional secondary battery 1 Remove the modular bay lock screw if one is present then slide and hold the module bay latch The battery may move out sligh...

Страница 11: ...le 1 If you are removing a drive make sure that there is no disc in it 2 Complete the steps in Preparing the convertible notebook on page 5 3 Turn the convertible notebook over so the bottom is facing...

Страница 12: ...lock screw if one is present then slide and hold the module bay latch The drive may move out slightly 5 Slide the drive out 6 Firmly push the new drive straight into the bay until the latch clicks in...

Страница 13: ...oosen the screws that secure the memory cover These screws cannot be removed 3 Remove the memory bay cover Be careful not to break off the tabs located on the bottom of the cover If the cover does not...

Страница 14: ...the slot 6 Hold the new or replacement module at a 30 degree angle and press it into the empty memory slot This module is keyed so it can only be inserted in one direction If the module does not fit m...

Страница 15: ...o complete this task X 23 7762 thermal grease To replace the cooling assembly 1 Complete the steps in Preparing the convertible notebook on page 5 2 Loosen the screws that secure the cooling assembly...

Страница 16: ...r screws that secure the cooling assembly to the system board These screws cannot be removed Use the numbers stamped in the metal next to each screw and loosen the screws in reverse numerical order st...

Страница 17: ...ew cooling assembly into the convertible notebook 12 Connect the fan to the system board 13 Tighten the two optional screws that connect the cooling assembly to the system board 14 Tighten the four sc...

Страница 18: ...task X 23 7762 thermal grease To replace the processor 1 Complete the steps in Preparing the convertible notebook on page 5 2 Remove the cooling assembly by following the steps in Replacing the cooli...

Страница 19: ...sor socket then use a flat blade screwdriver to turn the processor lock screw 1 4 turn clockwise 6 Remove any thermal grease residue from the cooling assembly using a soft cloth and isopropyl alcohol...

Страница 20: ...ard Tools you need to complete this task Screws removed during this task To replace the IEEE 802 11 wireless card 1 Complete the steps in Preparing the convertible notebook on page 5 Phillips 0 screwd...

Страница 21: ...to loosen it 4 Unplug the antenna cables Note which color cable is connected to each of the connectors 5 Move the antenna cables out of the way Important The number of antenna cables varies by the typ...

Страница 22: ...tebook components 18 6 If the wireless card is held by clips press outward on the clip at each side of the card until the card tilts upward 0 OR If the wireless card is held by screws remove the screw...

Страница 23: ...direction If the card does not fit make sure that the notch in the card lines up with the tab in the card slot 9 Move the antenna cables out of the way 10 Press the card down until it clicks into plac...

Страница 24: ...rring tool under the old battery and gently pry it up until it pops out of the socket 5 Make sure the positive side of the new battery is facing up then press the battery into the socket until it snap...

Страница 25: ...eed to complete this task Screws removed during this task To replace the hard drive 1 Complete the steps in Preparing the convertible notebook on page 5 Phillips 0 screwdriver 1 chrome 2 5 5 0 Hard dr...

Страница 26: ...screws that secure the hard drive bay cover These screws cannot be removed 3 Remove the hard drive bay cover Be careful not to break off the tabs located on the bottom of the cover If the cover does n...

Страница 27: ...www gateway com 23 4 Remove the hard drive screw Screw...

Страница 28: ...t out of the convertible notebook 6 Remove the four screws that secure the hard drive to the hard drive kit bracket 7 Insert the new drive into the bracket label side up so the screw holes line up 8 R...

Страница 29: ...www gateway com 25 9 Slide the new hard drive into your convertible notebook then replace the screw that was removed in Step 4 10 Replace the hard drive bay cover then tighten the cover screws...

Страница 30: ...p is facing up 3 Insert the small flat blade screwdriver or non marring tool under the bottom of the back hinge cover then carefully pry it up 4 Open the LCD panel to the fully open position insert th...

Страница 31: ...he convertible notebook by pulling the cover toward you and at the same time lifting its front to clear the keyboard You will hear small snapping sounds as the cover comes away from the convertible no...

Страница 32: ...board 1 Complete the steps in Preparing the convertible notebook on page 5 2 Remove the two bottom keyboard screws 3 Remove the keyboard cover by following the steps in Replacing the keyboard cover on...

Страница 33: ...tebook Be careful not to damage the LCD panel 6 Swing the black keyboard connector clip up then lift the cable out of the connector Be careful not to touch or damage any other components 7 Place the n...

Страница 34: ...he retaining tabs into their corresponding slots 10 Gently press the keyboard down until it is flat all the way across The keyboard should easily fall into place Be careful to not damage the LCD panel...

Страница 35: ...owing the steps in Replacing the keyboard cover on page 27 3 Open the LCD panel to the fully open position 4 Remove the rubber inserts from the front of the LCD panel assembly Important The number of...

Страница 36: ...fully separate the front and back of the LCD panel assembly 7 Disconnect the connectors from the inverter 8 Remove the screw that connects the inverter to the front of the LCD panel assembly Important...

Страница 37: ...halves together in several places until they click in place You should find no loose spots or spots where the two halves do not meet 11 Replace the LCD panel assembly screws removed in Step 5 12 Repl...

Страница 38: ...oard cover by following the steps in Replacing the keyboard cover on page 27 3 Open the LCD panel to the fully open position 4 Remove the rubber inserts from the front of the LCD panel assembly Import...

Страница 39: ...el assembly 6 Carefully separate the front and back of the LCD panel assembly 7 Disconnect the power button cable from the power button board Important The number of screws varies by convertible noteb...

Страница 40: ...cable 11 Press the LCD panel front and back together Press the two halves together in several places until they click in place You should find no loose spots or spots where the two halves do not meet...

Страница 41: ...following the steps in Replacing the keyboard cover on page 27 3 Open the LCD panel to the fully open position 4 Remove the rubber inserts from the front of the LCD panel assembly Important The numbe...

Страница 42: ...the LCD panel assembly 6 Carefully separate the front and back of the LCD panel assembly 7 Disconnect the tablet button cable from the tablet button board Important The number of screws varies by con...

Страница 43: ...ss the LCD panel front and back together Press the two halves together in several places until they click in place You should find no loose spots or spots where the two halves do not meet 12 Replace t...

Страница 44: ...wireless card on page 16 3 Remove the screws on the bottom that secure the LCD panel hinge to the chassis 4 Turn the convertible notebook over so the top is facing up 5 Remove the hinge covers by fol...

Страница 45: ...LCD video cable from the convertible notebook Make sure you grasp the tab not the cable 10 Taking care to note the cables routing and positions as they are installed from Gateway pull the antenna cabl...

Страница 46: ...ook 16 Reattach the three cables to the appropriate connectors on the system board 17 Replace any tape that held the antenna wires and LCD cable 18 Replace the keyboard cover by following the steps in...

Страница 47: ...the hinge covers on page 26 4 Remove the keyboard cover by following the steps in Replacing the keyboard cover on page 27 5 Remove the LCD assembly by following the steps in Replacing the LCD assembly...

Страница 48: ...back of the LCD panel assembly 10 Carefully pull the wiring out of the hinge Important The number of screws varies by convertible notebook model Tip Startby pulling the wire that has the smallest conn...

Страница 49: ...inserts removed in Step 4 19 Replace the LCD assembly by following the steps in Replacing the LCD assembly on page 40 20 Replace the keyboard cover by following the steps in Replacing the keyboard cov...

Страница 50: ...e steps in Replacing the keyboard cover on page 27 5 Remove the LCD assembly by following the steps in Replacing the LCD assembly on page 40 6 Disconnect the right inverter connector by following the...

Страница 51: ...Replace the LCD assembly by following the steps in Replacing the LCD assembly on page 40 17 Replace the keyboard cover by following the steps in Replacing the keyboard cover on page 27 18 Replace the...

Страница 52: ...in Replacing the keyboard cover on page 27 5 Remove the LCD assembly by following the steps in Replacing the LCD assembly on page 40 6 Remove the inverter by following the instructions in Replacing t...

Страница 53: ...button board by following the instructions in Replacing the power button board on page 34 17 Replace the inverter and reassemble the LCD assembly by following the instructions in Replacing the inverte...

Страница 54: ...1 5 Remove the hinge covers by following the steps in Replacing the hinge covers on page 26 6 Remove the keyboard cover by following the steps in Replacing the keyboard cover on page 27 7 Remove the k...

Страница 55: ...tion 10 Turn the convertible notebook over so the top is facing up 11 Flip the black touchpad connector clip up then remove the cable Be careful not to touch or damage any other components 12 Disconne...

Страница 56: ...onnector then lower the black connector clip to lock the cable in place 20 Turn the convertible notebook over so the bottom is facing up 21 Replace the screws removed in Step 9 22 Replace the LCD asse...

Страница 57: ...by following the steps in Replacing the keyboard cover on page 27 6 Remove the keyboard by following the steps in Replacing the keyboard on page 28 7 Remove the LCD assembly by following the steps in...

Страница 58: ...metal clips off of the fingerprint reader 13 Remove the fingerprint reader from the convertible notebook 14 Place the new fingerprint reader into the convertible notebook in the same orientation as th...

Страница 59: ...n page 27 21 Replace the hinge covers by following the steps in Replacing the hinge covers on page 26 22 Replace the hard drive by following the steps in Replacing the hard drive on page 21 23 If the...

Страница 60: ...nge covers by following the steps in Replacing the hinge covers on page 26 6 Remove the keyboard cover by following the steps in Replacing the keyboard cover on page 27 7 Remove the keyboard by follow...

Страница 61: ...he keyboard on page 28 16 Replace the keyboard cover by following the steps in Replacing the keyboard cover on page 27 17 Replace the hinge covers by following the steps in Replacing the hinge covers...

Страница 62: ...d install it on the new system board by following the instructions in Adding or replacing memory modules on page 9 Flat blade driver Scribe or non marring tool OR Phillips 0 screwdriver 5 0 mm hex nut...

Страница 63: ...the wireless bay remove it from the old system board and install it on the new system board by following the instructions in Replacing the TPM module select models on page 66 8 Remove the hard drive b...

Страница 64: ...Replacing convertible notebook components 60 15 Unplug the speakers from the system board one connector 16 Unplug the Bluetooth module from the system board one connector Speaker connector...

Страница 65: ...move it from the old system board and install it on the new system board by following the instructions in Replacing the TPM module select models on page 67 21 Place the new system board into the conve...

Страница 66: ...lowing the steps in Replacing the hinge covers on page 26 31 Replace the hard drive by following the instructions in Replacing the hard drive on page 21 32 Replace the cooling assembly by following th...

Страница 67: ...ng the instructions in Replacing the hard drive on page 21 5 Remove the hinge covers by following the steps in Replacing the hinge covers on page 26 6 Remove the keyboard cover by following the steps...

Страница 68: ...the LCD assembly on page 40 9 Remove the palm rest by following the steps in Replacing the palm rest on page 50 10 Remove the system board by following the steps in Replacing the system board on page...

Страница 69: ...n page 28 19 Replace the keyboard cover by following the steps in Replacing the keyboard cover on page 27 20 Replace the hinge covers by following the steps in Replacing the hinge covers on page 26 21...

Страница 70: ...6 3 Remove the two screws that secure the TPM module to the system board 4 Lift the TPM module from the system board 5 Install the new TPM module onto the system board 6 Replace the TPM module screws...

Страница 71: ...hard drive by following the instructions in Replacing the hard drive on page 21 Important If the TPM module is located in the wireless bay use the procedure found in Replacing the TPM module select mo...

Страница 72: ...ng the palm rest on page 50 17 Replace the LCD assembly by following the steps in Replacing the LCD assembly on page 40 18 Replace the keyboard by following the steps in Replacing the keyboard on page...

Страница 73: ......

Страница 74: ...MAN VIPER C SR SVC GDE R2 6 07...

Отзывы: