background image

49

www.gateway.com

Opening the case

Opening the case

Your computer case provides easy access to internal components.

Removing the side panel

To remove the side panel:

1

Follow the instructions in 

“Preventing static electricity discharge” on page 48

.

2

Shut down your computer, then disconnect the power cord and modem, network, 
and all peripheral device cables.

3

Press the power button to drain any residual power from your computer.

4

Remove the thumbscrew from the side panel cover. For the location of the 
thumbscrew, se

“Desktop PC Back” on page 12

.

5

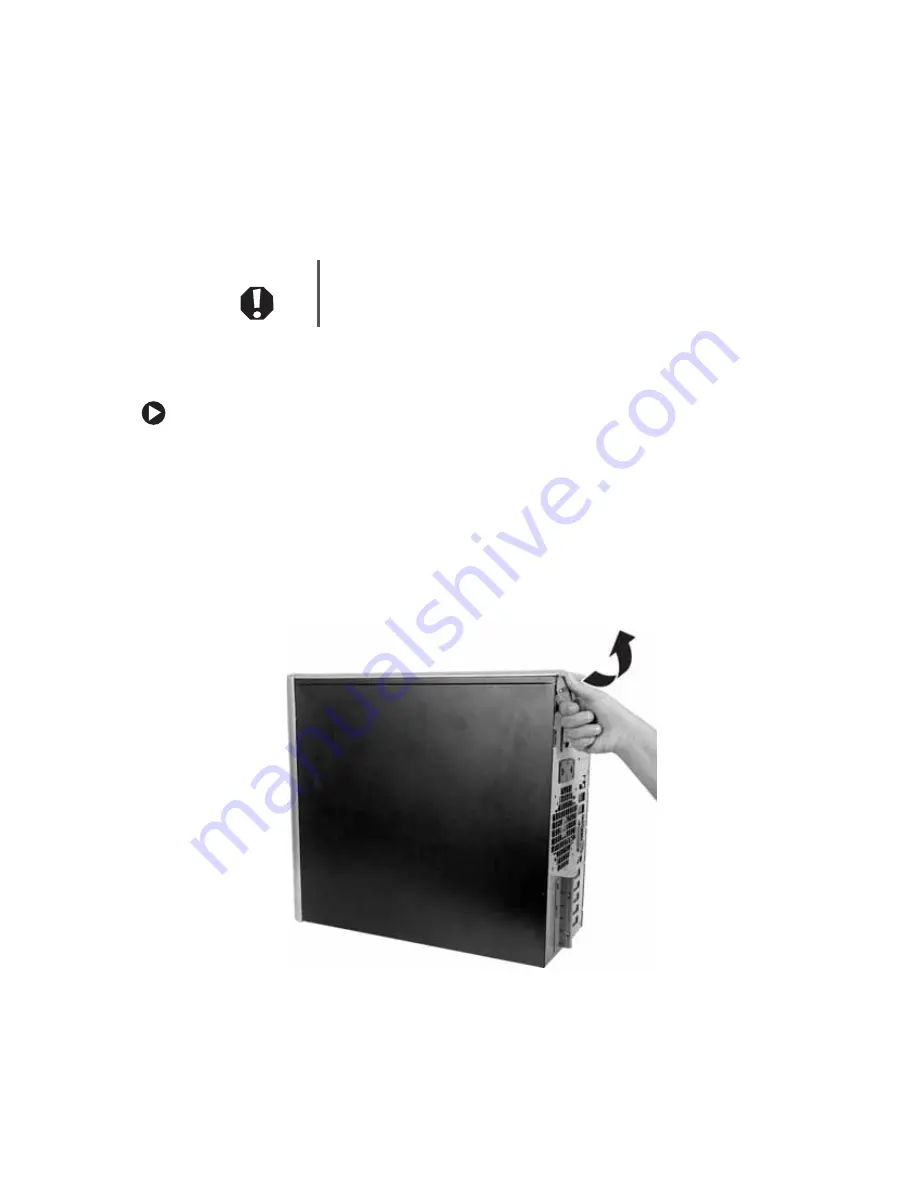
Lift the cover release lever.

Warning

To avoid exposure to dangerous electrical voltages and moving parts, 
turn off your computer, then unplug the power cord, modem cable, 
and network cable before opening the case.

Содержание 9310

Страница 1: ...Gateway Computer User Guide...

Страница 2: ......

Страница 3: ...ucing eye strain 20 Setting up your computer desk and chair 20 Setting up your computer and computer accessories 21 Sitting at your computer 21 Avoiding discomfort and injury from repetitive strain 21...

Страница 4: ...ning your computer 45 Cleaning the exterior 45 Cleaning the keyboard 45 Cleaning the computer display 46 Cleaning the mouse 46 Cleaning CDs or DVDs 46 Restoring your system 47 Preventing static electr...

Страница 5: ...an Ethernet network 89 Installing Ethernet cards and drivers 89 Making sure your broadband connection works 90 Naming the computers and the workgroup 90 Configuring the TCP IP protocol 91 Setting up...

Страница 6: ...iv www gateway com...

Страница 7: ...Chapter 1 1 Getting Help Using the Gateway Web site Using Help and Support Using BigFix Using Your Computer guide Using Do More With Gateway Using online help Contacting Gateway...

Страница 8: ...ully to familiarize yourself with our range of services and support We have highlighted some basic care and safety information to help you keep your computer in good operating condition Gateway stands...

Страница 9: ...Gateway s online support is available 24 hours per day 7 days per week and provides the most current drivers product specifications tutorials and personalized information about your computer Visit th...

Страница 10: ...rd drive Product Support Click Product Support to view a list of all the products that Gateway supports Downloads Click Downloads then click My Downloads to get the latest software updates for BIOS an...

Страница 11: ...eshooters and automated support Use Help and Support to answer questions about Windows and to help you quickly discover and use the many features of your Gateway computer To start Help and Support Cli...

Страница 12: ...e and contain the words you entered in the Search box You must be connected to the Internet to search for and access these topics To view a list of your search results click the results header for the...

Страница 13: ...s To access the Using Your Computer guide Click Start All Programs then click Gateway Documentation Online help Many programs provide information online so you can research a topic or learn how to per...

Страница 14: ...and technical support contact information on the label located on the side of your computer case Online Support Tech Support Phone Online Support Tech Support Phone Tech Support Hours 9003702 Website...

Страница 15: ...ing Out Your Gateway Computer Identifying features Locating your computer model and serial number Locating the Microsoft Certificate of Authenticity Locating the specifications for your computer Purch...

Страница 16: ...the following components Important Your computer hardware options and port locations may vary from the illustration below Memory card reader optional DVD CD drive Headphone jack Power button Power in...

Страница 17: ...ndard 3 5 inch diskette into the optional diskette drive Memory card reader optional Insert a memory card from a digital camera MP3 player PDA cellular telephone or other devices into the memory card...

Страница 18: ...lug the power cord into this connector Cover release lever Lift this lever to open the computer cover Parallel port Serial port PS 2 keyboard port PS 2 mouse port Voltage switch Power connector Ethern...

Страница 19: ...re that this switch is in the correct position for the correct power available The switch is preset at the factory with the correct voltage for your area In the United States the utility power is supp...

Страница 20: ...lug Plug a microphone into this jack Center subwoofer jack orange plug optional Plug your center speaker and subwoofer into this optional jack For information on configuring this jack see Configuring...

Страница 21: ...t Certificate of Authenticity label found on the back or side of your computer includes the product key code for your operating system Important The labels shown in this section are for informational...

Страница 22: ...gateway com The eSupport page also has links to additional Gateway documentation and detailed specifications For more information see Using eSupport on page 4 Accessories To order accessories visit t...

Страница 23: ...cking up files then removing them from your hard drive Writable CDs can hold as much as 700 MB of data Single layer writable DVDs can hold as much as 4700 MB of data Dual layer writable DVDs hold as m...

Страница 24: ...18 www gateway com Chapter 2 Checking Out Your Gateway Computer...

Страница 25: ...ed Using your computer safely Protecting your computer from power source problems Turning your computer on and off Adjusting the volume Using the keyboard and the mouse Using the computer display Inst...

Страница 26: ...lling shades or curtains on windows and by installing a glare screen filter on your monitor Use soft indirect lighting in your work area Do not use your computer in a dark room Avoid focusing your eye...

Страница 27: ...hion to provide extra back support Setting up your computer and computer accessories Set up the monitor so the top is no higher than eye level the monitor controls are within reach and the screen is t...

Страница 28: ...tion switch on the back of your computer to set the power supply to 115V or 230V To verify that your system has the correct setting for your environment check the voltage selection switch Warning High...

Страница 29: ...screen instructions to set up your computer 4 Turn on any peripheral devices such as printers or scanners and see the documentation that came with the device for setup instructions Important Your comp...

Страница 30: ...r more information about changing the power button mode see Changing Power Saving Settings in Using Your Computer which has been included on your hard drive To access this guide click Start All Progra...

Страница 31: ...rt your computer 1 Press CTRL ALT DEL The Task Manager window opens 2 Click the Applications tab then click the program that is not responding 3 Click End Task 4 Click X in the top right corner of the...

Страница 32: ...s See the program documentation to find out more about the function key actions Internet buttons Press these buttons to launch your Internet home page search or e mail programs Audio playback buttons...

Страница 33: ...tart menu These keys can also be used in combination with other keys to open utilities like F Search utility R Run utility and E Explorer utility Application key Press this key to access shortcut menu...

Страница 34: ...ration shows the standard mouse As you move the mouse the pointer arrow on the display moves in the same direction You can use the left and right buttons on the mouse to select objects on the display...

Страница 35: ...press and release the left mouse button twice This action is called double clicking Access a shortcut menu or find more information about an object on the computer display Position the pointer over t...

Страница 36: ...e default audio device you need to configure the audio jacks To configure the audio jacks 1 Connect your audio device s to the computer audio jack s 2 Click Start then click Control Panel The Control...

Страница 37: ...onnecting to a cable or DSL modem or to a wired Ethernet network Your computer has a network jack that you can use to connect to a cable or DSL modem or to a 10 100 wired Ethernet network To connect t...

Страница 38: ...usually recognize such a device whenever you plug it into the appropriate port When you use an IEEE 1394 or USB device for the first time your computer will prompt you to install any software the dev...

Страница 39: ...Chapter 4 33 Using Drives and Ports Using the diskette drive Using the memory card reader Using CD or DVD drives...

Страница 40: ...other computer To use a diskette 1 Insert the diskette into the diskette drive with the label facing up 2 To access a file on the diskette click Start then click My Computer Double click the diskette...

Страница 41: ...d types The memory card reader supports the following card types Each slot is assigned a different drive letter for example the E and F drives so data can be transferred from one memory card type to a...

Страница 42: ...ve a memory card Wait for the memory card reader access indicator to stop blinking then pull the memory card out of the slot Caution To avoid memory card damage or errors while using a memory card ins...

Страница 43: ...audio CDs accessing data creating CDs and playing DVDs DVD drive Installing programs playing audio CDs playing DVDs and accessing data DVD RW Installing programs playing audio CDs playing DVDs access...

Страница 44: ...tton to close the tray Important Some music CDs have copy protection software You may not be able to play these CDs on your computer Important When you place a single sided disc in the tray make sure...

Страница 45: ...g program on your computer to copy tracks from a music CD to your hard drive copy or create data CDs and DVDs create music CDs create video DVDs and more Tips Tricks For more information about playing...

Страница 46: ...40 www gateway com Chapter 4 Using Drives and Ports...

Страница 47: ...intaining Your Computer Caring for your computer Updating Windows Protecting your computer from viruses Cleaning your computer Restoring your system Opening the computer case Adding memory and replaci...

Страница 48: ...n storing your computer for an extended period of time unplug AC power Updating Windows Windows Update is the online extension of Windows that helps you to keep your computer up to date Use Windows Up...

Страница 49: ...the Norton AntiVirus program to check files and programs that are on diskettes attached to e mail messages or downloaded from the Internet Checking all programs for viruses before installing them Disa...

Страница 50: ...r and leave it off for at least 30 seconds 3 Turn on your computer and rescan for the virus To update Norton AntiVirus 1 Make sure that you are connected to the Internet 2 Click Start All Programs Nor...

Страница 51: ...the finish on components Your computer is cooled by air circulated through the vents on the case so keep the vents free of dust With your computer turned off and unplugged brush the dust away from the...

Страница 52: ...ver directly on the screen and wipe the screen with the cloth Cleaning the mouse If the mouse pointer begins moving erratically across the computer screen or becomes difficult to control precisely cle...

Страница 53: ...ailable for restoration in a hidden area of the hard drive If you need to restore your computer to the original configuration follow the instructions in the recovery help manual To access the manual c...

Страница 54: ...Remove components from their antistatic bags only when you are ready to use them Do not lay components on the outside of antistatic bags because only the inside of the bags provide electrostatic prote...

Страница 55: ...disconnect the power cord and modem network and all peripheral device cables 3 Press the power button to drain any residual power from your computer 4 Remove the thumbscrew from the side panel cover F...

Страница 56: ...50 www gateway com Chapter 5 Maintaining Your Computer 6 Swing the side panel away from the computer then lift the panel away from the computer...

Страница 57: ...ove the front bezel 1 Remove the side panel 2 Press on the three spring tabs while pulling the right side of the bezel away from the computer 3 Swing the bezel toward the left then remove the bezel fr...

Страница 58: ...ke sure that all of the internal cables are arranged inside the case so they will not be pinched when you close the case 2 Align the panel tabs into the bottom case notches then swing the side panel t...

Страница 59: ...53 www gateway com Closing the case Replacing the front bezel To replace the front bezel 1 Align the latch pins with the computer latch holes 2 Press the bezel firmly into place...

Страница 60: ...tions in Removing the side panel on page 49 2 For more stability place your computer on its side To avoid scratching the case place it on a towel or other non abrasive surface 3 Find the memory module...

Страница 61: ...ck 6 Replace the side panel by following the instructions in Replacing the side panel on page 52 7 Return your computer to its upright position 8 Reconnect the cables and the power cord 9 Turn on your...

Страница 62: ...pens 3 Write down all the values in the menus and submenus then exit from the utility 4 Shut down your computer 5 Remove the side panel by following the instructions in Removing the side panel on page...

Страница 63: ...he battery into the socket until it snaps into place 10 Replace the side panel by following the instructions in Replacing the side panel on page 52 11 Reconnect all external cables and the power cord...

Страница 64: ...58 www gateway com Chapter 5 Maintaining Your Computer...

Страница 65: ...Chapter 6 59 Troubleshooting Troubleshooting typical hardware and software problems Getting telephone support Using automated troubleshooting systems Getting tutoring and training...

Страница 66: ...ce such as a keyboard or mouse does not work make sure that all connections are secure Make sure that your hard drive is not full If an error message appears on the screen write down the exact message...

Страница 67: ...flawed or become scratched and cannot be read by the CD or DVD drive If you are trying to play a DVD make sure that you have a DVD drive To identify your drive type see Identifying drive types on pag...

Страница 68: ...he disc label is facing up then try again Try a different disc Occasionally discs are flawed or become scratched and cannot be read by the DVD drive Shut down and restart your computer Clean the disc...

Страница 69: ...nt diskette Occasionally diskettes are flawed and cannot be read by the diskette drive Run Error checking on the diskette For more information see Checking the hard drive for errors in Using Your Comp...

Страница 70: ...iskette from the diskette drive then press ENTER Make sure that the diskette you are using is IBM compatible The diskette drive LED is lit continuously Remove the diskette from the drive If the light...

Страница 71: ...ions on fixing hard drive problems see Checking the hard drive for errors in Using Your Computer which has been included on your hard drive To access this guide click Start All Programs then click Gat...

Страница 72: ...r ISP is set up correctly Contact your ISP technical support for help Make sure that you do not have a problem with your modem For more information Modem dial up on page 68 You see an Unable to locate...

Страница 73: ...e is plugged in correctly For more information see the poster that came with your computer Remove all extension cables and switch boxes Clean the keyboard by using an aerosol can of air with a narrow...

Страница 74: ...message Close all programs then restart your computer Memory card reader Drive letters for the memory card slots do not appear in the My Computer window Reboot your computer Modem dial up See also In...

Страница 75: ...such as call waiting call messaging or voice mail make sure that all messages are cleared and call waiting is disabled before using the modem Contact your telephone service to get the correct code to...

Страница 76: ...r house or a telephone line at a different location If you can connect on this line call your telephone service Try connecting with the modem at a lower connection speed If reducing the connect speed...

Страница 77: ...Hardware 3 Click Double click the Phone and Modem Options icon then click the Modems tab 4 Click your modem then click Properties The Modem Properties dialog box opens 5 Click the Diagnostic tab then...

Страница 78: ...ing but there is no picture Make sure that the monitor is plugged in and turned on If the monitor is turned on the power LED should be lit Adjust the brightness and contrast controls to the center pos...

Страница 79: ...isplays a white background The aperture grille allows more light to pass through the screen for brighter colors and greater luminescence The damper wire is a critical part of the overall monitor desig...

Страница 80: ...lean the mouse by wiping the bottom with a clean damp cloth Make sure that the optical sensor is clean and free of debris Networks You cannot connect to your company network Every network is unique Co...

Страница 81: ...an AC power source The printer is on but will not print Check the cable between the printer and your computer Make sure that it is connected to the correct port Make sure that the printer is online M...

Страница 82: ...f the printer you want to use If the menu shows a check mark next to Use Printer Offline click Use Printer Offline to clear the check mark Wait until files have been printed before sending additional...

Страница 83: ...ned off For more information see Adjusting the volume on page 29 If you are using external speakers see the speaker setup poster to check your speaker connections Make sure that the universal jacks ar...

Страница 84: ...are from Gateway see the manufacturer s documentation and technical support resources If you have how to questions about using a program see Online Help Printed documentation The Microsoft Windows doc...

Страница 85: ...sues www gateway com answers Gateway Customer Care Talk to a Gateway Customer Care representative about a non tutorial technical support question See Before calling Gateway Customer Care on page 78 be...

Страница 86: ...puters For more information go to www gateway com answers Training Gateway provides the following computer based training Help and Support For more how to information about Windows click Start then cl...

Страница 87: ...Chapter 7 81 Networking Your Computer Introducing networking Creating an Ethernet network Testing your network Sharing your resources Troubleshooting your Ethernet network...

Страница 88: ...etwork you can copy files from computer to computer by copying and pasting or dragging and dropping You will no longer waste your time transferring files by using recordable media In addition you can...

Страница 89: ...move about with your computer is as important as network speed Your computer has wireless Ethernet for networking Using a wireless Ethernet network A wireless Ethernet network is ideal for creating a...

Страница 90: ...ntages Disadvantages IEEE 802 11a 54 Mbps 5 GHz Less possible interference than IEEE 802 11b and IEEE 802 11g Shorter range 25 to 75 feet than IEEE 802 11b and IEEE 802 11g Not compatible with IEEE 80...

Страница 91: ...a cable or DSL modem and your computers The access point is the central control point for the network Attached to the access point is the cable or DSL modem that provides access to the Internet Each...

Страница 92: ...ll one Important IEEE 802 11b and IEEE 802 11g use the same radio frequency IEEE 802 11a uses a different radio frequency than IEEE 802 11b and IEEE 802 11g All wireless Ethernet components must use t...

Страница 93: ...Fast Ethernet runs at 100 Mbps and Gigabit Ethernet runs at 1000 Mbps Most home networks are built using Standard or Fast Ethernet components Business networks are typically built using Fast or Gigabi...

Страница 94: ...t network connect an access point to the router or use a router that has a built in access point such as the Linksys wireless access point router with 4 port switch For more information about accessin...

Страница 95: ...ork Installing Ethernet cards and drivers After you have determined the type of Ethernet you are using for your network you need to install Ethernet cards and drivers on the computers that do not have...

Страница 96: ...mputer to other users on the network Use a computer name of up to 15 characters with no blank spaces Each computer name must be unique on your network All numeric computer names are not allowed Names...

Страница 97: ...router temporarily assign an IP address to a computer on the network IP Address Internet Protocol IP address is a number that uniquely identifies a computer on the network Subnet Mask Subnet mask is...

Страница 98: ...u do not have a LAN connection setup click Create a new connection and follow the instructions in the New Connection Wizard 4 Click to select the Internet Protocol TCP IP check box in the This connect...

Страница 99: ...procedure for every computer on your network Where to go from here If you are setting up a wireless Ethernet go to Setting up a wireless Ethernet network on page 93 OR If you are setting up a wired Et...

Страница 100: ...to the WAN port on the wireless access point router and the other end into the DSL or cable modem 3 Plug one end of the power adapter into the AC connector on the router and the other end into a groun...

Страница 101: ...To use WEP wired equivalent privacy encryption select Mandatory If you use WEP encryption all computers on your network must use the same WEP encryption See the documentation that came with your acce...

Страница 102: ...twork Connections window opens 4 Right click the Wireless Network Connection icon then click View available wireless networks The Choose a wireless network window opens 5 Click the network you created...

Страница 103: ...ity settings as those used by the access point To configure computer settings with WEP security for an access point wireless Ethernet network 1 With the Wireless Network Connection window open click C...

Страница 104: ...ettings in the Network key and Confirm network key boxes to match those set on the access point OR If the WEP network key is provided automatically then leave the check mark in The key is provided for...

Страница 105: ...y This typically happens when you set the access point s Allow Broadcast SSID to associate to No For more information see Configuring the access point on page 94 To manually add an access point wirele...

Страница 106: ...key is not provided automatically click to clear The key is provided for me automatically check box then type the network key settings in the Network key and Confirm network key boxes to match those...

Страница 107: ...s on the network and can provide firewall protection for your network as well In addition to a router you need a straight through cable for each computer you want to connect to the network Help and Su...

Страница 108: ...ort is used to connect the router to the DSL or cable modem and is identified by a label or a switch Plug the other end of the cable into the network connector on the computer As each computer is conn...

Страница 109: ...Domain Name Check with your ISP to see if entries are required in these fields and if so what entries are required Normally leaving the fields blank will work LAN IP Address We recommend that you acce...

Страница 110: ...aring an Internet connection Internet sharing lets all computers on the network access the Internet at the same time using one Internet service provider ISP connection Important The Internet setup pro...

Страница 111: ...network 1 Make sure that the router or access point is turned on and configured as instructed by your cable or DSL provider 2 Click Start right click Internet then click Internet Properties The Intern...

Страница 112: ...106 www gateway com Chapter 7 Networking Your Computer 5 Click Next The Network Connection Type screen opens 6 Click Connect to the Internet then click Next The Getting Ready screen opens...

Страница 113: ...ype of Internet connection you are setting up then click Next 9 Click Finish 10 Repeat this procedure for each computer on your network Go to Accessing the Internet on page 107 Accessing the Internet...

Страница 114: ...haring drives or folders If you want to share a drive or folder use the following instructions To share drives or folders 1 In My Computer or Windows Explorer right click the drive or folder that you...

Страница 115: ...ions OR If you have previously enabled remote file access and you want to share a drive or folder with others on the network network sharing click to select the Share this folder on the network check...

Страница 116: ...Click Start then click Control Panel The Control Panel window opens If your Control Panel is in Category View click Printers and Other Hardware 2 Click Double click the Printers and Faxes icon The Pr...

Страница 117: ...shared drives and folders are listed Mapping a network drive After a drive or folder on one computer is mapped as a drive on another computer the contents of the drive or folder can be accessed as if...

Страница 118: ...t to open 4 Double click the folder containing the file then double click the file Copying files across the network To copy files across the network 1 Click Start then click My Computer The My Compute...

Страница 119: ...any new network obtain information about the network such as the SSID password key and security settings to use and enter that information See Configuring computer settings for an access point on pag...

Страница 120: ...8 N N where N is a number you assign between 0 and 254 The first N should be the same for all computers on your network and the second N should be different for all computers on your network The compu...

Страница 121: ...nel of the access point Your wireless Ethernet network is running slower than you expect If your wireless Ethernet network is running slower than you expect you should check your network signal streng...

Страница 122: ...window and make sure that both the WAP and the WLAN in the computer have matching WEP keys You are in a wireless network but no available networks are listed in the Windows XP Wireless Networking uti...

Страница 123: ...Appendix A 117 Safety Regulatory and Legal Information Safety information Regulatory statements Notices...

Страница 124: ...let contact an electrician to install the appropriate outlet If you use an extension cord with this system make sure that the total ampere rating on the products plugged into the extension cord does n...

Страница 125: ...n areas classified as hazardous locations Such areas include patient care areas of medical and dental facilities oxygen laden environments or industrial facilities Warning To reduce the risk of fire u...

Страница 126: ...gulations CFR 47 rules On the computer or modem card is a label that contains the FCC registration number and Ringer Equivalence Number REN for this device If requested this information must be provid...

Страница 127: ...ration and safety requirements The Department does not guarantee the equipment will operate to the users satisfaction Before installing this equipment users should make sure that it is permissible to...

Страница 128: ...atic charges Article 810 of the National Electrical Code ANSI NFPSA 70 provides information with regard to proper grounding of the mast and supporting structure grounding of the lead in wire to an ant...

Страница 129: ...or circuits Contact with them could be fatal Reference Grounding component 1 Electric service equipment 2 Power service grounding electrode system NEC Art 250 Part H 3 Ground clamps 4 Grounding conduc...

Страница 130: ...hen your electrical or electronic equipment is no longer useful to you take it back to your local or regional waste collection administration for recycling In some cases your end of life product may b...

Страница 131: ...the right to make improvements in this manual and the products it describes at any time without notices or obligation Trademark Acknowledgments Gateway and the Black and White Spot Design are trademar...

Страница 132: ...126 www gateway com Chapter 1 Safety Regulatory and Legal Information...

Страница 133: ...14 audio CD See CD audio file streaming 82 audio in jack 13 audio playback buttons 26 B battery replacing 56 bezel removing 51 replacing 53 broadband connection 31 82 90 connecting 13 buttons See keys...

Страница 134: ...hone 14 i Link 11 32 IEEE 1394 11 32 keyboard 11 14 line in 13 14 line out 14 microphone 11 14 modem 14 31 monitor 14 mouse 11 14 network 13 31 parallel 13 power 12 power cord 12 printer 11 13 14 PS 2...

Страница 135: ...drive Dynamic Host Configuration Protocol 91 E editing buttons 26 electrostatic discharge ESD 48 entering IP address 91 subnet mask 91 ergonomics 20 eSupport 16 using 4 Ethernet connecting 31 install...

Страница 136: ...g 66 70 IP address entering 91 LAN 103 WAN 95 103 J jacks See connections K keyboard buttons 26 cleaning 45 features 26 PS 2 port 14 troubleshooting 67 USB port 11 14 keys and buttons application 27 a...

Страница 137: ...clicking 29 scroll wheel 28 selecting screen objects 29 troubleshooting 74 USB port 11 14 moving pointer 29 screen objects 29 MP3 file streaming 82 MP3 player memory cards 35 multimedia adjusting vol...

Страница 138: ...r 23 power button 11 printer default 75 inkjet 17 installing 32 laser 17 parallel port 13 sharing 82 108 110 troubleshooting 75 USB port 11 14 printing files across network 113 programs closing unresp...

Страница 139: ...o 82 subnet mask entering 91 surge protector 22 S Video TV out jack 13 system battery replacing 56 system identification label 15 T tape backup drive 17 TCP IP protocol configuring 91 technical suppor...

Страница 140: ...out jack 13 video file streaming 82 viewing shared drives and folders 111 virus protecting against 43 removing with Norton AntiVirus 43 voltage switch 13 volume adjusting 29 adjusting modem 71 control...

Страница 141: ......

Страница 142: ...MAN NIAG CONS USR GDE R2 5 05...

Отзывы: