background image

14

Installation

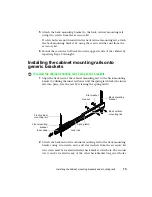
3

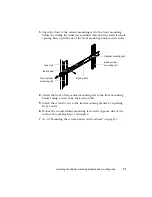
Align the front of the cabinet mounting rail to the front mounting 
bracket by sliding the inner rail and inner slide until the rail screw hole 
opening lines up with the first inner rail screw hole and with the second 
screw hole on the front mounting bracket.

4

Attach the front of the cabinet mounting rail to the front mounting 
bracket using a screw from the accessory kit.

5

Slide the inner rail and the inner slide again until the rail screw hole 
opening lines up with the front mounting bracket long screw hole.

6

Attach the front of the cabinet mounting rail to the front mounting 
bracket using a screw from the accessory kit.

7

Mount the second cabinet mounting rail on the opposite side of the 
cabinet by repeating Steps 1 through 6.

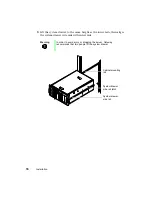
Inner rail

Inner slide

Front vertical

mounting rail

Cabinet mounting rail

Back vertical
mounting rail

Spring latch

Содержание 7400

Страница 1: ...7400 Server Rackmount Installation Guide A MAN US GW SERVER RACK R0 2 00...

Страница 2: ...9 Installing the cabinet mounting rails onto Gateway brackets 10 Installing generic mounting brackets 12 Installing the cabinet mounting rails onto generic brackets 13 Mounting the system drawer in t...

Страница 3: ...onsequential damages resulting from any defect or omission in this manual even if advised of the possibility of such damages In the interest of continued product development Gateway reserves the right...

Страница 4: ...A plus sign means to press the keys at the same time Setup Commands to be entered options to select and messages that appear on your monitor are printed in bold User s Guide Names of publications are...

Страница 5: ...me screen To get the latest updates to your system documentation visit the technical support area of www gatewayatwork com Getting additional information Visit the technical support area of www gatewa...

Страница 6: ...ackmount conversion accessory kit includes Gateway front panel assembly installed on pre configured systems 2 front panel side brackets 2 pairs of Gateway mounting brackets labeled FRONT and REAR 2 pa...

Страница 7: ...system came configured for rack installation go to Installing the system drawer side rails on page 7 Removing existing panels To remove the bezel and the top panel 1 Turn off system power then discon...

Страница 8: ...e bezel if necessary then depress the two tabs one on each side of the bezel 4 Pull the bezel away from the server 5 Remove the screw located at the top of the server 6 Slide the top panel forward the...

Страница 9: ...d screwdriver to lift up on both of the retaining latches then slide the outrigger towards the center of the bottom panel 3 Remove the outrigger by pulling it up and away from the server 4 Remove the...

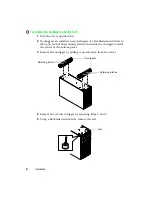
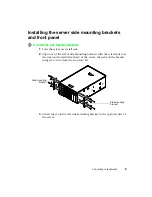
Страница 10: ...e server on its left side 2 Align one of the server side mounting brackets with the screw holes on the side and towards the front of the server then attach the bracket using six screws from the access...

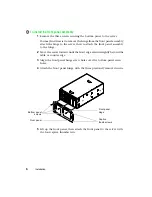
Страница 11: ...panel assembly to the hinge 2 Move the server forward until the front edge extends slightly beyond the table or counter edge 3 Align the front panel hinge screw holes over the bottom panel screw hole...

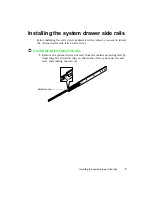
Страница 12: ...drawer in the cabinet you need to install the system drawer side rails on the server To install the system drawer side rails 1 Remove the system drawer side rails from the cabinet mounting rails by d...

Страница 13: ...m drawer side rail on the server using five screws from the accessory kit Make sure the retention clips are at the back of the server 3 Mount the second rail on the opposite side of the server System...

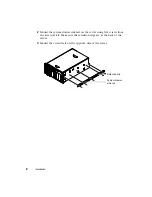
Страница 14: ...ready installed in the cabinet go to Installing the cabinet mounting rails onto Gateway brackets on page 10 To install the Gateway mounting brackets in the cabinet 1 If you received a mounting templat...

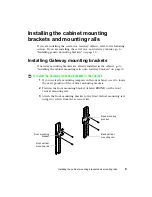
Страница 15: ...ng rails onto Gateway brackets To install the cabinet mounting rails onto Gateway brackets 1 Align the back end of the cabinet mounting rail to the back mounting bracket by sliding the inner rail forw...

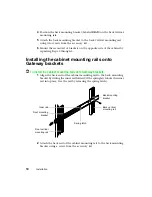
Страница 16: ...ttach the front of the cabinet mounting rail to the front mounting bracket using a screw from the accessory kit 5 Attach the second screw to the front mounting bracket by repeating Steps 3 and 4 6 Mou...

Страница 17: ...our cabinet use it to locate the exact position of the cabinet mounting brackets 2 Position the front mounting bracket shorter bracket on the front vertical mounting rail 3 Attach the front mounting b...

Страница 18: ...the cabinet mounting rails onto generic brackets 1 Align the back end of the cabinet mounting rail to the back mounting bracket by sliding the inner rail forward if the spring latch locks the inner ra...

Страница 19: ...nt mounting bracket using a screw from the accessory kit 5 Slide the inner rail and the inner slide again until the rail screw hole opening lines up with the front mounting bracket long screw hole 6 A...

Страница 20: ...Mounting the system drawer in the cabinet To mount the system drawer in the cabinet 1 Pull both of the inner rails forward until the spring latches on each side lock 2 Pull the inner slides all the wa...

Страница 21: ...the inner rails then align the system drawer side rails with inner rails Warning In order to avoid injury or dropping the server Gateway recommends that two people lift the system drawer System drawe...

Страница 22: ...From the back side of the cabinet release the spring latch on the inner rail while pushing the system drawer to the back of the cabinet The first time the system drawer is pushed back into the cabine...

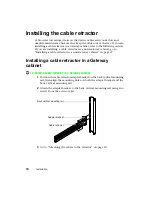
Страница 23: ...ng a cable retractor in a non Gateway cabinet on page 19 Installing a cable retractor in a Gateway cabinet To install a cable retractor in a Gateway cabinet 1 Position the cable retractor adapter brac...

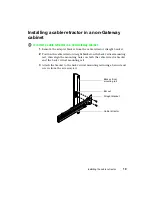
Страница 24: ...retractor straight bracket 2 Position the cable retractor straight bracket on the back vertical mounting rail then align the mounting holes on both the cable retractor bracket and the back vertical mo...

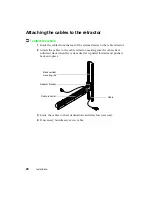
Страница 25: ...le retractor 2 Attach the cables to the cable retractor making sure the cables have sufficient slack when the system drawer is pulled forward and pushed back into place 3 Route the cables to their des...

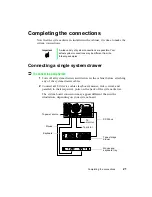
Страница 26: ...system drawer cables 2 Connect all I O device cables keyboard mouse video serial and parallel to their respective ports on the back of the system drawer The system board connectors may appear differen...

Страница 27: ...the keyboard and mouse inputs to the currently selected system drawer Installation of the autoswitcher is relatively simple and covered in detail in the autoswitcher user manual Turn off all system d...

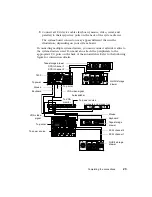
Страница 28: ...extender cables to the system drawers used You must also attach the peripherals to the appropriate I O ports on the back of the autoswitcher Refer to the following figure for connection details To po...

Страница 29: ...erruptible power supply UPS is installed plug only one CPU drawer into it The power cords must be routed through the cabinet floor opening and to the system drawer Make sure that the current demands a...

Страница 30: ...rmation If the monitor does not display information or the system drawer indicates an error has occurred refer to the server system manual troubleshooting section 7 When the system drawer starts succe...

Страница 31: ...rawer 5 Turn off any other drawers connected to the system drawer Securing the system drawer in the cabinet To secure the system drawer 1 Close the back door of the system cabinet then lock it if nece...

Страница 32: ...7400 Server Rackmount Installation Guide A MAN US 7400 RACK GDE R0 6 00...

Отзывы: