background image

45

www.gateway.com

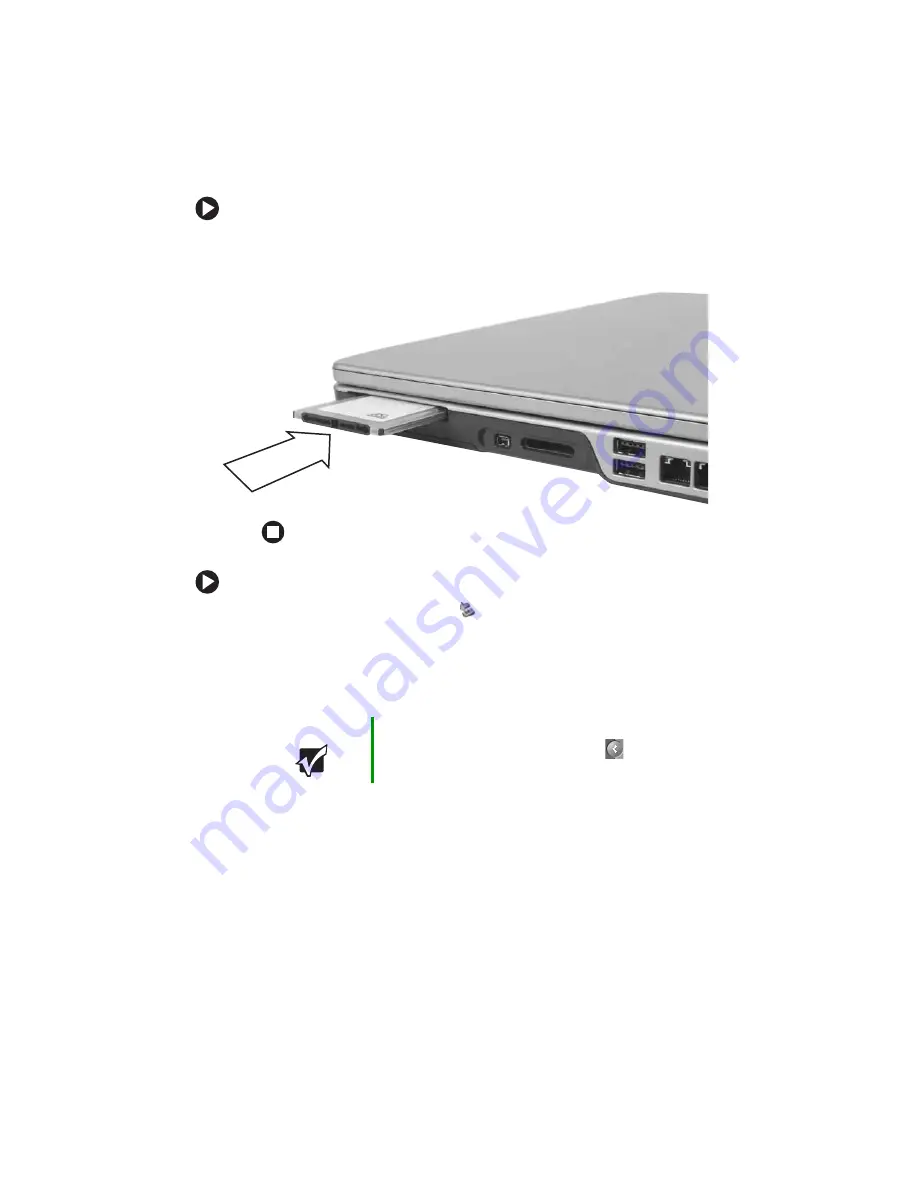
Adding and removing a PC Card

To insert a PC Card:

Push the card firmly into the PC Card slot label-side up until the 
outer edge of the card is flush with the side of your notebook.

To remove a PC Card:

1

Click the remove hardware

icon in the taskbar, the PC Card 

name, then click

Stop

.

-OR-

Turn off your notebook.

2

Release the eject button by pressing the PC Card eject button once.

Important

If the remove hardware icon does not appear on the 
taskbar, click the show hidden icons

button.

Содержание 6010GZ - Celeron M 1.4 GHz

Страница 1: ......

Страница 2: ......

Страница 3: ... Certificate of Authenticity 16 Finding your specifications 17 Accessories 17 3 Getting Started 19 Installing the battery 20 Connecting the AC adapter 20 Protecting from power source problems 22 Connecting the dial up modem 23 Connecting to a cable or DSL modem or to an Ethernet network 24 Starting your notebook 25 Waking up your notebook 26 Turning off your notebook 26 Restarting rebooting your n...

Страница 4: ... or monitor 46 Viewing the display on a television 48 Modifying television settings 51 Connecting a video camera to your notebook 52 5 Managing Power 53 Monitoring the battery charge 54 Recharging the battery 55 Recalibrating the battery 55 Changing batteries 56 Extending battery life 58 Conserving battery power 58 Using alternate power sources 59 Changing power modes 59 6 Upgrading Your Notebook ...

Страница 5: ...g 83 Safety guidelines 84 First steps 85 Troubleshooting 86 Audio 86 Battery 86 CD drives 86 Device installation 86 Display 87 DVD drives 88 File management 91 Hard drive 91 Internet 92 Keyboard 94 Memory 94 Memory card reader 95 Modem cable or DSL 95 Modem dial up 95 Mouse 99 Networks 100 Passwords 101 PC Cards 101 Power 102 Printer 103 Sound 104 Status indicators 105 Touchpad 105 Video 106 Telep...

Страница 6: ...iv www gateway com Training 109 A Safety Regulatory and Legal Information 111 Index 123 ...

Страница 7: ...Chapter 1 1 Getting Help Using the Gateway Web site Using Help and Support Using BigFix Using Your Computer guide Using online help ...

Страница 8: ... a greater battery life experience This design provides you with maximum performance when plugged into AC power balanced with optimized battery life when on battery power Please read this manual carefully to familiarize yourself with our range of services and support We have highlighted some basic care and safety information to help you keep your notebook in good operating condition Gateway stands...

Страница 9: ...rovides the most current drivers product specifications tutorials and personalized information about your notebook Visit the Gateway Support Web site at support gateway com Using Support The Support site is divided into seven major areas Support Home Product Support Downloads Customer Service Upgrade Center Resources Contact Us ...

Страница 10: ...s for BIOS and driver upgrades By entering your serial number you get drivers specific to your notebook Click Browse All Downloads to walk through a step by step wizard to locate your drivers Customer Service Click Customer Service to view information about your account and general information about warranties and special offers Upgrade Center Click Upgrade Center to view and purchase upgrades for...

Страница 11: ...leshooters and automated support Use Help and Support to answer questions about Windows and to help you quickly discover and use the many features of your Gateway notebook To start Help and Support Click Start then click Help and Support Help and Support opens You can find help information by clicking a link performing a search or browsing the index ...

Страница 12: ...e words you entered in the Search box You must be connected to the Internet to search for and access these topics To view a list of your search results click the results header for the type of results you want to view To view a topic click the topic name in the Search Results list BigFix Your notebook may include BigFix BigFix monitors your notebook for problems and conflicts It automatically gath...

Страница 13: ...the Internet sending a fax and changing power saving settings as well as other topics To access the Using Your Computer guide Click Start All Programs then click Gateway Documentation Online help Many programs provide information online so you can research a topic or learn how to perform a task while you are using the program You can access most online help information by selecting a topic from a ...

Страница 14: ...8 www gateway com Chapter 1 Getting Help You can search for information by viewing the help contents checking the index searching for a topic or keyword or browsing through the online help ...

Страница 15: ...ing Out Your Gateway Notebook Identifying features Locating your notebook s model and serial number Locating the Microsoft Certificate of Authenticity Locating the specifications for your notebook Purchasing accessories ...

Страница 16: ...battery is charging LED blinking red battery charge is very low LED solid red battery is malfunctioning Power indicator LED on notebook is on LED blinking notebook is in Standby mode LED off notebook is off Microphone jack Plug a microphone into this jack Headphone jack Plug amplified speakers or headphones into this jack The built in speakers are turned off when speakers or headphones are plugged...

Страница 17: ...kin Caution Do not block or insert objects into these slots If these slots are blocked your notebook may overheat resulting in unexpected shutdown or permanent damage to the notebook Caution Provide adequate space around your notebook so air vents are not obstructed Do not use the notebook on a bed sofa rug or other similar surface DVD drive Insert CDs or DVDs into this drive For more information ...

Страница 18: ...his 4 pin IEEE 1394 port Memory card reader Insert a memory card from a digital camera MP3 player PDA or cellular telephone into the memory card reader For more information see Using the memory card reader on page 43 The memory card reader supports Memory Stick Memory Stick Pro MultiMediaCard and Secure Digital USB ports Plug USB devices such as a diskette drive flash drive printer scanner camera ...

Страница 19: ...dem or to an Ethernet network on page 24 Modem jack Plug a modem cable into this jack For more information see Connecting the dial up modem on page 23 Component Icon Description Power connector Plug the AC adapter cable into this connector Monitor port Plug an analog VGA monitor or projector into this port For more information see Viewing the display on a projector or monitor on page 46 Component ...

Страница 20: ...a memory module into this bay For more information see Adding or replacing memory on page 63 Battery lock Slide to unlock the battery For more information see Changing batteries on page 56 System label Includes the product model number For more information see Identifying your model on page 16 Hard drive bay The hard drive is located in this bay For more information see Replacing the hard drive ki...

Страница 21: ...e To access this guide click Start All Programs then click Gateway Documentation Keyboard Provides all the features of a full sized computer keyboard For more information see Using the keyboard on page 29 Touchpad Provides all the functionality of a mouse For more information see Using the EZ Pad touchpad on page 34 Status indicators Inform you when a drive is in use or when a button has been pres...

Страница 22: ... Care will need this information if you call for assistance Microsoft Certificate of Authenticity The Microsoft Certificate of Authenticity label found on the bottom of your notebook includes the product key code for your operating system Important The labels shown in this section are for informational purposes only Label information varies by model features ordered and location Online Support sup...

Страница 23: ...ary See Changing batteries on page 56 for more information about using an additional battery Carrying cases Gateway has large capacity carrying cases if you need additional space for accessories or supplies Memory Large programs such as multimedia games or graphics programs use a lot of memory If your programs are running more slowly than you think they should try adding more memory See Adding or ...

Страница 24: ...rinters and cartridges are more expensive but they print much faster than inkjet printers Laser printers are better than inkjet printers when you are printing large documents USB flash drive Use a USB flash drive for storing files or transferring files to another computer ...

Страница 25: ... the AC adapter Connecting the dial up modem Connecting to a cable or DSL modem or to an Ethernet network Turning your notebook on and off Using the status indicators Using the keyboard and the EZ Pad touchpad Adjusting the volume Connecting to a wireless network ...

Страница 26: ... using an AC adapter or your notebook s battery The battery was shipped to you partially charged You should use the AC adapter right away to fully charge the battery Allow three hours for the battery to fully charge Important If the battery is not fully charged before you use your notebook on battery power for the first time the battery life may be much shorter than you expect If the battery life ...

Страница 27: ...AC adapter to your notebook s power connector Caution Make sure that you use the AC adapter that came with your notebook or one of the same type purchased from Gateway Replace the power cord if it becomes damaged The replacement cord must be of the same type and voltage rating as the original cord or your notebook may be damaged ...

Страница 28: ... system damage Protect your notebook and peripheral devices by connecting them to a surge protector which absorbs voltage surges and prevents them from reaching your notebook Warning Do not attempt to disassemble the AC adapter The AC adapter has no user replaceable or user serviceable parts inside The AC adapter has dangerous voltages that can cause serious injury or death Contact Gateway about r...

Страница 29: ... the modem 1 Insert one end of the modem cable into the modem jack on the right side of your notebook 2 Insert the other end of the modem cable into a telephone wall jack The modem will not work with digital or PBX telephone lines 3 Start your notebook then start your communications program Warning To reduce the risk of fire use only No 26 AWG or larger telecommunications line cord ...

Страница 30: ...ou can use to connect to a cable or DSL modem or to an Ethernet network To connect to a cable or DSL modem or to an Ethernet network 1 Insert one end of the network cable into the network jack on the right side of your notebook 2 Insert the other end of the network cable into a cable modem DSL modem or Ethernet network jack 3 Start your notebook ...

Страница 31: ...to On Off mode However you can also set it to function in Standby Resume mode 3 If you are starting your notebook for the first time follow the on screen instructions to set up your notebook Tips Tricks For more information about changing the power button mode see Changing Power Saving Settings in Using Your Computer which has been included on your hard drive To access this guide click Start All P...

Страница 32: ...notebook Warning Do not work for long periods with the notebook resting on your lap If the air vents are blocked the notebook may become hot enough to harm your skin Caution Provide adequate space around your notebook so air vents are not obstructed Do not use the notebook on a bed sofa rug or other similar surface Tips Tricks For more information about changing the power button mode see Changing ...

Страница 33: ...sk Manager The Windows Task Manager dialog box opens 3 Click the program that is not responding 4 Click End Task 5 Click X in the top right corner of the Windows Task Manager dialog box 6 If your notebook does not respond turn it off wait ten seconds then turn it on again As a part of the regular startup process a program to check the disk status runs automatically When the checks are finished Win...

Страница 34: ...turned off Caps lock LED on Caps lock is turned on LED off Caps lock is turned off Num lock LED on Numeric keypad is turned on LED off Numeric keypad is turned off Disc drive LED blinking The disc drive is in use LED off The disc drive is not in use Hard drive LED blinking The hard drive is in use LED off The hard drive is not in use Important If none of the indicators are on you may need to press...

Страница 35: ...ternate functions including shortcut keys for Windows function keys for specific system operations and the Num Lock keys for the numeric keypad Tips Tricks You can attach an external keyboard to the notebook using a USB port You do not need to shut down the notebook to connect a USB keyboard Function keys System keys Navigation keys FN key Windows key Numeric keypad Application key Arrow keys ...

Страница 36: ...e information see System key combinations on page 31 Navigation keys Press these keys to move the cursor to the beginning of a line to the end of a line up the page down the page to the beginning of a document or to the end of a document Arrow keys Press these keys to move the cursor up down right or left Application key Press this key for quick access to shortcut menus and help assistants in Wind...

Страница 37: ... aviation regulations require wireless devices to be turned off while traveling in an airplane 802 11g also known as wireless Ethernet or Wifi communication devices are examples of devices that provide wireless communication Enter Standby mode Press the power button to leave Standby mode For more information see Changing Power Saving Settings in Using Your Computer which has been included on your ...

Страница 38: ...ighting situations such as outside in bright sunlight Press a second time to decrease the brightness below the normal lowest brightness setting Use this feature in dim lighting situations Press a third time to return the display to the normal brightness setting Important Using this feature will affect battery performance Play or pause the CD or DVD Stop playing the CD or DVD Skip back one CD song ...

Страница 39: ...n again to restore the sound For more information see Adjusting the volume on page 37 Increase volume For more information see Adjusting the volume on page 37 Decrease volume For more information see Adjusting the volume on page 37 Press and hold FN then press this system key To ...

Страница 40: ...n you move your finger on the touchpad the pointer arrow on the screen moves in the same direction You can use the scroll zone to scroll through documents Use of the scroll zone may vary from program to program You can use the EZ Pad left and right buttons below the touchpad to select objects Touchpad Left button Right button Scroll zone ...

Страница 41: ...hen click Gateway Documentation To Do this Move the pointer on the screen Move your finger around on the touchpad If you run out of space and need to move the pointer farther lift your finger move it to the middle of the touchpad then continue movingyour finger Select an object on the screen Position the pointer over the object Quickly press and release the left button once This action is called c...

Страница 42: ...ouchpad to move drag the object to the appropriate part of the screen Release the button to drop the object where you want it Tips Tricks You received your notebook with the EZ Pad touchpad set to only accept clicking by using the touchpad buttons You can change this feature to allow tapping on the touchpad to simulate clicking the left button For more information see Changing the mouse or touchpa...

Страница 43: ...xternal speakers turn the knob on the front of the speakers OR Use the mute and volume control buttons on the keyboard For more information see System key combinations on page 31 Tips Tricks For instructions on how to adjust the volume in Windows see Adjusting the Volume in Using Your Computer which has been included on your hard drive To access this guide click Start All Programs then click Gatew...

Страница 44: ... 11g communication devices are examples of devices that provide wireless communication Warning In environments where the risk of interference to other devices or services is harmful or perceived as harmful the option to use a wireless device may be restricted or eliminated Airports hospitals and oxygen or flammable gas laden atmospheres are limited examples where use of wireless devices may be res...

Страница 45: ...39 Using Drives and Ports Using DVD drives Using the media card reader Using a PC Card Viewing the display on a monitor or projector Viewing the display on a television Connecting a video camera to your notebook ...

Страница 46: ...tection software You may not be able to play these CDs on your notebook If your drive has this logo This is your drive type Use your drive for Combination DVD CD RW drive Installing programs playing audio CDs playing DVDs accessing data and recording music and data to recordable CDs You cannot use this drive to create DVDs Multi format DVD RW CD RW drive Installing programs playing audio CDs playi...

Страница 47: ... 2 Place the disc in the tray with the label facing up then press down carefully on the disc until it snaps into place 3 Push the tray in until it is closed Important When you place a single sided disc in the tray make sure that the label side is facing up If the disc has two playable sides place the disc so the name of the side you want to play is facing up Eject button Manual eject hole ...

Страница 48: ...or Windows Movie Maker to copy or create data CDs and DVDs create music CDs create video DVDs and more Tips Tricks For more information about playing CDs see Using Windows Media Player in Using Your Computer which has been included on your hard drive To access this guide click Start All Programs then click Gateway Documentation Tips Tricks For more information about playing DVDs see Using Windows ...

Страница 49: ...ayer or cellular telephone Memory card types The memory card reader supports Memory Stick Memory Stick Pro MultiMediaCard and Secure Digital Inserting a memory card To insert a memory card Insert the memory card into the memory card slot with the label facing up and the arrow on the label pointing towards the notebook Using a memory card To access a file on a memory card 1 Click Start then click M...

Страница 50: ...slot This slot accepts one Type II card You do not need to restart your notebook when changing most cards because your notebook supports hot swapping Hot swapping means that you can insert a PC Card while your notebook is running If your PC Card does not work after hot swapping see the PC Card manufacturer s documentation for further information Important Do not use the remove hardware icon in the...

Страница 51: ...f the card is flush with the side of your notebook To remove a PC Card 1 Click the remove hardware icon in the taskbar the PC Card name then click Stop OR Turn off your notebook 2 Release the eject button by pressing the PC Card eject button once Important If the remove hardware icon does not appear on the taskbar click the show hidden icons button ...

Страница 52: ...onitor or projector to your monitor VGA port Your notebook supports simultaneous LCD and external display Simultaneous display lets you control the presentation from your notebook and at the same time face your audience To use a projector or external monitor 1 Turn off your notebook 2 Plug the projector or monitor cable into the VGA port on your notebook For the location of the VGA port see Back o...

Страница 53: ...the driver from the disc supplied by the manufacturer or download the driver from the manufacturer s Web site 5 After the driver is installed right click any empty space on the desktop then click Properties The Display Properties dialog box opens 6 Click the Settings tab 7 Right click the second monitor icon labeled 2 then click Attached 8 Click Apply 9 Adjust properties such as Screen Resolution ...

Страница 54: ...vision or VCR 4 Start your notebook Important Press FN F4 to switch between viewing the display on the LCD panel and viewing the display on the projector or monitor Important If an external monitor or projector is connected and you close the LCD panel your notebook may turn off the LCD panel but will not enter Standby mode Important To turn on external video by default connect the television or ot...

Страница 55: ...ontrol Panel The Control Panel window opens If your Control Panel is in Category View click Appearance and Themes 6 Click Double click the Display icon The Display Properties dialog box opens 7 Click the Settings tab 8 Click Advanced The Multiple Monitors Properties dialog box opens ...

Страница 56: ...plays tab 10 Click the Enable TV button if it is not already enabled then click Apply Important If the Enable TV and TV buttons are grayed out your notebook has not detected the television Make sure that the television is turned on and connected correctly Enable TV TV ...

Страница 57: ...To modify television settings 1 On the Multiple Monitors Properties dialog box Displays tab click TV 2 Modify the settings then click OK Important If you are traveling internationally you may need to change the video standard For example many televisions in Asia use PAL instead of NTSC ...

Страница 58: ...able to your video camera For the location of the IEEE 1394 port see Right on page 12 2 Connect the other end of the cable to the IEEE 1394 port on the side of your notebook Important For more information about using the IEEE 1394 port on your video camera see your camera s documentation Tips Tricks For more information about editing video see Editing videos in Using Your Computer which has been i...

Страница 59: ...Chapter 5 53 Managing Power Checking and recharging the battery Recalibrating the battery Changing batteries Extending the life of the battery ...

Страница 60: ...he Power Meter dialog box opens Look at the battery charge indicator see Front on page 10 LED blue battery is fully charged LED purple battery is charging LED blinking red battery charge is very low LED solid red battery is malfunctioning Wait for a Low Battery warning message to appear If your battery charge indicator displays what looks like an inaccurate charge you may need to recalibrate the b...

Страница 61: ... Connect the AC adapter then turn on your notebook 2 As soon as it starts and you see a startup screen press F2 The BIOS Setup utility opens 3 Open the Advanced menu 4 Highlight Battery Auto Learning then select Enabled by pressing the spacebar 5 Open the Exit menu then highlight Exit Saving Changes and press ENTER Important If the power cord or battery icon does not appear on the taskbar click th...

Страница 62: ... an AC outlet you must turn the notebook off while changing the battery To change the battery 1 If your notebook is on and is connected to AC power go to Step 2 OR If your notebook is on and is not plugged into an AC outlet save your work and turn off your notebook Important Do not interrupt the battery recalibration process If recalibration is interrupted you must start the process over again War...

Страница 63: ...k over so the bottom is facing up 4 Slide the battery lock to the unlocked position 5 Slide the battery release latch then slide the battery out of the notebook 6 Slide a recharged battery into the notebook until it snaps into place 7 Slide the battery lock to the locked position ...

Страница 64: ...not using your notebook The display stays off until you open the panel again Use Hibernate mode for maximum power savings while your notebook is not in use Use the DVD drive only when necessary This drive uses a large amount of power Tips Tricks For more information about using power management settings see Changing Power Saving Settings in Using Your Computer which has been included on your hard ...

Страница 65: ...pter To find AC power outlets in airports look for them next to support pillars in large areas such as boarding gates and under banks of telephones Changing power modes You can use the following power modes to lengthen the life of your notebook s battery Standby while your notebook is in Standby it switches to a low power state where devices such as the display and drives turn off Hibernate also c...

Страница 66: ... hard drive If power is interrupted the information is lost When in Hibernate mode your notebook saves all memory information to the hard drive then turns the power completely off If your notebook is and you want to then On Enter Standby mode Press FN F3 On Enter Hibernate mode must be activated Click Start then click Turn Off Computer Press and hold SHIFT then click Hibernate In Standby or Hibern...

Страница 67: ...Chapter 6 61 Upgrading Your Notebook Adding and replacing memory Replacing the hard drive ...

Страница 68: ...trostatic protection Always hold components by their edges Avoid touching the edge connectors Never slide components over any surface Wear a grounding wrist strap available at most electronics stores and attach it to a bare metal part of your workbench or other grounded connection Touch a bare metal surface on your workbench or other grounded object Important Before installing memory or replacing ...

Страница 69: ...ry modules designed for your Gateway notebook for upgrading your memory To add or replace memory modules 1 Follow the guidelines under Preventing static electricity discharge on page 62 2 Turn off your notebook 3 Disconnect the AC adapter modem cable and network cable 4 Disconnect all peripheral devices and remove any PC cards 5 Turn your notebook over so the bottom is facing up 6 Remove the batte...

Страница 70: ...64 www gateway com Chapter 6 Upgrading Your Notebook 7 With a small Phillips screwdriver remove the keyboard screw and put it in a safe place Tips Tricks The screw hole is marked with a K Screw ...

Страница 71: ...65 www gateway com Adding or replacing memory 8 Loosen the six memory bay cover screws these screws cannot be removed then remove the memory bay cover ...

Страница 72: ...eway com Chapter 6 Upgrading Your Notebook 9 If you are removing a module gently press outward on the clip at each end of the memory module until the module tilts upward 10 Pull the memory module out of the slot ...

Страница 73: ...it make sure that the notch in the module lines up with the tab in the memory bay 12 Gently push the module down until it clicks in place 13 Replace the memory bay cover then tighten the cover screws 14 Replace the keyboard screw 15 Insert the battery then turn your notebook over 16 Connect the power adapter modem cable and network cable then turn on your notebook Important Use only memory modules...

Страница 74: ... guide To access this guide click Start All Programs System Recovery then click Recovery Help Manual 2 Print the Using Gateway System Recovery online guide for use in Step 17 1 Back up any data you want to transfer to the new hard drive For more information see Backing up files in Using Your Computer which has been included on your hard drive To access this guide click Start All Programs then clic...

Страница 75: ...facing up 7 Remove the battery For more information see Changing batteries on page 56 8 Remove the two hard drive bay cover screws slide the hard drive bay cover then remove it The hard drive is attached to the back of the cover 9 If your new hard drive already includes the hard drive cover go to Step 14 OR If you need to move the hard drive cover from your old hard drive to your new hard drive go...

Страница 76: ...ive to the hard drive cover 11 Remove the cover from the old drive 12 Insert the new drive label side up onto the cover so the screw holes line up 13 Replace the screws that secure the cover to the drive 14 Slide the new hard drive kit into your notebook then replace the cover screws Screws Screws ...

Страница 77: ...ery then turn your notebook over 16 Connect the power adapter modem cable and network cable then turn on your notebook 17 For instructions on installing Windows your drivers and your applications see the Using Gateway System Recovery online guide you printed in Step 2 ...

Страница 78: ...72 www gateway com Chapter 6 Upgrading Your Notebook ...

Страница 79: ...Chapter 7 73 Maintaining Your Notebook Caring for your notebook Cleaning your notebook Protecting your notebook from viruses Updating Windows Restoring your system ...

Страница 80: ...an become brittle and easy to break in cold temperatures and can melt or warp in high temperatures Damage due to either extreme is not covered by your warranty As a general rule your notebook is safest at temperatures that are comfortable for you Keep all liquids away from your notebook When spilled onto computer components almost any liquid can result in expensive repairs that are not covered und...

Страница 81: ...e a damp lint free cloth to clean your notebook and other parts of your system Do not use household abrasive or solvent cleaners because they can damage the finish on components Your notebook is cooled by air circulated through the vents on the case so keep the vents free of dust With your notebook turned off and unplugged brush the dust away from the vents with a damp cloth Be careful not to drip...

Страница 82: ...e keyboard dry before trying to use it again If the keyboard does not work after it dries you may need to replace it Cleaning the notebook screen Use a soft cloth and water to clean the LCD screen Squirt a little water on the cloth never directly on the screen and wipe the screen with the cloth Cleaning CDs or DVDs Wipe from the center to the edge not around in a circle using a product made especi...

Страница 83: ...to e mail messages or downloaded from the Internet Checking all programs for viruses before installing them Disabling macros on suspicious Microsoft Word and Excel files These programs will warn you if a document that you are opening contains a macro that might have a virus Periodically updating the Norton Internet Security program to protect against the latest viruses Making sure the Windows Secu...

Страница 84: ...ateway com Chapter 7 Maintaining Your Notebook To scan for viruses 1 Click Start All Programs Norton Internet Security then click Norton Internet Security Norton Internet Security opens 2 Click Norton AntiVirus ...

Страница 85: ... for at least 30 seconds 3 Turn on your notebook and rescan for the virus To update Norton Internet Security 1 Make sure that you are connected to the Internet 2 Click Start All Programs Norton Internet Security then click Norton Internet Security Norton Internet Security opens Important You received a free limited time subscription to the Norton Internet Security service when you purchased your n...

Страница 86: ... software and hardware New content is added to the site regularly so you can always get the most recent updates and fixes to protect your notebook and keep it running smoothly Windows Update scans your notebook and provides you with a tailored selection of updates that apply only to the software and hardware on your notebook To run Windows Update 1 Connect to the Internet 2 Click Start All Program...

Страница 87: ...ystem Tools then click System Restore 2 Follow the on screen instructions Reinstalling applications and drivers If a program or device on your notebook is not working correctly you may need to reinstall your applications or drivers To reinstall your applications or drivers 1 Click Start All Programs System Recovery then click Application Driver Recovery 2 Follow the on screen instructions Help and...

Страница 88: ...onfiguration If Windows does not start or if the two previous procedures do not correct the problem you may need to restore your notebook to the original configuration To restore your notebook to the original configuration 1 Turn on your notebook then press F11 2 Follow the on screen instructions ...

Страница 89: ...Chapter 8 83 Troubleshooting Troubleshooting typical hardware and software problems Getting telephone support Using automated troubleshooting systems ...

Страница 90: ...efore accessing internal components For more information about preventing damage from static electricity see Preventing static electricity discharge on page 62 After you complete any maintenance tasks where you remove the memory bay or hard drive bay cover make sure that you replace the cover reinstall any screws then replace the battery before you start your notebook Warning Do not try to trouble...

Страница 91: ...e secure Make sure that your hard drive is not full If an error message appears on the screen write down the exact message The message may help Gateway Customer Care in diagnosing and fixing the problem If you added or removed peripheral devices review the installation procedures you performed and make sure that you followed each instruction If an error occurs in a program see the program s printe...

Страница 92: ...metimes a new device such as a PC Card can cause a system resource IRQ conflict Check IRQ usage to determine if there is an IRQ conflict To check IRQ usage 1 Click Start then click Control Panel The Control Panel window opens If your Control Panel is in Category View click Performance and Maintenance 2 Click Double click System click the Hardware tab then click Device Manager The Device Manager wi...

Страница 93: ... For more information see System key combinations on page 31 The screen resolution is not correct Change the screen resolution from the Display Properties dialog box The text on the display is dim or difficult to read Adjust the brightness and contrast using the system keys For more information see System key combinations on page 31 Help and Support For more information about IRQs click Start then...

Страница 94: ...ombinations on page 31 Make sure the notebook is not in standby or hibernate mode For more information see Changing power modes on page 59 The notebook may be sending its display to an external monitor or projector Press FN F4 several times to toggle through the attached display an external monitor or projector or both DVD drives Your notebook does not recognize a disc The disc may not be seated c...

Страница 95: ...that the Windows volume control is turned up Make sure that Mute controls are turned off For more information about the mute setting see System key combinations on page 31 Make sure that headphones are not plugged into the headphone jack on the notebook If you are using powered speakers make sure that they are plugged in and turned on Clean the disc For more information see Cleaning CDs or DVDs on...

Страница 96: ...he regional code of the disc The regional code for the disc is on the disc disc documentation or packaging If the DVD movie does not play the disc s regional code and your DVD drive s regional code may not match Make sure that a DVD player program has been installed on your notebook A DVD does not produce sound on a TV Audio is not transmitted through the S Video out jack Use the built in speakers...

Страница 97: ... an Insufficient disk space error message Delete unnecessary files from the hard drive using Disk Cleanup Empty the Recycle Bin by right clicking the Recycle Bin icon then clicking Empty Recycle Bin Help and Support For more information about restoring deleted files click Start then click Help and Support Type the keyword System Restore in the Search box then click the arrow Tips Tricks For instru...

Страница 98: ...age 68 If your notebook has been subjected to static electricity or physical shock you may need to reinstall the operating system Internet You cannot connect to the Internet If you are using a dial up modem make sure that the modem cable is plugged into the modem jack and not the Ethernet network jack See Right on page 12 to make sure that the connections have been made correctly OR Help and Suppo...

Страница 99: ...error message still appears disconnect from the ISP connection and close your browser then reconnect and open the browser If you still get the error your ISP may be having technical difficulties Connecting to a Web site takes too long Many factors can affect Internet performance The condition of the telephone lines in your residence or at your local telephone service The condition of the Internet ...

Страница 100: ...upside down to drain it Let the keyboard dry before using it again If the keyboard does not work after it dries you may need to replace it A keyboard character keeps repeating or you see a Keyboard stuck or Key failure error message Make sure that nothing is resting on the keyboard Make sure that a key is not stuck Press each key to loosen a key that might be stuck then restart your notebook You a...

Страница 101: ...dial up Your modem does not dial or does not connect Make sure that the modem cable is plugged into the modem jack and not the Ethernet network jack See Right on page 12 to make sure that the connections have been made correctly Make sure that your notebook is connected to the telephone line and the telephone line has a dial tone Make sure that the modem cable is less than 6 feet 1 8 meters long R...

Страница 102: ... any answering machine fax machine or printer that is on the same line as the modem Do not connect these devices to the same telephone line as the modem Make sure that you are not using a digital rollover or PBX line These lines do not work with your modem Check for line noise scratchy crackling or popping sounds Line noise is a common problem that can cause the modem to connect at a slower rate a...

Страница 103: ...ubleshooting information under Internet on page 92 Your 56K modem does not connect at 56K Current FCC regulations restrict actual data transfer rates over public telephone lines to 53K Other factors such as line noise telephone service provider equipment or ISP limitations may lower the speed even further If your notebook has a v 90 modem the speed at which you can upload send data is limited to 3...

Страница 104: ... Phone and Modem Options icon then click the Modems tab 4 Click your modem then click Properties The Modem Properties dialog box opens 5 Click the Diagnostic tab then click Query Modem If information about the modem appears the modem passed diagnostics If no modem information is available a white screen appears with no data or if you get an error such as port already open or the modem has failed t...

Страница 105: ...s icon then click the Modems tab 3 Click the modem you want to adjust then click Properties 4 Click the Modem tab then adjust the Speaker volume control 5 Click OK twice to close the Phone and Modem Options dialog box Mouse See also Touchpad on page 105 The external mouse does not work Make sure that the mouse cable is plugged in correctly Shut down and restart your notebook Remove all extension c...

Страница 106: ... IP addresses to the computers make sure that all computers have different IP addresses For home networks IP addresses should be 192 168 N N where N is a number you assign between 0 and 254 The first N should be the same for all computers on your network and the second N should be different for all computers on your network Your wired Ethernet network is running slower than you expect If your Ethe...

Страница 107: ... password feature which is set in the BIOS Setup utility is very secure with no easy way to recover a forgotten password You must return your notebook for repair Call Gateway Customer Care for instructions PC Cards You installed a PC Card and now your notebook is having problems Make sure that you have correctly installed required software for the PC Card For more information see your PC Card s do...

Страница 108: ...outlet and turn it on Make sure that the AC power adapter cables are free from cuts or damage Replace any damaged cables Your notebook is not working on battery power Check the power management settings Make sure that the battery is installed correctly For more information see Installing the battery on page 20 Make sure that the battery is fully recharged For more information see Recharging the ba...

Страница 109: ...nter online Check the port and cable for bent or broken pins If the printer you want to print to is not the default printer make sure that you have selected it in the printer setup To set a default printer 1 Click Start then click Control Panel The Control Panel window opens If your Control Panel is in Category View click Printers and Other Hardware 2 Click Double click the Printers and Faxes icon...

Страница 110: ...t one time you may want to add additional memory to the printer See the printer documentation for instructions for adding additional memory You see a Printer is out of paper error message After adding paper make sure that the printer is online Most printers have an online offline button that you need to press after adding paper Sound You are not getting sound from the built in speakers Make sure t...

Страница 111: ... touchpad settings Tips Tricks For instructions on how to adjust the volume control in Windows see Adjusting the volume in Using Your Computer which has been included on your hard drive To access this guide click Start All Programs then click Gateway Documentation Help and Support For more information about troubleshooting sound issues click Start then click Help and Support Type the keyword sound...

Страница 112: ... the TV Out mode For more information see Modifying television settings on page 51 Telephone support Before calling Gateway Customer Care If you have a technical problem with your notebook follow these recommendations before contacting Gateway Customer Care Make sure that your notebook is connected correctly to a grounded AC outlet that is supplying power If you use a surge protector make sure tha...

Страница 113: ...detailed description of your problem including the exact text of any error messages and the steps you have taken Make sure that your notebook is nearby at the time of your call The technician may have you follow troubleshooting steps Telephone numbers Gateway offers a wide range of customer service customer care and information services Automated troubleshooting system Warning To avoid bodily inju...

Страница 114: ...each Answers by Gateway Get tutorial assistance for hardware and software issues This is a fee based service www gateway com answers Gateway Customer Care Talk to a Gateway Customer Care representative about a non tutorial technical support question See Before calling Gateway Customer Care on page 106 before calling Gateway Customer Care telephone numbers vary by country or region See the label on...

Страница 115: ...rvice description For more information Gateway Learning Libraries A variety of courses and tutorials are available on CD Select from several easy to use learning libraries www gateway com training Online Training from Learn With Gateway More than 450 online courses are available from Learn With Gateway All you have to do is go online and log in You select the subject matter and the learning format...

Страница 116: ...110 www gateway com Chapter 8 Troubleshooting ...

Страница 117: ...Appendix A 111 Safety Regulatory and Legal Information Safety information Regulatory statements Environmental information Notices ...

Страница 118: ...g type outlet This is a safety feature If you are unable to insert the plug into an outlet contact an electrician to install the appropriate outlet If you use an extension cord with this notebook make sure that the total ampere rating on the products plugged into the extension cord does not exceed the extension cord ampere rating Care during use Do not walk on the power cord or allow anything to r...

Страница 119: ...specific countries are listed in the specific country sections or country group sections The wireless devices in your system are only qualified for use in the countries identified by the Radio Approval Marks on the system rating label If the country you will be using the wireless device in is not listed please contact your local Radio Approval agency for requirements Wireless devices are closely r...

Страница 120: ... Bluetooth communication devices are examples of devices that provide wireless communication Warning In environments where the risk of interference to other devices or services is harmful or perceived as harmful the option to use a wireless device may be restricted or eliminated Airports Hospitals and Oxygen or flammable gas laden atmospheres are limited examples where use of wireless devices may ...

Страница 121: ... the FCC The wireless devices installed in this system are intended to be used indoors In some areas use of these devices outdoors is prohibited Operation of this device is subject to the following two conditions 1 This device may not cause harmful interference and 2 this device must accept any interference received including interference that may cause undesired operation of the device Important ...

Страница 122: ...between the equipment and receiver Connect the equipment into an outlet on a circuit different from that to which the receiver is connected Consult the dealer or an experienced radio TV technician for help Compliance Accessories The accessories associated with this equipment are shielded video cable when an external monitor is connected These accessories are required to be used in order to ensure ...

Страница 123: ...be required The telephone company may request that you disconnect the equipment until the problem is resolved The telephone company may make changes in its facilities equipment operations or procedures that could affect the operation of this equipment If this happens the telephone company will provide advance notice in order for you to make necessary modifications to maintain uninterrupted service...

Страница 124: ...when wireless devices are on The power output of the wireless device or devices which may be embedded in your notebook is well below the RF exposure limits as set by Industry Canada Operation of this device is subject to the following two conditions 1 This device may not cause harmful interference and 2 this device must accept any interference received including interference that may cause undesir...

Страница 125: ...ngle line individual service may be extended by means of a certified connector assembly The customer should be aware that compliance with the above conditions may not prevent degradation of service in some situations Repairs to certified equipment should be made by an authorized Canadian maintenance facility designated by the supplier Any repairs or alterations made by the user to this equipment o...

Страница 126: ... DHHS Radiation Performance Standard Should the unit ever need servicing contact an authorized service location EPA ENERGY STAR As an ENERGY STAR Partner Gateway has determined that this product meets the ENERGY STAR guidelines for energy efficiency when used with a computer equipped with a Display Power Management System Warning Use of controls or adjustments or performance of procedures other th...

Страница 127: ...ectrical or electronic equipment is no longer useful to you take it back to your local or regional waste collection administration for recycling In some cases your end of life product may be traded in for credit towards the purchase of new Gateway equipment Call Gateway to see if this program is available in your area If you need further assistance in recycling reusing or trading in your end of li...

Страница 128: ...velopment Gateway reserves the right to make improvements in this manual and the products it describes at any time without notices or obligation Trademark Acknowledgments Gateway and the Black and White Spot Design are trademarks or registered trademarks of Gateway Inc in the U S and other countries SpotShop Spotshop com and Your Ware are trademarks of Gateway Inc Intel Intel Inside logo and Penti...

Страница 129: ...56 changing 56 charge indicator 10 54 charge status 54 charging 20 55 conserving power 58 icons 54 installing 56 latch 14 locating 14 managing power 58 monitoring charge 54 purchasing 17 recalibrating 55 recharging 20 55 release latch 14 replacing 56 bays battery 56 hard drive 14 memory 14 63 BigFix 6 BIOS Setup utility 55 brightness adjusting 32 brightness keys 32 C cable lock 11 cable modem 24 C...

Страница 130: ...4 cable modem 13 24 dial up modem 23 digital camera 12 digital video camera 12 DSL modem 13 24 Ethernet 13 24 external audio 10 external diskette drive 12 external speakers 10 Firewire 12 flash drive 12 headphone 10 i Link 12 IEEE 1394 12 keyboard 12 microphone 10 modem 13 23 monitor VGA 13 46 mouse 12 network 13 24 power 13 20 printer 12 projector 46 scanner 12 speaker 10 S Video TV out 11 S Vide...

Страница 131: ...ocating 11 troubleshooting 88 using 40 DVD CD RW drive See DVD drive DVD RW drive See DVD drive E electrostatic discharge ESD 62 EmPower power adapter 59 Ethernet connecting 24 jack 13 24 external monitor 13 31 EZ Pad touchpad See touchpad F fan 11 faxes troubleshooting 97 files opening 35 troubleshooting 91 finding Help and Support topics 6 specifications 17 Firewire port 12 Fn key 30 31 folders ...

Страница 132: ...atures 29 locating 15 troubleshooting 94 USB port 12 keys application 30 arrow 30 battery status 32 brightness 32 directional 30 Fn 30 31 function 30 LCD brightness 32 LCD CRT 31 navigation 30 numeric keypad 30 power status 32 Standby 31 Status 32 system 30 system key combinations 31 toggle display 31 Windows 30 L label model number 14 labels 16 laser printer 17 latch battery 14 LCD panel release ...

Страница 133: ...rds 43 multimedia adjusting volume 37 playing DVD 42 using DVD drive 40 using Windows Media Player 42 muting sound 33 37 N navigation keys 30 network jack 13 24 troubleshooting 100 networking turning off wireless network 38 turning on wireless network 38 Norton Internet Security 77 NTSC PAL jack 48 Num Lock status indicator 28 numeric keypad status indicator 28 using 30 O online help 5 7 opening f...

Страница 134: ...play properties 47 screen resolution 47 R RAM See memory rebooting notebook 27 recalibrating battery 55 recharging battery 55 replacing See installing resetting notebook 27 restarting notebook 27 restoring system 81 right clicking 36 rocker switch 34 S safety caring for computer 74 general precautions 112 guidelines for troubleshooting 84 static electricity 62 scanner USB port 12 screen cleaning 7...

Страница 135: ...shooting 107 Support 17 Technical Support 108 tips before contacting 106 tutorial service 108 telephone support 106 television playing DVD on 48 TV out jack 11 48 viewing display on 48 touchpad buttons 34 clicking 35 double clicking 35 dragging screen objects 36 locating 15 moving pointer 34 35 moving screen objects 36 opening files folders and programs 35 opening shortcut menu 36 right clicking 3...

Страница 136: ...V out S Video out jack 11 U updating device drivers 3 Norton Internet Security 77 Windows 80 upgrading 61 USB port 12 V VGA port 13 46 video playing 42 S Video out jack 11 troubleshooting 106 video camera connecting 52 virus protecting against 77 removing 77 volume adjusting 33 37 adjusting modem 98 controls 37 muting 33 37 system keys 33 troubleshooting 104 W waking up notebook 26 Web site Gatewa...

Страница 137: ......

Страница 138: ...MAN M360 365 6000SER GDE R2 7 05 ...

Отзывы: