Sheet 4 of 6 GPN 234969
Step 6
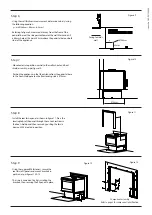
• Using the wall thickness measurement, determine value
(y)
using
the following equation:
y = wall thickness - 88mm, (± 2mm)
• Referring to figure 9, measure distance
y
from the front of the
pedestal base at the side pointed towards the wall. Mark and drill
a 6.5mm hole at this point, 43mm above the pedestal base on both
sides of the appliance.
Step 7
• Move heater into position, central to the wall cut-out and heat
shield assembly, as per figure 10.
• Position the appliance so that the distance from the pedestal base
to the heat shield panel on the freestanding side is 575mm.
Step 8
• Install the rear fascia panel as shown in figure 11. Press the
locating tabs of the panel through the cut-out sections in
the heat shield panel, then secure by pushing the fascia
down until it is seated in position.
Step 9
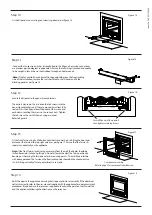
• Using the suppied M6 fasteners, secure the
rear fascia fill panels and mount brackets in
position, as per figures 12 & 13.
• This is best carried out by first installing the
brackets, then securing the fill panels in place.
Figure 9
'
'(7$,/'
6&$/(
0$7(5,$/
),1,6+1$785$/
'5$:1
7,7/(
$33'
-,*
6+((7
2)
5(9 %< (&11R '$7(
5(9 %< (&11R '$7(
5(/($6('
'21276&$/(
$
6&$/(
3$571R
'225+($7(5)6
%$6(+($7(5
77
7+,6,1)250$7,21,6&21),'(17,$/$1'5(0$,167+(
3523(57<2)$)*$62137</7'81'(5&23<5,*+7/$:
$)*$62137</7',1&,19,&725,$
5(*,67(5('2)),&(
%/$.(675((7$5$5$7
9,&725,$
0$66NJ
7+,5'
$1*/(
352-(&7,21
67$1'$5'0(75,&72/(5$1&(681/(6663(&,),('27+(5:,6(
',0(16,2166+2:17+86RU
'5,//('+2/(6381&+('+2/(6$1*/(6
)25/$6(5&87&20321(176
)256+((7PP$1'81'(572/(5$1&(
)256+((7WRPP72/(5$1&(
)256+((7WRPP72/(5$1&(
y
43mm
Ø 6.5mm
Facing towards
wall
0$7(5,$/
),1,6+1$785$/
'5$:1
7,7/(
$33'
-,*
6+((7
2)
5(9 %< (&11R '$7(
5(9 %< (&11R '$7(
5(/($6('
'21276&$/(
$
6&$/(
3$571R
'225+($7(5)6
%$6(+($7(5
77
7+,6,1)250$7,21,6&21),'(17,$/$1'5(0$,167+(
3523(57<2)$)*$62137</7'81'(5&23<5,*+7/$:
$)*$62137</7',1&,19,&725,$
5(*,67(5('2)),&(
%/$.(675((7$5$5$7
9,&725,$
0$66NJ
7+,5'
$1*/(
352-(&7,21
67$1'$5'0(75,&72/(5$1&(681/(6663(&,),('27+(5:,6(
',0(16,2166+2:17+86RU
'5,//('+2/(6381&+('+2/(6$1*/(6
)25/$6(5&87&20321(176
)256+((7PP$1'81'(572/(5$1&(
)256+((7WRPP72/(5$1&(
)256+((7WRPP72/(5$1&(
Figure 10
575mm
0$7(5,$/
),1,6+1$785$/
'5$:1
7,7/(
$33'
-,*
6+((7
2)
5(9 %< (&11R '$7(
5(9 %< (&11R '$7(
5(/($6('
'21276&$/(
$
6&$/(
3$571R
'225+($7(5)6
%$6(+($7(5
77
7+,6,1)250$7,21,6&21),'(17,$/$1'5(0$,167+(
3523(57<2)$)*$62137</7'81'(5&23<5,*+7/$:
$)*$62137</7',1&,19,&725,$
5(*,67(5('2)),&(
%/$.(675((7$5$5$7
9,&725,$
0$66NJ
7+,5'
$1*/(
352-(&7,21
67$1'$5'0(75,&72/(5$1&(681/(6663(&,),('27+(5:,6(
',0(16,2166+2:17+86RU
'5,//('+2/(6381&+('+2/(6$1*/(6
)25/$6(5&87&20321(176
)256+((7PP$1'81'(572/(5$1&(
)256+((7WRPP72/(5$1&(
)256+((7WRPP72/(5$1&(
Figure 11
0$7(5,$/
),1,6+
'5$:1
7,7/(
$33'
-,*
6+((7
2)
5(9 %< (&11R '$7(
5(9 %< (&11R '$7(
5(/($6('
'21276&$/(
$
6&$/(
3$571R
-(:(/63(&75()6
7+58:$//.,7&20%867,%/(:$//
77
(1*35
7+,6,1)250$7,21,6&21),'(17,$/$1'5(0$,167+(
3523(57<2)$)*$62137</7'81'(5&23<5,*+7/$:
$)*$62137</7',1&,19,&725,$
5(*,67(5('2)),&(
%/$.(675((7$5$5$7
9,&725,$
0$66NJ
7+,5'
$1*/(
352-(&7,21
67$1'$5'0(75,&72/(5$1&(681/(6663(&,),('27+(5:,6(
',0(16,2166+2:17+86RU
'5,//('+2/(6381&+('+2/(6$1*/(6
)25/$6(5&87&20321(176
)256+((7PP$1'81'(572/(5$1&(
)256+((7WRPP72/(5$1&(
)256+((7WRPP72/(5$1&(
77
0$7(5,$/
),1,6+1$785$/
'5$:1
7,7/(
$33'
-,*
6+((7
2)
5(9 %< (&11R '$7(
5(9 %< (&11R '$7(
5(/($6('
'21276&$/(
$
6&$/(
3$571R
'225+($7(5)6
%$6(+($7(5
77
7+,6,1)250$7,21,6&21),'(17,$/$1'5(0$,167+(
3523(57<2)$)*$62137</7'81'(5&23<5,*+7/$:
$)*$62137</7',1&,19,&725,$
5(*,67(5('2)),&(
%/$.(675((7$5$5$7
9,&725,$
0$66NJ
7+,5'
$1*/(
352-(&7,21
67$1'$5'0(75,&72/(5$1&(681/(6663(&,),('27+(5:,6(
',0(16,2166+2:17+86RU
'5,//('+2/(6381&+('+2/(6$1*/(6
)25/$6(5&87&20321(176
)256+((7PP$1'81'(572/(5$1&(
)256+((7WRPP72/(5$1&(
)256+((7WRPP72/(5$1&(
Component assembly.
Refer to page 2 for component identification.
Figure 12
Figure 13


