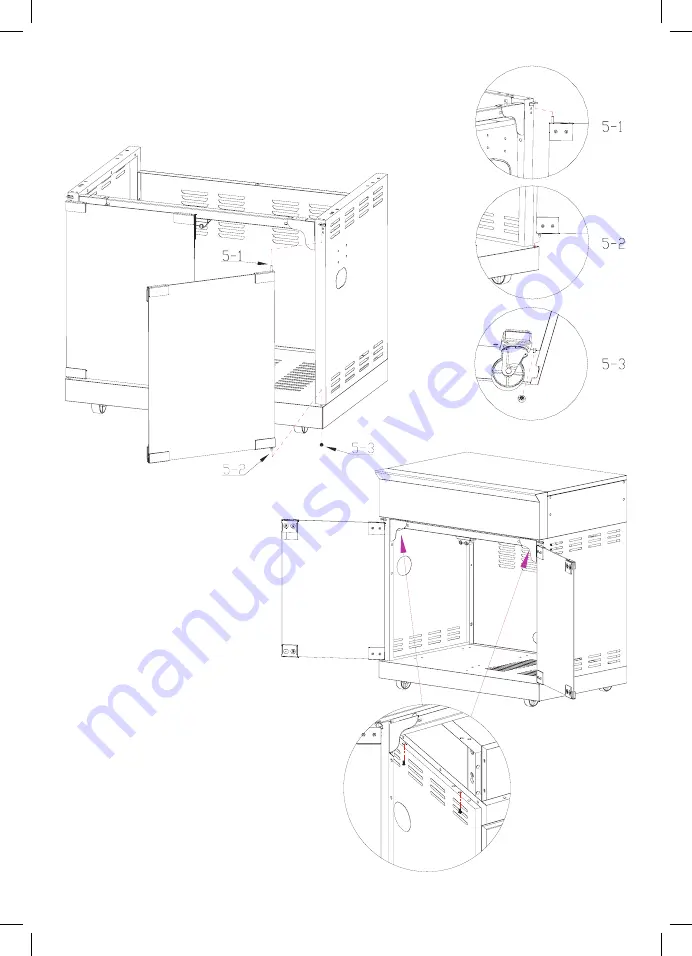
Gasmate Specialist Deluxe II Series Скачать руководство пользователя страница 6

7

6

STEP 5

To fit the cabinet doors, insert the fixed upper pin into the bracket as 

shown in the picture, then insert the bottom pin into the base, and 
use M4 nut(x2pcs) to fasten the doors, as shown.  

STEP 6

Use M6*12 screw (x4pcs) to fasten 
the storage body assy to cabinet 
cart as shown.

Содержание Specialist Deluxe II Series

Страница 1: ...body Glass doors Full width stainless steel front drawer 4 Castors 2 locking Dimensions L 800 x D 900 x H 880mm Freestanding unit Connects to right side of Specialist Deluxe Series II BBQs see instructions page 9 Gasmate is a registered trademark of Sitro Group Australia Pty Ltd www gasmate com au Aber Hamilton N Z www gasmate co nz FEATURES ...

Страница 2: ...2 EXPLODED DIAGRAM ...

Страница 3: ...ht Door Assembly 1pc 5 Left Door Assembly 1pc 6 Cabinet Left Side Panel 1pc 7 Back Panel 1pc 8 Cabinet Beam Assembly 1pc 9 Magnet 1pc 10 Cabinet Right Side Panel 1pc 11 Storage Body 1pc 12 M6 12 Screw black galvanize 33pcs 13 M4 10 Screw 4pcs 14 Nut M4 2pcs 15 Nut M6 4pcs 16 M6 15 Screw 4pcs ...

Страница 4: ...astors at the rear of the base so the locks can be accessed from the back of the Cart without the skirt panel being in the way ASSEMBLY INSTRUCTIONS Remove any transit protection material Tools Required Phillips Head Screwdriver Adjustable Spanner Step 2 Use M6 12 screw x4pcs to fix the cabinet left side panel and cabinet right side panel onto the base panel ...

Страница 5: ... fix the back panel onto base panel cabinet left side panel and cabinet right side panel Step 4 Use M4 10 screw x4pcs to fix the magnet to cabinet beam then use M6 12 screw x4pcs to fix the beam between two cabinet side panels as shown ...

Страница 6: ...rt the fixed upper pin into the bracket as shown in the picture then insert the bottom pin into the base and use M4 nut x2pcs to fasten the doors as shown Step 6 Use M6 12 screw x4pcs to fasten the storage body assy to cabinet cart as shown ...

Страница 7: ...tep 1 Loosen M4 10 screw x1pc and M6 12 screw x4pcs to remove the side shelf assembly CONNECTION WITH BBQ Step 2 Use M6 15 screw x4pcs and M6 Nut x4pcs to connect the storage module to the right of the BBQ ...

Страница 8: ...call Customer Service Australia Only 1300 174 876 Hours of operation Monday to Friday 8 30am 5 30pm EST Do not return to place of purchase Keep your purchase receipt this will be required to make any claims under the 12 month warranty ...

Отзывы: