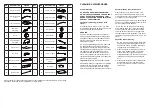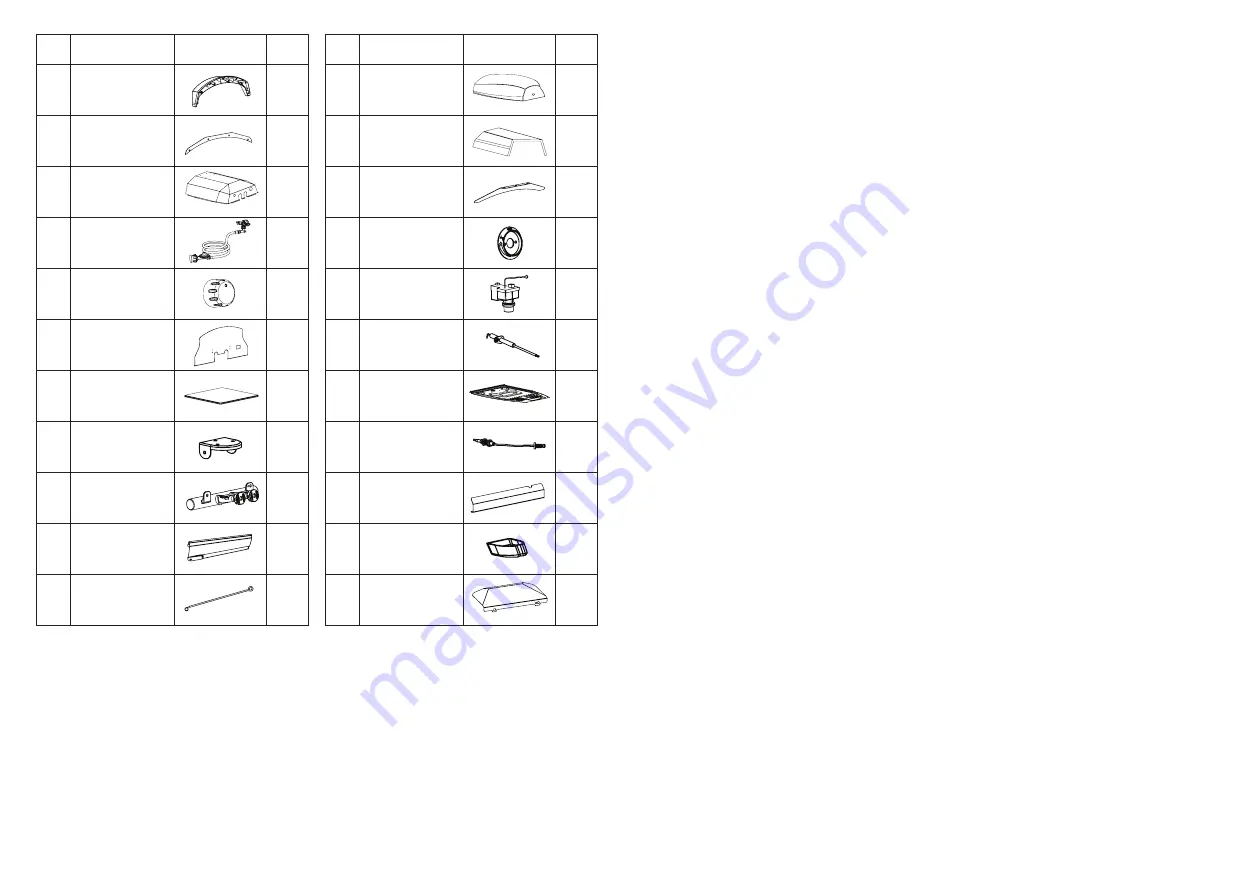
NO.
DESCRIPTION
FIGURE
QTY
1
Decorative plate
1
3
Decorative plate
seals
1
5
Inner lining plate
1
7
Gas inlet
assembly
1
9
Knob
1
11
Pulse diagram
assembly
1
13
Pizza stone
1
15
Foot base
3
17
Burner assembly
1
19
Feet
3
21
Ignition stick
1
NO.
DESCRIPTION
FIGURE
QTY
2
Shell assembly
1
4
Insulating cotton
1
6
Tail flame baffle
1
8
Knob bezel
1
10
Pulse igniter
1
12
Ignition needle
1
14
Bottom plate
1
16
Thermocouple
1
18
Pizza stone
baffle
1
20
Foot plug
3
22
Flame dampers
1
1
2
3
4
5
6
16
7
8
9
10
11
12
13
14
15
21
22
17
18
19
20
1
2
3
4
5
6
16
7
8
9
10
11
12
13
14
15
21
22
17
18
19
20
1
2
3
4
5
6
16
7
8
9
10
11
12
13
14
15
21
22
17
18
19
20
1
2
3
4
5
6
16
7
8
9
10
11
12
13
14
15
21
22
17
18
19
20
1
2
3
4
5
6
16
7
8
9
10
11
12
13
14
15
21
22
17
18
19
20
1
2
3
4
5
6
16
7
8
9
10
11
12
13
14
15
21
22
17
18
19
20
1
2
3
4
5
6
16
7
8
9
10
11
12
13
14
15
21
22
17
18
19
20
1
2
3
4
5
6
16
7
8
9
10
11
12
13
14
15
21
22
17
18
19
20
1
2
3
4
5
6
16
7
8
9
10
11
12
13
14
15
21
22
17
18
19
20
1
2
3
4
5
6
16
7
8
9
10
11
12
13
14
15
21
22
17
18
19
20
1
2
3
4
5
6
16
7
8
9
10
11
12
13
14
15
21
22
17
18
19
20
1
2
3
4
5
6
16
7
8
9
10
11
12
13
14
15
21
22
17
18
19
20
1
2
3
4
5
6
16
7
8
9
10
11
12
13
14
15
21
22
17
18
19
20
1
2
3
4
5
6
16
7
8
9
10
11
12
13
14
15
21
22
17
18
19
20
1
2
3
4
5
6
16
7
8
9
10
11
12
13
14
15
21
22
17
18
19
20
1
2
3
4
5
6
16
7
8
9
10
11
12
13
14
15
21
22
17
18
19
20
1
2
3
4
5
6
16
7
8
9
10
11
12
13
14
15
21
22
17
18
19
20
1
2
3
4
5
6
16
7
8
9
10
11
12
13
14
15
21
22
17
18
19
20
1
2
3
4
5
6
16
7
8
9
10
11
12
13
14
15
21
22
17
18
19
20
1
2
3
4
5
6
16
7
8
9
10
11
12
13
14
15
21
22
17
18
19
20
1
2
3
4
5
6
16
7
8
9
10
11
12
13
14
15
21
22
17
18
19
20
1
2
3
4
5
6
16
7
8
9
10
11
12
13
14
15
21
22
17
18
19
20
Please contact our after-sales service team for any replacement part requirements. Only engage
a qualified technician for any replacement or repair works.
Enamel Cleaning
DO NOT USE AN ACID DETERGENT AND/
OR ANTI-RUST CLEANER ON THE CONTROL
PANEL. SUCH CLEANING PRODUCT MAY
DAMAGE THE APPLIANCE OR REMOVE THE
CONTROL PANEL PRINTING.
Cooking Area Cleaning (including pizza
stone)
The easiest way to clean the oven is to clean
immediately after turning off the flame and once
your cooking has been completed.
WARNING
Keep in mind that your appliance will be hot
after cooking! Always wear long safety gloves
designed for heat (such as barbeque mitts) to
protect your hands and arms from any heat,
steam and hot parts.
Dip a wire bristle barbeque brush in water with
a mild detergent and scrub the pizza stone.
Dip the brush frequently in fresh water. Steam,
created as water contacts the hot oven, assists
the cleaning process by softening any food
particles. The food particles will lift from the
stone. It is completely normal for the stone to
remain discoloured though and won’t affect the
product or future cooking.
Important! Never immerse a hot part in water.
Alternatively, allow your appliance to completely
cool and remove the pizza stone for cleaning.
Again use a mild detergent with some warm
water and a barbecue brush to scrub the stone.
General Cleaning of Painted Surface
When cleaning your pizza oven use a mild
dish soap combined with warm water and a
microfiber cloth to clean the surface. Then rinse
your pizza oven with clean water.
Note: Never use steel wool or any hard cleaning
pad on any painted and stainless steel surface,
as it can cause surface damage.
If not in use, turn off the gas from the source.
After cleaning and when it is dry, spray some
canola oil over the whole pizza oven surface
and wipe off the excess with microfiber cloth
to enhance the surface protection. Then cover
the pizza oven with a cover and store it in a dry
place.
Appliance Burner Cleaning
1. Be sure the gas cylinder valve is firmly in the
off position and that the appliance control
knob is also in the Off position. Make sure
the appliance is completely cool.
2. Clean the exterior of the burner with a wire
brush. Clear stubborn scale with a metal
scraper. Clear any clogged ports with a
straightened paper clip. Never use a wooden
toothpick as it may break off and clog the
port.
3. Please note if insects or other obstructions
are blocking the flow of gas through the
burner, you will need to call our customer
service line.
CLEANING & MAINTENANCE

