Garwoods EC-2368IC Скачать руководство пользователя страница 20


20


四、產品操作說明


I、操作說明:


通電


後,

蜂嗚器會

發出一

短聲

表示

源已

,電磁爐


處於待

機狀態。


開機


在加熱區放置

需的鍋具

(

考鍋具的選擇和使用

)


按住


LED

數碼

顯示會顯示預

設火力段數

6(

)

5(


調整火力:


當火力功能

作時,

按“

調高鍵

調

大或減小


火力段數,而

LED

數碼

顯示

亦顯示所

設定的段數

火力


23 4 5 6 7 8 9 : ; < = > ? @ A B C D E F G H I 9 J K L M N O D P

Q > ? R S T U > ? V W X Y D Z [ \ ] ^ _ ` a I 9 J V K L M N D b

c d > ? e \ R S T U > ? f g
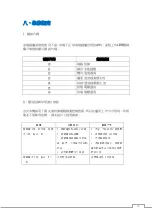


設置定時:


按“

定時鍵

,定時指

示燈會亮

按“

調高鍵

調


置定

需要的定時時

LED

數碼

顯示

內會顯示


定時

(

顯示格

為《

分鐘

)


,時

設定

範圍為

1

分鐘

99

分鐘,


當達到

設定的時

時,

蜂嗚器會

發出一

長聲

,電磁爐

停止加


熱。

要取

定時設定,需要將定時時

0


定:


按住“鎖

定鍵

蜂鳴器會

發出一

短聲

,同時

定指

示燈會


定功能啟動,除

了“

關”

“鎖

定鍵

外,


其它按

鍵將

會被鎖

定而無法操作

防止

兒童

其他

意外


操作。

消鎖

定功能,

再次按住“鎖

定鍵

蜂鳴器


出一

短聲

定指

示燈熄滅

定狀態

被解

除。在

機狀態


可進

行鎖

定操作,

定後

雖然

關仍

可操作,

但其他


的功能

都失

效,電磁爐不能進

加熱,可防止

兒童

啟動電


磁爐。


關機:


加熱過程中,

按“

關”

鍵即可

機。


Содержание EC-2368IC

Страница 1: ...1 Two Zone Induction Cooker Model EC 2368IC Installation Operating Instructions...

Страница 2: ...eration Method 8 10 4 1 Operation Instructions 4 2 Usable and Non usable Cookware 4 3 Heating Power Distribution 4 4 Examples Of Cooking Application 4 5 Caution 5 Safety Precautions 11 5 1 Safety Note...

Страница 3: ...ur top priority 1 Only cookware with a ferromagnetic material would be heated 2 Anti empty heating protection will be on if dry boiling of cookware 3 If the body temperature of cookware is too high or...

Страница 4: ...ards used in marking the work table will easily expand more It is required to stick varnish or special adhesive onto the edge of the opening in order to prevent any steam from condensation under the w...

Страница 5: ...s to ensure heat elimination illustration II Before put the induction cooker into the hole an water proof type is properly applied on the bottom of front panel of the induction cooker as per illustrat...

Страница 6: ...connection as per illustration IV illustration IV If the induction cooker is installed above an oven fix an insulation part at least 15cm under the induction cooker as per illustration V Also open an...

Страница 7: ...mer 2 Time Indicator 3 Timer Key 4 Minus Key Timer 5 Plus Key Timer 6 LED Digital Indicator Heating Front 7 Minus Key Heating Front 8 Plus Key Heating Front 9 On Off Switch Front 10 LED Digital Indica...

Страница 8: ...puter system will automatically decrease power level of another cooker zone so as to assure total power is under specified value Selecting Timer By pressing Timer key the time indicator will be on At...

Страница 9: ...tray bottom pan iron pot iron tray enamel pot etc Sorts of un suitable cookware Copper bronze and aluminum pot glass pot pottery pot bronze pan etc Put the suitable cookware on the central position of...

Страница 10: ...ancakes 6 Heavy stir frying hash browns steak pancakes for garnishing soup 7 Boiling large pot of water pasta noodle 4 5 Caution Don t place any metal cooking utensils e g knife fork spoon lid over th...

Страница 11: ...and scalding or damage Do not use the induction cooker in a high temperature environment Keep it far away from fire Do not lay object which are susceptible to the magnetic fields such as credit cards...

Страница 12: ...cleaning the ceramic surface wipe all coarse soiling off using a damp soft cloth and apply a few drops of proprietary cleaning agent for ceramic surfaces Do not let the bottom of the induction cooker...

Страница 13: ...nology Some phenomena appeared in the course of working may not indicate problems to occur Please check the induction cooker according to the follow specifications Situation Reason Solution The heater...

Страница 14: ...14 15 I II 16 18 19 20 22 I II III IV V 23 I II 24 24 25 I II...

Страница 15: ...15 I Garwoods EC EC 2368IC II 99 1 2 3 4 5 6 7 8...

Страница 16: ...16 1 2 3 4 100mm 5 6 7 30cm 8 100mm 9 13 1 100mm mm 280 x 490 x 100...

Страница 17: ...17 2 100c 3...

Страница 18: ...18 3 4 15cm 100c...

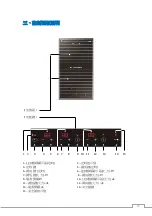
Страница 19: ...19 1 2 3 4 5 6 7 8 9 10 11 12 13 14 15 1 LED 2 3 4 5 6 LED 0 7 0 8 0 9 0 10 LED 1 11 1 12 1 13 1 14 15...

Страница 20: ...20 I LED 6 5 LED 23456789 ABCDEFGHI9JKLMNODP Q RSTU VWXYDZ _ aI9JVKLMNDb cd e RSTU fg LED 1 99 0...

Страница 21: ...21 II 1 12 26cm 20kg 4mm 4mm 120mm 2 3 III 2800W 2800W hij ki lm nopq rstu lm nopq rstu 1 200W 1 200W 2 400W 2 400W 3 600W 3 600W 4 1000W 4 1000W 5 1400W 5 1400W 6 1800W 7 2200W vr wrx yr...

Страница 22: ...22 IV 1 2 3 4 5 6 7 V 4 20 LED E2...

Страница 23: ...23 I II...

Страница 24: ...24 EC 2368IC AC220 50 2800 x x 288x 510x 65 7...

Страница 25: ...25 I LED E0 E1 E2 E3 E4 IGBT E5 E6 II z 789 IMO D e D 789 789 789 S D IY G S D 78 9G 789e D...

Страница 26: ...26 Sole Agent Araytron Technology Limited Enquiry 852 2397 3066 Fax 852 2397 3055 Website www garwoods com hk...

Отзывы: