


© ANITA
MP02800EN_180319
15
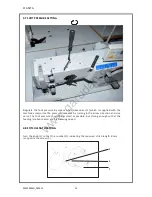
4.10 SETTING OF ZIG-ZAG STITCH WIDTH (THROW) AND POSITION
Setting of zig-zag stitch width
Press the lever (1) in the arrow direction (A) until it strikes the lever (2) - the lever
arrest is released (2). Grip both levers at the same time and set the zig-zag stitch width
by turning the lever (2) against the selected number indicating the stitch width.
Arrest
the lever (2) position by turning the lever (1) against the arrow direction (A).
Setting of zig-zag stitch position
Press the lever (1) in the arrow direction (A) until it strikes the lever (2). The lever arrest
is released (3). Make sure that the lever setting does not change at the arrest switching
off (2).
Press the lever (3) and turn it at the same time up to the stop (inside the machine)
against the respective symbol indicating the zig-zag stitch position. Only the middle
position of the lever is arrested with a lock.After the lever (3) setting, carry out
arresting with the lever (1).
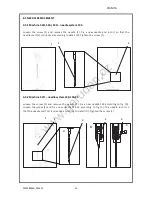
In picture (C) there are examples of setting the zig-zag stitch width and position from
which it is visible that the zig-zag stitch width does not change at the position change.
www.garudan.cz
Содержание GZ-5527-443
Страница 21: ......